How to remove the starter on a VAZ 2114 if it does not turn and needs to be replaced
Hello, dear car enthusiasts!
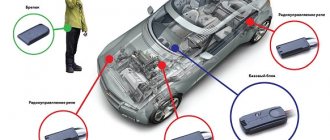
Once again we appeal to owners and admirers of cars from the domestic automobile industry. The Lada of the fourteenth model is equipped with a starter 5712.3708, which is noticeably different from similar VAZ starting devices in its smaller dimensions and weight. But, despite such a modest size of this device, it is subject to the same requirements as other starters for the start of rotation of the flywheel and the movement of the crank-piston group.
Perhaps, this design feature can be attributed to the disadvantages of this model, because situations when any malfunctions of the VAZ 2114 starter occur, unfortunately, are not uncommon. So, even the most careful driver of the “fourteenth”, at least once every five or six years, has to face a problem when the VAZ 2114 starter does not work, does not turn.
How to remove the VAZ 2114 starter yourself?
If you have to remove the VAZ 2114 starter, be prepared to drive the car into a pit or onto an overpass. For a VAZ 2114 car, replacing the starter in this case will not be particularly difficult, since it is convenient to unscrew the fastening bolts and remove the starter itself from the studs only while under the car.
After installing the machine, remove the engine protection. Open the hood, disconnect the “–” battery, remove the block with wires and the wire that goes to the traction relay. Then unscrew the three mounting bolts and remove the starter.
If you do not have the opportunity to drive the car into a pit, then there is nothing left to do but remove the VAZ 2114 starter in a regular garage. In this case, after you disconnect the “-” battery, remove the air intake bellows and the air filter (this will make room for removing the starter through the top of the engine compartment).
Then proceed to disconnect the wires from the solenoid relay and starter and dismantle the starter itself. To carry out work on removing the VAZ 2114 starter, you will need 13, 14, 15 mm keys or a set of starter keys.
What to do if the VAZ 2114 starter does not work - typical reasons?
1. If, when turned on, the starter does not turn, the traction relay does not operate, perhaps the cause should be sought using traditional methods, namely:
The battery is faulty or discharged. By charging or replacing it, you will fix the problem. Severe oxidation of battery terminals and wire tips. After cleaning the leads and tips, lubricate them with Vaseline. There is a short circuit between the turns of the relay pull-in winding, a break or a short to ground. In this case, the solenoid relay must be replaced. There is a break in the power supply circuit of the solenoid relay. It is necessary to check the integrity of the wires and their connections. There is a fault in the contact part of the switch. The contact part must be replaced. Solenoid relay armature is stuck
Pay attention to the armature stroke (of course, this will require disassembling the starter).
1. If, when turned on, the starter armature does not rotate at all, or moves slowly, and the retractor relay is working:
- The battery is faulty (discharged). Replace it or charge it.
- The battery terminals and wire tips are oxidized, or the wire fastenings are loose. Clean the leads and tighten the fasteners.
- Commutator burning. The collector needs to be cleaned.
- Stuck or worn brushes. Replace brushes.
- A break or short circuit has occurred in the armature winding. Replace anchor.
Pay attention to the surface of the armature shaft. If there is a yellow mark from the gear bushing, be sure to remove it
This mark may be the cause of poor starter performance due to gear sticking.
After diagnosing the condition of the VAZ 2114 starter and troubleshooting, assemble the starter and install it in place in the reverse order of disassembly and removal.
Before assembly, lubricate the drive gear and cover liners with oil, and the gearbox gears with grease or any other grease. After assembling the starter, check its operation on the stand.
How to check the starter: does it take on current?
It happens that when the starter is started, the light bulbs powered from the on-board network dim, the volts drop to 10-9.5 - there are signs that there is a current drawdown. This is a very real picture even in the warm season, and it indicates a malfunction of the starter. Many people do not understand how to check the starter if it takes on a lot of starting current, and what, in fact, is the reason for this phenomenon.
Most likely, the reason is the wear of the bushings, which is why the armature begins to touch when the stator rotates. This leads to overheating of the elements and destruction of parts. There is a risk of an interturn short circuit, which can only be detected with a special device - a megger. The bushings must be replaced, and the anchor can be replaced if necessary. Another cause of jamming is sometimes the internal gearbox, which requires lubrication.
If the starter is not working correctly, it is better to contact a trusted specialist who can determine the true cause of the breakdown.
Having summed up all the above tips, it is appropriate to highlight some recommendations from professionals. For example, when several starter parts or even the solenoid relay fail, it is best to purchase and install a completely new starter. Otherwise, the device can be disturbed more than once over all sorts of trifles, not to mention possible inconsistencies in the sizes of some spare parts.
Experts also strongly advise buying new parts rather than repairing old ones, and not giving preference to the cheapest options. Such savings can be completely offset by the negative consequences resulting from early breakdowns.
Briefly about the device and principle of operation
Lada Priora Sedan Logbook Preparing for winter.
Starter The starter itself is a power electric motor operating from constant voltage. Additionally equipped with a retractor relay, an overrunning clutch and a bendix (a gear with which the starter directly engages with the flywheel).
When the starter is turned on using the ignition switch, voltage is supplied to the solenoid relay (the relay, by its operating principle, is an electromagnet). An electromagnetic field is generated due to the coil built into the relay. Under the influence of which the connecting fork moves the bendix along the rotor shaft of the electric motor and engages it with the flywheel. At this time, the armature enters the relay, closing the contacts, which turns on the electric motor itself. Which starts to rotate the flywheel through the bendix.
After starting the engine, the rotation speed of the flywheel is several times higher than the rotation speed of the bendix. It turns out that it is not the starter that turns the flywheel, but vice versa. To prevent damage to the electric motor, the overrunning clutch is activated. The gear begins to spin together with the flywheel in a “free” motion, without turning the starter shaft. This continues until the power supply through the ignition switch is stopped.
Differences between starter and relay failure
In order not to confuse what exactly has failed - the starter or the solenoid relay, there is an excellent method for recognizing the “culprit”.
- Remove the starter, connect the negative terminal of the battery to ground;
- The design of the device has copper bolts and a tongue-shaped element;
- The positive wire from the battery is connected to this “tongue”;
- If there is contact, the solenoid relay clicks and starts working;
- If not, then you will have to go to the store for a new relay.
The performance of the starter can be checked differently. To do this, the negative wire from the battery is attached to the starter ground, and the positive wire is attached to a bolt (contact goes from it to the solenoid relay). If the starter starts turning, then everything is fine. Your hypothesis about the problem relay was once again confirmed. Just before checking, make sure that the contacts themselves are in good condition and not damaged. Many people forget about this, which leads to incorrect conclusions regarding the performance of the two elements.
But there is one more very important point. Even if all the facts indicate that the starter or retractor relay is not working, another unit - the ignition switch - may still be the cause of ignition problems. Take the time to check its serviceability before buying new parts.
Ignition relay location
When the ignition switch is turned on, the starter does not turn. Why does the starter not respond to turning the ignition key? It also happens
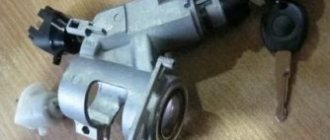
Finding the location of the ignition relay is easy, because this element in the VAZ-2114 injector is located on the left side of the steering wheel, and a decorative cover protects it from the eyes. What this element looks like can be found out from a photo on an online resource. Sometimes, in order to replace an old relay with a new one, you do not need to remove the protective casing. For this purpose, you should simply reach the relay with your hand, which must be inserted into a special hole located under the steering wheel.
I myself suffered for a long time, I looked all over the Internet, nothing helped, I hope I helped someone)))
Installing the relay
for
starter
and 2110.
However, this replacement step is not convenient, so experts advise motorists to still remove the protective cover when replacing the ignition relay, especially since such an operation is done quite easily and simply.
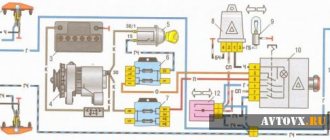
Device and connection diagram of the VAZ 2114 starter
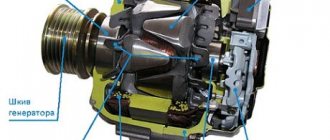
VAZ 2114 starter connection diagram The car starter is an electric DC motor and has a rather complex design.
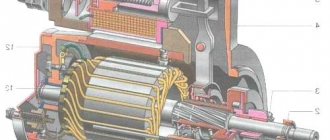
During the operation of this unit, various problems may arise and in order to figure out, for example, why the starter on a VAZ 2114 does not turn, you need to have a good understanding of how it works and how the VAZ 2114 starter switching circuit is designed. An electric starter model 5712.3708 is installed on the machine. The main parts of this device are:
- the moving part is an armature rotating on a shaft inside a stationary stator on which four magnets are fixed, which are the poles of the stator;
- a traction or retractor relay, which, when the ignition key is turned, sends a signal to unwind the armature;
- Bendix, also known as an overrunning clutch, which is designed to engage the engine flywheel;
- the housing in which all the working elements of the electric starter are located, it is closed with two covers. A solenoid relay is attached to the motor housing.
The main task of this electric motor is to spin up the flywheel of the internal combustion engine, so at the moment of startup it experiences heavy loads when creating torque.
Based on this, special attention must be paid to how this unit is secured to the engine block so that it does not get torn off the mounting bolts.
This electric motor is turned on using the ignition switch. When the key is turned, an electrical signal from the battery, through the switch and the mounting block, enters the windings of the solenoid relay. The contacts close and the signal passes to the armature electrical winding.
Step-by-step replacement of the ignition relay
Why doesn't the starter turn on a hot engine? And we know the reason
If during the check it turns out that the ignition switch relay is faulty, then repair this element
, as was previously said, specialists do not advise. To purchase a new relay, small foreign exchange costs will be required, and the replacement will be able to be done by the car owner, if our client remains, the operations will be carried out in stages:
- And the most important thing that needs to be done first is to disconnect the battery from the power supply; for this purpose, simply disconnect the negative terminal from the battery.
- Using a screwdriver, it is best to take a slotted tool. It is necessary to unscrew the 4 clamps from the control column casing to simplify the process of removing the “relay”.
- The latch holding the lower part of the casing is most conveniently unscrewed using a Phillips screwdriver.
- The casing, loosened from the fasteners, is carefully removed from its place.
- The ignition relay is connected to wires that are located at the bottom of the block. To change an element that has become unusable, you just need to disconnect the wires from the block and install a new one in the area of the old relay.
After which you need to check the result of your work by starting the engine of your own car for this purpose. If the malfunction does not show itself, it means that the replacement process was completed correctly, and the car enthusiast can be proud of his yet another, albeit small, achievement.
After reading this article, anyone should realize that the process of replacing this device is simple and straightforward. And because the “relay” does not burn out often, VAZ-2114 owners do not have to do such an operation all the time. If when replacing the relay
problems will arise with the ignition switch, you should not despair, because of course you can find the answer to every question in a training video on an Internet resource, which you can watch both day and night.
The training video lesson was prepared and conducted by true masters in their field, who thoroughly understand the stages of auto repair for our client. Because all that remains to be done is for our client to receive additional information about replacing the relay and find its clear location from the photo. And after watching the training video, the replacement process will become more common, and you won’t even have to hesitate – the car owner will be able to handle this task.
How to replace starter bendix (details)
Work order:
- Disconnect the negative wire from the battery.
- Take the key at “13” and unscrew the two upper mounting screws that secure it to the clutch housing. As a rule, there is no third bolt, but if there is one, you will need an inspection hole to unscrew it.
- Moving the starter forward, we remove wire No. 1 from the relay connector.
- We take the key to “13” and unscrew the nut securing the wire connecting the relay terminal to the “plus” of the battery.
- Visually assess the condition of the flywheel teeth.
- Using a Phillips screwdriver, unscrew the two mounting screws in the starter cover.
- Unscrew the fastening nut of the winding output on the relay.
- Remove the washer-bracket.
- Using a “10” wrench, unscrew the two coupling bolts and remove them.
- We check the condition of the bushings.
- To separate the starter housing, apply a couple of light blows with a wooden or rubber hammer to the lower part of the housing. We evaluate the condition of the brushes.
- We take the Bendix ears out of the fork.
- We knock down the locking ring.
- The second locking one needs to be picked out with a screwdriver.
- We remove the bendix.
- Installing a new bendix.
- We perform assembly in reverse order.
Checking work
Sometimes, despite more than obvious signs of breakage or wear of the retractor, in reality everything turns out to be wrong. The car may behave similarly with some other malfunctions.
Therefore, in order to figure out whether the relay works or not, and also who is the real culprit for the violation of the functionality of the system, we will conduct several checks.
- Check the starter. Turn the ignition key. The starter should begin to turn, and the relay should make a characteristic click. If the starter is not doing its job, replace it. Relyukha has nothing to do with it in this case.
- Check the solenoid relay. To do this, there are two copper bolts on the back cover. Two contacts are attached to them. If the starter starts turning, then your relay has definitely failed and needs to be replaced. In this case, you should not remove the starter, which will allow you to get more accurate test results.
- If you have removed the starter, the check is performed slightly differently: Connect the contact wire of the retractor relay to the positive terminal of the battery;
- The second contact connects the starter ground and the battery charger;
- When the contacts are placed on the relay terminals, the relay should turn on with a characteristic click;
- If the operation is too slow, uncharacteristic, check the condition of the contacts. They often burn out or oxidize.
https://youtube.com/watch?v=vhq_2EEiDzU
Starter: how to check the operation of the starter without removing it from the car
The situation when you leave the supermarket with packages, get behind the wheel, but the starter suddenly does not respond to turning the key, happens to many motorists. It is quite possible that just yesterday the engine started at half a kick, but today, under the same circumstances, nothing happens. And if you have a smartphone with Internet access at hand, you can quickly surf in search of a suitable article on the topic: how to check the starter right in the parking lot. In principle, there is nothing complicated here, and a minimum of auxiliary tools is required. It wouldn't hurt to have an assistant.
A starter is a device that spins the crankshaft to start the engine, which sometimes still fails.
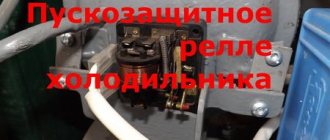
Starter relay VAZ 2109 principle and features of its operation Video AvtoNovator
The VAZ 2109 starter retractor relay is responsible for inputting and outputting the starter from the state of engagement with the car engine. This small and simple mechanism is of great importance for the normal operation of the internal combustion engine.
Design and principle of operation of the VAZ 2109 starter relay
The operation of the relay is based on electromagnetism: a copper conductor is wound around the tubular core of the device, and when current passes through this structure, a magnetic field is created. Under the influence of the resulting force field, the anchor located in the tube is pulled inward.
The design of the described device has two coils.
The switching on of the first is noted at the moment when voltage is applied to the relay, the second begins to work after the armature enters the core.
The anchor overrunning clutch is connected by a lever directly to the anchor. Due to this relay, firstly, it controls the process of supplying voltage to the internal combustion engine, and secondly, it allows the gear to engage with the flywheel of the car engine.
The additional VAZ 2109 starter relay has several contact pins. Two of them transmit current from the car battery, and one has the status of a controller (a wire runs from it to the vehicle’s ignition switch), which controls the operation of the entire device. The control terminal is the thinnest, and the power contacts look like bolts of relatively large thickness (they are mounted on a textolite cover). Inside the relay, the contacts are rectangular or round.
As you can see, the design of the relay is quite simple; any car enthusiast can figure it out after spending very little time. The task of this machine unit is to transmit torque to the starter flywheel by turning off the power and disconnecting the wire after starting the vehicle engine.
https://youtube.com/watch?v=Ao7NsU_Kh2E
For what reasons can the starter relay fail?
Most often, failure of this device is caused by burning of its contacts. The phenomenon is very common, due to the fact that a high current flows through the relay (from 80 to 300 A). Because of this, a spark gap may form, which causes the contacts to burn. This in turn leads to low conductivity of electrical energy.
Also, a break in the winding is often noted on the solenoid relay. In cases where such a disaster occurs in the middle of the winding, the driver has no choice but to buy and install a new device. But when a break occurs in the soldering area of the winding and contact, the situation can be corrected by replacing the damaged area.
How to repair the retractor?
To carry out repairs, the car enthusiast will need to disassemble the mechanism, guided by the following diagram:
- first remove the nut holding the wire connecting the lower contact of the retractor with the starter winding;
- then the housing is disconnected from the starter (this is easy to do using a regular screwdriver).
The back cover is screwed to the relay body. It needs to be removed (unscrew the bolt) in order to be able to clean the contacts using a needle file. This solves the problem of soot formation.
After disassembling and repairing the mechanism, it is recommended (as they say, “in passing”) to check it for a break or short circuit. To do this, connect an ohmmeter between the bolt that sends voltage to the starter and the control contact (checking the winding) or between the housing and the control contact (checking the coil). If there are no faults, the device should show the following values:
- 0.75 Ohm for holding coil;
- approximately 0.55 Ohm for the pull-in winding.
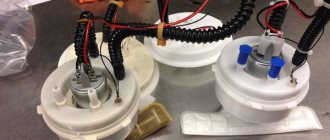
How can I check the starter solenoid relay?
If manipulations with a screwdriver do not yield anything, or if it is not possible to reach the desired terminals, you will have to remove the stubborn starter from its home. This can be done both from below and from above (depending on the design features of the units). Most likely, neighboring elements will have to be partially dismantled. Before checking the starter solenoid relay, it is necessary to clean the housing from dirt and keep it at room temperature (preferably). It is better to secure the starter in a vice. Then, using wires with “crocodiles” at the ends, you need to connect the housing to the “minus” of the battery, and the relay output “50” to the “plus”. If a click occurs and the gear moves in the window, it can be stated that the relay is working properly.
Power fuses
The power fuse and relay block is located on the strip under the panel (dashboard), at the feet of the front passenger; to access you need to bend the plastic side panel.
Depending on the car model, the appearance of the unit may differ slightly from that shown in the photo.
The lowest relay and fuse are the fuel pump. When the ignition is turned on, the fuel pump turns on for 5 seconds to create pressure in the system. Check the ground and contacts of this unit, and also inspect the wiring. The wire from the relay to the pump, which runs along the floor under the casing, may be broken.
The topmost relay is the radiator cooling fan. If it is OK, see the information about fuse F5.
Mounting block connection diagram
Most serious electrical problems can be solved by replacing the fuse and relay mounting block. The price of such an assembled unit is about 1500-2000 rubles. Usually, due to oxidation of contacts, current surges, moisture ingress after washing, dust, dirt and other factors, printed circuit board tracks and contacts become green or black, and simply fail.
If your VAZ 2115 is several years old and nothing has been done to the block, then there is a very high probability of seeing all the problems described above when it is removed. Replacing the unit with a new one will avoid many future problems. The electrics will work as they should, most likely even better. There are often cases when, after replacement, devices that never worked before begin to work. Drivers get used to the car and do not know how it should be in fully working order.
Therefore, in case of serious problems, I advise you not to save money and change the unit. It would also be a good idea to replace the steering column switches - it will save a lot of nerves and time in the future, and it will just be a pleasure to drive a working car.
Another important point in case of electrical faults in the VAZ-2115 is the presence of good contact to the body. The block is grounded to the car body and uses it as a second wire. When the nut that secures the terminal of this contact is loosened, any strange behavior of the devices may begin. If interruptions and unstable operation of any components begin, check the reliability of this grounding to the housing.
Do you often have electrical problems? What ways can you suggest to solve such problems? Maybe there was some special case, write about it, it will be useful to other car enthusiasts.
Fuses and relays Niva Chevrolet
There is a click, but the starter does not turn
If you clearly hear the relay click when you turn on the ignition, the problem is most likely in the starter itself. Perhaps the brushes are worn out, or there is a break in one of the windings. In any case, further diagnostics without dismantling the device is impossible. If a break in the windings is detected, you can try to restore the starting device by entrusting it to winding winding specialists. If things are generally bad with it, it is better to buy a new starter 2114. The price for it varies between 3700-5000 rubles.
Dismantling and replacement
To make it more convenient to replace the relay, it is recommended not to be lazy and still remove the starter itself. This will allow you to simultaneously check the condition of the starter while replacing the relay.
The removal procedure described below concerns an assembled relay, which has the ability to replace individual structural elements.
- Disconnect the negative terminal from the battery.
- Disconnect the red terminal from the relay. This is a red wire.
- Using an 8 mm wrench, unscrew the nut securing the brush assembly. You will find it behind the relay.
- Remove the contact that this nut held in place.
- Unscrew the fastening of the solenoid relay to ground. We are talking about coupling bolts.
- Next, you need to dismantle the power wire, after which the relay itself is pulled out.
- The fastening nuts are unscrewed from the end part, which allows you to remove the upper part of the relay.
- It is advisable to immediately replace the relay core with a new one.
- Install a new relay.
- Proceeding strictly in reverse order, reassemble the assembly, which will allow you to complete the replacement of the unit.
- When separating the relay into its two component parts, be sure to ensure that the core does not slip out and the spring does not jump out.
We can say that replacing the gearbox on a VAZ 2114 is not so difficult. It is much easier to replace a non-separable relay, since to replace it it is enough to unscrew all the fasteners in the same way and disconnect the contacts.
Other relay
We figured out where the starter relay is located on the VAZ-2114 and how to replace it. But in the engine starting system there is another part with the same name. Yes, yes, it is also called the “starter relay”. Only extra. And its function is completely different. An additional starter relay serves to ensure the safety of the entire starting mechanism. Without it, the brushes and armature windings would burn almost every time it was started.
You will ask again, where is the starter relay located on the VAZ-2114? On the first models of the “fourteenth” it was located in the engine compartment at the top on the partition separating the engine compartment and the interior. On the new VAZ-2114 it is not there. And some “experts” foam at the mouth and prove that cars of the Samara-2 family do not have it at all.
In fact, there is an additional relay, but it is located under the steering column. Just remove the bottom part of the plastic casing and you will immediately see it. This is a regular four-pin relay labeled 98.3777-10 that protects the starter circuit. If you have problems starting the power unit, do not be lazy to check it too.
Materials: https://fb.ru/article/285446/gde-na-vaz—nahoditsya-rele-startera-vozmojnyie-polomki-i-ih-ustranenie
Green370 Blog Location of VAZ 2115 fuses and their purposes.
I myself was faced with the problem of finding fuses, which one is responsible for what, so here you go))) It helps me a lot)) Good roads to everyone, and a full tank)))
K1 – relay for turning on the headlight cleaners; K2 – relay-interrupter for direction indicators and hazard warning lights; K3 – relay for the windshield wiper; K4 – relay for monitoring the health of the lamps; K5 – relay for turning on the power windows; K6 – relay for turning on the sound signals; K7 – relay for turning on the heating rear window; K8 – headlight high beam relay; K9 – headlight low beam relay; F1-F20 – fuses
F1 (10 A) Rear fog light lamps and indicator lamp for turning on the rear fog light. Electric motors for headlight cleaners (at the moment of switching on). Headlight washer motor.
F2(10A) Direction indicators, relay-interrupter of direction indicators and hazard warning lights (in hazard warning mode). Hazard warning lamp.
F3 (7.5 A) Interior lighting. Individual interior lighting lamp. Luggage compartment lighting. Ignition switch illumination lamp. "Check engine" indicator lamp. Brake light bulbs. Trip computer (or clock)
F4(20A) Cartridge for connecting a portable lamp. Relay for turning on the heated rear window (contacts). Rear window heating element
F5 (20 A) Sound signal. Horn relay. Cooling fan electric motor.
F6 (30 A) Electric windows. Power window relay (contacts).
F7 (30 A) Heater motor. Windshield washer motor. Electric motors for headlight cleaners (in operating mode). Cigarette lighter. Glove box lighting lamp. Relay for turning on the heated rear window (winding).
F8 (7.5 A) Right fog lamp.
F9 (7.5 A) Left fog lamp.
F10 (7.5 A) Side lamps on the left side. Indicator lamp for turning on the side light. License plate lamps. Engine compartment lamp. Instrument lighting switch. Illumination lamps for switches, instruments, cigarette lighter, ashtray, heater control levers.
F11 (7.5 A) Side lamps on the starboard side.
F12(7.5A)Right headlight (low beam).
F13 (7.5 A) Left headlight (low beam).
F14 (7.5A) Left headlight (high beam) and indicator lamp for turning on the high beam headlights.
F15(7.5A)Right headlight (high beam).
F16 (15 A) Direction indicators, relay-interrupter of direction indicators and hazard warning lights (in direction indication mode). Reversing lamps. Relay for monitoring the health of lamps. On-board control system display unit. Instrument cluster. Indicator lamp for emergency oil pressure. Parking brake warning lamp. Brake fluid level warning lamp. Battery discharge warning lamp. Trip computer (or clock). Generator field winding (in engine starting mode)
Mechanical problems
You can talk about the presence of any mechanical malfunctions if the starter works, but the engine does not start because the crankshaft does not rotate.
Parts to be checked: overrunning clutch lever, clutch ring, buffer spring, flywheel crown.
One of the reasons why the starter does not rotate the crankshaft
When the starter is spinning, the engine may not start if :
The clutch is slipping, the release lever has failed or it has come off the axle, the clutch drive ring has worn out, or the buffer spring is not doing its job. When a grinding noise is heard during startup, such symptoms may indicate wear on the flywheel ring teeth. In this case, it is worth checking the gear travel adjustment and the condition of the buffer spring.
Diagnostics and causes of malfunctions
Ideally, the unit should quickly spin the engine flywheel after turning the key in the ignition. If the starter does not turn or fires but does not turn, and the engine does not start, and the familiar indicator lights up on the dashboard, this indicates that the device is not working.
What could be the reasons for the mechanism to break down if the relay cannot operate and the armature does not rotate:
- The problem may be oxidation of the contacts on the battery or the unit itself; to solve it, the contacts must be cleaned.
- A dead battery will cause the previously triggered unit to refuse to function. In this case, first of all, you need to check the battery charge with your own hands.
- If there is an exclamation mark on the dashboard and the car engine cannot start, the reason may be a short circuit between the turns of the retractor winding. If this is indeed the case, then the only solution may be to replace the mechanism.
- Quite often, car owners are faced with the problem of broken wiring in the unit, in particular in the area leading to the traction relay. First of all, you need to check the contact between the two plugs - the ignition switch, as well as the electric motor itself.
- There is no short circuit between the two plugs - only now we are talking about the elements of the contact part numbered 30 and 50.
- Problems with the armature; this component may jam. You can check the possibility of its rotation without any problems with your own hands.
Starter brush assembly
If the solenoid relay is working, but the assembly turns weakly or does not turn at all, this may be due to:
- The battery charge is too low or the lead contacts are oxidized. The battery discharge lamp may not light up on the dashboard if the unit receives a weak impulse that is not able to spin the armature. Therefore, even if there is no indicator on the control panel, the battery charge is still worth checking. In addition, in your car you should always monitor the absence of oxidation on the electrical circuit contacts, and if you clean them, it is advisable to lubricate the contacts.
- Poor connection of contacts on the battery, the mechanism itself or the solenoid relay. If the contacts are not oxidized, in any case it is necessary to diagnose whether the contact screws are tightened well, since weak connections will still form a poor contact. It should be noted that poorly tightened contacts can cause a short circuit, as well as burning of the wiring.
- Another reason could be worn brushes or burnt commutator. All elements that have failed must be replaced with new ones.
- Sometimes a malfunction occurs as a result of an armature short circuit, in particular, we are talking about the winding.
- When you turn the key, the VAZ 2114 engine will not start and the battery is normally charged, the reason may be the relay winding. In particular, a short circuit or break could occur in the holding winding. Only replacing the relay will solve the problem.
The unit works, the armature rotates, but the engine flywheel does not rotate:
- Bendix slipping occurs, the fault can be identified by diagnostics on the bench;
- the reason may lie in the inoperability of the gears of the gear mechanism, in which case the latter requires replacement.
The motor has started, but the unit continues to turn, and a grinding or other uncharacteristic noise or vibration is possible:
- if vibration is present, it is necessary to diagnose the device fixation;
- the reason may be incorrect installation of the mechanism, perhaps it is installed skewed;
- the problem may be a cracked lid, which needs to be changed as soon as possible;
- The grinding noise can sometimes be caused by the destruction of the gear teeth of one of the elements - the flywheel crown, gear unit or drive;
- extraneous noise may appear due to wear of bearing shells installed on the so-called armature or on the mechanism drive;
- Bendix failure.
When the engine does not start, but you urgently need to go somewhere, you can try to start it by closing the starter in a direct circuit. How to directly close the starter yourself - look at the video (the author of the video is Sergey Tsapyuk).
Malfunctions and their causes - diagnostics without a service station
Now let's talk about possible malfunctions of the VAZ 2114 starter, and also discuss their causes and symptoms.
The retractor relay does not work and the armature does not turn. There may be several reasons for the malfunction. The most common is oxidation of the wiring. In addition, a discharged battery or its failure can also contribute to such a turn of events. Look at the condition of the coil of the solenoid relay; it is quite possible that a short circuit has occurred between its turns. And by checking the contact between the ignition switch and plug “50” of the electric motor, you will find out whether there is a break in the electrical wiring, which also contributes to the occurrence of such a malfunction. Another reason could be the failure of the anchor itself.
The solenoid relay works, but the armature does not turn. This turn of events may result from a malfunction or low battery charge. Also in this case, check all connections on the starter itself, the battery and the solenoid relay. Oxidized and loose bolted joints result in poor contact. As a result, not only does the starter itself not work, but there is also a high probability of a short circuit and even burning of the wiring. Another reason for this malfunction may be wear of the brushes and short circuit of the armature winding.
Checking the battery charge
If the flywheel stops turning, but the starter turns on as expected, then, most likely, the bendix or starter gears have failed. You should be alert to extraneous noise and increased vibration that occurs during startup. First of all, check the fastening of the part; it is quite possible that the bolted connections have loosened, or it was fixed askew during the last maintenance. Noise can be caused by damaged bearing shells or mechanical damage to the housing cover. A characteristic sound also appears after wear of the gears of the gearbox, crown or flywheel drive. And a bendix that does not disengage will lead to noise.
Starter replacement
Access to the VAZ 2114 starter is limited by: an air filter, a thermostat and some attachments. To ensure freedom of operation, it is recommended that some of these parts be removed.
The starting device is dismantled as follows:
- disconnect the negative terminal from the battery;
- unscrew the size 13 starter mounting screws connecting it to the clutch housing;
- move the device slightly forward to remove the control wiring from the solenoid relay;
- get the starter.
Next is replacement. Before doing this, the condition of the flywheel must be visually assessed.