The alternator brushes on the VAZ-2110 need to be changed every four years or every 50,000 kilometers on the odometer. This detail, insignificant at first glance, is very important, since it directly affects the state of charge of the on-board battery. The generator is the only thing that allows the tens' power supply system to support the operation of all systems, including ignition and fuel supply. That is why it is worth paying attention to brushes.
- 3 Diagnostics
- 4 How to change for VAZ 2110
Technical characteristics of the VAZ 2106 generator
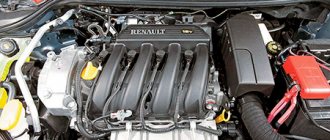
The “six” comes from the factory with a G-221 generator, which is classified as a synchronous alternating current device.
The device is fixed to the engine on the right side, but it can only be adjusted or changed from under the body, since it is difficult to get to the generator from above due to the presence of many hoses, devices and instruments. The nominal voltage of the G-221 corresponds to the voltage of a typical VAZ battery - 12 volts. The generator rotor rotates to the right (when viewed from the drive side), since this feature is due to the position of the generator relative to the crankshaft.
The maximum current that the VAZ 2106 generator is capable of delivering at a rotor speed of 5000 rpm is 42 amperes. Power indicator - at least 300 watts.
The device weighs 4.3 kilograms and has the following dimensions:
- width - 15 cm;
- height - 15 cm;
- length - 22 cm.
Device operation
The generator system is necessary to charge the battery and ensure the operation of the vehicle's electronic components. When the engine starts, the starter is turned on, which is necessary for the operation of the vehicle. If periodic repair work is not carried out, frequent battery discharges will occur and the overall voltage will decrease. Because of this, first of all you will need to replace the system brushes on the VAZ-2114.
Modern cars use three-winding alternators to create alternating voltage. Thanks to the electromagnetic field that arises in them, an electric current is created, which is transmitted to consumers. In such a system, a special brush mechanism is installed that relieves stress from the slip rings.
Troubleshooting VAZ 2107 battery charging problem
If you set the ignition incorrectly, what will happen?
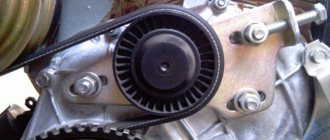
First, you should check the serviceability of the generator belt - it is this that causes the generator to rotate and generate current. This belt drives the coolant pump, so this malfunction also manifests itself in engine overheating.
If the charge indicator lamp does not light up, and the voltmeter shows normal voltage of the on-board network, and the battery does not charge, the reason is in the contacts at the terminals.
You should remove the wires from the battery and clean the battery terminals and wires with emery cloth. If the charge does not appear, it is necessary to measure the voltage at terminal “30” (generator output) with the engine running. If the voltage at this terminal and the battery is very different, you need to clean the contacts and ring the wire going from the generator to the battery. The faulty wire must be replaced.
If, when the engine is running, the voltage in the on-board network is within normal limits, but when a load (headlights) is connected, it drops, the reason lies in the weak tension of the alternator belt. As the load increases, the weakened belt slips. A correctly tensioned belt should bend by 12-17 mm with a force of 10 kgf. A loose belt must be tightened or replaced.
Important: if the belt is over-tensioned, excessive load occurs on the bearings of the generator and pump, which can lead to their failure. Other reasons for the lack of charge may be a broken rectifier diode on the generator, an open or shorted rotor or stator winding
Other reasons for the lack of charge may be a broken rectifier diode on the generator, an open or shorted rotor or stator winding.
Diodes can be checked using a multimeter or a test lamp. Using a multimeter, you can check the resistance of the diodes in the direction in which they should be locked. To check with a test lamp, you must remove the “+” terminals from the battery and connect the test lamp. The wire of the test lamp must be touched in succession to the three bolts of the rectifier devices. Then perform the same operation, only disconnecting the “-” terminal. If the lamp lights up, the diode being tested is broken.
If one of the diodes malfunctions, the diode rectifier assembly must be replaced.
A break in the stator winding is determined with a multimeter by measuring the resistance between the rectifier unit mounting bolts. Lack of contact between the winding and the other indicates its breakage. In this case, it is necessary to replace the winding or generator assembly.
A common cause of generator failure is brush wear. To check them, you need to dismantle the brush assembly. The length of the brushes must be more than 5 mm, otherwise they need to be replaced. Also, the brushes may become warped or “stick” in the wells. Therefore, it is necessary to check the condition of their side surface.
Note: the VAZ 2107 generator (carburetor) is no different from the unit for the injection version of the “Seven”. Therefore, all tips for checking and repairing the generator are relevant for both modifications of the car.
If the warning lamp does not light up and other devices do not work when the engine is running, and the battery is not charging, the reason is a blown fuse or a breakdown of the ignition switch (relay).
The reason for the lack of battery charging may be a breakdown of the relay regulator. To check it, you need to connect “+” from the battery to the top contact, and “-” to the left one and check the voltage on the brushes, which should be 12 V. If the voltage is lower, the relay regulator must be replaced.
If you find that your VAZ 2107 is not charging the battery, measures must be taken immediately. Continued use of the vehicle may result in battery discharge. You will have to either look for a travel companion willing to tow the car, or call a towing service.
Recommendations
Comments 16
I converted it to a launch vehicle with a wire that I connected to one of the generator windings, now, depending on the air temperature, the voltmeter readings are different, in winter at start the maximum is 14.7, in summer in the heat it drops to 13.5, and the difference under load and without it is 0.2 volt
Not at times, but a little bit better. This German does not keep the declared 14.5, which means that not everything is in order. If I had just installed an additional diode, I would have gotten the same thing. And if I also replaced the contact rings, which are apparently worn out, it would be absolutely beautiful. By the way, about your soldering, it may float, there is welding everywhere if you noticed. Well, of course, the masses should be at least cleaned up, and better yet, duplicated. It’s not that I’m criticizing, it’s just that if effort is expended and there is a desire to get rid of the problem, then you need a result, and not like, like, I corrected it a little and it’s a bug)) You try to check your own LV as described in the Murzilka, I think it will normally give a cutoff at 14 volts (well, maybe plus or minus a little). Speaking of birds, take a multimeter and check how much the gene gives on the pin and what voltage you have at the battery terminal, I’m almost sure that you will see the difference, which means that you have a shitty contact in the tips on the wire between the gene and the battery. This is not visible from the outside, but by replacing this wire everything can fall into place. Good luck!
Thanks, buddy) I'll take note. There were simply problems with finances at that time. I will fix it)
No reason)) Believe me, I didn’t decide to get smart, it’s just experience.
Thanks again
Not at times, but a little bit better. This German does not keep the declared 14.5, which means that not everything is in order. If I had just installed an additional diode, I would have gotten the same thing. And if I also replaced the contact rings, which are apparently worn out, it would be absolutely beautiful. By the way, about your soldering, it may float, there is welding everywhere if you noticed. Well, of course, the masses should be at least cleaned up, and better yet, duplicated. It’s not that I’m criticizing, it’s just that if effort is expended and there is a desire to get rid of the problem, then you need a result, and not like, like, I corrected it a little and it’s a bug)) You try to check your own LV as described in the Murzilka, I think it will normally give a cutoff at 14 volts (well, maybe plus or minus a little). Speaking of birds, take a multimeter and check how much the gene gives on the pin and what voltage you have at the battery terminal, I’m almost sure that you will see the difference, which means that you have a shitty contact in the tips on the wire between the gene and the battery. This is not visible from the outside, but by replacing this wire everything can fall into place. Good luck!
It’s strange that I re-soldered it at home, your welding floated from the soldering iron, I tried it on several RNs.
My friend, I don’t know what you have there, and on several others that you soldered, on normal LV the terminals are resistance welded due to operating conditions.
I wonder, due to the operating conditions, why the copper wire from the brushes soldered to the steel contacts is not unsoldered, and certainly not by WELDING
Look carefully at the photo, it is just welded and not soldered. Besides the fact that the resistance in contact with solder is higher than with resistance welding, that is, the place of such contact will heat up more, it is also not mechanically strong and is more susceptible to oxidation. If you consider yourself smarter than the designers and engineers who come up with all this, then why don’t you create something of your own and surprise the world.
Sorry friend, I just didn’t understand you correctly, but the brushes were soldered and here and the contact, but then I also soldered it, it seems like it’s still alive for two years.
Well, I soldered it too, the question is reliability. It costs a penny to save on it.
Not at times, but a little bit better. This German does not keep the declared 14.5, which means that not everything is in order. If I had just installed an additional diode, I would have gotten the same thing. And if I also replaced the contact rings, which are apparently worn out, it would be absolutely beautiful. By the way, about your soldering, it may float, there is welding everywhere if you noticed. Well, of course, the masses should be at least cleaned up, and better yet, duplicated. It’s not that I’m criticizing, it’s just that if effort is expended and there is a desire to get rid of the problem, then you need a result, and not like, like, I corrected it a little and it’s a bug)) You try to check your own LV as described in the Murzilka, I think it will normally give a cutoff at 14 volts (well, maybe plus or minus a little). Speaking of birds, take a multimeter and check how much the gene gives on the pin and what voltage you have at the battery terminal, I’m almost sure that you will see the difference, which means that you have a shitty contact in the tips on the wire between the gene and the battery. This is not visible from the outside, but by replacing this wire everything can fall into place. Good luck!
It will be useful How to open a bowling alley in a small town: how much does the equipment cost: business plan
By the way, the additional diode helped me at first, but not for long, after a month and a half the diode bridge burned out, I installed a new one and removed the additional diode, and then the gene began to charge normally, by the way, on the old LV.
Well, it’s unlikely that it burned out because of the extra. diode, it just lowers the voltage at the RN input by an amount equal to the voltage drop across the diode. As a result, the output voltage rises by this amount. By the way, I only travel with it in winter; in summer it is unnecessary and can even cause harm. Due to the high charging voltage, the current will increase and the electrolyte may boil. As a result, even in the summer, the battery can discharge so much in a couple of days of parking that it won’t even be enough to start. By the way, I somehow achieved normal voltage by replacing those three small diodes on the horseshoe that power the LV with Schottky diodes. It worked great.
Russia Estonia 07/20/2019 live broadcast
What happens if you replace halogen headlight bulbs with LED ones?
The broadcast has ended. Watch the review or post ↴
Russia and Estonia will meet as part of the Men's Beach Soccer World Championship. According to experts, the Russian squad is the favorite of the match. The Russians need to win every match to ensure successful selection from the group.
The Estonian team, in general, is playing quite well, but the level of play is clearly not up to the level of the Russians.
Prediction: victory of the Russian team
Russia – Estonia live broadcast 07.20.2019
- Date: July 20, 2020, at 20:00 Moscow time
- Name of the championship: Beach soccer. World Championship 2019
- Category: football
How to change brushes on a generator It’s okay to do this
What happens if
- Arbitrary shutdown of electronic devices in a car while the engine is running, when this happens frequently and the reasons for this phenomenon are unclear;
- Poor lighting when traveling at night;
- The battery charging voltage does not correspond to that recommended by the car manufacturer, which leads to a decrease in battery capacity.
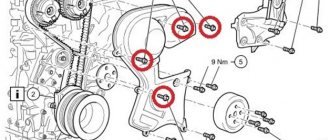
- The engine protection is removed, the screws securing it around the perimeter are unscrewed and removed from the engine compartment;
- Now you need to remove the rubber protection from the generator output contact bolt. Next, unscrew the nut and disconnect the wires;
- To remove the belt, you need to loosen the nut on the tensioner bar, slide it towards the block and remove the drive belt. After this, remove the tension bar;
- To perform the next step of dismantling it, you need to unscrew the two bolts that press the generator mounting bracket to the cylinder block;
- After this, it can be easily removed from the engine compartment.
AutoFlit.ru
Required tool for replacement
When the tool is ready, you can start working.
Before you begin work, you need to prepare the following tools:
- A driver or ratchet wrench.
- Head at “17” and “19”.
- Lubricant like WD-40.
- Spring ties.
- Jack.
- Special key for the rack rod.
Preparatory work
Carry out the following preparatory work:
- When the car is secured on a level surface, remove all the nuts on the rear wheels. Then we lift the car on a jack and finally remove the wheel.
- It is also necessary to loosen (but not completely unscrew - approx.) the nut securing the strut rod. This is done either from the trunk or the rear seat.
- Treat all unscrewing surfaces with lubricant for best unscrewing.
New elements are ready for installation.
Step-by-step work order
- First of all, we remove the plug and unscrew the nut on the rear pillar rod, and in order to prevent it from turning, you can use a regular “6” key or a special one - which is intended for this.
The plug will come off easily by prying it off with a screwdriver.
With some force, the nut will unscrew
The lower mount for the rear pillar sometimes sticks.
It is necessary to tighten the springs until they release the upper cup. The photo shows an example with a front shock absorber on a VAZ-2112.
Removing the rack components
With the rack removed, we inspect the condition of the boot and bumper, and when installing new racks, we replace them, or if they are in good condition, we leave them.
As you can see, the bumpers are in worn condition.
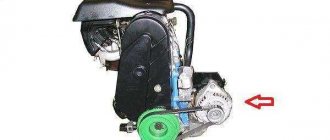
Replacing generator brushes
If the alternator brushes on VAZ 2110-2112 cars are critically worn, the battery charge may sharply decrease or disappear altogether. This indicates that it is necessary to carry out minor repairs, namely, replacing the brush assembly.
This work can be done without any particular difficulties, but you will first need to remove the generator from the car. Once this is done, you can begin to do the work itself. And for this you will need the following tool:
- 8 mm socket head
- ratchet or wrench
- open-end wrench 13 mm
- flat blade screwdriver
So, when the generator has already been removed from the car, you can carefully remove the plastic cover by first prying the latches on three sides:
Next, disconnect the plug from the contact on the brushes, as is clearly shown in the photo below:
Next, it remains to unscrew the two small bolts securing the brush holder:
And now all that remains is to loosen the nut with a 13mm wrench, which is visible in the picture below:
And now the generator brush assembly can be removed without any problems:
Pay attention to the length of the protrusion of the brushes from the body: if it is less than 5 mm on at least one side, then the entire assembly must be replaced with a new one. The price of new generator brushes for VAZ 2110, 2111 and 2112 is about 300-400 rubles.
Installation of this part is carried out in reverse order.
VAZ 2110 how to change brushes on a generator
How to change brushes on a generator? There's no shame in doing this
- Arbitrary shutdown of electronic devices in a car while the engine is running, when this happens frequently and the reasons for this phenomenon are unclear;
- Poor lighting when traveling at night;
- The battery charging voltage does not correspond to that recommended by the car manufacturer, which leads to a decrease in battery capacity.
- The engine protection is removed, the screws securing it around the perimeter are unscrewed and removed from the engine compartment;
- Now you need to remove the rubber protection from the generator output contact bolt. Next, unscrew the nut and disconnect the wires;
- To remove the belt, you need to loosen the nut on the tensioner bar, slide it towards the block and remove the drive belt. After this, remove the tension bar;
- To perform the next step of dismantling it, you need to unscrew the two bolts that press the generator mounting bracket to the cylinder block;
- After this, it can be easily removed from the engine compartment.
AutoFlit.ru
Do-it-yourself removal and disassembly of a VAZ generator
| Generator 2110 is a part without which the operation of the car is impossible. Its condition must be checked every maintenance (15 thousand km). If during the diagnostic process of the generator, comments were identified, they must be addressed urgently. Let's look at how to remove the generator yourself, as well as disassemble it (remove the voltage regulator, diode bridge and bearings). |
Replacing the VAZ 2110 generator
- Disconnect the generator excitation wire.
- Unscrew the nut securing the wires to terminal “B+” using a “10” wrench.
- Remove the “B+” terminal wires.
- Remove the generator tension bar.
- Unscrew the nut of the lower mounting of the generator using a “13” wrench.
- Remove the mounting bolt.
- Remove the tens generator.
Removing the generator voltage regulator
- Release the 3 spring clips and remove the protective cover of the generator diode bridge.
- Unscrew the 2 screws securing the voltage regulator using a Phillips screwdriver.
- Disconnect the block with the wire from the output of the relay-regulator and remove it.
Removing the diode bridge from the generator
- Unscrew 3 bolts that connect the terminals of the stator windings to the rectifier block (1) using an 8-mm spanner, and 1 more bolt holding the diode bridge (2). Remember how the isolating and thrust washers are installed.
- Bend the wires of the stator winding leads to the side.
- Unscrew the capacitor mounting screw using a Phillips screwdriver.
- Remove the diode bridge along with the capacitor. Unscrew the 2 contact bolt nuts using a 10mm socket wrench. Remove the spacer and insulating bushings from the bolt, remove the bolt from the diode bridge and the capacitor tip from the contact bolt.
Replacing the front and rear bearings of the generator
- Before removing the front and rear covers of the generator, you should mark their location with a marker.
- Unscrew the 4 bolts using an 8mm socket wrench.
- Open the generator covers using a flathead screwdriver.
- Disconnect the back cover from the front along with the stator winding.
- To remove the front bearing of the generator, you need to attach a suitable object to it, for example, a “27” socket. Then knock it out with hammer blows.
- Lubricate the bearing seat.
- The front bearing is installed using the old one. Place it on top and carefully drive the bearing in a circle.
- The front generator bearing is installed.
- If a special puller is not available, then a large open-end wrench will be required. We pick up the rear bearing with a wrench, as shown in the photo.
- Lightly hit the key with a hammer and move it around in a circle to remove the rear bearing of the generator.
- The rear bearing has been removed from the generator rotor shaft.
- Installation of the rear bearing can be done using a piece of pipe of a suitable diameter (for example, a deep “19” socket). Using light blows of a hammer, press the new bearing onto the generator rotor shaft.
xn--2111-43da1a8c.xn--p1ai
The best generator for VAZ 2110-12
FAQ on generators (automotive)
- Winding 600 rub.
- Anchor 850 rubles.
- Generator diode bridge 250 rub.
- Generator brushes 100 rub.
- Generator bearing 150rub/set.
- What generator did you buy?
- Impressions and comments on the operation of the generator?
- How long did the last generator last?
xn--2111-43da1a8c.xn--p1ai
Generator assembly
When assembling, you must select the correct position for installing the capacitor, otherwise it will not be possible to install the brush holder:
- The capacitor is screwed exactly along a certain protrusion in the generator cover.
- Reassemble in reverse order.
- It is necessary to demonstrate the accuracy of installation and the order preceding disassembly.
- Assemble the generator.
Note: before connecting the electrical terminals, it is necessary to clean them with fine sandpaper to remove any oxidation that has formed. Oxidation occurs from temperature changes and the formation of humidity in the environment.
- There is no place to install it.
- Tighten the nuts.
- Install the adjustment bolt.
- Put on the drive belt.
- Adjust the belt tension.
Note: this work is mandatory.
Since weak tension significantly deteriorates battery charging, this leads to early failure. If the belt is overtightened, this causes early destruction of the generator bearings. According to technical parameters, the belt deflection, when applying a force of 10 kgf, in the middle should bend by 10-15 mm. This check is carried out with a metal ruler, a corner 30 cm long. So:
- Place the corner on two pulleys - the crankshaft, the generator.
- Select the middle of the distance.
- Apply increased pressure on the end of the ruler.
- Measure the resulting deflection.
- If it meets the standards, then the tension was done correctly.
Generator and its repair
To recheck, you need to rotate the crankshaft. Place the wrench on the pulley mounting bolt and make two turns to the right. If necessary, repeat the adjustment process. After fully checking the tension of the generator drive belt, fully tighten the nuts of the upper and lower mountings of the generator. Advice from a qualified auto electrician:
- on the VAZ-2110 generator, the minus from the battery is connected to ground, the plus goes to terminal B (when connected in reverse, there is an excess voltage from the valves, which causes them to burn out);
- It is strictly forbidden to turn on the generator when the battery is disconnected - a short-term overvoltage occurs at output B, which leads to failure of the voltage regulator and damage to electronic sensors in the vehicle's electrical supply system;
- It is not allowed to check its operation with a short-term connection of output B to ground - this causes immediate failure of the valves; the operation of the generator is checked using an ammeter or voltmeter;
- It is not allowed to check the operation of the valves at a voltage of more than 12V using a megohmmeter - an increase in voltage causes a short circuit and they burn out;
- checking the insulation resistance of the stator winding must be carried out on special equipped stands in auto repair shops;
- Carrying out body work on a car using welding equipment requires disconnecting the supply electrical wires from the inputs of the generator and battery.
When carrying out work to replace the generator brushes on a VAZ-2110, it is necessary to thoroughly study the video. View all photos attached to this article. Read the work instructions to ensure safety. Do-it-yourself work should be started by well-trained car enthusiasts so that minor misunderstandings do not arise during the work. Well-studied material is a guarantee of success in operating a vehicle and a low price for repairs, which are quite expensive at service stations.
How to replace alternator brushes on a VAZ 2110-VAZ 2112
The brushes can be replaced in two ways, which one you choose is up to you, the first method is to remove the generator from the car and replace the brushes (Convenient, but takes more time), the second method is to simply disconnect the minus terminal from the battery (How to remove the terminal , read in paragraph 1 of the article: “Replacing the battery on a car”) and in doing all the work on the installed generator on the car (It’s not very convenient but it won’t be difficult to remove the brushes, if you do everything correctly, you’ll save a little time, if you use tools there won’t be any short ones suitable for this purpose, then it doesn’t even make sense to undertake such work, it’s better to do everything on a removed generator, and read about how to remove the generator in the article: “Replacing the generator in a car”)!
1. To change the brushes, first press out the three latches on the sides of the generator that secure the cover to it and then disconnect this cover from the generator (see small photo), now you have access to the voltage regulator, it has two screws that it is secured (indicated by blue arrows), you unscrew these screws and then, by pulling the regulator, disconnect it and thereby remove it completely from the generator.
When you have removed the regulator, you can change it entirely with brushes, or if you do not have such an opportunity (it is not sold anywhere or you simply don’t have money for a regulator), then you can find the brushes separately and replace only them, they are soldered to the regulator are attached (or rather, their wires are soldered to the terminals of the regulator), so in this case, take a soldering iron and unsolder the wires coming from the brushes and then remove them from the regulator and new ones in the same way, install them by soldering in the same places, for more details, see the video that is posted below, but there is no sound in it, but in principle everything is perfectly clear from the video!
2. A few words about checking the brushes: as soon as you remove the regulator, look at the brushes themselves, which should be in good condition and have a length of at least 5 mm (see photo 1), if they are smaller, then either change them separately, or Replace the entire regulator so that you definitely don’t have any problems with it in the future, you can also check the regulator itself as follows, connect a 12-volt test lamp as shown in diagram 2 (that is, to the brushes) and apply the same voltage 12 Volts (the battery can supply it, that is, run some thin wires from it) “” to the terminal, and “-” to ground, and the lamp should light up and do the same thing, but just apply the current no longer to 12 V , but at 15-16 V and if the lamp goes out, then everything is fine with the regulator and it does not need to be replaced.
You can see in more detail and clearly the process of replacing the voltage regulator with a new one in the video below:
Replacing VAZ 2112 generator brushes and regulator relay with capacitor
If the battery of your VAZ2112 car is periodically discharged, the headlights are dim, while the engine is running, the battery discharge lamp is lit or blinking on the dashboard, all this indicates a malfunction of the generator. There can be many reasons, but you shouldn’t rush to change the entire generator, or rush to a service station where you’ll pay good money for a crap repair (this happens quite often). Most often, the reason lies in a small regulator relay block with brushes and a capacitor. Replacing the brushes of a VAZ 2112 generator usually solves problems for a long time and seriously, it is not expensive, takes minimal time, and anyone can do it with their own hands (you don’t even need to remove the generator from the car for this!). Brushes serve to transmit electrical contact from the generator rotor to its outputs and then to the battery and other parts of the machine’s electrical circuit. Good contact and stable transmission of voltage from the generator, stable charging of the battery and the brightness of the headlights when the engine is running depend on their condition.
Fault diagnosis
Now that we have the brush holder with the regulator and the capacitor in our hands, replacing the generator brushes on the VAZ 2112 is carried out together with the brush holder and the relay regulator, but we need to make sure that the cause of the malfunction lies here, so we begin to look for the fault. So:
It is necessary to clean the contact on the brush holder with sandpaper, they are marked in the photo below; poor contact in this place can also cause poor operation of the electric generator
Clean the contact highlighted in red
- We check the serviceability of the relay - voltage regulator, to do this we connect a 12 Volt light bulb to the brushes
- We apply a voltage of 12 Volts, “+” goes to the terminal, and “–” goes to the ground of the brush holder
- The indicator light should light up
We connect the light bulb to the brushes and apply 12 volts to the contacts of the relay-regulator
- Next, we apply a higher voltage: 15–16 Volts - the light should go out
- When the light is on or does not light up in both cases, this means that the regulator is faulty and needs to be replaced along with the brush holder
- We check the ease of movement of the brushes in the brush holder body and the height of their protrusion
- If they protrude from the body by less than 5 millimeters, replacement is needed; the brushes of the VAZ 2112 generator are changed along with the relay - voltage regulator and brush holder
Required brush height
- If you find chips and cracks on the brushes, then replace the generator brushes on the VAZ 2112
- To change the brushes alone, we pull out the holder from the relay housing - voltage regulator, to do this we press on terminal “B”
- Before installing the voltage regulator with new brushes in place, blow the installation socket on the generator from dust and wipe off oil
This completes the replacement of brushes on the generator for the VAZ 2112, let's move on to the last small but important part - the capacitor (see Changing the capacitor (VAZ generator))
Tip: When there is already wear on the slip rings of the electric generator, it is recommended to slightly grind down the contact corners on the brushes, so that the new brushes will fit more easily into the grooves of the worn slip rings
Capacitor functions and testing
If you have never dealt with capacitors, these instructions will help you:
- The capacitor is designed to protect all electronic equipment of the car from voltage pulses (jumps) appearing in the ignition system; it also reduces radio interference
- If the capacitor is damaged or its fastening on the electric generator is loosened (contact with the housing worsens), it sharply increases the interference of the radio receiver when the engine is running
Its serviceability can be checked using a megger or tester (with a scale of 1–10 Mega Ohms):
- We connect the probes of our tester to the terminals of the capacitor
- It should show infinity before connecting
- Resistance decreases only at the moment of connection, and then must return to infinity again
- This means the capacitor is working properly
- Otherwise, the capacitor must be replaced
Attention: The K73-58-4 capacitor is installed on the VAZ2112 electric generator. The marking is located on the side of the body
To avoid problems, it is not recommended to install a different type of capacitor.
We screw the capacitor back, pay attention that it is important to accurately orient the capacitor relative to the special mounting protrusion located on the cover of the electric generator, otherwise the brush holder will not fall into place. We connect the connector back to the brush holder (the bend of the output wiring faces up) and screw it back, while the brushes must get onto the contact rings Snap the plastic cover, insert and screw the wires back If there is a spring washer on the “+” bolt under the nut, it needs to be removed, dirt and moisture often accumulate under it, which often leads to oxidation and deterioration of the contacts. Put the terminals on battery
That’s all for the VAZ 2112 generator, replacing the brushes is over, if some points are not entirely clear to you, we recommend watching the video.
How do generator brushes work?
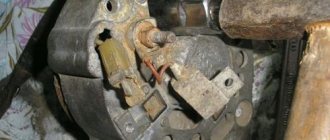
Alternator brushes used in automobile alternators are made of graphite, which is sometimes impregnated with a special substance that reduces their wear. The brushes are attached to the generator using a special plastic case - a brush holder and consist of two metal bricks with wires.
A car generator has moving and fixed parts. So, metal plates called brushes transmit current to the rotating part, which is called the rotor, and due to the impact of the friction force of the rotor, they gradually become unusable. The brush assembly is located near the rotor. In the figure below it is indicated by number 3.
How to determine if the VAZ 2107 battery is not charging
The first sign of a lack of charging is a burning indicator lamp on the instrument panel or a voltmeter needle that is not in the green sector when the engine is running. A more reliable way is to check the voltage on the battery using the will class=”aligncenter” width=”600″ height=”450″[/img]
When the engine is running, the normal voltage on the battery is 13.9±0.3 V. When the battery is not charging, the voltage on it is approximately 12 V.
Important: to avoid failure of the regulator relay and the electronic engine control unit, it is prohibited to remove the battery terminals while checking the on-board voltage while the engine is running. Low and high voltage on-board network harms the battery
In the first case, it is discharged, in the second, the electrolyte boils away, which leads to battery failure
Low and high voltage of the on-board network harms the battery. In the first case, it is discharged, in the second, the electrolyte boils away, which leads to battery failure.
What is needed to repair VAZ 2107 battery charging
To identify and troubleshoot problems, the following devices and tools are needed:
- multimeter;
- control lamp 12 V;
- flat screwdriver;
- knife;
- pliers;
- sandpaper.
Signs of a generator malfunction
Complete or partial failure of a device can be determined by the following symptoms:
- The warning light on the instrument panel, usually in the form of a picture of a battery, begins to flash or stays on. This indicates that the battery is not charging or the current supplied to it is insufficient.
- Constant failures in electrical equipment: unstable operation of external and internal lighting, when the lamps burn brighter or dimmer, heating when the engine is running (if the engine is turned off, then everything functions normally). By the way, problems with lighting can also occur if headlights need to be polished.
- The battery is constantly and frequently discharged.
- There is a burning smell in the interior or engine compartment.
- A whistle or excessively loud rustling noise is heard from the generator.
- The generator makes a loud noise during operation: the diode bridge or stator windings are faulty.
Replacing the gearmotor
In the case when it is necessary to replace the micro-gearbox, it is necessary to follow the work plan given below, for the implementation of which you will need two Phillips screwdrivers (long and short), and a ten-point open-end wrench.
- We remove the windshield wipers from the special fuse, which is presented in the form of a rubber cap. But first you need to unscrew the contact nut using a ten key.
- We dismantle the frill, which is located in four plugs, which mostly serve a decorative function.
- On the side planes of the frill you can see a couple of nuts that will need to be unscrewed.
- We look at the electric motor compartment and find a rubber seal that needs to be removed.
- To disconnect the pipeline, you will need to unscrew the screws that hold the thermal radiators from the electric motor.
- Next to the brake vacuum booster there is a damper motor, which is mounted on three mounting screws.
- At this stage, you can dismantle the electric motor by first removing the smallest block. The larger block has a wire fastening.
- We install a new gear motor in place of the damper sector.
- To assemble the heating damper, we strictly follow the described plan, but all steps are performed in reverse order.
Replacing the brushes of the VAZ-2110 generator without removing the generator instructions
The generator in the car design is responsible for supplying voltage to all components of the on-board network. It is a fairly reliable unit, but it requires maintenance from time to time to prevent serious breakdowns. One of the stages of service work is replacing brushes.
These stator elements, made of durable graphite, supply current to the rotating rotor of a car generator. Constant friction gradually wears out the brushes. It is not difficult to identify it - you will definitely notice the appearance of problems in the car's electrical supply system.
When may it be necessary to replace alternator brushes?
The manufacturer requires replacing the alternator brushes on a VAZ-2110 car every 50 thousand kilometers or every 4 years (it all depends on what comes first). But you may also need this procedure if any of the following symptoms of incorrect operation of the on-board network occur:
- spontaneous decrease in headlight brightness;
- periodic shutdown of the cigarette lighter, car radio, dashboard backlight lamps;
- sudden drop in network voltage;
- turning off all electronics on board the vehicle;
- rapid discharge of the battery and problems with restoring its charge.
If you notice at least one of these symptoms, it makes sense to check whether the generator brush is worn out and whether this device is working correctly.
In addition, you can perform a simple diagnosis using one of the following methods:
- visual assessment of the condition of the brushes. They should protrude slightly from the holder body. If this is not observed, wear is evident;
- measurement of brush resistance. It should be no more than 0.05 Ohm. Otherwise, the part needs to be replaced.
If problems are identified, it is urgent to install a new part, since further safe operation of the machine is not possible.
How to replace alternator brushes on a VAZ-2110 car
Let’s immediately answer a very common question asked by domestic car enthusiasts: is it possible to replace the alternator brushes on a VAZ-2110 car without removing the alternator? Yes, theoretically, such an operation can be performed, but we would like to warn you that there is a fairly high risk of damage to the unit, as well as breakdown of expensive parts located in the immediate vicinity of it. Replacing brushes on a car with a 16-valve engine will be a particularly difficult task, since, among other things, you will need to remove the crankcase protection, and also try to get to the generator from below, being under the bottom of the car. This is why we strongly recommend following the instructions in the video.
In order to remove the generator and install new brushes, you will need to prepare all the necessary tools - keys 8 (socket), 10 and 13, as well as a flat-head screwdriver and a universal joint with a special extension. The entire procedure is performed according to the following scheme:
- disconnect the negative contact of the battery to de-energize the generator;
- unscrew the nut located on the positive contact. This is necessary to disconnect the generator from the system;
- loosen the lower and upper nuts, as well as the tensioner bolt, in order to quickly and effortlessly remove the generator belt;
- completely remove the adjusting bolt, and then remove the tension bar from the generator;
- remove the generator. All other work can be done in any convenient place, since it is now easy to provide quick access to the brushes;
- remove the battery and disconnect all wires connected to it from the generator;
- Using the cardan joint, we get to the bolt of the brush assembly and completely unscrew it from the body;
- install new brushes and reassemble the generator in the reverse order.
After this, you will need to secure the generator in a place specially designed for it and reconnect all the wires. Be sure to check the operation of the vehicle's electrical network after completing assembly and correct any errors, if any.
Replacing alternator brushes in a VAZ-2110 car is a relatively simple procedure, so you can handle it yourself even without the involvement of car service specialists. You just need to have at your disposal all the necessary tools, without which you will not be able to dismantle the unit.
Checking the brushes of the VAZ 2110 generator
The following signs also indicate brush wear:
- Spontaneous shutdown of electronics for no apparent reason
- Voltage drop in the on-board network
- Rapid discharge of the battery, which then refuses to charge
These problems indicate that the generator brushes need to be replaced urgently. Otherwise, the car will simply become useless and even dangerous. Don't worry, fixing the problem is much easier than it seems! But first you need a correct diagnosis. What if the cause of the trouble turns out not to be the brushes?
First of all, you can check the condition of the brushes visually. To do this, you will need to turn off the power and remove the generator itself and see how far the brushes protrude from the holder body. If they are no longer visible, it means they have worn out and must be replaced. You can also use an electric multimeter to check the condition of the brushes, which many motorists have in their garages. This is a device that measures both current voltage and electrical resistance. It is enough to switch the tester to ohmmeter mode.
Then you need to take a 12-volt lamp with two wires and connect them to the B+ and D+ terminals of the car alternator. We apply the multimeter probes to different ends of the brush. A working brush has a resistance of 0.05 Ohm. If this value is higher, it is time to change the brushes.
Replacing brushes on a VAZ-2110
In order to remove the brushes from the generator, it is best to first remove the generator itself. For this you will need:
- 13mm wrench
- Socket wrench 8
- Flat head screwdriver
- Key for 10
To directly dismantle the generator, you need keys for 10 and 13. There are differences in the procedure for removing the generator on “tens” with 8-valve and 16-valve engines. In a car with an 8-valve engine, the device can be reached from above by opening the hood, but on a car with a 16-valve engine, you will have to remove the crankcase protection and dismantle the generator while under the bottom of the car.
Before looking for a generator, you need to disconnect the negative terminal of the battery. After this, you can begin dismantling. First, unscrew the nut on the positive terminal of the generator (B+).
It's time to get to work on the generator belt drive. Loosen the bottom nut using a 13mm wrench.
Do the same with the top nut.
Loosen the tensioner bolt and remove the alternator belt. Completely unscrew the generator mounting bolts.
Unscrew the adjusting bolt and remove the tension bar
After this, the generator can be pulled out of the engine compartment.
People often ask whether it is possible to replace the brushes without removing the generator. It is possible, but it will be much more difficult, since there is a risk of losing important parts and damaging the device. In addition, such a trick is unlikely to work on a 16-valve engine, where even just getting close to the generator is no longer an easy task.
The brush assembly is attached to the generator with just one bolt, but in order to get it out, you will need to add a universal joint with an extension to the standard set of tools and remove the battery. First, by hand, disconnect all the wires and contacts connected to it from the generator. Help yourself with pliers as needed. After this, use the universal joint to unscrew the brush holder bolt and try not to lose it. After this, insert new brushes into the holder and screw the bolt into place. If it becomes difficult, replace the brushes using the first method, removing the generator.
How to check the generator regulator relay Doing it right
- 591.3702-01, these are the oldest relays. They were installed on the first VAZ cars. This regulator is located separately from the generator, on the wing. It is because of their appearance that all relays of this type are called “chocolate bars”. It can still be found on old domestic cars, as well as on some motorcycles;
- Ya112V is a more modern relay; it uses an integrated control circuit;
- Ya212A is the most common type of relay regulator today.
- The relay is disconnected from the generator;
- Terminals “B” and “B” are connected to each other by a piece of wire;
- Terminal “Ш” is connected to the body of the brush assembly;
- The wire going to pin “30” must be disconnected and insulated as reliably as possible;
- The light bulb crashes into the wire going to pin “15”.
- In integrated relay regulators, the connection occurs a little differently:
- The relay is disconnected from the diode bridge;
- The light bulb is connected to a wire running from the generator to the relay.
- Oxidized contacts. Try cleaning the battery leads and terminals going to them. In many cases, this action helps restore normal charge levels;
- Worn brush assembly. The brushes should not be shorter than 1.5 cm; if they are shorter, they do not reach the slip ring, and no current is generated. Sometimes, if the unit is installed incorrectly, one brush may wear out more, which also leads to loss of charge;
- The problem may also be caused by a burnt-out diode bridge (rectifier). If all other elements of the generator are in order, then check the functionality of this part of the structure.
AutoFlit.ru