You can suspect that something is wrong with the engine mounts of your car by the characteristic knocking noise under the hood and vibrations while driving.
Today we’ll talk about what engine mounts or mounts are, what they serve and how they are replaced.
Device type
Diagnostics of the breakdown of the scenes on the VAZ 2110
While driving, the driver notices extraneous noise on the right side of the seat, observes excessive play in the lever, and difficulty in changing gears correctly. The gearbox (gearbox) is suspicious. Upon closer examination, the control drive turns out to be to blame for the unstable operation of the car. The first thing you need to do is calm down, study the operating instructions, carry out an external inspection, make a list of work, parts, tools necessary for repairs and adjustments.
Typical faults
- When reverse gear is engaged, the lever is not held in the set position and spontaneously jumps to the right. Other switching occurs as normal. Possible reason: the plastic retainer (gear shift lever cover) has worn out or burst. If, after examining the drive, the condition of the remaining components is satisfactory, you should purchase a repair kit and replace the part.
- Problems with engaging (disengaging) first, fifth gears, and reverse. The second, third, fourth speeds are turned on. The link needs to be adjusted and replaced.
- The engine is running. Strong vibration of the switching unit, the handle dangles in all directions. The drive requires replacement. Possible breakdowns:
- The service life of the spherical washer of the ball joint (plastic insert) has expired,
- excessive degrees of freedom of the gearbox hinge (cardan),
- the gearbox ball lever support bracket (cushion) is cracked,
- rods are bent.
- Oil stains under the car, on the protective boot of the cardan. The gear selector rod seal has failed.
Diagnostics
In any car, the gearbox slide serves to prevent the car from switching gears on its own . This part needs to be monitored and looked after; in addition, over time it becomes loose and requires adjustment. If the adjustment has not been made for a long time or it was performed poorly, then the driver will feel uncomfortable when driving the car.
As practice shows, those car owners who forget about the rocker and its adjustment can, over time, destroy the entire transmission system. And this is a very expensive repair.
It is because of this that prevention should be carried out, as well as due attention should be paid to the scenes. If the car begins to behave somehow differently, then it is necessary not to delay the repair.
Gearbox slide
To understand that the rocker requires adjustment or replacement, you just need to monitor the operation of the gearbox.
As a rule, when a failure occurs, the following symptoms appear:
- Difficulty when engaging 1st gear. As a rule, it is difficult to engage the gear; the driver has to practically drive the lever in to engage 1st speed.
- Possibly difficult shifting from 1st to 2nd speed.
- Due to a loose lever, it is not 1st speed that is engaged, but reverse. This is very dangerous, especially at a traffic light, at the start. It is necessary to urgently repair the rocker, otherwise the problem will only get worse.
- Difficulty engaging 5th gear, while other speeds can be engaged smoothly.
- There is play in the shift knob. As a rule, the rocker only requires replacement and adjustment is not necessary.
- Extraneous sounds appeared coming from under the car, or rather from the gearbox. As a rule, the sound becomes ringing. This problem is a disease of the entire VAZ 2110-2112 family. As a rule, such a ringing can appear after repairing the car’s suspension.
- When driving, the speed may jump. In other words, the car, gaining acceleration, independently disables the engaged gear and switches to neutral speed. For further driving, you will need to keep the lever at the desired speed constantly so that it does not jump out.
- Strong vibration that occurs on the shift knob. This is due to the failure of the scenes. It will need to be repaired to solve the problem.
If the symptoms described above appear, then you will need to begin repair work. You should completely replace the linkage or simply adjust it and gear shifting will become comfortable again. Therefore, it should be adjusted before replacing.
Adjusting the work of the scenes
The adjustment procedure will save money that could possibly be spent on completely replacing it.
Adjustment is made only in cases where:
- The gearbox was removed and installed back;
- Previously, repairs were carried out to replace the cardan;
- In the case when the hinges on the slide have turned.
Of course, adjustments can be made at other points as described earlier. Do not forget that even minimal gaps can disrupt the correct operation of the entire transmission.
Naturally, before starting repair work and adjustments, you will need to prepare the right size wrenches . With their help, the clamps will be loosened. You should also place bricks, stones or special anti-roll devices under the wheels.
When everything is ready, you can begin the work process itself. To do this you need:
- It is recommended to use an overpass or pit for repairs; if these are not available, then use reliable jacks. Next, you should go to the garage.
- When the car is ready for repair, it is necessary for safety to put on the handbrake and throw bricks or specialized devices under the wheels that will prevent the car from rolling away.
- Next, you need to crawl under the car and find a special clamp. It connects the hinge and the rocker itself. Then you will need to loosen it using a wrench.
That's the whole process of adjusting the scenes. Nothing complicated, the main thing is to follow safety precautions.
Preparation
If the listed symptoms appear, it is necessary to conduct an independent inspection of the drive.
Prepare a set of wrenches, a hammer, a pry bar, screwdrivers, a chisel, and pliers. Organize workplace lighting. Place the car over the inspection hole (overpass; lift the front part with a jack, place safety supports). Place chocks on the outside of the wheels. Disconnect the negative terminal of the battery. The check begins in the salon.
Provide access to the floor tunnel.
For ease of operation and to avoid damage or contamination of the upholstery, dismantle the passenger seat:
- remove the torsion bars from the front side with a pry bar, unscrew the nuts, remove the fastenings of the tubular stop;
- Unscrew the bolts of the runners from behind, move, tilt the seat back;
- Unscrew the front fasteners of the guides and take out the chair.
Disassemble the floor tunnel:
- unscrew the self-tapping screws of the right and left facing panels;
- disconnect the handle with the casing;
- remove the four screws of the top cover, the plastic plug, lift it, pull it slightly back, lay it on its side;
- disconnect the wires, sign, attach marking tags, remove the box;
- Unscrew the nut and remove the metal air duct;
- Unscrew the four retaining nuts and remove the bottom of the tunnel structure.
Modification by installing a different type of backstage
In the photo above there is a short-throw rocker, below is a standard one from a VAZ-2110.
Currently, VAZ-2110 owners have the opportunity to install an improved gearbox linkage on their car. This tuning includes replacing a standard part with a short-stroke rocker. Thanks to this procedure, gear shifts begin to shift much more clearly. Installation of the modernized backstage occurs according to the following algorithm:
Adjusting the scenes of the VAZ 2110
It is preferable to carry out the adjustment together. The master with the tools is under the car, the assistant is in the cabin and performs the necessary actions behind the wheel.
- Try to install and hold the lever in first gear.
- Loosen the clamp on the control drive rod (stage).
- Move the lever to the far left position. Avoid switching to front and rear positions.
- Tighten the clamp.
- Assess the condition of the hinge switch cover. If damage is found, replace it.
- Carefully pull the boot towards the box. Inspect the cardan. Deviations from the norm are noticed - schedule a shift. Pull the protection back.
Reasons for replacement
There are several situations when the owner of a VAZ 2109 has or wants to get into the design of the gearbox and specifically work with the rocker:
- Oil is leaking due to a damaged rocker seal. It must be replaced;
- The old drawstring was out of order;
- I would like to exchange the long-stroke for a short-stroke in view of its advantages.
Now to the question of when replacing or repairing the backstage is a necessary measure.
- The backlash of the gearbox selector has increased significantly.
- Gears change with difficulty, and when changing speed, extraneous sounds appear.
- It is possible to change gears, but with a lot of effort.
- Speeds change incorrectly. Instead of one, a completely different one turns on.
- It is impossible to turn on all or part of the gears at all.
Even if the resulting play is still insignificant, it is advisable to immediately begin repairs or completely change the drawstring.
Replacing the oil seal
If you find that the oil in the gearbox is gradually disappearing, you can suspect the rocker seal. There is nothing else left to do but change the element.
- First, buy a new shift rod seal. It costs about 70-100 rubles.
- Drain the oil from the box, having prepared a clean container in advance. This is in case you refill the same oil. Although this is an excellent reason for you to change the transmission lubricant at the same time.
- To make sure the oil flows out better, first unscrew the filler plug or remove the speedometer gear. After draining the oil, screw the cap back on.
- We climb under the car and disconnect the fasteners of the gearbox lever driveshaft.
- Pull the boot off the cardan, unscrew the bolts securing it to the gearshift rod. Problematic fasteners that you will have to tinker with.
- After removing the cardan shaft, remove the rod boot.
- We remove the damaged oil seal using an awl or suitable available tools. The main thing here is the stock itself.
- We install a new one in place of the old oil seal and press it with a tube of the appropriate diameter.
- Put the boot back in place and rotate the driveshaft.
- Please note that the bolt securing the cardan to the rod is an adjustment bolt. Therefore, screw it in exactly the same way as before dismantling. Otherwise, some speeds may not turn on.
After the work done, do not forget to check the result.
Replacing the cardan
Practice shows that if problems arise with the slide, it is not at all necessary to completely change it.
The VAZ 2109 has its own disease, the weak point is the backstage joint. Replacing it with an analogue from Kalina will solve the problem and turn a disadvantage into an advantage.
The instructions for replacing the cardan are as follows.
- Using two 13mm spanners, unscrew the clamp that relates to the speed switch drive rod.
- Pull the boot off with a screwdriver, moving towards the box. If you want, remove it completely. So it definitely won’t interfere with the repair process.
- Using a 10mm wrench, unscrew the fixing bolt on the cardan.
- Apply several gentle, not strong blows with a hammer to knock the cardholder off the shaft. Remove the boot to the side if you have not done so before.
- We replace the old cardan with a part from Kalina. It is more reliable, efficient and durable.
- For reassembly you will need the help of a friend. Do not rush to tighten the clamp immediately at the end.
- The assistant will set the position of the gearshift lever at the optimal points from inside the cabin. First you need to catch the center, then move the lever a little to the right while you tighten the clamps from below.
- Check if the gears engage well. If yes, then we continue assembling the unit and check the updated gearbox under real road conditions.
The experience of VAZ 2109 owners shows that when there are problems with the rocker, the essence often lies in an unsuccessful factory cardan. By replacing it with an analogue from Kalina, you will be able to get rid of discomfort and continue to confidently operate your car. By replacing the cardan shaft, the design of the gearbox will improve significantly.
Adjustment
After changing the link or cardan, you should definitely adjust the operation of the unit.
- Engage reverse gear, loosen the clamp tension.
- Set the gearbox selector to the position in which it should ideally be located when engaging reverse.
- Tighten the clamp back.
- A similar operation is performed with other speeds.
There are situations among VAZ 2109 owners when difficulties arise when engaging reverse gear. This is where adjustment can help.
- Set the gear lever to first gear;
- Loosen the rocker clamp;
- Turn the rocker drive counterclockwise;
- Turn the drive until the selector is pressed against the plastic stopper for the reverse gear. You will feel this without any problems;
- Resting against the stopper, tighten the clamp under the bottom. That's it, the adjustment is done.
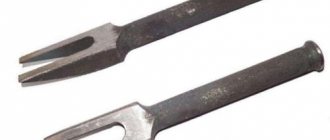
Installing a repair kit for the wings on a VAZ 2110
Contents of the repair kit (catalogue names).
- Cover plate for VAZ-2110 gear shift lever.
- Clip retaining ring.
- Lever spring.
VAZ-2110 gear lever axle assembly:
- remote bushing,
- low hex nut,
- spring washer,
- two bushings,
- spherical washer.
Replacement procedure
- Remove the axle retaining ring.
- Pull out the axle.
- Unscrew the six bolts, lift the pressure plate, and remove the cushion retaining ring.
- Remove the lever from the holder and remove the old hemisphere. Options for the design of a hemispherical part are possible.
- From one part. Warm up, slightly soften the new part with an industrial hair dryer (hold in boiling water), insert, gently pressing, the switch ball.
- Composite - a hemisphere, a sleeve cut along the axis. No heating required.
- Before assembly, plastic products are thoroughly lubricated.
- Unscrew the three bolts and replace the reverse trim.
- Reassemble in reverse order.
Removing and disassembling the gearbox control drive
We disassemble the drive to replace the bushings of the gear lever shaft and the lever ball joint. We change the plastic bushings of the lever axis if there is a large play in the connection of the lever with the drive rod. We replace the parts of the ball joint if they are worn out or broken. We change the control rod when it deforms. Remove the floor tunnel lining (see “Removing the floor tunnel lining”). If it is necessary to replace the plastic lining of the reverse gear lock bracket, which can be worn by the mating part during long-term use...
...using a 10" wrench, unscrew the two nuts of the upper fastening of the lining...
...and the lower mounting bolt.
Remove the bracket cover. Replacing the gearshift lever axle bushings, as well as all plastic (subject to wear) elements of the lever ball joint, can be done inside the car without dismantling the entire drive. For clarity, we show these operations on a removed drive. To remove the drive, it is necessary to release the fastening of the ball joint race from the bottom of the car and the rubber boot in the car interior. We turn the head “10”...
...six nuts securing the drive pressure plate to the body.
Remove the pressure plate. Remove the protective cover from the pressure plate mounting studs. From the bottom of the car, remove the power unit mudguard (see “Removing the power unit mudguard”) and dismantle the drive rod (see “Removing the power unit mudguard”). We mark the position of the control rod relative to the shank of the gear shift rod hinge.
Using a 13mm spanner, loosen the tightening of the nut of the coupling bolt of the clamp securing the control rod to the shank of the gear selector rod hinge. Using a slotted screwdriver, we open the clamp and move it along the rod. Remove the control rod from the rod joint shank.
We remove the mechanism with the control rod, removing the gear shift lever from the hole in the floor.
Using a 13mm spanner, unscrew the lever axle nut...
Using a Phillips screwdriver, unscrew the screw securing the gear shift lever axis to the control rod.
We take out the axle. Remove the protective cover from the gear shift lever.
We take out the spacer bushing.
Replacing the backstage cushion of a VAZ 2110
The work is performed under the car (partially inside the car).
- Using a socket wrench, unscrew the nuts of the metal buffer. The bar is put on the studs and presses the clip from below to the body.
- Two bolts secure the cage to the jet rod. Disassemble, holding the nut with a spanner from above. Take it aside.
- Pull the cushion out of the boot down along with the lever. Remove the retaining ring using a pointed tool. When working together, an assistant can pry the stopper from the interior side.
- Assemble, lubricate, install back, tighten fastening hardware.
Replacing the gearbox slide
First, you should decide whether you will buy a ready-made short-stroke part or make it yourself. For Lada Priora drivers who have not upgraded components, we recommend choosing the first option. The instruction will be carried out taking into account modifications.
For work we will need:
- Two metal plates.
- Kardanchik from Kalina.
- Welding machine.
- A set of keys, including spanners.
- A grinder with a cutting wheel; alternatively, you can use a hacksaw.
Step-by-step instruction
- Repair and replacement begins with removing the decorative cover from the gearshift lever. The knob may not give in, but it is not secured by anything, so just pull firmly towards you;
Assembly
- It is necessary to install a rod on the rod and assemble the reverse gear unit; it is recommended to lubricate the ball;
- Next comes the gearbox adjustment - install it securely and check how it moves between gears. We fix the rod with a clamp;
Replacing the backstage oil seal of a VAZ 2110
- Loosen the drive rod clamp.
- Pull the cover off the hinge. If you plan to replace the boot, cut it lengthwise to save time.
- Unscrew the locking screw.
- The assistant, while driving, presses the clutch pedal and changes gears. In this case, the drive supplies thrust towards the box and back. The master, pressing the cardan to the gearbox, disconnects the drive assembly.
- Remove the hinge.
- Remove the cover.
- Remove the oil seal, carefully, without crimping the cuffs, insert a new seal.
- Pull the boot.
- Install and secure the hinge. Important point. Rotate the adapter within a few degrees around the axis and insert the locking screw into the hole on the shaft.
- Refill the cover.
- Connect the rod to the cardan.
- Adjust gear shifting.
Replacing the gearbox slide
First, you should decide whether you will buy a ready-made short-stroke part or make it yourself. For Lada Priora drivers who have not upgraded components, we recommend choosing the first option. The instruction will be carried out taking into account modifications.
For work we will need:
- Two metal plates.
- Kardanchik from Kalina.
- Welding machine.
- A set of keys, including spanners.
- A grinder with a cutting wheel; alternatively, you can use a hacksaw.
Step-by-step instruction
- Repair and replacement begins with removing the decorative cover from the gearshift lever. The knob may not give in, but it is not secured by anything, so just pull firmly towards you;
After removing the cover, you can begin dismantling the lever.
The next step is dismantling the gearbox lever rod. Using the 13th key, you need to loosen the clamp and release the reverse gear start lock ball. The ball should be removed first. Remove the retaining ring. You can’t pull the gearshift lever up, deal with the ball first;
We take out the ball, spring and lever from the plastic case at the same time
- The spring, retaining ring and ball are mounted in a plastic housing - remove all elements at the same time. The lever with the rod must be pulled out at the same time. To make it more convenient to work, you can disconnect the rod and gearshift lever.
- We continue the repair and move on to the cardan. There are latches on the left side; you can get to them after removing the cover;
- Now we can compare both parts, as you can see, the Kalinovsky cardan is longer. You need to shorten the Kalina component, taking into account the type of new link. It is necessary to shorten the cardan by 10-20 mm;
- When the adjustment of the cardan is completed, it can be installed in its normal place. Thoroughly lubricate it from the inside with lithol and screw it in. The cone bolt fits in easily, so be careful not to overtighten it. The traction is installed through the interior of the Lada Priora. It will be easier to do the work with a partner: one stretches the rod, and the second holds it by the elastic band inside the car;
Adjustment
You still need to engage first gear and drive onto the overpass. Naturally, put the car on the handbrake and put wheel chocks under the wheels. Don't turn off first gear!
From below, find the clamp that secures the rocker and loosen it. Returning to the car, you need to move the lever to the left as far as you can. You cannot move the lever back or forward; the link may come off.
Go back under the car and tighten the clamp. Sometimes it is enough to move the rocker relative to the cardan by a few millimeters, and the gearbox will work perfectly again, gear shifts will occur as expected.
Short-stroke link for Priora PrioraPRO
Lada Priora Sedan 16kl Kvartsukha Logbook REPLACING THE FUEL FILTER
Before we consider how to properly install a short-throw rocker on a Priora with our own hands, let’s remember why this is being done.
The essence of a short-stroke rocker is that it reduces the travel of the gearbox lever when switching gears off or on. Moreover, gear shifting in the car becomes clearer.
Unlike the factory standard lever, the short-stroke rocker has slightly different bending angles. Thanks to improved geometry, the gear shifting process brings pleasure to sports driving enthusiasts.
As already mentioned, installing a Priora short-stroke rocker results in the gearshift lever reacting to your movement faster and more responsively, while the actual rocker travel will be less.
If you are a fan of sporty style and want to accelerate the car as quickly as possible, then you will need to change gears quickly. Again, here too a short-throw slide will come in handy.
Installation process
Let's analyze the installation of the Priora short-stroke rocker with our own hands step by step.
First you need to pull the knob and cover off the box lever. The knob on the lever is not fixed, so it is enough to apply a certain force to remove it.
Using a key set to “13”, loosen the clamp and separate the gearbox lever rod from the cardan.
To release the lever, we release the ball from the spring mechanism, which is necessary to activate the reverse gear with locking. To do this, remove the locking ring.
It is strictly forbidden to sharply pull the lever upward when trying to release it.
Slowly, carefully remove the retaining ring.
We take out the spring and then the lever with the ball inserted into the plastic frame, as well as the locking ring.
The plastic mandrel includes two parts: the lower one, located on the right and the upper one, located on the left, cylindrical in shape. There is a slit at the top. This component fits onto the gearshift lever. At the bottom there is a lever ball. The upper part wraps around the lower part so that the grooves match.
We take out the lever and rod from the interior. For convenience, you can separate the lever from the rod, although this is not at all necessary.
Using a “10” wrench, unscrew the left bolt on the cardan and pull off the rubber boot.
The driveshaft from the Priora differs in length from the driveshaft of the Viburnum. It is necessary to shorten the stem of the viburnum, depending on its type.
We insert the cardan from the viburnum. Lightly lubricate it with lithol from the inside. When screwing in the bolt, you do not need to tighten it.
We insert the rod through the interior. It is advisable to do this not alone, but to take someone as an assistant. Let one hold the elastic band in the cabin, through which the thrust passes, while the second gradually stretches the thrust.
Next we assemble the lever:
— We put the rod back on the cardan shaft. — We equip the spring mechanism again (we also lubricate the ball with lithol). — We center the lever (we fix it in a comfortable position). — We tighten the clamp on the rod.
It is quite possible that the lever will not immediately center itself as it should. In this case, perform steps 3-4 again.
Please note that if you first assemble the spring mechanism, then due to the greater length of the rod it will be impossible to put the rod on the cardan (the problem can be solved if the cardan is shortened)
Don't forget to put the boot on the driveshaft
After completing the above steps, we will be able to correctly install the short-throw rocker on the Priora.
It will also be necessary to adjust the mechanism that blocks reverse gear engagement. Due to the fact that we customize the Priora short-stroke rocker to suit ourselves, the following problem may arise. The locking mechanism does not align with the plate it engages. We solve the problem by removing the plate and carefully adjusting the engagement.
In the end, all that remains is to put the knob and cover on the gearshift lever. Keep in mind that after assembly the gearshift lever will be tilted to the right.
Advantages of a short-stroke rocker
After we bought a short-throw rocker for a Priora and installed it manually, we can see the following improvements:
— the lever stroke becomes 3 times shorter, resulting in a much faster transition from gear to gear. You can feel as if you are driving a sports car;
— you need to get used to switching, because the lever itself is not in its original position. To stick gears you now need to put in more effort;
The irritating rattling noise, which is inherent in driveshafts of Ladder models from Nines to Prior at high speeds, disappears.
Tuning
Many VAZ 2110 car owners, even having purchased a completely new car, strive to change the scenes. This can make it more comfortable, but only if done carefully.
The fact is that the short-stroke rocker is, in fact, a homemade product, a modification. If you have a short-throw shifter, the gearbox wears out less, and in general this is not bad for the gears - they engage more clearly.
In order for the short-stroke rocker to replace the standard one, it does not have to be completely removed. It is enough for the ball joint to be disassembled from the outside. It is necessary to unclench the metal ring of the support and spread the plastic legs so that the ball comes out.
Next, you need to disconnect the rod from the support and weld a small piece of pipe to the rod, as well as a piece of durable sheet metal. Do not forget to lift up the hinge, which has a hook, to prevent the gears from being engaged by mistake.
Although the short-throw rocker requires more effort to engage, it increases the smoothness and clarity of gear engagement. But, in principle, choosing which is better for him - short-stroke or full-time - is the right of every VAZ 2110 owner.
Eliminating rattling of the gearbox lever and replacing the ball joint race of the gearbox lever 2110, 2111, 2112
The content of the article:
1. Elimination of chattering of the gearbox lever 2110
2. Replacing the ball joint race of the gearbox lever 2110
Elimination of chattering of the gearbox lever 2110
We continue to fight for silence in the car.
I tried to defeat the cause of the vibrations, and not the consequence in the form of lever rattling. I changed the engine mounts, installed an additional gearbox mount, and changed the gearbox ball race. In terms of rattling, all this did not bring any significant results, it only calmed down a little.
Well, let's treat not the cause, but the consequence of vibration. There were three options for solving the problem:
1. Purchase of repairs. set of scenes.
2. I washed down a couple of millimeters of the cylinder.
3. Installation of plastic washers.
The first option seemed untenable to me. I wanted to solve the problem once and for all, and the bushings were visually in good condition.
I decided to use the second and third options at the same time.
I sawed it down using sandpaper and made a 2mm cylinder.
Then I leveled it with a file.
I cut out washers from the lid of a 3L jar.
Finally, success! There is silence in the cabin. Naturally, the vibration on the handle has not gone away, but it has stopped cracking completely. The lever began to move a little tighter, but this does not cause discomfort, rather the opposite. Previously, after 3000 rpm, the engine sound was almost inaudible due to the terrible rattling of the lever. The engine sound is now clearly audible and just great. The zero impedance filter gives a special charm to the sound. This was really unheard of before.
2. Replacing the ball joint race of the gearbox lever 2110
The next item in the plan to eliminate the itching of the gearshift lever will be replacing the ball joint race of the gearbox lever, or in simple terms - the “butterfly”.
I bought such a thing, cost 320 rubles, manufacturer Balakovo.
To replace the “butterfly” you need a hole, because In order to remove it, you need to unscrew the 4 bolts from the bottom. This is a little problematic to do, as the exhaust system gets in the way.
Then you should remove the gearshift lever. To do this, unscrew one nut and one screw.
In order to unscrew the screw, insert a screwdriver into the joint of the tunnel.
Some people prefer to drill a hole in the tunnel or remove the top completely. I don't see the point in this, because... The tunnel is quite flexible, after a screwdriver there are practically no marks left.
The old "butterfly" was in disgusting condition. It just fell apart in my hands.
When assembling the lever, all moving parts should be generously lubricated. I used silicone grease with fluoroplastic.
I'm not happy with the result; replacing the butterfly gave practically nothing. The vibrations decreased slightly and the timbre of the chatter changed slightly. The next step will be to cut down the cylinder and place a plastic washer.
https://www.drive2.ru/l/2042744/, https://www.drive2.ru/l/2052503/
next article:
Modification and removal of jet thrust of VAZ 2110, 2111, 2112 gearboxes
Contents of the article: 1. Modification of the jet thrust of the VAZ 2110, 2111, 2112 gearbox 2. Removal of the jet thrust of the VAZ 2110, 2111 gearbox
remont-vaza.ru
Replacing the rocker rod oil seal
The normal condition of the oil seal determines whether the oil “disappears” from the gearbox, so if you notice oil stains on the asphalt after parking, you should think about whether it is the oil seal or the oil filter.
Therefore, after checking the filter, it’s the seal’s turn. A malfunction of the VAZ 2110 oil seal can also be suspected if a crunching sound is heard when changing gears.
An article dedicated to selecting and changing gearbox oil is located here: https://vazweb.ru/desyatka/transmissiya/maslo-v-korobku.html
The oil seal can only be replaced in a hole, overpass or other device that allows you to get under the car:
- First of all, we pay attention to the rubber boot. If oil escapes from the VAZ 2110 gearbox through the oil seal, then the entire boot will be in its drops;
- We bend the boot and disconnect the cardan, gaining access to the cuff;
- We remove the cardan from the lever, and then from the rocker;
- Having removed the cardan, we get to the oil seal;
- Using an awl and a hook, remove the cuff on the gearbox;
- Now you need to press in the new oil seal. Traditional craftsmen usually install it using a plastic bottle cap;
- If the replacement was successful, we return everything to its place, install the boot, and we can consider this minor repair complete.
Remember that any rocker repair will not be successful if it is not adjusted correctly. It is best if the setup is done with an assistant, since it is problematic to do this on a VAZ 2110 yourself.
Replacement
We have already noted that there are a total of three supports on the VAZ 2114. But it’s not uncommon for car owners to decide to install a fourth—an additional airbag. It serves to connect the crankcase and transverse the front suspension. This reduces wear and vibration and increases the level of comfort. But keep in mind that with such a modification you will have to look for a new place for the ignition module.
Now let's talk in more detail about the three standard pillows. Replacement of each of them is carried out in a certain sequence and according to the appropriate algorithm.
Front
To change the front engine mount, follow the instructions.
- Drive the car into a pit with a flat surface. Stop the wheels, turn on the handbrake, and put the transmission in first gear. This is a guarantee that the car will not roll away unexpectedly for you.
- Remove the crankcase protection and give yourself access to the front airbag.
- If the car has been in service for more than a year, and you haven’t touched the supports for a long time, then be sure to treat all fasteners with WD40 or another effective “fighter” against rust.
- Using a jack, you need to slightly raise the power unit. In this case, be sure to use a wooden beam as a spacer so as not to damage the motor. Keep an eye on the radiator and fan while lifting the engine. They should not break, otherwise you will not avoid serious expenses.
- There is a rather long bolt on the body cross member. It secures the support and bracket. It needs to be unscrewed.
- Now the bolts that connect the motor block and the pillow are unscrewed.
- All that remains is to remove the damaged element and replace it with a new one.
- Assembly is performed strictly in reverse order.
Engine pad
Left
Here, in addition to the standard set of tools, you will also need a cable.
- Using a cable, pick up the gearbox and place a jack under it.
- If your car has a large stator (an old-style device), you cannot do without dismantling it.
- Now we remove the bolt that connects the bracket and the support.
- Remove the worn out cushion.
- Place the new element in place and reassemble.
- Before firmly tightening all the fasteners, make sure that everything is exactly in place.
Path to the left pillow
Rear
A cable will also come in handy here. How exactly to perform the replacement? Simple enough.
- By analogy with the left support, pick up the gearbox and place your jack under it.
- Loosen the fasteners that secure the gearbox and rear support slightly.
- Loosen your grip on the two nuts on the body that hold the rubber mount in place.
- Raise the gearbox slightly with a jack and unscrew both nuts.
- The bolts that hold the pillow are unscrewed from the box itself.
- Remove the damaged element, install a new support and reassemble in the reverse order.
- If there is rust on the fasteners, we recommend cleaning it or replacing the bolts with similar new ones.
Changing these elements is not difficult, but we still recommend that you first consult with specialists and watch training video instructions. This will allow you to take on the work with your own hands more confidently and save an impressive amount of money on car service services.
To ensure that new engine and gearbox components serve for a long time and reliably, we recommend that you do not skimp on their purchase. Buy high-quality products right away that will last you many years.
How to replace a VAZ 2114 engine mount will be discussed in our article. The power unit of any vehicle begins to vibrate strongly from the moment it is started, and if its vibrations (which increase with power gain) are not suppressed, one can expect dire consequences for the car frame.
Despite the fact that on older models of the domestic automobile industry, special cushions made of dense and durable rubber acted as dampers for engine vibrations, but the engine still continues to lie on the frame.
The designers have significantly modernized the engine compartment of the latest generation front-wheel drive models (for example, on the VAZ-2114), adding specially designed cushions, which are now also supports for the power unit.
However, under our operating conditions for automotive vehicles, these elements are subject to high loads and wear out faster. In this publication, we will discuss in what cases it is necessary to replace the engine mounts of a VAZ-2114, and how to carry it out yourself.
VAZ 2110: replacing the gearbox cushion on your own
Replacing the box cushion
If the car has been in use for more than three years, it starts to knock somewhere and a squeak comes out somewhere. When accelerating or driving on broken roads, a knocking sound begins under the bottom of the car. A knock can also be heard at the location of the gearbox. For a VAZ 2110, replacing the gearbox cushion, which will be discussed in the article, can completely solve the problem. Replacing the VAZ 2110 gearbox cushions is a simple matter that anyone can handle.
When do you need to change engine mounts on a VAZ-2114?
Since rubber elements are included in the design of the supports, during operation they are subject to increased loads, wear out and lose their properties. This can be judged by the noticeable vibration that is clearly felt inside the car. The following factors affect the service life of the element:
- load;
- temperature regime;
- operating conditions of the vehicle.
It is very important to replace the airbag in a timely manner; if this is not done, the part will simply become unsuitable for further use, and only then will cause a more complex and expensive repair of the power unit suspension.
If you hear extraneous noises in the area of the engine compartment when driving, and suddenly noticeable vibration appears in the interior of the VAZ-2114, it is necessary to perform a visual inspection of the engine mounts, and if damage is found, replace them immediately.
Advice! You need to purchase only original products, the quality of which is confirmed by the manufacturer’s guarantee. Otherwise, the pillow will not cope with its functions and will quickly collapse.
Do-it-yourself repairs and preparatory work
Replacing the VAZ 2110 gearbox cushion
The knocking starts when the gear is switched from 1 to 2 or from 3 to 4. The knocking also occurs when driving on country roads at one speed. One thought immediately arises: the checkpoint is buzzing. What to do? Contact a car service center or look for the cause yourself. A car enthusiast, not a specialist, needs to know a simple truth. At service stations, minor repairs are taken on reluctantly or even refused due to workload. They may, of course, offer to repair the gearbox. Since such repairs will bring financial profit. But the result is the same. The knock under the bottom will remain. Therefore, there is no need to despair. You need to visit a car store and buy the necessary spare parts:
- 2 assembled pillows (choose from the Volzhsky Rubber Plant or Balakovo);
- 2 bolts M12x75; 4 washers dia. 12 mm;
- 2 nuts - 12 mm with nylon insert;
- 2 bolts M10x25; 6 wide washers - 10 mm;
- 2 engraving washers - 10 mm;
- 1 VAZ-2108 timing case bushing.
Note: it is advisable to buy all rubber cushions for repairing VAZ and other car models from these manufacturers, since they use natural rubber in their production. This is not advertising, but years of practice.
- Drive the car into the garage into the inspection pit:
- Connect the lamp with the lantern closed;
- Visually inspect the attachment points of the box cushions. The knock can be produced by the rocker (see Replacing the rocker on a VAZ 2110 on your own), hitting the transverse rod. All due to the fact that the gearbox sagged. The gap from the link to the rod should be more than 5 mm.
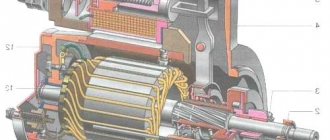
Purpose and principle of operation of the speedometer
The car speed meter kit consists of a speed sensor (DS), connecting wires, a mains fuse and an indicating device.
On the “tens”, a dial speedometer is installed. It is located on the dashboard and is made in a single unit with other instruments and indicators. When the car is moving, the speedometer needle shows the true speed, and the odometer records the distance traveled. Readings are displayed either on the LCD display or on the drum counter. On VAZ-2110 cars of the first production, a mechanical speedometer drive was used, made in the form of a cable in a metal braid with tetrahedrons on both sides. For fastening to the device and the drive device there were special union nuts. The torque from the secondary shaft of the gearbox was transmitted directly to the indicating device via a cable.
The operating principle of the device is based on the Hall effect. The signal from the DS is transmitted to the electronic control unit (ECU) and, converted, enters the input of the speedometer circuit. In addition, it is involved in the ignition system and fuel supply to the injectors. DS is an asynchronous generator excited by permanent magnets. The signal enters the ECU in the form of electrical impulses proportional to the speed of the vehicle. For example, while a car travels a distance of 1 km, about 6 thousand of them enter the control unit.
Repair
Regardless of what exactly you do with the rocker - repair, adjust or change, you will still need to disassemble this unit.
Disassembly is performed as follows.
- Remove the cover from your gear shift knob.
- Place the car on a pit, or raise the front end with a jack.
- Remove the front console. It is held in place by mounting bolts.
- Now remove the curtain itself. To fix it, AvtoVAZ used 6 bolts in the case of the VAZ 2110 model.
- When carrying out dismantling work, be sure to examine the condition of all elements.
- By bending the boot, you will gain access to the support, oil seal and cardan shaft.