March 23, 2016 Lada.Online 27,986 2
It is necessary to remove the steering wheel of a car in various cases, for example, to re-tighten its rim with leather or to dismantle subsequent parts. Removing the steering wheel of Vesta and XRAY is performed in the same way.
Attention!
After removing the steering wheel, there is a chance to get an ESP error, which will force you to calibrate the steering angle sensor. And for this you need diagnostic equipment, at least Scanmatik 2.
Mini life hack according to Lacetti
As you correctly noted, we have only one wire for two contacts, this is done in order to properly distribute the load.
How to remove the steering wheel on a Chevrolet Lacetti? The reseller poorly prepared the car with low mileage. How to Remove...
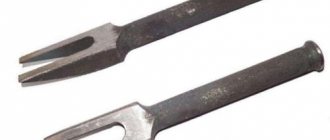
If you cannot remove the steering wheel using the above method, press the wheel towards you with your knees and apply several blows to the end of the shaft with a hammer. Store it with the plastic side facing up.
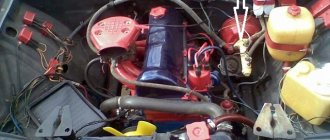
We prepare the car for work, see Separate the wiring harness block and remove the airbag module.
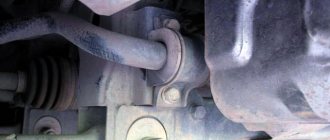
Therefore, some people remove the protective cover completely. But I think this is a wrong decision.
It is better to fill the boot with waterproof lubricant. This, it seems to me, is a better solution to extend the service life of the crosspiece bearings.
To make the steering wheel easier to rotate for a while, just spray the crosspiece with a WD can, or even better, with a silicone lubricant spray. For example, the one I used to treat rubber seals. How can I do this without removing the protective cover?
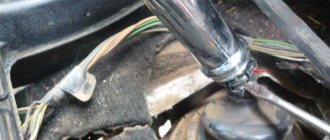
There is a small slot in the cover for condensation drainage, etc. It is located at the bottom and, with the wheels standing level, is not visible.
Steering wheel from Chevrolet Cruze on Lacetti "Gentra"
You need to turn the steering wheel either to the right or to the left and it will be on top. Just insert a tube from a spray can into this slot and spare no expense in spraying lubricant under the cover. After that, turn the steering wheel left and right and let it stand for a while so that the lubricant penetrates where it is needed. As a rule, after this the steering wheel turns without problems.
Step-by-step replacement of the Lacetti steering shaft You need to set the wheels to the position of straight-line movement of the car.
We lower the steering wheel to the lower position. You don’t have to do this, but it’s more convenient.
On some versions of the Lacetti, there is also a plug on the other side, but in this case there are audio system control buttons. We unscrew several screws using a screwdriver, pull out the terminal, and put the remote control aside so as not to lose it.
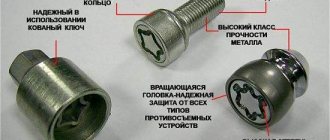
There are bolts deep in the hole that cannot be unscrewed with ordinary tools; this is where the TOREX kit comes to the rescue.
Carefully remove the airbag, having first disconnected the power wire from it, and also put it aside. An awkward movement can cause it to be triggered, and even if you do not get injured, you will have to buy a new pillow, and it costs 23 thousand rubles.
How to Remove Steering Wheel (Chevrolet Lacetti)
We unscrew the steering wheel fastening nut, but not all the way, leaving a few turns so as not to damage the wiring during dismantling. Using a screwdriver, pry up and remove the driver airbag module mounting hole plug. The plug is located on the right side of the steering wheel.
Remove the screws securing the radio control unit located on the left side of the steering wheel. Separate the wiring harness block from the block and remove the radio control unit.
The screws are located one on each side. Install the steering wheel in the reverse order. The steering wheel is mounted on the steering shaft in only one position.
Source: https://iaarus.ru/shevrole/rul-razobrat-na-shevrole-lachetti.html
Preparing for work
When choosing a new steering wheel, approach it responsibly
What needs to be done for the new “steering wheel” to take its rightful place and, most importantly, to perform its functions efficiently?
This requires:
- Directly find and prepare a new steering wheel;
- Preparing the spacer for installation;
- It is advisable to find instructions and a manual for the car;
- Phillips and flathead screwdrivers;
- Socket wrench.
When choosing a new steering wheel, there are certain requirements to consider. It is worth giving preference to factory products or recommended manufacturers. Otherwise, certain malfunctions or problems may occur
Which, ultimately, ends quite disastrously - at best with malfunctions, at worst with accidents.
The instructions and user manual are, of course, optional, but they will help you find the information you need if the need arises. For example, it is often necessary to determine which wires belong to what, or to find some element, etc. In principle, this is a personal matter for everyone, but such technical information will give you confidence and protect you from incorrect installation.
Chevrolet Lacetti Removing the Chevrolet Lacetti steering wheel
Chevrolet Lacetti > Steering > Removing the Chevrolet Lacetti steering wheel
Chevrolet Lacetti Steering wheel removal
The steering wheel is removed for replacement, as well as when dismantling the steering column, instrument panel, steering column switch connector, and driver airbag spiral cable drum device. Set the front wheels to the straight-line position of the vehicle.
Before performing any operations related to the removal of the driver's airbag module, it is necessary to disconnect the wire terminal from the negative terminal of the battery and wait at least one minute before starting the work. This time is necessary for the capacitor of the airbag deployment system to discharge. Otherwise, injury may occur if the airbag deploys unauthorizedly.
On the right side of the steering wheel, use a slotted screwdriver to pry it off and remove the plug that covers the airbag module mounting screw. Similarly, remove the plug on the left side of the steering wheel.
In the event that the control unit for the head unit of the sound reproduction system is located on the left side of the steering wheel...
... use a Phillips screwdriver to unscrew the two screws securing the block.
Disconnect the wiring harness block from the control unit of the head unit of the sound reproduction system and remove the unit.
Torx key TR-50…
...unscrew the screw securing the airbag module. Similarly, unscrew the screw securing the airbag module on the other side of the steering wheel.
We move the airbag module away from the steering wheel...
...and remove the wire block clamp.
Disconnect the wiring harness from the airbag module. Having removed the airbag module, place it with the plastic cover up, away from the place where disassembly work is performed.
Disconnect the horn switch wire terminals.
- Using a 22" socket with an extension, loosen the steering wheel nut and unscrew it a few turns.
- While rocking, pull the steering wheel towards you and remove it from the splines of the steering shaft. Completely unscrew the steering wheel mounting nut and remove it...
...by passing the wire blocks of the airbag module, the sound signal and the control unit of the head unit of the sound reproduction system through the hole in the wheel hub. Install the steering wheel in the reverse order.
- The steering wheel is mounted on the steering shaft in only one position.
- The double spline in the wheel hub hole must match...
...with a double tooth steering shaft. Tighten the steering wheel nut to the prescribed torque (see Appendix).
Removing the steering wheel of a Chevrolet Lacetti
Source: https://www.chevrolet-lacetti.dv13.ru/rulevoe-upravlenie/snyatie-rulevogo-kolesa/
Troubleshooting
The first step is to check whether there is actually a malfunction, and whether some kind of failure has occurred; to do this, the battery terminals are disconnected and reconnected. If after this the problem is not solved, then you need to diagnose the system with special equipment that counts errors, as a result of this you can understand the reason for the glowing indicator and solve the problem. Since the security system is very important in a car, it is better to entrust the solution to this problem to a specialist.
If the Renault Logan airbag cable fails, it must be replaced, for this:
After this, replacement or necessary repair work can be carried out. Everything is reassembled in the reverse order. As you can see, to remove the airbag from the Renault Logan steering wheel and replace the failed part, you just need to follow simple steps. All work can be done independently without the help of specialists. Having eliminated the malfunction, you can continue to enjoy a safe and comfortable trip.
Removing and installing the steering wheel Chevrolet Lacetti 2004 - 2013
This is how he came to me
Try on immediately
Soaked leather on the steering wheel
(the face on the leather blank - where the protrusions on the spokes are not even and longer) and immediately set it clearly in the center of all the spokes, check the inside, where the seam will be, to ensure that it runs evenly along the center of the inner diameter of the steering wheel.
This is very important, because if you don’t do this right away, it will turn out wrong in the end.
Yes, I forgot to mention, for convenience we remove the upper part with the cushion (there are two plastic plugs on the sides of the steering wheel, and under them two star bolts hold the cushion in place), and remove the rear plastic.
Removing the rear plastic
After everything is aligned, we begin sewing from the top of the steering wheel from the middle (12 o'clock). To do this, measure the required length of the thread with which we will make the seam - measure the length of part of the circumference of the steering wheel (from knitting needle to knitting needle) and multiply by three + reserve. Thread a needle and go. The seam chosen, in my opinion, is simple and beautiful - sporty. As soon as we made the first seam in the middle of the steering wheel.
Starting the first stitch
We even the thread in half and start sewing in one direction slowly, sewing a certain distance.
Beginning of seam close-up
Tighten the seam carefully
- Rear view in a tense form (tubercles under the fingers) Yes, I almost forgot the most important thing (how could I?)
- Beer is a must, well, you can’t do without it. So we continue, slowly sewing up to the knitting needles, we reach the turn, tightening the seam, and just lace it to the end without tightening.
- We approach the spoke
We are starting to see the finished result...
- A seam on the steering wheel begins to appear
- In the process - I puff
- Near the spoke - view from the back side
- Gradually tighten the seam with the back of the gypsy needle as it is stitched
This is how it turns out in a tightened state. We continue with the remaining inter-spoke sections in the same way. Closer to the knitting needle, we tighten the seam very carefully and slowly, so that everything turns out as it should and beautifully.
- More clearly visible seams in the knitting needle area
- Tighten the seams near the knitting needles carefully
- Much is sheathed, but not everything - general plan
Steering wheel and airbag tuning
Technical diagram for disassembling parts when installing a sports steering wheel
Another option for mounting the steering wheel is to install a sports steering wheel. It is worth noting that in this case the driver is deprived of an airbag, but this function will be performed by a safety adapter.
Safety adapter and fastenings to it
So, let's look at the process of installing a sports steering wheel on a Lada Granta:
- Since we have everything removed, the first thing we do is install the adapter. We attach it to the steering shaft, but do not fix it.
- We connect the signal wiring to the steering adapter. We insulate the airbag unit wires and leave them inside the adapter.
- We install an adapter on the slots. It will perform functions instead of airbags, since upon impact it is easily deformed and does not injure a person’s chest.
- We screw the tuning steering wheel directly.
- The last step is to check the steering wheel position. We drive forward and backward, if the steering wheel is not level, then remove the adapter and align it.
Thus, you can tune the steering wheel of the Lada Granta. It is worth noting that if a sports steering wheel is installed, then you should definitely use seat belts.
Installed sports steering wheel with adapter for Lada Granta
Chevrolet Lacetti steering wheel
Hello dear friends!
Finally installed a wonderful steering wheel from Cruze. Which I already wrote about here
- Cruze steering wheel
Before this there was an OMP sports steering wheel, you can see the photo here
— OMP steering wheel.
Part 2. The OMR was not a bad steering wheel, I liked it, but somehow it became boring, as they say, the taste and color of the markers are different))
The adapter on which the OMR steering wheel was attached was carefully removed using a puller, it is similar to a bearing puller.
The new steering wheel itself does not fit, it needs to be adjusted to the Lacetti shaft, for this the turner must prepare an adapter
(You can cut it out of the Nexia steering wheel) and use a jack press to stick it into the seat.
First, the outer part of the seat must be thinned by 3 cm
.
Where the black line is drawn, this part also needs to be cut off, this is needed for the train
The new steering wheel is in place, sorry about the quality
The wiring was connected by an electrician, but I couldn’t remember how I connected it because I’m not that good at electrics yet, but I’m learning))
In order for the buttons on the steering wheel to work, I bought a remote control for Alpine, so to speak, this remote control with minimal functions, Forward - Back, Up - Down, Volume, MUTE, SRC. It is assembled by local electricians, and the price is about 20 US dollars.
Connected according to this diagram
The control panel eye was installed near the armrest cover. Conducted a test even when changing gears with the hand and gear knob
does not interfere with the work of the peephole, that is, does not interfere with the beam from the peephole.
- Now the button function looks like this. Some of the designs on the buttons do not correspond to their function and at first it was difficult to get used to, but I’ve already gotten used to it and do everything automatically, it’s very convenient)) For operating the control unit in CD-MP3/USB/iPod mode
- To operate the GU in RADIO mode
- Here is a photo of the result, this is what the Spitfire interior looks like now)) The steering wheel is very comfortable and the materials are pleasant to the touch, the thickness and radius are just right))
Thank you all for your attention! Good luck and even dear! I hope this post is useful to someone and finds the information they need))
Source: https://inter-foto-press.ru/chevrolet/rul-shevrole-lachetti-diametr-kak-snjat.html
Steering wheel and airbag tuning
Technical diagram for disassembling parts when installing a sports steering wheel
Another option for mounting the steering wheel is to install a sports steering wheel. It is worth noting that in this case the driver is deprived of an airbag, but this function will be performed by a safety adapter.
Safety adapter and fastenings to it
So, let's look at the process of installing a sports steering wheel on a Lada Granta:
- Since we have everything removed, the first thing we do is install the adapter. We attach it to the steering shaft, but do not fix it.
- We connect the signal wiring to the steering adapter. We insulate the airbag unit wires and leave them inside the adapter.
- We install an adapter on the slots. It will perform functions instead of airbags, since upon impact it is easily deformed and does not injure a person’s chest.
- We screw the tuning steering wheel directly.
- The last step is to check the steering wheel position. We drive forward and backward, if the steering wheel is not level, then remove the adapter and align it.
Thus, you can tune the steering wheel of the Lada Granta. It is worth noting that if a sports steering wheel is installed, then you should definitely use seat belts.
Installed sports steering wheel with adapter for Lada Granta
Replacing the Lacetti steering shaft
- Lacetti steering wheel sticks
- Step-by-step replacement of the Lacetti steering shaft
In this article we will consider such an issue as replacing the Lacetti steering shaft. Its replacement is necessary if there is such a symptom as the steering wheel sticking.
Failure of the bearings of the intermediate shaft crosses of the Chevrolet Lacetti is not a rare occurrence. This manifests itself in wedging or play when the steering wheel rotates. Extraneous sounds in the steering are also possible.
That is, replacing the Lacetti steering shaft is necessary when the symptoms are as follows: the Lacetti steering wheel sticks, the Lacetti steering wheel does not turn well, there are problems when rotating the Lacetti steering wheel
Lacetti steering wheel sticks
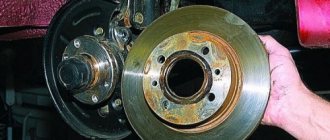
On the intermediate steering shaft there are two crosses with bearings - one in the passenger compartment, and the second in the engine compartment. As a rule, it is the one under the hood that fails due to environmental influences.
Causes of airbag failure
The reason for the failure of the Lada Granta airbags is:
- Triggered due to an accident.
- Closure of the pillow package, which prevented it from opening, or a manufacturing defect.
- Battery failure, which caused the airbags to deploy.
- Wear of the pillow module.
Reasons for failure of the Lada Granta steering wheel:
- Deformation of the structure due to the driver hitting the steering wheel.
- Braid wear and cracks.
- External factors that caused damage to the steering wheel.
All this becomes the reason for the forced replacement of the steering wheel and airbags.
Catalog numbers and steering wheel analogue options
It is generally accepted that only original spare parts for the steering wheel and airbags can be installed on the Lada Granta, but this is a misconception. There are several analogues of these parts, which are known only to tuning masters and some car enthusiasts.
Let's look at the catalog numbers and manufacturers of the Lada Granta steering wheel:
- The original VAZ part has the manufacturer's catalog number - 21910-3402018-00. It fits perfectly and does not require any improvements or modifications.
Factory steering wheel
One of the sports steering wheel options
Catalog numbers and airbag manufacturers
Let's look at the catalog numbers and manufacturers of Lada Granta airbags:
- The original spare part is produced by the VAZ plant. It consists of several elements that include: a gas generator module (21910-8232010-00) and a safety control unit (21900-3824010-00).
Airbag module
Airbag control unit
Thus, you can understand that in addition to standard parts for the steering wheel and airbags of the Lada Grant, there are also analogues that few people know about.
Chevrolet Lacetti steering rack: signs of malfunction, repair, replacement
The control system of many modern cars is based on a combination of MacPherson strut suspension and steering rack.
Both mechanisms were developed back in the late 19th and early 20th centuries (the final version of the suspension was presented in the forties of the 20th century, but it first appeared on drawings in the 1900s). Nowadays this system is very common, but is not used in luxury cars, for example.
But for the production of crossovers and middle-class cars, this scheme is ideal. One of the striking examples is the control system and steering rack of the Chevrolet Lacetti.
Despite the fact that this car is now out of production, it still remains one of the most popular models in its class. Therefore, issues such as Lacetti steering rack repair, the price of this action and its process are quite relevant.
What is a Chevrolet Lacetti steering rack?
This component of the car transmits force from the steering wheel to the steering wheels and ensures a change in the trajectory of the car depending on the movement of the steering wheel. This effect is achieved through the interaction of the following parts:
- rack shaft
- internal and external seals
- distributor
- crankcase
- support sleeve
- retaining ring
It is worth noting that the Lacetti steering rack is one of the model’s weak points, so you need to carefully monitor the condition of the mechanism and repair the car if the slightest sign of malfunction appears.
Signs of a faulty steering rack
What should you pay attention to? Owners of this Chevrolet model most often complain about play in the steering mechanism. The following may also appear on the steering wheel:
- "biting"
- spontaneous rotation of the steering wheel
- its rotation is too tight
- difficult return to zero position
Another proprietary problem is the rapid wear of the mechanical parts of the rack. If this happens, you will hear and feel:
- a dull knock from under the hood on the front left side of the car
- metallic knock echoing throughout the body
- feedback to the steering wheel; When driving on uneven roads, the steering wheel may shake strongly
- sometimes after stopping, oil spots may appear under the front left wheel
The cause of trouble can be all the parts that make up the Lacetti steering rack:
- The distributor housing may wear out. This occurs when the distributor rings rub against the inside of the housing.
- Bushing destruction. As a rule, this spare part wears out after driving on rough roads.
- Destruction of the central tooth of the rack shaft awaits all cars after approximately 150 thousand km. mileage
These are the most typical breakdowns, the likelihood of which cannot be reduced. Thus, driving exclusively on roads where there are no small obstacles is, in principle, impossible in our country. It is also unrealistic to save the central tooth of the rack shaft from inevitable destruction. This part wears out when the car drives in a straight line. And this is exactly the trajectory that the driver adheres to almost all the time.
There are also more rare malfunctions that occur when the car is used carelessly. For example, corrosion of the rack shaft occurs if water gets inside the car. Or if poor quality repairs were made.
Instructions for removing the steering wheel from the Lada Granta
- The first step is to disconnect the negative terminal from the battery. After this, you must wait at least ten minutes until the airbag activator capacitor is completely discharged.
Note: you must wait at least 10 minutes, otherwise there is a chance of getting hit in the forehead after it is triggered.
- The second step is to disconnect the pillow by unclipping the two clips on the spring clips that hold it in place. To compress them, there are two holes on the steering wheel on both sides (if the steering wheel is removed for the first time, they will be “closed” with some kind of plugs).
- Next, if there are any, they must be carefully pierced, for example, with a Phillips screwdriver.
- Then, again, you need to insert a flat-head screwdriver into the hole in the seal and feel for the spring-loaded stop.
- Afterwards, you need to squeeze the latch with one hand, and with the other, pull the airbag towards you from the side until you hear a click. Now the screwdriver can be released, and if the pillow does not return to its original position, then the latch has become unfastened.
- Now, in the same way, you need to pull it out from the other side, while supporting the opposite disconnected side so that it does not snap into place again.
- Next, remove the additional cushion fasteners located below. They hold tightly enough, so you can remove them only by firmly grasping the pillow and pulling it towards you from below.
Note: the airbag wire on the Granta is short, and if you pull too hard, it will stretch and break, which will damage the airbag connector. And this is a very delicate part that can shatter into small pieces from any wrong movement. Inside the AirBag (airbag), in addition to the terminals, there is also a throttle. It is not possible to buy it separately, only with a block of steering column switches. Therefore, calculate your strength correctly and do not rush anywhere to avoid unnecessary problems.
- Once the airbag is detached from its mountings, it can be moved away from the steering wheel.
- Next, you need to unfasten the 2 wires of the sound signal, after which, using a knife or a flat-head screwdriver, pry up the small retainer (yellow), which is located on the orange connector of the pillow, after which it will “move” a little forward.
- Now the connector is removed and the pillow is set aside.
- It is also necessary to remember the correct position of the steering wheel when reinstalling it. To do this, use a marker or colored pencil to make a mark on the shaft directly opposite the arrow.
Further, all actions must be performed clearly and strictly sequentially, so as not to damage the latch of the steering column switch block or the block itself.
- Using a 24 mm wrench you need to loosen the steering wheel nut, but you don’t need to unscrew it completely, let it remain screwed in with a few screws.
- Next, you need to disconnect the steering wheel by pulling it towards you. At the same time, it should rest against the nut.
- Now you need to align the Granta's wheels and set the steering wheel straight.
- Then you should remove the latch from the special recess and, aligning the marks, insert it into the block of steering column switches.
- Only after the steering wheel is accurately fixed can you unscrew the nut completely.
Note: you must be careful not to move the steering wheel with the red lock, in which case it will turn it out with the roots of the steering column switch block.
- Next, the steering wheel is removed, while passing the wiring through the gap.
Assembly is carried out in the reverse order, observing the sequence.
That's all! As you have seen for yourself, there is nothing difficult to remove the steering wheel from a Lada Granta car with your own hands.
We hope that our article was useful to you!
Installation of a sports steering wheel without an adapter on a VAZ 2104-07
If you are not too concerned about the steering column trim in the cabin, then a tuning product from the Sparco brand, equipped with a quick-release device, can be put in “four” without using an adapter. The essence of the method is to use as the last part the central part of the standard steering wheel with a wide platform and slots, and simply cut off the rest. To work you will need:
- electric drill with a 6.5 mm drill bit;
- long M6 bolts – 6 pcs.;
- hammer and core;
- grinder with a circle on iron;
- hex wrench to suit the size of the bolts;
- caliper, ruler.
The flange of the quick-release mechanism fits well on the central part of the standard steering wheel
The first step is to cut out the central part of the standard steering wheel with a grinder and carefully process the edges. Then the order is as follows:
- Having taken the dimensions from the quick-release mechanism, where there are 6 holes for fastening, mark the cut part for them. The central holes of both parts must match.
- Trim the ends of the cut element so that they do not interfere with the tight fit of the new steering wheel.
- Drill holes, having previously marked them with a core.
- Bolt the resulting part to the sports steering wheel mechanism.
Holes are drilled on the old steering wheel for a new flange
As a result, the splined part of the old steering wheel will serve as a mount for the new one. Then install and configure it as usual.
Sparco sports steering wheel with the core from the factory steering wheel
Operating principle
AirBag is made from fabric with nylon elements. Due to special holes through which gas escapes, it is possible to soften the product, thereby reducing the likelihood of injury. A gas generator is attached to each instance, then the product is neatly folded and placed in small holes in different zoned areas of the car. When it comes to steering wheels, the gas generator is equipped with a rubber ring to ensure an optimal level of balancing.
The gas generator, by the way, fills the pillows with gas and implements prompt release. It is considered the most complex in technical and structural terms. AirBags inflate at extremely high speeds, and their ejection speed is three times faster than the blinking speed of the human eye. As for the operating principle, they deploy at the moment of collision if the vehicle speed exceeds 20 km/h.
The operating principle of an airbag consists of the following stages:
- On different sides of the machine there are special sensors that react to a given critical moment.
- The information is sent to the computer, which processes the data. The circumstances for this are more than specific - overcoming a high obstacle in the form of a curb, a hard landing or a head-on collision.
- From the ECU the signal goes to the gas generator and the pyrotechnic charge is activated.
- After combustion of the squib, nitrogen is released in excess, since the gas generator has sodium acid. It is nitrogen that opens the pillows.
We recommend: Installing and connecting a rear view camera on a Renault Duster with your own hands
How to remove the steering wheel on a VAZ-2104-2107
Many car owners of the wonderful classic VAZ-2107, especially those who like to upgrade their cars, do not like the design of the steering wheel due to its large size.
Due to the fact that the steering column on this car is not height adjustable, the large diameter of the steering wheel makes it difficult to sit comfortably in the seat. Surely tall drivers have encountered this problem.
Therefore, replacing the “original” steering wheel, which is more similar to the steering wheel of a steamship, with a smaller steering wheel with a “sporty” design helps solve this problem.
To replace this vehicle control, you must remove the factory one, and you may also need to remove the steering wheel if the sound signal does not work.
To remove the steering wheel you will need the following tool:
- flat screwdriver;
- 24mm head with wrench and extension.
This must be done in the following sequence:
- We disconnect the negative terminal of the battery just in case.
- Carefully, using a screwdriver (preferably the screwdriver slot is small), pry up the “Lada” badge in the middle of the steering wheel, which is a plug, and pull it out. As a result, we see a 24 nut inside.
- We put the steering wheel in a position so that the wheels “look” straight.
- We take the head of the required size, insert it into the extension, and then put it on the nut. We insert the crank into the extension, rest our knees on the steering wheel so that it does not turn when unscrewing the nut, and with a sharp movement of the crank counterclockwise we try to twist the nut. I don’t recommend unscrewing the nut completely, because... The steering wheel sits firmly on the shaft and, if removed abruptly, can hit you in the chest painfully.
- Then we take the steering wheel in both hands and rock it, from side to side, pulling it up. Moreover, it is desirable that the range of movements be frequent. When our steering wheel hits the nut, unscrew it completely and completely remove the steering wheel from the shaft.