Stickers on a car windshield allow the driver to identify his personal vehicle. The stickers are durable and weatherproof. They will help hide the cracks, and if desired, you can remove them without effort.
Drawings are used for different purposes:
- Hide the defect. Such stickers do not carry any meaning. The inscriptions “You can’t overtake”, “I have nothing to lose”, “I’m not drunk - I drive around pits” are pasted on for fun or to hide a visible flaw - a scratch, crease, chip, crack.
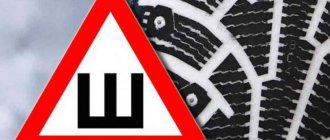
- Submit information. The drawings warn about the presence of a child in the car, a woman driving, etc. The “Spikes” badge is required and must be installed in the upper left corner of the rear window.
- Replacement of airbrushing. Stickers are inexpensive, while a professionally made drawing will cost the car enthusiast a pretty penny. If necessary, the sticker can be removed or replaced with another image. Airbrushing can only be painted over.
- Advertising. Helps the car owner promote his business. Advertising with a phone number increases the chances of finding new customers. Large companies offer drivers to place information about their company in the form of a sticker on the rear window. In exchange, drivers receive a reward.
Stickers as a way of advertising
One of the ways of marketing has become advertising stickers of various subjects. This could be company logos, contact information, a brief description of the service, or part of an advertising slogan. The more impressive the image on the glass, the greater the chances of attracting new customers and increasing income. Luminous images are becoming increasingly popular. The drawings are visible in the dark, which attracts the attention of passers-by and drivers. This is often used by taxis and delivery services.
Informativeness and originality
Stickers can carry useful information, for example, informing that there is an inexperienced car owner, a child, a car is for sale, or the driver is driving on studded tires - these are examples of the use of informative stickers.
Manufacturing materials
Stickers are made from various materials. Let's list all possible options, starting with the most popular:
- Vinyl film. An acceptable option that is resistant to changes in climatic conditions. Retains ideal shape from 2 to 10 years, which depends on the thickness of the film and its quality. With the help of a vinyl sticker it is easy to remove a visible defect.
- Fluorescent film. It has a special brightness. Valued by drivers who often drive in the dark. The service life is no more than 1 year. Later the film begins to fade.
- PVC film with reflective microspheres included. Able to reflect light from a source, it is visible in the dark, withstands scratches and lasts up to 3 years. In brightness it is inferior to fluorescent film.
- Tinting film. Most drivers prefer film that protects from sunlight. Tinting helps protect the driver from the sun and the interior from fading.
The process of applying stickers to the windshield
The easiest way is to attach a vinyl sticker to the glass. But when working with any of them, you need to carry out preliminary preparation of the glass. Firstly, it should be washed thoroughly, and secondly, wiped dry. To clean the surface, it is recommended to use auto chemical products specially designed for this purpose.
Then they look for the optimal location of the sticker and measure the distance from its ends to the edges of the windshield using a tape measure. Next, take masking tape and fix the sticker on four sides in the right place. Now you need to carefully expose one of the sides of the sticker, freeing it from the bottom protective one. After one part of the image is attached, it is smoothed with a rubber spatula or a dry rag towards the center. Gradually remove the remaining protective film and at the same time press the sticker to the glass with a spatula, squeezing the air out from under it.
When the image is completely fixed on the windshield, carefully iron it again with a rag and remove the top protective film. Installation of luminous stickers is more complicated, since it involves the output of wires. But if everything is done in accordance with the manufacturer’s instructions, then there will be no difficulties in the work.
OPTIONS FOR ATTACHING A VINYL STICKER TO A CAR
There are 2 methods of gluing: dry and wet!
DRY method.
We clean the surface to be pasted (glass or car body) from dust, grease and dirt. This can be done with an alcohol solution (not on car enamel), preferably white spirit or a cleaning agent. We take the sticker and bend the corner of the backing and, bending it strongly in the opposite direction, remove it from the sticker. Then we carefully glue one edge, smoothing it with our fingers, a clean rag or a thin piece of felt, expelling the air, and gradually glue the rest of it. We hold the free edge with our hand until the last centimeter. If a few bubbles still remain, you can get rid of them by gently heating them with a hairdryer, piercing them with a needle, releasing the air and pressing them against the car.
WET method.
1. Place the sticker in the right place, see how it should be positioned, how close to the edges of the surface. We decided on the exact location. You can even use a pencil to mark the location of the corners of the sticker or make an exact horizontal line. It's good if you have an extra pair of hands to help - it never hurts, especially when working with a large sticker. In winter, we stick only in a warm garage at home, at a friend’s place, or in a shopping center parking lot at a temperature not lower than +8. If it’s outside, in windless weather or in the garage, any speck of dust or hair under the sticker can ruin everything.
2. First of all, it is necessary to clean the surface to be pasted (glass or car body) from dust, grease and dirt. This can be done with an alcohol solution (not on car enamel), preferably white spirit or a cleaning agent. 3. Remove the sticker, separating the bottom protective paper layer from the image - you will be left with the sticker itself (while trying to take it away from the edges). 4. Pre-treat the entire surface, in the places where the sticker is glued to the car, and the sticker itself (from the adhesive side) with water and a light soap solution from a 1:10 sprayer of “FERY” type detergent. This will allow, after you attach the sticker to the car, to move it a little, adjusting the position and easily expel all air bubbles from under the film. Don't be afraid - water is not a hindrance to the glue, especially since you will then drive it out from under the sticker. 5. Having attached the sticker to the car, roll it evenly with a rubber squeegee (if you don’t have one, then a rubber spatula or a wooden ruler with sharpened edges will do, so as not to scratch the image). Start from the middle, pushing out the remaining soap solution and bubbles to the edges. If a few bubbles still remain, you can get rid of them by heating them with a hairdryer, piercing them with a needle and pressing them against the car. Small bubbles will disappear on their own after drying out within a week, unless it’s winter outside, of course. Then smooth it out again with a cloth and wipe dry. !!! ATTENTION!!!
When the ambient temperature is less than +8 degrees, the use of a hair dryer is highly recommended, but do not overdo it, otherwise the sticker will simply melt!!!
You cannot glue stickers at air temperatures below +2 degrees!!!
6. Now you need to leave the sticker alone for a day so that everything “sets.” After a day, inspect the entire surface of the sticker and, if necessary, go over it again with a felt squeegee or cloth and press the loose edges if necessary. We do not recommend washing the car, or rather the area around the sticker, or even the sticker itself, for a week!!!
Stickers on transparent film are also applied, only from the inside of the car, which ensures greater safety, but given the transparency of the paints, such stickers are less noticeable.
How to wash already pasted stickers?
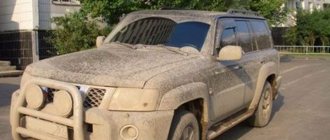
During the operation of the car, the stickers on it become dirty, especially for jeepers after driving. It is necessary to wash off the dirt only after preliminary moistening with water, waiting for the plaque to soften. Water the sticker with plenty of water and carefully wash off the dirt with a damp cloth
(from the center outwards, but not vice versa!!!).
Removing dirt with a dry cloth is PROHIBITED - you can damage or scratch the paint layer on the sticker!
How to remove a sticker from the body surface?
We decided to change the sticker or it has become frayed over time. There is nothing complicated - we pre-heat it with a hairdryer and remove the sticker at an acute angle. “Today there are different methods of tuning a car, but most of the options require serious financial investments.
Let's take a closer look at external car tuning using car stickers!
Stickers are one of the easiest and most inexpensive ways to add some zest to your car, attract attention, and inform others about the special status of the car.
Depending on the purpose, the following types of stickers are distinguished:
- Graphic car stickers - a variety of graphic designs and collages give freedom to self-expression and more subtly emphasize the inner world of the car owner.
- Advertising – contain information of an advertising nature, for example, about the sale or purchase of goods with contact information.
- Informational – these include stickers of taxi services, driving schools, and government agencies.
- Signs - they are glued, for example, by novice drivers or parents carrying a baby in the cabin.
- Humorous - you've probably met car enthusiasts on the roads whose cars have inscriptions like “I often confuse the pedals” or “First day behind the wheel.”
Films (glossy and matte) are also divided into:
- special high-quality (intended only for application to glass),
- reflective (visible at night),
- light-accumulating (accumulate the energy of sunlight during the day and release it at night in the form of a beautiful glow).
Pasting methods
If the car owner does not know how to stick a sticker on the glass, then the following recommendations will help:
- First choose the side of the glass. It is better to fix the darkening film from the inside - it will not last long if it is exposed to precipitation. Stickers are glued on the outside.
- Clean the glass using professional auto chemicals. Wait until the surface is completely dry. The recommendations on the packaging are taken into account, which tell you how to apply the sticker to the car glass.
- If there are no instructions, then arrange the drawing according to your own understanding and fix it with masking tape.
- Peel off the tape, remove part of the protective film from the design, then cut off the edge and glue the sticker from the middle to the edge. The resulting bubbles and creases are removed by hand or with a blunt spatula.
- Remove the remaining tape and add part of the design.
If the technology is followed exactly, the image will last for years. When installing luminous film, it is advisable to seek the help of a specialist.
How to put a sticker on a car
Depending on the material of the sticker, its size, and where you plan to stick it, the methods for this process may vary. There are so-called “dry” and “wet” pasting methods.
. Let's start with the last one. If you plan to glue vinyl film over a large area, then for this you will need the following materials:
- sticker directly;
- detergents for car surfaces (car shampoos or similar compounds);
- soap solution;
- stationery knife or scalpel;
- plastic spatula;
- needle;
- degreaser (alcohol or vodka is best; it is better not to use solvents, as they can damage the car’s paintwork);
- construction or household hair dryer (preferably a construction hair dryer).
Using soap solution and hair dryer
It is worth paying attention to the environment in which the work is carried out. The room temperature should not be lower than +10°C, the air should be dust-free, and there should be no drafts. The further operation takes place in several stages. The first of them involves surface preparation, the second - fitting, the third - application, the fourth is the gluing itself and the elimination of defects. All work is performed according to the following algorithm:
- The surface to be pasted must be thoroughly washed, grains of dirt, grains of sand and other debris must be removed. Any, even the smallest particle that gets under the sticker will be visible, which will spoil the appearance of the surface.
- Try the sticker on the surface. If its canvas is large, then it makes sense to glue it in parts. In this case, decide into which parts you need to divide it. In this case, it is necessary to proceed from the considerations that it is necessary to glue first of all smooth surfaces, and then convex ones. After this, the joints between them should be processed.
- Separate the paper base from the sticker.
- Apply a soap solution to the adhesive surface of the sticker, as well as to the surface of the car where you plan to stick it.
- Carefully apply the sticker to the surface. A soap solution will help you level it if you were unable to glue it evenly the first time.
- Using a rubber spatula, gently smooth it out, starting from the center and working out to the edges.
- Remove the top protective film from the surface without damaging the car sticker or tearing the adhesive layer off the main surface.
- If an air bubble has formed under the sticker, you must carefully pierce it with a needle so that the air comes out.
- If the film is glued to the door joints, it must be cut with a utility knife.
- The final stage consists of heating the surface with a construction hairdryer to a temperature of +60...70°C. This is necessary so that the sticker becomes soft and it is easy to bend it at the joints.
Don't go overboard with the temperature. Otherwise, the sticker may simply melt.
The first few days (up to about 10) after gluing it is not advisable to wash the car
. It will take some time for the glue to dry completely.
- directly the sticker that you plan to stick;
- glass cleaner and rags;
- mounting tape;
- ruler or tape measure;
- scissors;
- rubber spatula, plastic card or other object with a smooth edge (optional).
The work is carried out according to the following algorithm:
“Dry” gluing method
- The first step is to thoroughly wash the surface of the glass where you plan to place the sticker and remove particles of debris and sand.
- Next, place the sticker in the planned location and secure it at the top corners using mounting tape.
- Using a ruler or tape measure, align the sticker and check for symmetry. If necessary, move the sticker and re-tape it at the corners.
- Attach a strip of mounting tape in the middle of the sticker vertically. Remove the tape from the upper left corner of the sticker.
- Lift the left half of the sticker and peel off the backing (down to the mounting tape). When doing this, make sure that the mounting film is aligned with the pattern.
- Cut off the separated piece of backing and set aside.
- Using a spatula or card, begin carefully applying the decal, moving from the center to the edges. Be careful not to create air bubbles.
- When half of the sticker is pasted, remove the mounting tape from the middle and right corner of the sticker.
- Remove remaining backing. When doing this, make sure that the mounting film is aligned with the pattern.
- Glue the right side of the sticker in the same way. Proceed carefully and carefully. Make sure there are no air bubbles.
- When the entire sticker is installed, remove the mounting film from it. It's best to do this at an angle.
Stickers on the side of the car are installed in the same way. The main thing is to always act carefully and not rush. However, car owners often wonder not only about applying, but also about removing the sticker from the surface of the car, as well as any adhesive residue from it.
Is a fine possible?
When stickers on a car block the view, the driver will be fined. Violation of technical regulations and the collection of traffic rules is punishable by administrative measures. A traffic police officer can issue a warning if the driver does not immediately get rid of the sticker on the car glass, but the police officer has the right to choose a different preventive measure. The minimum fine for a windshield sticker is 500 rubles, the maximum penalty is confiscation of license plates until the driver removes the stickers on the car.
How to remove a sticker from a car
Using a hair dryer to remove the sticker
Let us examine in detail how to remove a sticker from the glass of a car or its body. First of all, you need to know that there are different types of stickers, but the most popular among motorists are vinyl ones.
We need to start the story with the features of vinyl stickers. The fact is that they are produced on the basis of vinyl (a chemical compound that is resistant to moisture, temperature changes, and so on), which has excellent performance properties, durability, strength, and resistance to external influences. The stickers are produced as disposable ones, and their adhesive is designed to last for 2…3 years. After this, it polymerizes, and the sticker itself shrinks. In addition, its surface is often covered with cracks, and when you try to tear it off, it breaks off in small pieces.
Another common type of stickers is paper-based. They are cheaper, but are not resistant to moisture and temperature changes. However, they are often used for gluing on the inside of glass.
If your car has a dark tint, and the sticker has been used on it for a long time, then there is a high probability that after removal, the tint in its place will be darker than on the rest of the surface.
A popular way to remove a sticker from a car body is to heat it with a hair dryer.
. At high temperatures, the material becomes soft, and if it is not very cracked, then there is a high probability that it can be removed in one piece. The metal must be heated evenly. As it cools, it is necessary to periodically maintain the temperature. Remember that the higher the temperature of the metal, the less likely it is that glue residue will remain on the surface. However, do not overdo it, otherwise you may damage the car's paintwork.
How to apply a sticker to a car - step-by-step instructions
For self-gluing you will need the following tools:
- glass cleaner, as well as a special product if there are bitumen stains on the car,
- a clean synthetic suede cloth,
- mounting tape,
- ruler or tape measure,
- squeegee or plastic card,
- scissors,
- It is advisable to take a friend to help.
The temperature indoors or outdoors should not be lower than +10C. It is not advisable to carry out work in rainy, humid weather.
Operating procedure:
1.Spray glass cleaner on the glass and wipe dry with a rag.
If the situation is satisfactory, apply a couple more strips of the fastening film. Instead of mounting film, you can use regular mounting tape. To make it easier to glue the car sticker, it is better to place the fasteners on the side of the central axis. This will allow you to apply one half of the sticker first, and then the second without creases.
3. Unfasten the fastener on one side and begin to remove the backing from the sticker
. We bend the edge of the backing and begin to carefully remove it. We do this until the middle of the sticker.
4.Glue half of the sticker and iron it with a plastic card, moving from the center to the edge. If “bubbles” appear, the unsmoothed part can be peeled off and corrected.
5.Remove the fastening tape, since the sticker is already securely fixed.
6.Remove the paper backing from the second half of the sticker.
7.Glue the second half to the glass and iron it again with a plastic card.
8. Peel off the transparent layer and slowly pull it along the surface. We make sure that all the elements of our drawing remain on the glass.
At the end of the work, we stroke the surface with a plastic card a couple more times.
VIDEO INSTRUCTION
- Rectangular and elongated stickers are easier to start gluing on the narrowest side.
- Do not wash glass with a high pressure washer for 2 weeks. This is necessary so that the adhesive layer has time to completely polymerize.
- On the first day, avoid driving fast - there is a high risk that the work will have to be done all over again.
- If you decide to remove the sticker, heat it with a hairdryer (you can use a regular one, but an industrial one is better), and then it will come off easier. The remaining adhesive after removal can be removed with solvent and a rag.
- On dark-colored cars, the outline of the sticker will remain visible, as the paint will fade a little during this time. To prevent this from happening, change the location of the sticker every six months.
- Expect the average lifespan of the film to be about 2 years.
A product such as a vinyl sticker can be applied to a car quite easily. Therefore, the surface gluing procedure is accessible to both experienced car service technicians and beginners. This product has become widespread among motorists due to its affordability and properties.
Vinyl is a flexible and elastic material that can be easily printed using full-color printing. It also prevents the formation of scratches, thereby protecting the car's paintwork.
Auto sticker
The film selection process includes:
- choice of color, texture of the sticker. Variations are possible here: glossy or matte models, as well as black, blue, red or white films;
- selection of product quantity. This can be done based on the surface area to which the coating needs to be glued. Covering is sold in linear metres. This means that even if you need to buy several centimeters of film, you will have to purchase 1 linear meter.
Car sticker
DIY car stickers consist of the following components:
- mounting coating for transfer to the surface;
- products directly;
- white paper base.
In order to successfully complete the job of gluing vinyl film, you will need:
- the surface of the car, which has been previously washed and cleaned;
- a dry cloth to level the surface and remove excess moisture;
- a stationery knife for trimming excess stickers;
- squeegee made of rubber, plastic or felt. It is designed to level the surface and remove air bubbles from there;
- soap solution (if you are gluing wet);
- a household or construction hair dryer for heating the workpiece and giving it elasticity.
Vinyl Application Tools