Removing and installing components of the Opel Astra B window washer system
- Repair manuals
- Repair manual for Opel Astra 1998-2004.
- Removing and installing windshield washer system components
Removing and installing windshield washer system components
Washer fluid reservoir
Washer fluid pump
| EXECUTION ORDER |
Nozzles for supplying washer fluid to the windshield
| EXECUTION ORDER |
Nozzle for supplying washer fluid to the rear window
| EXECUTION ORDER |
| EXECUTION ORDER | |
| |
Nozzles for supplying washer fluid to headlight lenses
| EXECUTION ORDER |
↓ Comments ↓1. Introduction 1.0 Introduction 1.1 Opel Astra and Zafira cars - abstract 1.2 Vehicle identification numbers 1.3 Purchasing spare parts 1.4 Maintenance technology, tools and workplace equipment 1.5 Jacking and towing 1.6 Starting the engine from an auxiliary power source 1.7 Checking the vehicle’s readiness for operation 1.8 Automotive chemicals, oils and lubrication 1.9 Troubleshooting 2.Operation manual 2.0 Operating manual 2.1 Instrument panel 2.2 Information display 2.3 Additional electronic devices 2.4 Access, security 2.5 Interior lighting 2.6 Elements of vehicle safety systems 2.7 Interior equipment 2.8 Comfort 2.9 Operating techniques 3. Routine maintenance 3.0 Routine maintenance 3.1 Routine maintenance schedule 3.2 Specifications 3.3 General information about settings and adjustments 3.4 Checking fluid levels 3.5 Checking the condition of tires and their inflation pressure, rotating the wheels 3.6 Replacing the engine oil and oil filter 3.7 Checking the condition and replacing the accessory drive belt 3.8 Removing sludge from a diesel engine fuel filter 3.9 Checking the condition and replacing the hoses located in the engine compartment 3.10 Checking the condition of the cooling system components 3.11 Checking, maintaining and charging the battery 3.12 Checking the condition and replacing windshield wiper blades 3.13 Inspecting the suspension and steering components, checking the condition of the protective covers of the drive shafts 3.14 Verification of the brake system 3.15 Verification of electrical equipment 3.16 Monitoring the state of the anti -corrosion coating of the body and bottom of the car 3.1 models produced up to 09.2000 3.22 Checking the idle speed and exhaust gas composition 3.23 Replacing the air cleaner filter element - all gasoline models and diesels produced from 10.2000 3.24 Replacing the fuel filter - diesel models produced from 10.2000 3.25 Replacing spark plugs, checking the condition of the explosive wiring 3.26 Replacing the fuel filter - petrol models 4. Engine 4.0 Engine 4.1 Specifications 4.2 Checking the compression pressure in the cylinders 4.3 Diagnostics of the engine condition using a vacuum gauge 4.4. Procedures for repairing SOHC gasoline engines without removing them from the car 4.5. Procedures for repairing DOHC gasoline engines without removing them from the car 4.6. Repair procedures for 1.7 l and 2.0 l diesel engines without removing them from the car 4.7. General and major engine repairs 5. Cooling and heating systems 5.0 Cooling and heating systems 5.1 Specifications 5.2 Antifreeze - general information 5.3. Engine cooling system 5.4. Ventilation, interior heating and air conditioning systems 6. Power and exhaust systems 6.0 Power supply and exhaust systems 6.1. Power supply system 6.2. Fuel injection system for gasoline engines 6.3. Diesel engine injection and turbocharging systems 6.4. Exhaust and emissions systems 7. Engine electrical equipment 7.0 Engine electrical equipment 7.1 Specifications 7.2. Electronic ignition (and injection) control system for gasoline engines 7.3. Diesel engine fuel preheating and heating systems 7.4. Charging and starting systems 8. Manual transmission 8.0 Manual gearbox 8.1 Specifications 8.2 Adjusting the gear shift drive 8.3 Removing and installing the gear shift mechanism 8.4 Replacing oil seals 8.5 Checking the proper functioning, removing and installing the reverse light switch sensor 8.6 Removing and installing the speed sensor (VSS) 8.7 Replacing transmission oil 8.8 Removal and installation of manual transmission 8.9 Repair of manual transmission - general information 9. Automatic transmission 9.0 Automatic transmission 9.1 Specifications 9.2 Adjusting the gear selection mechanism 9.3 Removing and installing the gear selection cable 9.4 Removing and installing the AT selector lever assembly 9.5 Replacing oil seals 9.6 ATF cooler - general information 9.7 Removing and installing electrical components of the AT control system 9.8 Removing and installing AT 9.9 Major AT repair - general information 10. Clutch and drive shafts 10.0 Clutch and drive shafts 10.1 Specifications 10.2. Clutch 10.3. Drive shafts 11. Brake system 11.0 Brake system 11.1 Specifications 11.2 Anti-lock brake system (ABS) and traction control system (TCS) - general information and fault codes 11.3 Bleeding the brake system 11.4 Checking the condition and replacing brake lines and hoses 11.5 Replacing front wheel disc brake pads 11.6 Replacing disc brake pads mechanisms of the rear wheels 11.7 Replacing the shoes of the drum brake mechanisms of the rear wheels 11.8 Checking the condition, removing and installing the brake disc 11.9 Removing, checking the condition and installing the brake drum 11.10 Removing, repairing and installing the calipers of the disc brake mechanisms of the front wheels 11.11 Removing, repairing and installing the calipers disc brake mechanisms of the rear wheels 11.12 Removal, maintenance and installation of wheel cylinders of drum brake mechanisms of the rear wheels 11.13 Removal and installation of the main brake cylinder 11.14 Removal and installation of the foot brake pedal 11.15 Checking the proper functioning/tightness, removing and installing the vacuum brake booster assembly 11.16 Removal, inspection proper functioning and installation of the check valve of the vacuum brake booster 11.17 Removing and installing the vacuum pump of the brake booster servo drive (diesel models) 11.18 Checking the proper functioning of the vacuum pump of the brake booster servo drive (diesel models) 11.19 Adjusting the parking brake drive 11.20 Removing and installing the parking brake lever 11.21 Removing and installing installation of parking brake drive cables 11.22 Removing, installing and adjusting the brake light sensor-switch 11.23 Removing and installing the parking brake warning lamp sensor-switch 11.24 Removing and installing ABS and TCS components 11.25 Removing, installing and adjusting the pressure regulator valve in the hydraulic circuits rear wheel brakes 12. Suspension and steering 12.0 Suspension and steering 12.1 Specifications 12.2 Removing and installing the steering knuckle 12.3 Checking the condition and replacing the hub assembly 12.4 Removing and installing the front subframe 12.5 Removing, repairing and installing the front suspension strut 12.6 Removing and installing the front stabilizer bar 12.7 Removing, repairing and installing the lower arm of the front suspension 12.8 Replacing the lower ball joint 12.9 Removing and installing the rear hub assembly 12.10 Checking the condition and replacing the rear wheel bearings 12.11 Removing, checking the condition and installing the rear shock absorber 12.12 Removing and installing the rear suspension coil springs 12.13 Removing and installing the rear suspension torsion beam 12.14 Replacing the rubber-metal hinges of the trailing arms of the torsion beam 12.15 Rear axle ride height adjustment system - general information and adjustment 12.16 Removing and installing the air valve and rear axle ride height control line (Universal models) 12.17 Removing and installing the steering wheel 12.18 Removing and installing the steering column 12.19 Removing, checking the condition and installing the intermediate shaft of the steering column 12.20 Replacing the protective covers of the steering gear housing 12.21 Removing and installing the steering gear 12.22 Removing and installing the steering pump 12.23 Removing air from the power steering hydraulic path 12.24 Removing and installing tie rod ends 12.25 Removing and installing steering rod 12.26 Wheel alignment angles 13. Body 13.0 Body 13.1 Specifications 13.2 Caring for Body and Underbody Components 13.3 Caring for Vinyl Trim 13.4 Caring for Upholstery and Carpeting 13.5 Repairing Minor Damaged Body Panels 13.6 Repairing Severely Damaged Body Panels 13.7 Maintaining Vehicle Hinges and Locks 13.8 Replacing Windshields and Other Fixed Parts windows 13.9 Removing and installing bumpers 13.10 Removing and installing front fenders 13.11 Removing and installing a decorative radiator grille 13.12 Removing, installing and adjusting the hood 13.13 Removing and installing hood hinges 13.14 Removing and installing hood lock components 13.15 Removing and installing the hood latch release cable 13.16 Removing, installing and adjusting doors 13.17 Removing and installing the inner door handle 13.18 Removing and installing the outer door handle 13.19 Removing and installing door locks 13.20 Removing and installing front door lock cylinders 13.21 Removing and installing the door lock striker 13.22 Removing and installing door glass 13.23 Removing and installing installing the window regulator 13.24 Removing and installing the trunk lid (Sedan models) 13.25 Removing and installing the trunk lid hinges 13.26 Removing and installing the trunk lid components 13.27 Removing and installing the tailgate (Hatchback and Station Wagon models) 13.28 Removing and installing the tailgate hinges 13.29 Removal and installation of tailgate components 13.30 Removal and installation of single lock components 13.31 Removal and installation of electric window drive components (if the vehicle is equipped accordingly) 13.32 Removal and installation of door rear view mirrors 13.33 Removal and installation of rear view door mirror glass 13.34 Removal and installation of electric mirror components rear view 13.35 Removing and installing the internal rear view mirror 13.36 Removing and installing elements of the windshield fairing panel 13.37 Removing and installing the top hatch glass 13.38 Removing and installing the top hatch components 13.39 Removing and installing wheel arch protection lockers - general information 13.40 Removing and installing the hatch door fuel tank filler neck 13.41 Removal and installation of body trim elements 13.42 Removal and installation of front seats 13.43 Removal and installation of rear seats 13.44 Removal and installation of emergency seat belt tensioner modules for the front seats 13.45 Removal and installation of seat belts 13.46 Removal and installation of upper adjustable seat belt anchor units 13.47 Removing and installing interior trim panels 13.48 Removing and installing the center console 13.49 Removing and installing the glove box 13.50 Removing and installing the instrument panel 14. On-board electrical equipment 14.0 On-board electrical equipment 14.1 Specifications 14.2 Finding the causes of electrical equipment failures 14.3 Fuses - general information 14.4 Relays - general information and checking proper functioning 14.5 Removing and installing switches 14.6 Replacing lamps of external lighting and signaling devices 14.7 Replacing lamps of internal lighting devices 14.8 Removing and installing external lighting/signaling devices signaling devices 14.9 Adjusting the direction of the optical axes of the headlights 14.10 Removing and installing the instrument cluster 14.11 Removing and installing instrument panel components 14.12 Removing and installing the cigarette lighter 14.13 Removing and installing horns 14.14 Removing and installing windshield wiper arms (leads) 14.15 Removing and installing windshield wiper drive elements 14.16 Removal and installation of components of the glass washer system 14.17 Checking the proper functioning and repair of the rear window heater 14.18 Removing and installing the audio system/navigation unit 14.19 Removing and installing remote control elements for the operation of the audio system 14.20 Removing and installing loudspeakers 14.21 Removing and installing the radio antenna 14.22 Anti-theft system and immobilization system engine - general information 14.23 Vehicle speed sensor (VSS) - general information 14.24 Supplemental safety system (SRS) - general information 14.25 Removal and installation of SRS elements 14.26 Electrical connection diagrams - general information 14.27. Schematic diagrams of electrical connections |
Removing and installing windshield and tailgate glass washer
To remove and install the windshield window washer and tailgate glass washer on an Opel Astra, you will need: a 10-mm socket and a flat-blade screwdriver.
1. Disconnect the wire from the negative terminal of the battery.
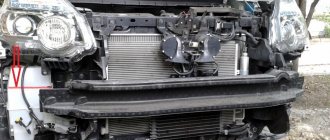
2. Remove the radiator trim (see Removing and installing the radiator trim).
3. Remove the front bumper (see Removing and installing the front bumper).
Note
It is necessary to remove the radiator trim and front bumper because they block access to the washer reservoir mounting bolts.
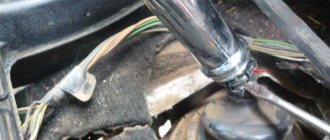
4. Compress the spring clip and disconnect the wiring harness block from the washer pump.
5. Disconnect the hoses from the pump fittings.
6. Remove the shank of the electric pump holder from the socket in the wall of the tank by pulling the pump to the side...
7. ...and remove the pump by removing its inlet fitting from the sealing sleeve in the tank hole.
8. Remove the holder from the pump.
Note
Pay attention to the pump markings. Purchase a new pump with the same markings.
9. Use a screwdriver to pry off the sealing sleeve of the pump...
10. ...and remove it from the tank opening.
Note
The sealing sleeve of the tank simultaneously functions as a washer fluid filter. Wash the filter mesh if it is clogged. Replace the sealing sleeve if it is too compressed, hardened, or its filter is torn.
11. Turn out the top...
12. ...and the lower bolts securing the washer reservoir to the radiator frame...
13. ...remove the hoses from the holders on the tank and remove the tank.
14. Install the parts in the reverse order of removal.
The windshield washer jets are installed in the air intake duct grille. To replace them, follow these steps:
1. Disconnect the air supply duct grille from the body (see Removing and installing the air supply duct grille).
2. To replace the right jet, press it down slightly into the grille...
3. ...use a screwdriver to press the latch on the back of the grille...
4. ...remove the jet from the grille hole...
5. ...and remove it by disconnecting the tube.
6. Remove the left jet in the same way, disconnecting the supply and connecting tubes from it.
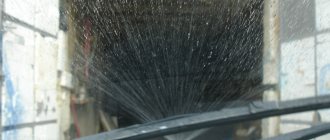
7. Install the jets and the air intake duct grille in the reverse order of removal, and, if necessary, adjust the direction of the washer fluid jets. To do this, insert a thin, pointed tool (for example, a nail pin or a sewing needle) into the nozzle hole and turn the nozzle ball in the required direction.
Warning
Do not use a hardened needle to adjust the direction of the jets: its tip breaks off easily, and it is impossible to remove the fragment from the nozzle hole.
The tailgate glass washer nozzle is installed in the additional brake light. To replace it, follow these steps.
1. Remove the additional brake light (see Replacing the additional brake light).
2. Use a screwdriver to press out the latch...
3. ...and remove the nozzle from the hole in the brake light housing.
4. Install the parts in the reverse order of removal.