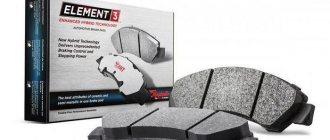
Pad life
The axles of the Lada Priora are equipped with mechanisms of different designs. The front brake is disc. This mechanism has good performance and provides better braking dynamics.
Front pads should be replaced much more frequently. According to the instructions, they travel 15 thousand kilometers. With an aggressive driving style, the life of the pads is reduced by 20-30%.
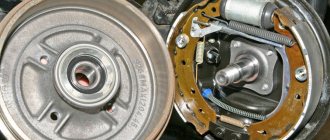
The rear brake on almost all VAZ models is drum. It does not provide such braking dynamics, but it needs to be changed much less frequently. When braking, the main force falls on the front axle, and the rear brake acts as an auxiliary one.
According to the regulations, replacement of rear brake pads is carried out after a mileage of 50,000 kilometers, provided that the mechanisms operate correctly. And on cars equipped with ABS (anti-lock braking system) - even longer. There are a number of situations when it is necessary to change the mechanism earlier.
- if the brake drum of the Lada Priora begins to knock or squeak, then you should inspect the mechanism and replace the pads;
- When driving aggressively, wear occurs faster, so it is necessary to monitor the part more carefully.
It is advisable to carry out the check on an overpass or lift. On the back of the device there is a special viewing window with a rubber plug. We remove it and analyze the condition of the friction part. The thickness of the lining must be at least 1.5 mm. Otherwise, unscheduled work is required:
- If chips or deep grooves are found on the pads, it is recommended to change them. Otherwise, the mechanism may jam at the most crucial moment;
- You can also identify brake fluid leaks on the rear pads. This indicates a faulty brake cylinder. The element should be repaired and new spare parts supplied. The old ones will not work well.
How to remove a brake drum (option No. 3)
There is another way to remove the brake drum in a situation where it is stuck to the axle shaft. The first step is to thoroughly clean the edge of the inner hole of the drum from rust and dirt using a knife or screwdriver, and then moisten it generously with a penetrating liquid, for example VD-40. After 30 minutes you can begin dismantling. On VAZ cars, the brake drum has two holes for guides, which do not contain threads, but two technological holes into which you can screw a screw of a suitable size and thus use them as a puller. I hope the point is clear to you. For a clear example and all the subtleties of removing the brake drum on VAZ cars in the video presented.
Difficulties in selecting parts
Before you begin replacement, you must select a suitable set of pads. There are many options for the Lada Priora on the market. Conventionally, they can be divided into two categories - parts equipped with ABS and those without this system. It is not difficult to understand what type your Lada Priora is - the diagram of cars with an anti-lock braking system includes an ABS sensor and a wire connected to it.
The basic principles of selection are common to the two categories. The product must be well packaged, have protective holograms and quality certificates. When purchasing a whole set with release springs, it is advisable to check them. We often came across sets from China where the spring brackets were turned in the wrong direction.
There is no need to look for how much the cheapest kit for a VAZ will cost. It is better to give preference to original parts or famous analogues. Even at a higher cost, the pads will provide excellent service life and excellent braking dynamics.
Selection for cars with ABS
Below is a list of pad sets with the best price-quality ratio.
| Part name and number | Minimum price, rub. |
| AT 2090-118BP | 400 |
| AutoReal AV18-350-2090 | 450 |
| Pilenga BSP1005N | 600 |
Selection for cars without ABS
If your Lada Priora is not equipped with an anti-lock braking system, then you should purchase special pads. The most popular sets are the following.
| Parts brand | Initial cost, rub. |
| Fortech FB-2102 | 500 |
| Pilenga BST1002N | 550 |
| Bosch 0986487219 | 800 |
Vehicle preparation and tools
Before you start replacing the rear pads with your own hands, you need to prepare a tool. We will need:
- a set of standard keys;
- minus and Phillips screwdriver;
- pliers;
- wooden mallet or rubber mallet;
- metal brush;
- Additionally, you can get graphite lubricant, VD-40 fluid and a special hook for removing the tension springs.
The machine should also be prepared for work:
- open the hood and find the brake fluid reservoir. Use a syringe to remove the brake fluid to the minimum mark. The spent pads extend further, the cylinder itself is similar, and when changing pads you will have to refill it. The brake fluid will return to the reservoir and may spill onto the engine, so it is worth taking it away;
- All wheels must be securely secured by placing wheel chocks on them.
Replacing pads
The brake pads of the rear wheels must be replaced only as a set - all four pads.
Replacing the pads of only one brake mechanism can lead to the car pulling to the side when braking.
1. Using a socket wrench (preferably a high hex head) 7, unscrew the two wheel guide pins.
2. Remove the brake drum.
3. If the drum cannot be removed, then, turning it evenly, use a hammer with a plastic tip (or an ordinary hammer through a wooden block) to strike the end of the drum.
4. Using a screwdriver, pry the hook of the upper tension spring out of engagement with the block.
5. Remove the spring
6. Remove the upper stops of the pads from the slots of the cylinder pistons and remove the spacer bar.
7. Using a screwdriver, pry the hook of the lower tension spring out of engagement with the block.
8. Remove the tension spring
9. Use a screwdriver to remove the guide spring from engagement with the block.
10. Remove the front block.
11. Having disconnected the guide spring from the rear block, lower the block
12. Remove the manual brake pad drive lever from the hole in the parking brake cable end
Work order
Detailed instructions for replacing the pads are presented below along with a photo. With its help, the owner of a Lada Priora will cope with the entire procedure in an hour.
- Loosen the handbrake lever. To do this, find the tension nut. We follow the parking brake cable and find it in the rear of the car. To adjust it, a special window is cut out in the heat shield. Unscrew the locknut and loosen the cable to the limit.
- Next, we remove the wheel bolts and jack up the car. You should rest in a specially designated place to prevent damage to the thresholds. Unscrew the rear wheel hub bolts and remove the disc.
- We find the guides behind the drum. Using a 7-mm socket we unscrew them.
- We dismantle the mechanism casing. It happens that due to intensive use, the pads simply stick to the outer part. In this case, you will need a mallet. You can gently tap the case and then remove it.
- Using a screwdriver, remove the upper tension spring and release the ends of the pads.
- We dismantle the special spacer bar.
- Remove the lower tension spring from the mechanism using a screwdriver or wrench.
- We take out the pressure spring and take out the brake pad.
- Remove the locking pin and disconnect the handbrake drive.
- Now you should clean the seats with a wire brush and replace the old pads with new ones.
- Installation is carried out in the reverse order of removal - connect the handbrake drive, fix the block with a pressure spring, install the second element.
- We connect the lower areas, install the locking plate, and mount the upper part.
- It may be necessary to push the brake cylinder piston back during reassembly.
- We combine the parts, check the integrity of the seals and mount the housing in place.
- We tighten the hub mount, put on the cap and install the wheel.
- Add brake fluid and check the serviceability of the installed mechanism.
Removing the rear brake drum of Lada Priora
Removing the drum on a Priora is not a difficult task; it will take 20-30 minutes. A working diameter of 201.5 mm is allowed. If the drum is larger or has the same size, it should be replaced.
Under no circumstances should there be burrs or deep depressions on the inside. And if there is one, you need to replace or sharpen the surface.
Also, the rear drum on a Priora must be replaced if it has cracks.
To work you will need a 7mm wrench, a bologna jack, a hammer and a wooden stand.
Removing and replacing the drum on the Lada Priora:
We put the car in first gear and put supports under the front wheels on both sides so that the car does not roll.
We check that the handbrake is not raised and that the car is not on the parking brake.
We jack up the car and remove the wheel, then clean the drum from dust and dirt.
Take the 7 key and unscrew the two mounting pins as shown in the picture.
Apply WD-40 to the hub, wait a couple of minutes, and remove any dirt and rust from there.
With light blows of a hammer through a wooden stand, we move the drum from its place.
We remove it from the hub, if it doesn’t work, then from the back of the drum you need to try to pull it out with a hammer through a wooden stand with light blows.
Also, if you can’t pull it out, you can compress it; it’s very simple; you need to evenly screw the pins or bolts of suitable diameter into two threaded drums.
If you are installing an old drum, you need to remove the collar using a file from the working surface. It is formed as a result of wear and tear.
Install the drum in reverse order. Lubricate the hub belt with graphite lubricant or an equivalent. Be sure to check the ease of rotation of the wheel. Light grazing is allowed. Once assembled and the car is firmly on the ground, we press the brake pedal a couple of times so that the pads fall into place and are brought to the drum.
Adjusting the brakes
After replacing parts, it is worth adjusting the handbrake using the adjusting screw, and also bleeding the brakes.
Additionally, inspect the integrity of the mechanism parts, oil seals and seals. If necessary, replace. Before driving on public roads, check the functionality of the system and remember that the car will slow down worse at first, because the pads need to get used to the drum.
Video on replacing rear pads on a Lada Priora
Below is a video that clearly demonstrates the procedure.
Author of the material: Dumchenkov Mikhail
PROMOTION: SALE OF NEW CAR 2020 PRODUCTION
from 606,900 rub.
from 489,000 rub.
Did you like the material? Share with your friends:
Have questions about car repairs? Ask them in the consultation section, to do this, click on the link below.
auto mechanic
- Audi
- Brilliance
- Faw
- Ford
- Chevrolet
- Citroen
- Geely
- Haval
- Changan
- Chery
- Datsun
- Great Wall
- Hyundai
- Kia
- Lada
- Volkswagen
- Renault
- Nissan
- Toyota
- Honda
- Mitsubishi
- Opel
- Lifan
- Mazda
- Skoda
- Rest
- Acura
- Alfa Romeo
- Audi
- Bentley
- BMW
- Cadillac
- Chery
- Chevrolet
- Citroen
- Daewoo
- Dodge
- Fiat
- Ford
- GAZ
- Geely
- Hawtai
- Honda
- Hyundai
- Infiniti
- Jaguar
- Jeep
- KIA
- Land Rover
- Lexus
- Lifan
- Lincoln
- Mazda
- Mercedes-Benz
- Mini
- Mitsubishi
- Nissan
- Opel
- Peugeot
- Porsche
- Renault
- Skoda
- SsangYong
- Subaru
- Suzuki
- Toyota
- UAZ
- VAZ
- Volkswagen
- Volvo
- New cars 2019
- New cars 2018
- Test drives
- Jeeps
- Repair and service
- Engine
- Chassis
- Electrical equipment
- Signaling
- Cigarette lighter
- Car Reviews
- Photo and video galleries
- News
- Tires
© 2020 Daciaclubmd.ru. If you do not agree with any provision of this Disclaimer, do not use this Site. Please read Disclaimer and Privacy Policy before use.
Copying materials is permitted only with an active hyperlink to our website.
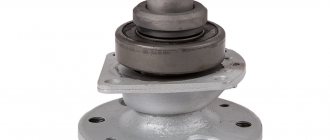
The brake drums of the rear wheels on a Lada Priora car are removed either for replacement in case of mechanical damage or when the internal diameter of the working surface has become larger than the maximum permissible 201.5 mm. The drums are also removed for preventive repairs related to the removal of the edge that is formed during operation along the outer edge of the working surface. This defect can be eliminated either with the help of a file, working with it carefully so as not to damage the working surface, or by grinding the drum on a lathe so that the diameter does not exceed the maximum permissible value. Dismantling is also carried out to perform various repairs of the rear brake mechanism.
Set the parking brake lever to the lowest position, engage first gear and place wooden blocks under the front wheels to prevent the car from rolling while jacking it up. To carry out repair work, prepare a standard set of tools, and then perform the following sequence of actions:
Removing and installing the rear brake drum Lada Priora
The maximum permissible diameter of the drum working surface is 201.5 mm.
You will need: a “7” wrench, two mounting blades, a hammer with a rubber or polymer striker.
1. Engage 1st gear and install wheel chocks (“shoes”) under the front wheels.
2. Check that the parking brake lever is lowered all the way down (the car is released).
3. Remove the rear wheel and clean the brake mechanism from dirt.
4. Remove the two locating pins.
5. Use a hammer to remove the drum from the hub using a wooden spacer.
6. Remove the drum from the hub. If this fails, knock it down with a hammer, striking through a wooden spacer on the collar on the back side of the drum...
7. ...or press by evenly driving pins or suitable bolts into the two threaded holes of the drum.
NOTE
On vehicles with ABS, remove the wheel speed sensor pulse disc.
8. Install the drum in the reverse order of removal. Pre-lubricate the hub seating belt with graphite grease and bring the pads together using two mounting blades.
HELPFUL ADVICE
Before installing the drum, thoroughly clean the mating surfaces of the hub and drum from rust and scale, since even the smallest particle sandwiched between the mating surfaces will cause drum beating and vibration during braking.
9. With the car parked on the ground, press the brake pedal two or three times to move the shoes to the drum.
Share on social networks:
Replacing rear brake pads (in drums) on Lada cars
The minimum permissible thickness of the friction linings of brake pads is 1.5 mm. Rear pads should only be replaced as a set on two rear wheels at once. Otherwise, the car may pull to the side. On all modern Lada cars (XRAY, Vesta, Largus, Granta, Priora, Kalina and Niva), replacing the rear pads is carried out in the same way without significant differences.
Required . new rear brake pads, a set of keys and remove the car from the handbrake.
Check the brake fluid level, if it is around 0, then pump out some of the fluid. Jack up the car and remove the wheel. Further:
- Unscrew the guide pins.
- remove the drum from the hub, knocking it with a hammer through a wooden spacer.
unscrew the drum guide pins
remove the drum from the wheel hub
Next in order:
- disengage with the spring block.
- and remove the upper spring first.
- then the bottom one.
disengage the spring from the block, remove first the upper spring then the lower spring
- disengage the pressure spring from the block.
- remove the front pad.
- remove the spacer bar.
disengage the pressure spring from the block, remove the front block, remove the spacer bar
- Having disconnected the pressure spring from the rear block, lower the block.
- remove the rear shoe lever from the hole in the handbrake cable end.
Having disconnected the pressure spring from the rear block, lower the block
remove the rear shoe lever from the hole in the handbrake cable end
- pull the cotter pin out of the hole.
- remove the washer.
- pull out your finger.
pull out the cotter pin from the hole, remove the washer, pull out the pin
Before installing new brake pads, remove dirt and wipe the rear brake parts. Assembly is carried out in reverse order. To install the pressure spring with the block, use the lower tension spring, hooking its end to the hook of the pressure spring. We tighten the spring with a screwdriver and insert the hook of the spring into the hole in the block.
we use the lower tension spring, hooking its end to the hook of the pressure spring
we bring the pads together with two mounting blades
Move the pistons to the center of the cylinder, bringing the pads together with two mounting blades. After completing the work, press the brake pedal 2-3 times to bring the pads to the drum. For clarity, the entire process is also shown in the video:
Let us remind you that periodically monitor the serviceability of the brake system and change the front brake discs on time.
Replacement steps
Replacing the front brake pads is not affected by the fact that the car has ABS or does not have an anti-lock braking system. The details are the same. This is important if you need to change the rear brake pads on a Priora.
Before carrying out work, you need to inspect and check the braking mechanism on the Lada Priora.
Carry out maintenance, check the condition of the pads and how worn they are. Analyze the performance of the braking system. Remove the wheels.
Examine the brake pad linings through the hole in the caliper.
Replacement is made if the thickness of the overlay elements is less than 1.5 millimeters.
Turn the brake disc. Check the working surfaces of the mechanism from all sides. It is important to record the absence of cracks and deep dents.
Using a caliper or micrometer, measure the thickness of the disc. The indicator should not exceed 17.8 millimeters. If the thickness is greater, both discs will have to be replaced.
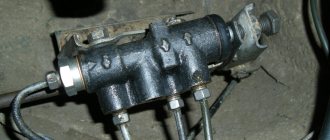
The photo below shows the brake system of the left front wheel. Elements are marked with numbers:
- 1 – bolt connecting the cylinder body to the caliper;
- 2 – brake hose;
- 3 – wheel cylinder;
- 4 – bleeding fitting for the braking system;
- 5 – caliper;
- 6 – pads;
- 7 – caliper guide pin;
- 8 – mini-corrugation for guide pin protection;
- 9 – guide;
- 10 – disk;
- 11 – protective casing;
- 12 – ABS speed device;
- 13 – punk retainer;
- 14 – screw connecting the cylinder to the guide pin.
If the brake mechanisms are faulty, the pads are changed as a whole, that is, all four at the same time. If you install only one new part, the car will wobble when braking.
Check the fluid level in the brake hydraulic reservoir. At the maximum mark, remove the liquid with a syringe, and only then change the pads. If excess is not removed, leakage will occur as the piston plunges into the cylinder.
Secure the car to a support and remove the front wheel.
Using pliers, bend the edges of the retaining bar for the screw securing the cylinder to the lower guide pin.
Using a 13mm socket wrench, remove the bolt. Use a 17 mm wrench to support the guide pin.
Remove the screw together with the retaining bar.
Raise the bracket.
Remove the pads from the guide.
While the bracket is rotated relative to the guide, you cannot brake. If you neglect this rule, the piston will fall out of the cylinder.
Clean the places where the pads were located from dust, dirt and rust.
Using sliding pliers, insert the piston deep into the cylinder, then install new pads.
Place a wide-bladed screwdriver or a mounting spudger into the caliper hole. Move the bracket by pressing the disc with the tools. Insert the piston into the cylinder.
When the parts are completely replaced, press the brake 3-5 times. This is necessary to set the distance between the discs and pads.
Check how much liquid is in the tank. If necessary, add to the established norm.
During operation, the coating of the brake system discs becomes distorted. The friction area between new and untested pads and discs is reduced.
Experts recommend moving carefully during the first 100 kilometers of driving after completion of work on replacing brake system elements. Since the new pads have not yet taken root, the car can slow down much longer.
The pads will get hotter than the old ones. There may be some smoke and odor, especially at high temperatures.
Just like on the first wheel, you need to replace the front brake pads on the second. It doesn’t matter whether the Priora will have ABS or without it.
Replacing rear brake pads on a Priora - instructions
The service life of the rear brake pads of the Priora is quite long, but provided that the quality of the components is decent. Even factory ones can easily travel more than 50,000 km with careful operation without sudden braking or maneuvers using the handbrake. But there are also such instances that after the first 10,000 km they already begin to exhibit a terrible sound during operation, and efficiency sharply decreases.
If you decide to replace it, then below I will try to provide detailed instructions for replacing the rear pads on a Priora with a detailed photo report of the work done. So, first of all, it’s worth talking about the tool that you will need for all this work:
- Screwdriver flat and Phillips
- Pliers and long-nose pliers
- 7 deep head and knob
- Head 30 (if the rear drum cannot be removed in the usual way)
Replacing the rear wheel brake cylinder
It is more convenient to carry out the work on an inspection ditch or overpass.
Remove the brake drum and upper tension spring.
We remove the upper stops of the brake pads from the slots of the cylinder pistons.
To make it easier to unscrew the brake pipe fitting, you can unscrew the bleeder fitting from the cylinder.
If the tube does not come off and there is no spare tube, you can first unscrew the two cylinder mounting bolts.
We pull out the cylinder along with the tube so that it can be held with a key.
Then, by rotating the cylinder and holding the tube with a wrench, you can dismantle the cylinder without damaging the tube.
Using a 8mm spanner, unscrew the bleeder fitting (the bleeder fitting can also be a 10mm spanner).
Using a special 10mm wrench, unscrew the brake pipe fitting.
We remove the tip of the tube from the cylinder hole
Using a spanner wrench or a 10mm socket, unscrew the two bolts securing the cylinder to the brake shield
Removing the cylinder
Install the new cylinder in reverse order.
After assembling the brake mechanism (including installing the drum), we bleed the hydraulic brake drive.
Replacement of rear brake pads of Lada Priora (Lada Priora)
Details Parent category: Repair (manual for) Lada Priora cars
Operations performed when replacing brake pads of the rear wheel brake mechanism on a VAZ 2170 2171 2172 Lada Priora
Additionally, I would like to note that the rear brake mechanisms of the Priora and the tenth family are identical, and therefore the removal and installation of the pads can be performed according to the procedure for removing the rear pads on a VAZ 2110 2111 2112 car (instructions are given with color pictures). The minimum permissible thickness of the friction linings of brake pads is 1.5 mm. The pads are replaced in the following cases:
– the thickness of the friction linings is less than the permissible value; – the surface of the linings is oily; – the friction lining is not firmly connected to the base; – the linings have deep grooves and chips.
Removing the rear brake drum of Lada Priora
Removing the drum on a Priora is not a difficult task; it will take 20-30 minutes. A working diameter of 201.5 mm is allowed. If the drum is larger or has the same size, it should be replaced.
Under no circumstances should there be burrs or deep depressions on the inside. And if there is one, you need to replace or sharpen the surface.
Also, the rear drum on a Priora must be replaced if it has cracks.
To work you will need a 7mm wrench, a bologna jack, a hammer and a wooden stand.
Removing and replacing the drum on the Lada Priora:
We put the car in first gear and put supports under the front wheels on both sides so that the car does not roll.
We check that the handbrake is not raised and that the car is not on the parking brake.
We jack up the car and remove the wheel, then clean the drum from dust and dirt.
Take the 7 key and unscrew the two mounting pins as shown in the picture.
Apply WD-40 to the hub, wait a couple of minutes, and remove any dirt and rust from there.
With light blows of a hammer through a wooden stand, we move the drum from its place.
We remove it from the hub, if it doesn’t work, then from the back of the drum you need to try to pull it out with a hammer through a wooden stand with light blows.
Also, if you can’t pull it out, you can compress it; it’s very simple; you need to evenly screw the pins or bolts of suitable diameter into two threaded drums. If you are installing an old drum, you need to remove the collar using a file from the working surface. It is formed as a result of wear and tear.
Install the drum in reverse order. Lubricate the hub belt with graphite lubricant or an equivalent. Be sure to check the ease of rotation of the wheel. Light grazing is allowed. Once assembled and the car is firmly on the ground, we press the brake pedal a couple of times so that the pads fall into place and are brought to the drum.