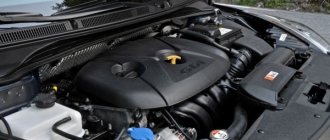
The car can be used for a long time, and various breakdowns may occur in the process.
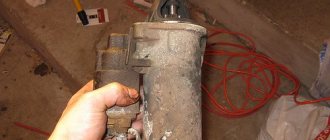
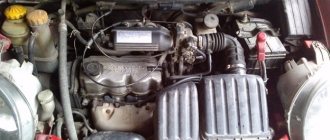
Car drivers often encounter starter failure. Situations may often arise when the starting system does not work correctly, and the engine cannot be started. It is important to pay attention to the condition of the starter, as this may be a clue to the cause of the malfunction. In most cases, the device does not work immediately, but starts up intermittently. If, based on its behavior, it is not possible to determine the malfunction and eliminate it, then you have to check the device with a multimeter or using improvised means.
Classification of faults
The starter is an electromechanical device, so faults can be classified as electrical or mechanical.
Electrical breakdowns
Such malfunctions often occur due to insufficient power supply. The reasons for inoperability may be:
- Dead battery.
- Damaged wiring.
- Winding short circuit.
- Oxidation and burning of contacts.
To determine this type of breakdown, you need to be able to check the starter using special instruments. Mechanical problems most often appear as a result of prolonged use and mechanical damage.
Mechanical damage may be caused by electrical problems. The parts of the starting device are subject to heavy loads, especially in severe frost, since the device must generate high power and pass high voltage.
The most vulnerable components are:
- Bushing and armature corrector.
- Brushes.
- Heels.
- Fork.
- Gear.
- Solenoid relay.
- Damper spring.
Extraneous noise, unpleasant odor and untimely activation of the starter can be evidence of mechanical failure.
Common Mechanical Failures
- Untimely switching on. The motor rotates, but during start-up a metallic grinding noise is heard. In this case, most likely the damper spring is faulty, the gear or bushings are unusable. The exact cause is determined visually after disassembly.
- The starting device works, but there is no rotation of the crankshaft and there are extraneous sounds. The cause may be a broken bushing.
- The starter does not work when trying to start. You need to tap the back of the starter with a mallet. If operation resumes upon impact, the brushes may be worn.
- After starting the engine, friction and metal grinding can be heard. The engine must be turned off immediately. Most likely the relay is stuck. The exact cause is determined during disassembly.
- The retractor relay clicks are heard, but the mechanism does not work. The battery may not be sufficiently charged. The voltage supplied to the mechanism is weak; there is enough current to operate the relay, but the terminals are not closed by the contact plate. You need to remove the battery and connect the charging unit. If such symptoms occur when the battery is charged, then the heels may burn or the power cable may malfunction.
- When the battery is charged, the starter rotates slowly. The bushings may be worn out or the electric drive may be dirty.
- When you try to start the engine, a burning smell may come from the device. The winding in the traction relay may have burned out. The anchor can also burn out, but this happens less often. In this case, the wires connected to the starter overheat.
- The retractor on the starter does not work. There is a fault in the electrical circuit. It is necessary to check the integrity of the wires and the operation of all components included in the electrical circuit.
The main types of faults detected during diagnostics
At this point, we have highlighted the main points regarding what may cause a malfunction. Our technicians have been repairing and diagnosing units for several years now, so they have learned to quickly identify the causes:
- Loss of contact in the electrical circuit can cause a drop in starter power, which will lead to the formation of an arc between the commutator and the brushes. As a result, destruction occurs, which affects the level of power output by the device.
- If the starter runs for a very long time, this can lead to complete wear of the bushing, as well as complete loss of insulation.
- If the bushings are faulty, the armature shaft will hit the starter, which leads to breakage of the flywheel teeth and the device stops working.
If diagnosed in time, this can save the driver from replacing the starter or very expensive repairs.
Our advantages
| Fast completion of work Our specialists value your time, so they do their work as quickly and on time as possible. | Vast work experience The GENSTAR network of car services and workshops in Moscow was founded in 1998. | Flexible pricing policy
|
| Free diagnostics Our workshops provide free diagnostics of the unit. | Experienced staff Over our long history of work, we have a fully formed professional team of craftsmen | Work guarantee We issue a guarantee on our work for a period of 6 months |
The most common faults are the following:
- The starter rotates but does not turn the engine flywheel. This malfunction indicates that the bendix needs to be replaced. Depending on the year of manufacture and make of the car, the service for replacing a bendix can cost from 720 to 2880 rubles (the price includes the cost of a new bendix and installation work); The starter makes a slight clicking sound after turning the ignition key, but does not rotate. Such a malfunction is possible in the following cases: a) the starter brushes have run out, which is why the starter armature has burned out. c) the solenoid relay has failed d) the starter mass has disappeared (inside or outside)
- the starter rotates slowly. This can happen due to the strong wear of the plain bearings, which is why the armature “clings” to the stator. — the starter burned out completely. This most often occurs due to the rotation of the starter at high speeds along with the engine flywheel. As a rule, such a malfunction is caused by a malfunction in the ignition switch.
Checking the starter
It often happens that when the engine is warm, the car can be started, but when the engine is cold, the starter turns weakly, the battery is charged. The car may jerk when driving. Most drivers only check the terminals on the battery, after which the situation may improve slightly, but after a short period of time it repeats, and the starter turns as if the battery is dead.
To solve this problem you need to:
- Clean all terminal connections.
- Clean the places where the terminals are attached.
- Clean the contacts on the starter with sandpaper.
- Check the ground wire and clean the terminals.
- Replace high-voltage wires (if the car jerks while driving) if necessary.
Also, the starter may not turn well in cases where the lubricating oil is not suitable for the season. Then the engine crankshaft will have difficulty turning. However, this phenomenon occurs only at low temperatures. It is necessary to change the oil to a more suitable one and, if necessary, insulate the parking lot of the car.
In most cases, these simple actions solve the problem, however, if this does not help, you need to contact a car service.
Battery Application
Many drivers are wondering how to check the starter without removing it from the car. A quick check of the device can be carried out on site. This process only requires a working battery and power cables. In this case, you need to check the solenoid relay and the motor of the unit, and to check the armature, brushes or winding after disassembly you will need a multimeter.
How to check the starter armature
In this process, you will need to turn on the 12 V voltage from the battery to the starter without a relay. When it is triggered, operation is confirmed; if there is no rotation, there may be problems with the brushes or the armature itself. In this case, the starter must be removed from the car, completely disassembled, a visual inspection and a resistance check with a multimeter must be carried out.
Basic electrical faults of the armature
- The winding breaks through to the housing.
- Wiring of collector outputs.
- Short circuit in the winding.
In most cases, interturn short circuits can be determined by careful visual inspection. The signs are as follows:
- The presence of chips and other conductive particles on the commutator lamellas.
- Burnt slats.
Uneven wear on the commutator is common, causing the brushes to wear out and the starter to not work. The groove on the collector must be at least 5 mm deep.
Checking with a multimeter
Not every ordinary motorist has the opportunity to check the starter with a flaw detector or using a test lamp. The most common and accessible way is to check with a battery and a multimeter. Brushes and windings are checked for short circuits by switching the device to megger or continuity mode; there should be a small resistance in the relay winding.
Common starter faults
Thanks to the starter it is possible. It receives power from the battery. If the starter does not work or rotates at low speeds, you should check the battery and wiring.
The following malfunctions are possible:
- battery is low;
- the terminals are poorly secured or the contacts on the battery have oxidized;
- poor contact on the solenoid relay;
- damage to the electrical network in the area between the starter and the battery;
- The contact group of the ignition system does not work.
If the starter does not turn on, the cause may be a faulty relay or a short circuit in the windings of the device itself. If, when the armature rotates, the crankshaft does not rotate, it is possible that the clutch is slipping or the screw thread drive is running tight.
It is possible that the engine starts, but the starter does not turn off; in this case, there may be several reasons:
- bearing wear;
- wires jam on the shaft;
- jamming in the ignition switch.
Failures are eliminated by replacing faulty parts. If the drive gear becomes disengaged, extraneous noise may appear during operation of the trigger mechanism (video author: Irina Kuzilova).
Since the starter experiences heavy loads when turning the shaft and starting the piston group of the power unit, it should be regularly diagnosed to identify malfunctions.
Recommendations for use
It is not recommended to run the starter for more than 15 seconds. If extraneous noise appears and periodic failure of the mechanism, you must immediately find the cause of the malfunction and eliminate it. In this case, it is necessary to monitor the condition of the contacting parts of the retractor and prevent sparking and overheating of the contact pads. If you take good care of your device, your trip will be comfortable.
The purpose of writing this text is to warn car owners against one common mistake. When the key is turned to the START/KRANK mark, the starter does not turn, and then they try to close the power terminals directly. Having opened the hood and reached the starter, they see two copper taps - they are closed. In this case, the electric motor is activated, but the solenoid relay is not activated, and the freewheel bearing remains in place. In reality, power taps cannot be shorted! We will talk further about how to properly close the starter with a screwdriver.
How to close the starter with a screwdriver?
This measure should be resorted to in the event of a malfunction of the traction relay. This is evidenced by a characteristic clicking sound in the engine compartment when turning the key in the ignition switch, when the relay is turned on, while the starter cannot give the crankshaft the required number of revolutions to ensure the engine starts due to the fact that the drive gear does not engage with the flywheel. In this case, it is necessary to apply voltage to the windings directly by bridging the starter power terminals using a screwdriver. In this case, the screwdriver takes on the role of a faulty traction relay.
Note! Before performing this procedure, be sure to put the car on the parking brake and put the gear in neutral. You need to use a screwdriver with a powerful working part and a well-insulated handle.
It is advisable to carry out the procedure together: one is behind the wheel of the car and turns on the ignition, the second at this time bridges the starter terminals with a screwdriver. This method is quite insidious, since there is a risk of burning the coil. Therefore, in order to avoid damage to it, you should not constantly perform this procedure if you were unable to start the engine the first time.
As you can see, the methods for closing the starter are quite simple and do not require the driver to have a certain amount of technical knowledge or a set of complex tools. But you can’t do it without helpers.
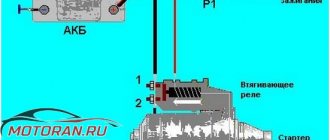
Scheme, theory and practice
Let's see what the wiring diagram of any electric starter looks like. Contact B is constantly supplied with voltage.
Starter and its external circuits
In the diagram we see three “positive” contacts and one negative (8), which is always connected to the body. What needs to be closed:
- Before closing the starter, locate the S terminal. It is often made in the form of a petal;
- How to distinguish contacts B and M: the first will have a potential of “+12”;
- You need to close contact B with terminal S. This is done briefly and after turning on the “neutral”;
- Contacts M and B cannot be closed.
We move from theory to practice. On a VAZ-2114 car everything looks simple.
Solenoid relay VAZ-2114
Terminal B here is covered with a rubber band, and petal S is in contact with the terminal in plastic. The plastic plug is removed before “shorting”.
Closing the starter contact with a screwdriver
Make sure that the metal of the screwdriver does not touch the relay body when closing. Otherwise, we will simply close the “+” contact to “ground” (dangerous). All work is carried out with the ignition on.
- B – Bold, “thick” wire;
- M – Motor (electric motor);
- S – Start.
Malfunctions
There is nothing special to break in the starter and all its malfunctions consist of wear, sticking of the brushes and contamination of the commutator, which often happens due to engine oil getting into the housing from the engine crankcase. It is worth noting that faults associated with commutator contamination and brush wear are typical for DC electric motors.
Worn brushes, as well as a dirty commutator, prevent the passage of electric current through the brushes to the lamellas of the rotor windings and therefore the starter stops working. In this case, to restore the functionality of the starter, we just need to clean and wash the commutator and replace the brushes with new ones or make them ourselves (more on that later).
In addition to purely mechanical faults associated with wear and contamination of current-carrying elements, there are also a number of faults associated with a short or interturn circuit of the rotor windings, as well as with a violation of the contact of the winding output with the commutator lamella and burnt wire insulation.
All these malfunctions are characterized by increased noise and heating of the starter during operation and a drop in its speed. If, after cleaning the commutator and replacing the brushes with new ones, the starter turns poorly, gets hot, and hums, then most likely not everything is in order with the rotor windings. Either they shorted out, went to ground, or simply burned out. And nothing can be done about it.
We close the starter “in French” (special cases)
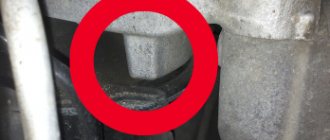
Access to the starter is always open from under the bottom - you just need to remove the crankcase protection. An example is in the photo below.
Under the bottom of Renault Megane 2
It is difficult to reach the starter from the engine compartment. In the best case, it is closed by a filter (VAZ), in the worst case, by a battery. You can remove the filter, but what about the battery?
Starter installation location (circle)
Everything is done so that the starter can be changed, repaired, but not short-circuited.
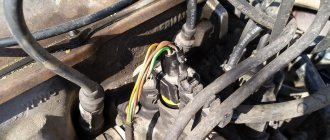
What does terminal S look like?
On Renault cars, the terminal looks like a threaded outlet. The nut screwed onto it is “white”, although it itself is made of copper (see photo).
Starter Renault Logan, phase 1
We have already talked about the VAZ - they use a plug. If you remove it, you can see the “petal”.
The starting method using a screwdriver is not the best. The problem is limited access.
50 Amps
The pull-in relay on the “Ten” consumes 50 Amps. For budget Lada models the current is 30 A, for many foreign cars it is higher. This means that a current of 40-50 Amps will flow from terminal B to terminal S. Think about the dangers of this.
We are going to short-circuit the starter with a screwdriver, but at the connection points where the current will flow, it may “stick”. In this case, without unnecessary panic, remove the negative terminal from the battery.
To remove the minus terminal, you need a 10mm open-end wrench. Keep it with you.
conclusions
Let's look at diagram 1 again. If the key is not turned to the Start label, terminal S is “hanging in the air.” This can be done for any car, even if the circuit has an additional relay. This means that it will not be necessary to disconnect the standard wire from terminal S... And in the case of a VAZ, the disconnection is carried out in order to gain access to the terminal.
We removed the filter, disconnected the plug, and tried to close it...
Checking the serviceability of the starter - video with example
The starter does not turn (or turns slowly, jerkily). The situation is unfortunately not uncommon. Where to start troubleshooting?
Of course, we check the battery first. Have you made sure that it is charged normally, but the starter turns as if the battery is dead? There is no need to be afraid of such a malfunction and immediately send the car for service on a tow truck. The engine starting system is not the most complex part of the car.
Checking the battery starter
It is almost impossible to check a starter installed in its original place. You will not be sure of the true cause of the problem. Therefore, it would be better to remove it. Moreover, this is not at all difficult to do on any car.
Before dismantling, we check the integrity of the wiring and the cleanliness of the contacts. In some cases, simple cleaning and tightening of the terminals helps. To complete the experiment, check the supply wiring. The voltage at the contacts of the connecting cables must be the same as at the battery terminals.
Before you remove the entire assembly, check to see if the starter can drain the battery. To do this, it is not necessary to connect an ammeter and record the leakage current.
- Disconnect the power cables from the starter
- Connect the multimeter to the battery, record the voltage value (if possible, do not turn on any load: external lighting, multimedia, interior lights)
- Connect the power cables to the starter. If there are no leaks, the voltage on the battery will not change. If the value decreases, there is a problem in the starter circuit.
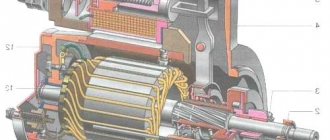
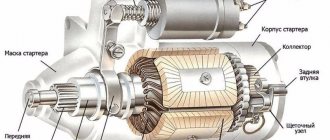
If you are not familiar with the starter design, carefully study the illustration. Then it will be easier to understand the principle of operation of the node.
Possible causes of battery failure. Details in this video.
Starter contamination
A common cause of starter failure is contamination or rust on its mechanical moving parts: gear teeth, shaft and bearings. After severe operating conditions of the vehicle (dirt, water obstacles, swamps, ingress of engine oil), it is advisable to inspect and preventively clean the assembly elements from blockages.
In addition to mechanical elements, electrical contacts and wires on the starter are subject to contamination and oxidation. When strong oxidation and dirt appear on the contacts, the electrical resistance at the terminals increases, which leads to a decrease in the efficiency of the unit with increasing load, heating of the electrical wiring, that is, to a decrease
service life of the product or its failure. Perform timely preventive maintenance on the contact group, check the reliability of the terminals and the tightness of the contact nuts.
Monitor the condition of your vehicle's starter - the performance of many components and equipment in general depends on its proper operation.
Well, if the unit fails, you will need to repair the starter or replace it with a new one, which will always help you. Good luck!
How to properly test the starter on a battery
As can be seen in the illustration, the node consists of two separate components:
- The retractor relay - works on the principle of the clutch of a manual transmission - connects the Bendix gear to the engine flywheel to turn the crankshaft. After a successful start, the Bendix returns to the “parking” place so that the electric motor shaft does not rotate idle. A breakdown of the relay leads to the fact that a serviceable starter motor cannot crank the crankshaft, and the internal combustion engine does not start.
- Starter motor . The breakdowns are classic - the armature winding is burned out, the commutator is worn out, the brushes are worn out. The stator does not break because it has no winding.
There are also purely mechanical failures - for example, if the starter does not turn well when the battery is charged and the electrical part is in normal condition, it may be a matter of bearings or worn gears.
And if you removed the block from the engine, carry out preventative cleaning. The presence of dirt can make it difficult for the armature to rotate.
Let's look at checking electrical components. To do this, you need to directly connect the starter to the battery.
Checking the electric motor
Having securely secured the housing, we connect the negative terminal of the battery to the starter mounting eye (that is, we connect the negative terminal to the housing and ground). The cable must have a cross-section of at least 6 squares.
We connect the positive terminal to the engine power cable (a short piece of wire with a terminal that is attached to the contact of the solenoid relay).
The shaft should rotate vigorously. If the starter barely turns, we’ll deal with the engine. Check the condition of the brushes and commutator. The brush assembly is easily dismantled. Flexible wires must be without traces of melting, and the brushes themselves must have a margin of length. If there is visible damage, the elements must be replaced.
We inspect the rotor commutator (after removing the brush assembly, it is accessible from all sides). The rotor itself should rotate freely, and the copper lamellas should wear evenly. A short circuit between the contact plates is unacceptable (checked visually and with a multimeter).
There is another test - let the engine spin for 20-30 seconds. Then evaluate the heating of the housing and check for the absence of a burnt winding smell. The temperature should not be higher than 40-50°C.
Checking the solenoid relay
This element simultaneously closes the starter shaft with the internal combustion engine flywheel (via Bendix) and supplies power to the starter motor winding.
To check the starter solenoid relay from the battery, just connect the positive wire to the relay control terminal. It is easy to find - there is no threaded connection on the terminal, unlike power contacts.
When 12 volts are applied, a characteristic click should sound and the Bendix gear will take its working position.
You can check the closure of the power relay contacts that supply voltage to the starter motor. At the moment of operation, the resistance between them should be zero. If not, just clean the contacts (nickels).
If the relay does not operate , it should be replaced. This unit is purchased separately from the starter, is inexpensive, and can be easily changed. Restoring a burnt-out relay winding is impractical, although possible.
Having gained access to the “insides” of the starter, check the mechanical condition of the Bendix fork and gears. Wear may be present, but without tooth deformation. Play on the fork should not prevent reliable engagement of the Bendix gear.
After checking, the assembly is purged with compressed air and the bearings are lubricated. The contact junctions are treated with a special lubricant for contact groups.
How to check the starter on a battery video recommendations using the example of a VAZ 2110 car
How to hook up a button to the starter via a relay and connect
The starter does not engage when turning the key
Today, drivers of old cars often want to see a convenient button on the instrument panel that can easily activate the starter. They want such modernization not only for aesthetic purposes, but also for purely practical ones. We will learn from the article how to connect a button to the starter via a relay.
Contact vulnerability
In cars manufactured more than ten years ago, the starter wires are always connected directly to the ignition switch contacts. The engine starts only after the driver turns the ignition key to the extreme position.
This option for connecting the starter is simple and effective. But contacts are always a problem. Moreover, when the starter device is activated, a huge amount of voltage is generated, causing sparking. Where there is a spark, the contacts burn out, oxides accumulate on them, etc. As a result of this, over time, problems arise with starting the engine; motorists are looking for alternative ways to turn on the starter, including directly from the battery.
How to connect a starter via a relay
As you know, in cars of recent years of production, which do not have a button, an additional relay is provided that controls the starter. In this way, the lock contacts are relieved, which now bear less of a load.
- Systems with a separate relay are more reliable because they last longer.
- The ignition switch contacts also “live” much longer.
- An additional relay can always be upgraded.
How to connect a button to the starter
However, the topic of this article is connecting the starter via a button connected to the same relay. How can this be accomplished?
Connecting a button in a car where there is no additional relay
First of all, you should find the contacts responsible for turning on the starter. Then integrate them with the button.
The modernization algorithm generally looks like this:
- The plastic trim under the steering wheel is disassembled;
- There is a connector connected to the ignition switch contacts (as a rule, this connector has locking tabs);
- Press the tabs to release the connector and pull it out.
As a rule, on older cars, after inspecting the connector, two cables with a large cross-section are found. The red one is responsible for controlling the starter.
Note. You can check whether the wiring is really responsible for controlling the starter like this. Turn the ignition key all the way, short-circuit both wires from the removed connector. If the starter turns on, then that's what they are.
- The button is placed in a place convenient for the driver;
- The found wires are connected to it.
Connecting a button via a relay
In this case, finding the wires responsible for controlling the starter will be much more difficult, because you need to calculate those that are connected to the additional relay.
Experts recommend first ringing all the wires going to the car body with a tester. The identified wires are marked as negative, since they are connected to ground.
How to connect the starter button via a relay
Then you need to connect the tester with one end to each of the positive wires, and the other - connect the measuring device to ground. The device itself must be put into a current measurement operating cycle. Test tasks: find a cable that produces 12V when the key is turned all the way.
Button recommendations
It is desirable that the button does not have various latches inside. In other words, the button should instantly engage the starter and disable it as soon as the button is released. The locking button works a little differently. You have to press it twice to turn off the starter, and this is not so much inconvenient as it is harmful to the starter.
In a word, the principle of operation of the button comes down to the following: the driver holds the button pressed until the engine starts, then releases it, the starter turns off. It turns out to be a convenient option when you operate the button like a key.
The button material also needs to be selected wisely. You should take into account the fact that the button itself can burn out due to the passage of large currents through it. For example, a button made of anti-vandal chrome material fails after just 6 months of use, despite the fact that it is designed for high loads.
How to pay TWICE LESS for GASOLINE
- Gasoline prices are rising every day, and the car's appetite is only increasing.
- You would be happy to cut costs, but is it possible to live without a car these days!?