2163-5-12-03-03
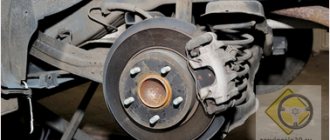
Remove the brake drum assembly with bearing.
Attention! Do not press the brake pedal after removing the brake drum, as the pistons may come completely out of the wheel cylinder.
We clean the brake mechanism parts from dirt.
Attention! Do not use gasoline or diesel fuel to clean brake parts.
Content
- 1 Replacement of rear brake pads. 1.1 Replacement steps.
- 1.2 Replacing pads on disc brakes.
- 1.3 Stages of replacing pads on a disc brake system.
For the safety of driving a vehicle, it is necessary to promptly check and maintain the car stopping system. An important element of the brake system, responsible for the braking efficiency of a car, is the pad. In this regard, the question arises of how often and how used elements are replaced. To clarify this issue, you must refer to the manufacturer's instructions. As a rule, the manufacturer recommends servicing the brake system after passing a certain mileage. In addition to the mileage, the manufacturer indicates the maximum permissible thickness of the element, after which it is necessary to change it. Brake pads must be replaced in pairs. Because otherwise, the wear of the brake system elements accelerates and the tires become unusable.
In addition to the manufacturer's instructions, the fundamental factor in servicing the car stopping system is the operating conditions of the vehicle. Unfortunately, modern conditions for using a car are far from ideal and the condition of the road surface accelerates the wear of brake components. Therefore, the frequency of replacement may increase depending on:
- Weather conditions of car operation.
- Condition of the road surface.
- Motorist driving habits.
To change elements of the car stopping system, you will need a sufficient amount of care, the appropriate tool and the instructions provided. Changing between drum and disc brakes is slightly different. Therefore, when servicing disc brakes, additional tools may be required depending on the design of the system. Despite the design of the brake system, the general steps for replacing brakes remain the same. Let's consider replacing the most important elements on drum and disc brake systems.
2163-5-12-03-13
Disconnect the parking brake cable end from the rear shoe lever and remove the shoe.
We check the technical condition of the parts and clean them.
Before installing new pads, clean the threads of the tip of the spacer bar and ratchet nut and apply a thin layer of grease to the threads. Install new rear wheel brake pads in reverse order. After installing the pads, we set the automatic gap adjustment mechanism to its original state. To do this, by changing the length of the spacer bar, set the distance between the outer surfaces of the front and rear pads to 202.45 ± 0.25 mm.
Removal and disassembly
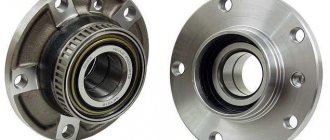
Rear wheel brake drum
1 — bolts securing the drum to the axle shaft; 2 - threaded holes for installing bolts 1 when removing the drum
Remove the brake drum by unscrewing the mounting bolts 1. Remove the drum. If this does not work, then insert the removed bolts into technological holes 2 and tighten until the drum separates.
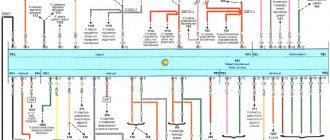
Rear wheel brake
1 — wheel cylinder; 2 — upper tension spring of the pads; 3 — pad lining; 4 — brake shield; 5 — inner plate; 6 — rear cable sheath; 7 — lower tension spring of the pads; 8 — front brake pad; 9 — pad support plate; 10 - rivets; 11 — oil deflector; 12 — pad guide plate; 13 — rear parking brake cable; 14 — rear cable spring; 15 — rear cable end; 16 — rear brake pad; 17 — block support post; 18 — lever for manual drive of the pads; 19 — rubber cushions; 20 — pad spacer; 21 — finger of the lever of the manual drive of the pads
- Disconnect cable tip 15 from lever 18 of the manual drive of the shoes, remove the cotter pin, press pin 21 and remove the lever.
- Use pliers to disconnect the upper 2 and lower 7 tension springs.
- Having turned the cups of the support struts 17, remove them together with the struts, springs and lower cups; remove pads 8 and 16 and spacer bar 20.
- Disconnect the brake fluid supply tube from the wheel cylinder and plug the inlet holes of the cylinder and tube.
- Remove the wheel cylinder.
- When replacing the brake shield, remove the axle shaft (see Rear Axle), and disconnect the parking brake cable by unscrewing the two bolts securing it to the brake shield.
2163-5-12-03-15
To change the length of the spacer bar, remove the adjuster lever from the ratchet nut of the threaded tip of the bar and use a screwdriver to rotate the nut (left-hand thread).
Before installing the brake drum, clean its working surface with a wire brush to remove dirt and wear products from the pads. We replace the wheel hub bearing mounting nut with a new one and tighten it to the prescribed torque. Similarly, we replace the brake pads of the right wheel (the threads on the tip of the spacer bar and the ratchet nut are right-handed).
Then press the brake pedal several times to adjust the position of the brake pads. In this case, clicks will be heard in the brake mechanisms of the rear wheels from the operation of the mechanism for automatically adjusting the gaps between the pads and brake drums. Press the pedal until the clicking stops. If necessary, tighten the parking brake cables. We check the ease of rotation of the wheels with the parking brake lever fully lowered.
We check the brake fluid level in the hydraulic drive system reservoir and, if necessary, bring it to normal.
[How to save up to 6,500 rubles on Renault Logan/Sandero maintenance] [Renault Logan/Sandero maintenance for 15 thousand km] [Renault Logan/Sandero maintenance for 60 thousand km] [Renault Logan/Sandero maintenance for 90 thousand km of mileage] [Carrying out maintenance yourself - general recommendations] [Safety rules for doing car maintenance yourself] [Tools required for maintenance of Renault Logan/Sandero] [Replacing the brake pads of the front wheels of Renault Logan/Sandero]
Replacing brake pads for the rear wheels of Renault Logan/Sandero
Adjusting the brakes
To correctly perform operations on adjusting the rear wheel brakes and handbrake , you can use the following recommendations:
- prepare the necessary tools for this case: a 13 mm open-end wrench, pliers, a combination wrench for fastening wheels, a 17 mm socket wrench. and probe 0.1-0.15 mm.
- place the car on an overpass or inspection ditch
- remove the rear wheel caps and loosen the wheel bolts
- raise the rear of the car and install stands
- Unscrew the wheel mounting bolts and remove the wheels.
It should be recalled that performing the described operation is quite inconvenient, since an assistant is required, who must be in the car while checking the brakes and carry out your simple commands.
If such an assistant is found, he, at your command, must press the brake pedal, and at this time, by rotating the drum, you determine whether the pads are in contact with the drum mirror.
If adjustment is required:
- keeping the pads pressed, turn the nut of the adjusting eccentrics 1 and 2 until they come into contact with the pads
- After releasing the brake pedal, turn the nuts in the opposite direction by about 10° so that the gap between the pads and the drum mirror is 0.10 - 0.15 mm.
- use a feeler gauge to check the set gap
- To be more sure, press the brake pedal sharply 3-4 times and check the gap again. If necessary, the adjustment should be repeated
- install the wheels, tighten their mounting bolts and check for ease of rotation. The wheels should rotate completely freely.
Scheme for adjusting the gap between the brake pads and the brake drum
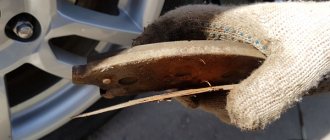
There are times when the required gap between the pads and the drum cannot be established. This is a symptom of excessive wear on the brake pads and should be replaced with new ones.
The linings are replaced, naturally, with the drums removed. Removing a brake drum, even in a service station, is a rather labor-intensive operation.
The fact is that during operation, as a result of electrochemical corrosion, a drum cast from an aluminum alloy is, as it were, “welded” to the flange flange of an axle shaft made of steel. There are numerous recommendations and tips on how to quickly remove the drum.
It should be recalled that the use of various types of pullers does not give the desired result; moreover, the puller most often breaks the drum collar.
The easiest way to remove the drum is to use two mounting bolts 1, which are screwed into the technological holes 2 until the drum separates. However, as practice has shown, this method is effective when the car is “young,” i.e., its mileage is 3–5 thousand km.
If you cannot remove the drum using this method, you can do the following as a last resort:
- unscrew the guide pins from the drum
- lubricate the drum seat on the axle shaft with engine oil, start the engine and press the brake pedal
- engage first gear.
With the help of the described manipulations, it is almost always possible to free the drum, since it is held in place by the blocks, and the axle shaft rotates.
While rotating, the axle shaft makes a very unpleasant squeaking sound, but after 10 - 15 seconds, you can turn off the engine, release the brake pedal and remove the drum.
Common Difficulties
Quite often difficulties arise in the process of dismantling the guide bolts. Due to the presence of too much moisture, they tend to get stuck in the staple itself. If this problem does arise, then you should resort to the most extreme measures. Otherwise, replacing the rear pads will simply be impossible. To do this you need a gas cylinder-heater and a wrench. It will take some time for the guide to warm up. Once it reaches the required temperature, unscrewing it will be very easy. If you don’t have a cylinder at hand, you can simply tap the drum on all sides. This must be done as carefully as possible, as additional damage may occur, for example, the guide bolt will crack or the thread will break. And this will make replacing the pads much more difficult.
When to change rear brake pads
Several factors influence pad wear:
- terms of Use;
- driving method;
- condition of the mechanism;
- quality of spare parts.
Operation in unfavorable conditions leads to a reduction in the service life of parts. Front pads (disc) wear out 2-3 times faster than the rear ones.
The mechanism may last longer if new drum brakes are installed. However, before you make the replacement yourself, you need to take into account the general technical condition of the car. It is important not to miss the moment when the system requires an update, otherwise new problems will appear.
Parts need to be replaced when signs of wear appear:
- pronounced creaking when braking (whistle, grinding, squealing);
- long pedal travel;
- shocks during a sudden stop;
- long braking distance;
- the brake pedal goes to the floor.
If one of these signs is detected, you need to urgently purchase parts. Doing the repair yourself is not at all difficult. If you put off solving the problem, the brake system will completely fail and it will not be easy to restore it.
You can correct the situation by contacting a service center, a private mechanic, or installing the pads yourself.
Attention! The device quickly fails if the car is equipped with counterfeit parts, when driving off-road, or if sharp braking is used.
How to change rear brake pads yourself
Before you start replacing worn parts, you need to carefully inspect other mechanisms to make sure that there are no other “surprises”. Together with the drum system, they often break down: the drum, the cylinder leaks, the handbrake cable gets jammed.
Video
For effective repairs, the car must be driven into a hole or jacked up. Regardless of the brand and features of the mechanism, the process of replacing brakes is carried out in several phased steps:
- The wheel is dismantled.
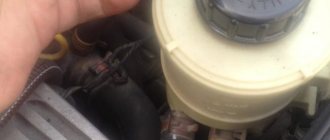
- Inside the hood, the brake tank cover is removed;
- Parts are cleaned of dirt.
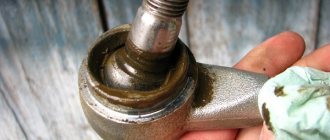
- The guide bolts are unscrewed.
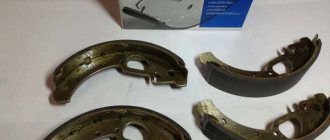
- The pads are removed with a screwdriver and replaced in pairs.
- The system is checked upon ignition.