I bought myself a toy in the summer - Niva 21213. All sorts of minor improvements began.
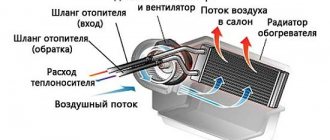
Remembering the problems with the heater from the time when I had the 2106, I decided to immediately remake this device. We don’t go into plumbing details - a lot has been written about this on the Internet.
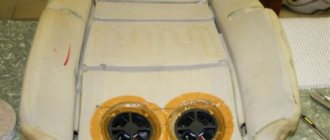
1. The snail from 2108 in the air supply boot is not a problem. Decided and completed in two days. The price of a snail is 900 rubles. 4-speed switch, price 150 rubles, resistor from 2123, price 120 rubles. I completely threw out the air intake damper; it is not needed there. The air flow is crazy. Original three-row copper radiator. The temperature in the cabin is like in Africa. Tested already in winter.
Now a little about the tap. Knowing the “advantages” of the Zhiguli ones, I immediately went to the disassembly site and found a heater valve from some Toyota:
I had the same one on my Toyota, so I took the already tested one. The faucet was installed under the hood. I brought the radiator pipe directly under the hood and threw out the original faucet. I redid the tube coming out of the cylinder head and made a direct exit. I connected the pipe to the tap, and from the tap to the radiator inlet:
True, it’s hard to see him, but he’s there.
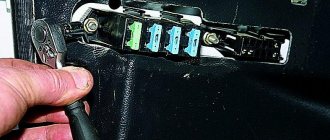
I found a suitable pipe in a store, I don’t know what car it came from, the sellers don’t know either. From the outlet of the radiator, the pipe goes to the thermostat, made from two pieces, also unknown, but it seems to be from Oka, at one end there is just an extension of 18, under the thermostat. To control the crane I used a heater damper servomotor from a Japanese car, I don’t know which one:
I connected the cable from the Niva faucet, having previously shortened it to the required size. I found the drive control in a headlight from the Volga, an electric headlight corrector. I disassembled the headlight unit, and there was the Bosch corrector drive:
I disassembled the drive - there is an electric motor and an adjustment board made on the TLE 4209A chip:
I looked at the current of this microcircuit on the datasheet - it is enough for a more powerful drive, I connected a servo drive from Toyota (see the group of four photos above).
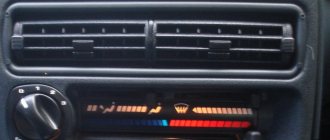
Now the position of the heater tap is adjusted from the passenger compartment using a variable resistor. By what angle you turn the regulator, the tap will open or close by the same amount. Stops in any position from “closed” to “open”. The degree scale is not used:
I connected it according to the headlight electric corrector circuit:
2. Thermostat from Shniva - also very simple:
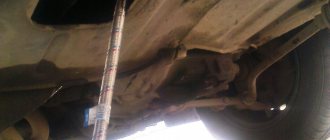
I plugged the hole on the pump and threw out the metal tube from the radiator:
I connected the carburetor heating pipe. The lower pipe from the radiator was connected from two pieces using a cut aluminum pipe from the thermostat housing 2110. The photo shows it directly. But the thermostat was a little pulled to the side, so I decided to redo it. Everything was done locally. No problems. For the future, I plan to machine a threaded pipe for the temperature sensor; I want to install electric radiator cooling fans. Most likely also from disassembly from a Japanese car. The price is approximately 400-500 rubles. But this is already for the summer. For now let's talk about temperature. It warms up quickly, I can’t tell you about the time, I’ve never driven a Niva in winter before, I have nothing to compare it with. But when it warms up, the thermometer needle does not move in the operating temperature zone in any driving mode and at any temperature. True, this year it was not lower – 25.
Revision instructions
Remove the air intake box (popularly called “boot”):
- In the interior, unscrew 4 nuts using a 10mm wrench;
- In the engine compartment, an assistant holds the bolts with the same key;
- Remove the air intake.
Remake the “boot” and install a fan in it:
- Cut off part of the plastic a little from the side so that the fan housing does not interfere with the hood lock;
- We cut off all the protruding parts of the fan mount and place it inside the “boot”;
- Secure the fan, securing its housing with sealant.
- We close the space around the fan nozzle with suitable material to prevent air outflow;
- We install the casing with the fan in place, laying the wires;
- We check that the hood closes without problems.
The result should be a design as shown in the video:
The damper can be left in place, but if it is removed, there will be no additional obstruction to the air flow into the cabin.
content .. 112 113 114 115 116 117 118 119 ..VAZ-21213 (Niva). Heater
VAZ-21213 (Niva). Removing and installing the heater
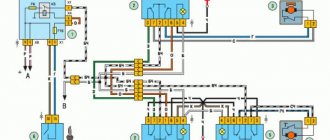
Heater1 – air distribution cover; 2 – lever of the air distribution cover; 3 – damper for the windshield heating air duct; 4 – control handle for the heated windshield damper; 5 – air supply cover control handle; 6 – crane control handle; 7 – control lever bracket; 8 – flexible rod; 9 – air duct for body ventilation;
| 10 – side window heating air duct; 11 – air duct for heating the windshield; 12 – air supply cover; 13 – air supply box seal; 14 – air supply box; 15 – radiator; 16 – inlet and outlet pipes; 17 – tap; 18 – fan casing; 19 – spring bracket; 20 – fan motor |
EXECUTION ORDER
1. Move heater valve 17 control handle 6 all the way to the right and drain the liquid from the engine cooling system.
2. Disconnect the ground cable from the battery. 3. Remove the fastening screws, remove the instrument panel shelf and the radio panel, and disconnect the electrical wires. 4. Loosen the clamps and disconnect the rubber hoses for supplying and discharging fluid from pipes 16 of the heater. 5. Unscrew the two mounting bolts inside the engine compartment and remove the heater radiator pipe seal. 6. Loosen the bolt of the bracket securing the flexible rod shell on the tap and remove the rod from the tap. 7. Remove the heater fan motor switch and disconnect the wires from it. 8. Remove the four spring holders and the fan casing 18 assembled with the electric fan. 9. Remove the instrument panel panel, through the opening for it in the panel, loosen on bracket 7 the screws of the brackets of the flexible rods of the air inlet cover 12 and the damper 3 of the windshield heating air duct. Remove the rods from the control levers. 10. Unscrew the nuts securing the radiator casing 15 to the air inlet box 14, disconnect the ground wire secured under one of the nuts, remove the casing and the air inlet box. 11. Install the heater in reverse order. Pay attention to the correct position of the sealing gasket between the radiator casing and the body, and to the reliability of tightening the rubber hose clamps. 12. After installing and connecting the hoses, fill the engine cooling system with liquid and check the tightness of the connections. VAZ-21213 (Niva). Dismantling and assembling the heater Heater parts
| 1 – air distribution cover; 2 – fan casing; 3 – resistor; 4 – guide casing; 5 – radiator casing; 6 – air supply cover gasket; 7 – air supply cover; 8 – spring bracket of inlet and outlet pipes; | 9 – spring holder of the fan casing; 10 – radiator gasket; 11 – radiator; 12 – inlet and outlet pipes; 13 – tap; 14 – fan impeller; 15 – electric motor; 16 – spring bracket; 17 – electric motor mount |
PERFORMANCE ORDER
1. To disassemble the heater, remove two spring brackets 16 and remove the electric fan from the casing 4. Unscrew the nut securing the impeller 14 and remove it from the electric motor 15. 2. Unscrew the nut of the clamping bracket 8 securing the inlet and outlet pipes, remove the bracket and remove the radiator 11 from casing 5. 3. Remove air supply cover 7 by unscrewing the nuts securing the bracket. 4. Unscrew the nuts securing the brackets and remove the air distribution cover 1 of the fan casing. 5. Assemble the heater in reverse order.
content .. 112 113 114 115 116 117 118 119 ..
What did you improve?
The modernized stove has a number of advantages:
- Quiet, and at 1st speed silent.
- Productive, at speed 1 it blows at the level of speed 2 of the old fan. At maximum speed, dust will fly out of the air ducts.
Such tuning of the heating system is mandatory for drivers of northern cities. Have you improved the Niva 4x4 stove in this way? Write reviews and additions on this modernization, take part in the survey. Let us remind you that other modifications to the SUV are published in this category.
Photo: Flea in-flight magazine
Keywords: Niva stove | Niva air ducts
Found an error? Select it and press Ctrl+Enter..
Methods for modifying the stove in a Chevrolet Niva car
Before the heater is improved, it is necessary to understand the principle of operation of the dampers.
Then you should completely dismantle the decorative panels located on the left side of the Chevrolet Niva stove. The next step is to remove the regulator responsible for the position of the dampers. When optimizing your car, you need to understand the design of the heating device, which will allow you to dismantle the “unnecessary” equipment without unnecessary delays. The motorist must remove the lower part of the regulator, through which the front flap is activated. When dismantling all the plastic elements, you should not try to abruptly remove the parts, since almost all the components of the device being disassembled are made of fragile plastic, which breaks even under more or less significant impact. If, however, due to haste or carelessness of the owner of the movable property, the lower part of the device being removed gets a crack, it can be hidden with a soldering iron.
Modifying the Chevrolet Niva stove with your own hands involves the need to secure the lower damper so that it is tightly closed in the upper position. Of course, such a modernization completely eliminates the ability of the motorist to take advantage of the “front” position, however, it provides many other more significant advantages.
To tightly fix the front flap, you will have to make a small-sized bracket with your own hands (it is best to resort to using a simple tin), which will be held on by a self-tapping screw.
Once the “front” of the stove is in the closed position, you will need to think through the trajectory of the element that regulates the simultaneous supply of heat to the glass and legs. It is worth noting that skilled craftsmen, when upgrading their Chevrolet Niva, use all available means, in particular, an ordinary discount card will be useful for optimizing the stove. By means of which a cut line is drawn, then the element is glued with cyanoacrylate and filed to size with a file.
The modification of the Chevrolet Niva heater should be completed after the hand-cut part is glued with superglue.
The Chevrolet Niva is equipped with a liquid-type heating system combined with an engine cooling radiator. This design, the main function of which is to heat the interior, allows, if necessary, to increase the intensity of engine cooling. In addition, the LC and GLC trim levels include air conditioning.
Perhaps the problem is not in the interior heater, but in the cooling system. With the help of damper position regulators, warm air is directed to different parts of the cabin. First, the dampers should be adjusted.
To supply hot air to your feet, follow these steps: The engine warms up until the warm air can be felt with your hand. The heater fan speed switch is set to position 4.
Air should begin to flow into the lower part of the cabin. If the result is not achieved, the procedure is repeated.
This sequence of actions is due to assembly errors. Due to gaps and backlashes, interference is created with air distribution and installation of the damper in the desired position the first time. If after these steps the heat still does not reach your feet, the heating system needs to be modified.
The aluminum radiator heats up quickly, is inexpensive, has good rigidity and is light in weight.
The Chevrolet heating system ensures high-quality engine operation, preventing overheating, which leads to engine failure. The interior heater of the Chevrolet Niva model is liquid. Warm air is exhausted inside the car, cooling the running motor. Two types of heating systems are available: without air conditioning and equipped with air conditioning. The interior heater does not require additional maintenance during normal operation of the Chevrolet Niva model.
Types of radiators for the Niva stove
It doesn’t immediately become colder in the Niva’s cabin – the stove stops working normally for several reasons:
- the heating tap does not switch (stays sour in the closed or half-closed position);
- The motor rotates at low speed;
- the heater radiator is clogged;
- an air lock is created in the cooling system;
- parts turn out to be defective;
- the valve in the thermostat opens prematurely;
- poor circulation is created in the cooling system due to the water pump.
It may still be cold inside the car due to a blown cylinder head gasket in the engine. To make the interior warmer, car owners often install on Niva 21213 cars:
- three-row copper radiators of the stove, they have better heat transfer;
- The heater motor is 2108, they are more efficient than the standard ones on the Niva.
RP for the VAZ 21213 is produced by various companies, and the quality of stove radiators may vary. On the auto parts market you mainly find parts from manufacturers:
- "Orenburg radiator";
- luzar;
- DAAZ;
- SHAAZ;
- "Likhoslavl Radiator Plant";
- Iran;
Based on the material used, RPs can be made of copper or aluminum, each of them has its own advantages and disadvantages. Aluminum radiator:
- heats up quickly;
- cheaper than copper;
- has high rigidity and low weight.
But aluminum RP is not repairable, it is practically impossible to solder it. Other disadvantages of aluminum include:
- rapid cooling, this metal does not retain heat well;
- susceptibility to corrosion, which is why aluminum RPs fail more often than copper ones.
The main disadvantage of copper RP is that it takes a long time to heat up the interior, but even after stopping the engine, it retains heat for quite a long time. Copper heater radiators are approximately 30-50% more expensive than aluminum ones, but this is not so important - in general, the parts are still relatively inexpensive. The problem with copper RPs is different - the quality of the products is low, and it is not so easy to buy parts of acceptable quality.
Chevy Niva car owners often have problems with heating the interior; the car can be cold even in frosty temperatures of -15? C - the aluminum radiator of the stove does not heat very well. Another problem on VAZ 2123 cars is that stove radiators often leak.
Aluminum heater radiators on a Niva car are inexpensive:
- VAZ-2123 (Chevrolet Niva) - on average from 700 to 1000 rubles;
- VAZ-21213 (21214/2105) - from 650 to 1100 rubles.
Copper RPs are sold more expensive, their prices range from 1,500 to 2,500 rubles, the cost depends on the brand of the product, the region of sales and the sellers themselves.
Introduction
Modifying the Chevrolet Niva stove with your own hands does not require huge labor costs and investments. As practice shows, it can be done by absolutely anyone who wants to upgrade a standard unit in such a way that the airflow is maximum. All owners of a Chevrolet Niva car note the impossibility of adjusting the warm air in such a way that the glass and the area where the feet of the driver and passengers are located are simultaneously heated.
In fact, there are several methods to make interior heating more optimal and productive, however, in the material below we will consider a method that allows you to carry out all the manipulations without first removing the front panel. In addition, this modernization method does not require large financial investments.
Removing and installing the heater motor on a VAZ-2121 Niva
Good afternoon. In this manual, we will tell you how to independently remove and install the electric heater fan motor on a Niva VAZ-2121 . The procedure is not too complicated; the only tools we need are a Phillips screwdriver and straight hands