The sensor is a thermistor; it has a negative coefficient; as the temperature increases, the resistance decreases. After installation, you need to check the functionality of the system.
Author of the article: Yaroslav Alchevsky 05/15/2020 0 0
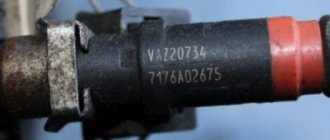
The Passat B3 coolant temperature sensors are responsible for the readings transmitted to the engine ECU and to the device installed on the panel in the car's interior. Malfunctions of these elements can cause problems in the operation of the motor.
Sensors installed on VW Passat B3
Coolant temperature sensors for VW Passat B3 have the abbreviation DTOZH. Three elements are installed, differing in color, each with its own purpose.
Red
The red sensor is a thermal relay. With single injection, the intake manifold warms up due to its activation. VAG code 251919369B.
The cooling sensor for the Passat is red. Photo source: https://www.drive2.ru/l/472438981930254355/
Installed at the bottom of the flange tee, closer to the radiator.
Black with green trim
DTOZH transmits coolant temperature readings to the device in the car interior. VAG catalog number 251919501D.
The cooling sensor for the Passat is black. Photo source: https://www.drive2.com/l/467804265541272060/
It is installed at the top of the tee, it is the farthest from the block.
Blue sensor
The blue element transmits data about the coolant temperature in the system. Article VAG 025906041A. Located on the flange tee closest to the body. This sensor is the most important among DTOZH.
The cooling sensor for the Passat is blue. Photo source: https://www.drive2.ru/l/483279616824311905/
Based on its signal, the ECU, according to the programmed program, controls the fuel supply, changes the ignition timing, and starts a fan that cools the antifreeze in the radiator tubes with an air flow.
Overview of types of DTOZH: design and principle of operation
Let's take a closer look at the operating principle and types of controllers.
Magnetic
Such controllers consist of coils located on the sides of a steel armature. The arrow of the controller located on the instrument panel in the cabin is connected to the latter. The first coil is connected to the vehicle's on-board network, and the second to a cable with varying resistance. This parameter changes according to the temperature values in the engine. The voltage passing through the coils creates a magnetic field that controls the armature. The element displacement parameter is determined by the field difference depending on the current value.
User Irimiya Evgeniy showed in his video how unstable the DTOZh is.
Bimetallic
The operating principle of bimetallic controllers is based on the expansion of elements during heating. The device is equipped with a rod that changes size as the temperature of the internal combustion engine increases. The stripes in the coil rotate the arrow on the control panel in the car's interior in accordance with the current value.
Modern antifreeze temperature sensors can use two types of sensors:
- semiconductor;
- bimetallic.
The latter are practically not used today. The strip in such controllers moves to the coil and opens the contacts, helping to change the amount of current flowing to the dashboard. And semiconductors are used everywhere. The control unit supplies a signal to the device thermistor with a negative coefficient through a resistive element with constant resistance. As the temperature increases, the resistance in this circuit drops. Accordingly, the voltage level decreases. The control module detects a decrease in this parameter and determines the temperature of the consumable material, displaying it on the control panel with an indicator.
Capillary
It is considered the oldest and irrelevant type of sensor for use today. The arrow on the device is directly connected to the device. The controller is made in a housing in the form of a container with consumables, which has a low boiling point. The reservoir is connected to a pointer as well as a steel tube. When the power unit warms up, the refrigerant in the container begins to boil and evaporate, resulting in an increase in pressure in the flask. This parameter is sent to the pointer where the Bourdon tube is located. This element begins to straighten as a result of pressure and moves the arrow on the control panel.
This type of controller is almost never used for several reasons:
- the measuring element itself runs through the entire engine compartment, connecting to the tube on one side and to the control panel on the other;
- The capillary tube is quite thin and is quickly damaged during operation.
Photo gallery “Varieties of DTOZH”
Diagrams of different types of sensors are shown in the photo.
Magnetic type DTOZH Bimetallic sensor Capillary sensor circuit
Signs to identify sensor malfunction
Malfunctions of the cooling sensor switch on the Passat B3 can be a consequence of:
- long service life of the coolant, reducing its quality;
- factory defects DTOZH;
- antifreeze leaks at sensor installation sites;
- electrical equipment malfunctions;
- thermostat failure.
The driver can see symptoms of sensor malfunction when starting and driving the car. If the DTOZH, which is responsible for the coolant temperature indicators, fails, the instrument needle may show incorrect values. There may also be symptoms of malfunctioning car components:
- A cold engine has difficulty starting. After switching on, it stalls or only works with throttle. After warming up there are no problems.
- Problem starting the power unit, which did not have time to cool down. The sensor sends incorrect signals and a lot of fuel enters the engine.
- Increased gasoline consumption.
- The fan turns on regardless of the engine temperature.
- When driving, the driver feels jerking.
- At idle, the speed increases, it significantly exceeds 1000 rpm.
The driver may encounter a situation where the Passat B3 coolant temperature sensor transmits the normal temperature, the arrow is in the normal position, and the light does not light up. However, the thermostat has failed or the coolant level is below normal, so the car may boil, the on-board computer will give an error, and the engine will stall.
Replacing the DTOZh sensor. Photo source: https://www.drive2.ru/l/464991714797422001/
The blue coolant temperature sensor on the Passat B3 may have a malfunction due to a broken wire inside or a loose terminal, then the engine ECU will generate an error and chek will light up on the monitor.
A faulty sensor may show excessive values. The temperature in the engine compartment may be negative, but the DTOZh determines +20 and above. The engine will not start and will not have enough fuel.
Purpose of the device
DTOZH should not be confused with an antifreeze level controller. If the first is intended to detect the temperature of the power unit, then the second is used to control the volume of consumables - refrigerant. Based on the DTOZH readings, the control unit detects temperature changes and transmits data to the on-board computer about the state in which the engine is operating. Using the controller, engine warm-up, overheating, and the optimal temperature of the operating internal combustion engine are determined. Pulses transmitted to the control module determine the functionality of the internal combustion engine control system as a whole.
The engine temperature determines the following nuances:
- fuel consumption per 100 km;
- volume and quality of gases;
- ignition of the air-fuel mixture;
- optimal operation of the gearbox.
All these factors are controlled by a control device, which, based on the information received, determines the optimal operating mode of the engine. Therefore, the performance of the temperature sensor is important for the vehicle. If the device is faulty and sends incorrect pulses to the control module, this can lead to problems.
How does DTOZh affect the operation of the internal combustion engine?
Based on the parameters supplied to the control device, the module performs the following functions:
- Enrichment of the air-fuel mixture or its depletion. If the controller detects that the temperature is too low, it will begin to increase the duration of the signal sent to the injectors, which helps to enrich the fuel mixture. In accordance with the normalization of the temperature regime, the fuel is gradually depleted, which prevents possible excessive consumption of gasoline and reduces the volume of exhaust gases. If the sensor breaks down, it can regularly lower the temperature in the engine, which will lead to fuel contamination and increased consumption.
- The control unit sets the ignition. It can be early or late. If the temperature increases, the control module adjusts the ignition timing to reduce exhaust toxicity.
- Thanks to DTOZH, proper recirculation of gases is performed during warming up. The recirculation valve closes tightly when the power unit warms up. If the car’s engine is still cold, then recirculation will cause fluctuations in idle speed and random engine stops.
- With the help of DTOZH, the control unit purges the filtration system, which traps fuel vapors. To achieve better machine controllability, the carbon filter element is not purged until the engine is completely warmed up.
- Locking of the gearbox torque converter when the internal combustion engine warms up. The control module should not limit the operation of the device until the machine warms up.
- The ECU controls the operation of the unit's cooling fan. Based on the temperature controller readings, the module activates and deactivates the ventilation device to correctly select the temperature of the unit. If the DTOZ gives incorrect impulses, there is a possibility of the motor overheating.
We recommend: Why do the spark plugs on the injector flood and how to deal with it?
Typical faults
The car engine does not start well, or the device does not show the coolant temperature in the Passat B3 - such symptoms may indicate a malfunction of the DTOZH.
The coolant lamp comes on
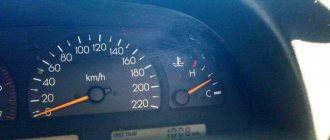
When the engine starts, the lamp begins to flash and then goes out. This may mean engine overheating, including due to insufficient coolant volume.
The coolant lamp is on. Photo source: https://www.drive2.com/l/507154412309840137/
If the coolant level is normal, the sensor may be faulty. It is also necessary to check the functionality of the thermostat.
The gauge needle does not show coolant temperature
The Volkswagen Passat B3 coolant temperature sensor may be faulty. Another reason is a break in the electrical wiring in the dashboard.
DTOZH shows inflated values
After the engine has been successfully started, the needle on the temperature gauge goes off scale. This may also be a sign of a sensor failure. Another explanation for the symptom is that the thermostat has failed, and the coolant flows only through a small circuit.
Incorrect values
On the Volkswagen Passat B3, the coolant temperature sensor shows incorrect values. The arrow indicates overheating at standard data, or vice versa. If the coolant is normal, then perhaps the DTOZ has failed; you need to check its performance.
Knock sensor Mazda 3 replacement
But this does not apply to all systems. АMazda 3 Long-awaited)) Outside air temperature sensor. I decided to install it on my Mazda...
Deviations may be caused by excessive voltage on the contacts.
The most convenient and shortest way is through the clutch plug.
Mazda 3 2008, 105 l. With. — self-repair
On some cars, readings have been observed - 40 degrees after turning on the headlights. In this case, the cause of the malfunction most likely lies in poor ground contact. The ground from the sensor is attached together with the ground from the left headlight on a stud behind the headlight. With such symptoms, it is necessary to unscrew and clean these ground wires.
Sometimes it shows 40 only when driving, that is, somehow the reason is connected with the speed sensor. This is due in most cases to the design differences of the machines.
However, understanding where the ambient temperature sensor is located is quite simple.
You need to find its number in the electrical diagram, and that's all. In most cases, it is installed near the radiator, usually in front or behind it.
General information
But it happens that it is mounted on the side. The main requirement is the absence of temperature effects from the engine. The motor gets hot and affects the controller. He, in turn, will give incorrect testimony.
In other cases, there is preparation, that is, there are all the necessary connectors and wires for connection. This is done so that the driver has the opportunity to carry out the installation himself. However, before installation, it is advisable to check whether the dashboard will display controller readings.
Side mirror. temperature sensor
To do this, press the daily mileage button and turn on the ignition. This is how we run self-diagnosis, as a result all indicators are displayed.
During diagnostics, press the daily mileage button again, which should bring up the version or higher on the display.
This will indicate the possibility of installing the sensor. Installation itself. As noted above, the VAZ ambient temperature sensor is not difficult to install. Especially if all connectors are provided by the manufacturer. The next step is purchasing a sensor.
There is nothing complicated, we go to the car store and buy the thing we need. The most optimal location for the sensor is near the radiator.
The mass can be thrown over the welded pin. The wires need to be pulled into the interior. How this will be done is up to you. The most convenient and shortest way is through the clutch plug. Of course, you can’t do without disassembling the instrument panel.
We dismantle it and look for the contact. It is precisely intended for the ambient temperature controller. Readings on the on-board computer usually appear automatically.
"Lada Granta": sensor installation
If this does not happen, reset the battery terminal for a few minutes. And from the outboard readings, oh, horror! No, I honestly don’t understand the “discrepancy” with which thermometer, which is installed where?
It may show differently at different weather stations, is this important? Or should it be permanent? Or is it some kind of glitch, for example: What depends on temperature? But there is a mass flow sensor, which calculates everything itself, why does it need a thermometer, and even so inaccurate: Or it has to be constant Honestly, it seems to me that there is always an error, only in the summer people bother even less about this than in the winter, when they sit in the car while warming up and feel sorry for themselves because of the cold outside: This is done this way on purpose: And that after turning off the engine the temperature does not change - it seems to me that there is also a reason - if I’m not mistaken, the sensor cannot instantly obtain the ambient temperature environment, so its previous state is displayed Oleg Damn guys, and my speedometer is also wrong. Too lazy to look for my exact words, but I have long proposed renaming all these damn devices according to the algorithm, and this would save many of us from searching for hidden meaning!
Added after 3 minutes Wow! I wish I knew the exact temperature for some reason! Maybe it’s still extra. You can also put a server with a DBMS in the glove compartment to somehow automate this process!
Source: https://diabloarea.ru/khonda/datchik-temperatury-okruzhayushhey-sredy.html
Installation on the engine
Making a sensor for an alarm with your own hands is still half the battle. You need to install it correctly and connect it to the system. In order for the thermistor to show the engine temperature as accurately as possible, the best place for it is the cylinder block.
The latter cools down later than all other parts, so the signal to turn on the starter will arrive in a timely manner. With a different arrangement, the system mistakenly believes that the engine has already cooled down and will start it more often, which leads to excessive fuel consumption.
The easiest way to mount your sensor is on the thermostat or radiator pipe. In the first case, it will show a more realistic temperature, in the second, it will be easier to connect in parallel with the hood closing sensor. The fastening method is the same:
- attach the homemade thermistor to the metal surface of the pipe;
- secure it with electrical tape;
- insulate the outside with heat-insulating material and fix it with the same electrical tape.
Connection to alarm
Typically, the manual for a car alarm provides instructions on connecting all sensors, including temperature ones. For example, in TOMAHAWK and STARLINE systems, one wire is connected to the orange-gray wire of the control unit. In ALLIGATOR - to black and green. The other end is always attached to the mass. In practice, this is equivalent to connecting in parallel to the hood sensor, which is what is most often done in practice.
Advice: laying the wires in the engine compartment must be done so that they do not dangle, but are securely fixed to the surrounding parts using electrical tape or installation clips.
The correct operation of the alarm with auto-start depends on the correct location of the additional temperature sensor. A thermistor made by yourself will cost several times less than a purchased product, and the creator will feel proud of the results of his work.
Another weekend was spent usefully: an external air temperature sensor was installed. Having read about the possibility of equipping the car with a temperature sensor, I went to look at the version of the dashboard on the car. To do this, with the ignition off, press the mileage switch button and turn the key to position 1. As soon as the arrows start moving and all the indicators light up (dashboard test mode), release and press the same mileage switch button again. We see the dashboard software version! 090
exactly what you need!
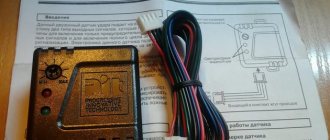
Next, a temperature sensor was purchased complete with a connector: in the store it was called “VAZ-2115 Outside air temperature sensor” and cost 200 rubles. I bought some corrugated plastic at a hardware store, and used the wires supplied from the speakers, which I installed in the rear doors. To install, you will need to remove the battery as the wiring will have to be laid underneath it. I unsoldered the sensor connector and tucked the wires into the corrugation.
Installed without removing the bumper, your hands can easily fit into the lower slots, you can install the sensor itself and lay the corrugation with the wire.
It is best to bring the wires into the cabin through the rubber plug of the hydraulic headlight range adjustment.
We go into the salon and tighten the wires. We disassemble the dashboard to get to the connector: 1) first unfasten the cover of the safety block (it is held on by latches, do not forget to disconnect the connector - the trunk release button) 2) then unfasten the cover on the instrument panel (it is held on by three screws, one on the left and two on the top, right edge also on the latch) 3) unscrew the four screws securing the dashboard. Before removing the connector, unfasten the rocker-lock (black) on it, then it will easily fall out of the mating connector. To disassemble the connector itself and get to the contacts, you need to bite through the clamp and slide down the black locking plate.
That's it, let's move on to the connection: we took the case from one of the bolts under the dashboard, the second wire was pre-soldered to a pre-prepared “pin” from the FDD power connector (removable from any computer power supply, even a very old one). We insert contact number 25 into the connector between the pink and white-black ones. Before installation, I rang the resistance of the sensor with a multimeter: at a temperature of +11 it showed 5.7 kOhm. The polarity of the connection does not matter. Reassemble the dashboard in reverse order, turn the ignition key 1 notch. Using the button on the right switch, we scroll through the BC readings, and we see the item with temperature that appears!
Time spent 2 hours and 200 rubles of money :), I completed another small and simple modification on my own.
PS: Thanks to everyone who has subscribed, you are already 200! I would like to believe that all these publications are not in vain and they help us in exchanging experience in finalizing our grants!
PUVN-10 and PUBT-03: main characteristics
It produces itself and offers to purchase control panels along with heating boilers. The most popular of them are PUVN-10 and PUBT-03.
Please note that in the case of the remote control, the correct installation of the external temperature sensor is crucial.
The control panel for electric water heaters PUVN-10 is compatible with most models of Kupper boilers. These include the series:
- OK (models 9, 15, 20);
- HVAC (models 10, 18);
- PRO (models 22, 28, 36, 42).
Removing the sensor
Currently, there are many devices that allow you to determine a controller malfunction in a matter of seconds. And above all, we are talking about Bluetooth and Wi-Fi adapters that connect directly to the vehicle’s on-board system.
If such a universal device is not at hand, then the driver will have no choice but to dismantle the temperature sensor himself.
In particular, to do this you will have to adhere to the following instructions:
- First of all, you need to wait until the engine cools down to at least 50 degrees Celsius.
- Next, you need to drain the antifreeze as much as possible, which will prevent you from burning your hands.
- The next stage involves disconnecting the battery from the vehicle’s electrical network, for which it is necessary to disconnect the “negative” terminal.
- After this, the entire thermoelement with wires is turned off.
- At the final stage, the part is unscrewed, for which you will have to select a suitable wrench.
It should be remembered that if the device is placed at the top in the general electrical system of the car, there is no need to completely drain the coolant. But with lower placement, you should do exactly the opposite, draining all the antifreeze.
Communities › Kulibin Club › Blog › Electrics: Temperature sensors, we make it ourselves.
Sometimes there is a need for temperature control of some process, be it a car or a national economy.
There are many different thermal control schemes, but the sensors usually have an inconvenient design that does not allow for mounting in a controlled environment. Let's talk about sensors. As a rule, semiconductor devices - thermistors - serve as sensors for measuring circuits:
The case may be different, but inside there will still be about the same droplet with leads.
The second common temperature sensor is the DS1820:
They are often sold as follows:
Inside is the same DS18B20 microcircuit with three pins, even without thermal paste.
Now let's try to implement these radio components into a car, for example, for digital display of coolant temperature or control of electric fans.
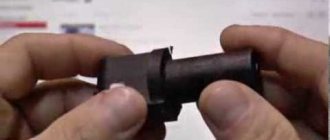
We will need a donor sensor - any suitable thread and cost. In my case, this is the Volga-UAZ sensor TM 106-10
:
We take a drill as a lathe and carefully clamp the sensor into the chuck. Using a metal hacksaw, we cut off the rolling. When the sensor falls apart into its component parts, use a drill to even out the edge of the sensor with a file. We receive a blank housing for introducing our radio component there.
Then you can go in two ways: 1. Pour molten solder into the body, drill a channel in this solder and insert a thermistor there. You can fill the housing cavity with thermal paste and stick the thermistor into it, but tin’s thermal conductivity is several orders of magnitude better than thermal paste, so thermal paste must of course be used, but it’s better to apply a thin layer of it.
The disadvantage of this method is the high inertia of the resulting sensor.
2. Do it the way I do it