Diagnostics of airbag malfunctions
The only method for accurately diagnosing a support is to thoroughly inspect it for damage. Sometimes. To do this, the support must be removed from the car. There is an opinion that you can test the operation of the airbags by observing the amplitude of engine oscillations by holding the brake and pressing on the gas. But we are wary of this test. In addition, there are often cases when a car owner is trivially scammed into replacing expensive hydraulic cushions (for example, on Honda Pilot and Honda Legend cars). And everything would be fine, but instead of a high-quality original, they install a Chinese non-original. The cost of the original for the same Legend is 12-15 thousand rubles, when a Chinese replica costs 2-3 thousand..
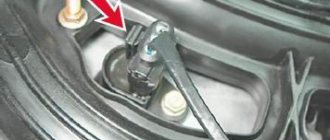
An indirect sign that the airbag has failed is strong vibration in the body. Most often, it first appears when driving in reverse, and after a few days it appears when the engine warms up in P, N and when switching to R. In D, the vibrations disappear. When you fall into a hole or hit a bump, very unpleasant sounds can also appear. In order to be completely convinced that the pillow is faulty, you need to look at it. There will be no gap.
In our case, there is no gap and therefore we proceed to replacing the pillows, simultaneously telling you our actions.
Marking of power unit damper mounts on Ford Focus 2
To make replacing engine mounts on a Ford Focus 2 as effective as possible, you need to choose the right unit. Although the markings are applied to the part, it is not always possible to purchase the same copy, so it does not hurt to know possible analogues.
Codes for the right hydraulic support of the internal combustion engine
Original spare parts depending on the year of manufacture of the car:
- From 2007 to 2009 – 1430066.
- From 06/22/2009 to 10/14/2009 – 1567878.
- After October 14, 2009 – 1671722.
- After 01/24/2014 – 1862540.
- Hutchinson 586282.
- Volvo 31375739.
- Volvo 30758020.
- Mazda BBM439060C.
- Mazda BBM439060D.
Codes for the left rubber-metal support of the internal combustion engine
Original parts, suitable for all engines:
- Ford 1437545.
- Ford 1798908.
- Ford 1684927.
- Ford 1801350.
- Hutchinson 538A21.
- Hutchinson 538A20.
As a replacement, it is possible to use an analogue – Mazda BP4N39070D.
Codes for the lower rubber-metal support of the internal combustion engine
Original parts, suitable for all engines:
- Ford 1404996.
- Ford 1751001.
- Hutchinson 532C79.
- Mazda BP4S-39-040A.
- Mazda 9YA0-2A-226A.
- Lemforder 3539401.
Unfortunately, recently there has been a lot of criticism about Volvo parts that quickly fail. This may be due to counterfeit products. For engines 1.4 and 1.6, hydraulic mounts must be used with different markings. The other two supports are similar for all motors.
Replacing the pillow with a new one
First of all, we remove the protection. We put a jack under the engine and raise it a little. Under no circumstances should you carry out any work on a vehicle that is being held in a raised position by a jack! Unscrew the air conditioner pipe mounting bracket. Next, unscrew the three bolts securing the upper jet rod; it can be easily removed. The two bolts and nut from the engine mounting bracket to the hydraulic mount fit very well. You will have to slightly loosen the structure with a jack up and down, otherwise the bracket will not be removed. We unscrew the bracket securing the engine mount to the body - three bolts, and remove it too. There are two bolts left that secure the support to the body; we also unscrew and remove the support – we see that it is covered in smudges and is torn. We install a new support, assemble it in the reverse order, do not forget to replace the upper reaction rod (if any). We go down into the “pit”, unscrew the three bolts securing the lower jet rod, take it out, install a new one and assemble it.
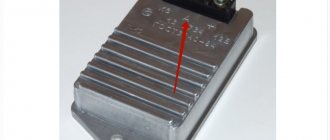
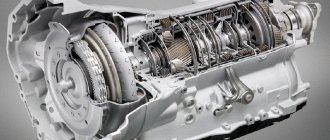
Changing the automatic transmission support: 1. Remove the battery. 2. Remove the air vent cover, the filter itself and the filter housing, having first disconnected the pipes and the sensor connector. 3. Remove the electrical control - a large aluminum radiator with three large connectors. 4. Unscrew the brackets. 5. Unscrew the two nuts and bolt securing the support to the automatic transmission. 6. Unscrew the two bolts securing the support to the body. 7. We change the support and put everything back together in reverse order.
Most modern Honda engine mounts are hydraulic. Such a support provides greater absorption of vibrations, in addition, it is controlled using a vacuum chamber built into the inside of the support. With all the advantages of this design, there is one significant disadvantage - the price of the part. The cost of the original is quite high. To avoid turning your Japanese car into a Chinese replica by installing a low-quality non-original, we advise you to frequently diagnose the supports, for example, at every maintenance. The point is that when one pillow fails, the load on the remaining, still healthy, supports increases sharply, thereby there is a very high risk that instead of replacing one support, three or four will have to be changed.
You can conduct an accurate diagnosis of engine and automatic transmission mounts, as well as undergo scheduled maintenance in our specialized Honda Acura services at the following addresses:
Other
How I determined that one of the engine mounts on my Ford Focus 2 is faulty:
- When I started the car at idle, there was a noticeable vibration of the car, the front panel shook a lot.
- Difficulty switching the automatic transmission (automatic transmission) to drive mode. In general, switching occurs with some slight effort and it is necessary, to put it more precisely, to switch with caution and with some kind of tension.
- When the car is moving, some extraneous knocks will be heard in the area of the gearbox.
- For example, I felt some kind of jerking when accelerating the car.
The principle of operation of engine mounts (mounts) is the same as the principle of operation of fire blocks. Here the main force comes from twisting the rubber or dampers. A low-quality part will manifest itself in the delamination of the rubber. How the cars are used plays an important role. If on bad roads, the engine mounts “out” very quickly and fail. You can replace the rear engine mount yourself in the garage if you have a hole.
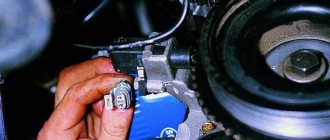
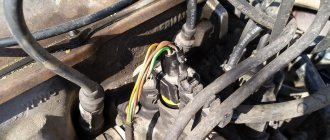
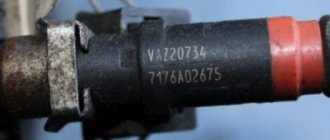
But before changing the rear engine mount, I opened the hood of my iron horse and looked at the condition of the right engine hydraulic mount. Upon inspection, I didn’t see anything suspicious, everything seemed to be fine. I looked at the rubber of the hydraulic mount or damper and found no fluid leaks.
Thinking nicely that everything is fine and my right hydraulic engine mount will continue for some time without replacement (this was my erroneous judgment). The photo shows the right hydraulic mount for a 2.0 liter engine. Ford Focus 2.
There will be no difficulties in carrying out repair work to remove the old support and install a new one.
Replacing engine mount ford focus 2
REMOVAL AND INSTALLATION OF ENGINE
We carry out work when it is necessary to repair the engine or replace it. We relieve the fuel pressure in the engine power system (see “2.3.1. Ford Focus II. Relieving pressure in the power system. Removing the fuel tank and drain pipe”). Disconnect the tip of the fuel supply hose from the fuel rail fitting (see “2.3.4. Ford Focus II. Removing the fuel rail and injectors”). Disconnect the wire terminal from the negative terminal of the battery. We drain the engine oil (see “1.3.4. Ford Focus II. Checking the oil level in the engine sump and replacing it”) and coolant (see “1.3.5. Ford Focus II. Checking the level and replacing the coolant” ). We remove the exhaust gas exhaust system collector (see “2.5.1. Ford Focus II. Removing the exhaust gas collector”). Disconnect the vacuum brake booster tube and the canister purge valve tube from the intake manifold fittings (see “2.3.6. Ford Focus II. Removing the intake manifold”). We disconnect the cooling system hoses from the heater radiator pipes and the thermostat housing, as well as from the exhaust pipe of the cylinder head (see “2.4. Ford Focus II. Cooling system of 1.4Duratec, 1.6Duratec and 1.6Duratec Ti-VCT engines”). We disconnect the tips and blocks of the wires from the starter (see “10.6. Ford Focus II. Removing and disassembling the starter”) and the generator (see “10.5. Ford Focus II. Removing and disassembling the generator”). Disconnect the wiring harness connectors from the injectors; ignition coils; throttle control unit, valves: canister purge, crankshaft position, phases, absolute pressure and air temperature, coolant temperature, detonation, insufficient oil pressure, reverse light, power steering fluid pressure. We disconnect the filler hose and the discharge pipe from the power steering pump (see “8.7. Ford Focus II. Replacing the pressure sensor in the hydraulic drive and removing the power steering pump”). You can dismantle the engine complete with or without the air conditioning compressor by unscrewing the compressor mounting bolts (without opening the refrigerant inlet and outlet lines) and securing the compressor with the pipes away from the engine. When removing the engine assembly with the air conditioning compressor, we disconnect the refrigerant inlet and outlet pipes from it and the wiring harness block from the electromagnetic clutch of the compressor (see “12.3. Ford Focus II. Removing the air conditioning compressor, condenser and air recirculation damper”). We remove the gearbox (see “4.4. Ford Focus II. Removing the gearbox”). After removing the gearbox, the engine is supported from below by a stop. We move the wire harnesses away from the engine. We secure the chain of the lifting device to two eyelets located on the engine. Having tensioned the chain, remove the right support of the power unit (see below “Replacing the supports of the power unit” ). Before removing the engine from the engine compartment, you must once again check that all hoses, tubes, and wiring harnesses are disconnected from the engine and laid aside.
Homemade rear engine mount
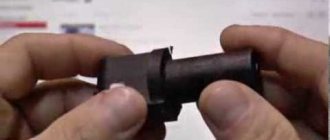
If suddenly it died, there is no need to waste 80 tanks to buy a new one, I already wrote here and there six months ago that instead of the internal rubber part, an engine from a GAZ-3307 is installed, catalog number 5312-1001020, any truck store has them, you just need choose according to size). they cost 7 rubles each, you put them on an iron sleeve (cut from the remains of the inner part of the elastic of the pillow ), press them into the outer part of the pillow , put wide washers on both sides, and put them in place.
Read more: Power steering pump Kamaz cummins
So, BUT the problem is that our Sovdepov rubber is more oak than Damascus steel, and therefore the vibration of the engine is almost completely transferred to the body, which is very unpleasant. YESTERDAY they won it. you just need to perforate these rubber bands by drilling holes with an 8 or 10 mm drill; the more holes, the softer the pillow.
You just need to drill more carefully closer to the center so that the central bushing does not tear the weakened rubber over time and begin to dangle. and in terms of outer diameter - the more holes, the better. Now my pillow is as soft as my original Ford one, there is almost no vibration on the body.
I also want to try soaking it in kerosene to make it even softer, just like in a limousine. Here!
I will share my experience in making a rear cushion
I read on this site about restoring the rear cushion using a cushion from a GAZ3307 and tried it. Complete bullshit! She's hanging out there. I won’t tell you how!
I did the following and got good results.
I cut out all the remaining rubber from it, cut two round pieces to size (I used rubber from a treadmill from a stadium about 2.5 cm thick), and cut holes in the middle of them for a homemade bushing from a piece of pipe.
Around the central hole (since the rubber is oak) I drilled holes with a diameter of 12mm for overall softness, 7 pcs. in each (rubber doesn’t drill well, so during this process it needs to be clamped between two pieces of plywood - then you get normal holes!).
Then I hammered these rubber bands into the body up to the protrusion in the body.
I inserted a homemade bushing. I secured the rubber bands in the body using U-shaped fasteners, the ends of which were bent inward onto the rubber.
Let people save 60. The pillow turns out no worse than a branded one!