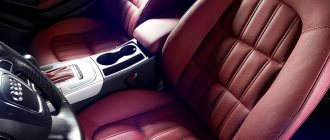
Over the years, every motorist has a need to update their car interior. After all, reupholstering the interior is not only a beautiful look, but above all it is comfort. And comfort for the driver is the most important thing, especially for those who spend a lot of time on the road. Therefore, if you decide to reupholster the interior of your car, then you need to take this matter responsibly. Since there are quite a lot of finishing materials available at the moment, you can create your own unique style. Of course, most people prefer leather, but you can find cheaper analogues. In any case, your interior will take on a fresh, aesthetic look and your passengers will be reluctant to leave your car.
In order to update the interior of your car, you don’t have to go to an expensive car service center and shell out a lot of money. You can purchase materials for upholstery of the interior in auto stores or auto markets, which will significantly save you money. And you can do this work yourself. To do this, consider the stages of work that are provided below. All work should be done correctly and efficiently so that reupholstering the car interior with your own hands is pleasing to the eye and lasts for decades.
Interior reupholstery
The upholstery of the car interior can be divided into several parts. Namely: re-upholstery of the dashboard, ceiling, doors. Now let's figure out how to do this in order.
Torpedo reupholstery
Reupholstering the interior should begin with the dashboard. Why did you choose a torpedo in the first place? It will take you a lot of time to update this element. Reupholstering a torpedo is considered the most difficult of all jobs. For high-quality finishing, the dashboard will have to be removed. If you have no experience in this matter, then it is better to turn to specialists. It happens that even an experienced craftsman cannot immediately find the fasteners the first time. So it’s better to shell out a small amount and seek help from qualified people.
After the dashboard has been removed, you can begin finishing. We cover it with the purchased material (in this case it will be leather):
- First, the entire torpedo needs to be thoroughly degreased. Refined gasoline works well for this. If you don’t have one, you can use a special degreaser, which can be bought at any auto store. We treat the entire surface of the torpedo and wait until it dries completely.
- Next, you need to sand the torpedo in those places where the material will fit and fit tightly. Let's take some coarse sandpaper and go over the surface of the torpedo well. The result is a clean surface, free of debris and remnants of previous material. Then we sweep away the dust resulting from cleaning with an ordinary soft brush.
- Let's move on to the finishing material. Let's put the material on the torpedo. We mark the places where the seams will be located. The design of the torpedo varies depending on the car. And if your dashboard has a minimum number of bends and irregularities, then you can consider yourself very lucky. Mark the material very carefully and slowly.
Read only on vse-provse.com How to charge a car battery at home
- To make the work easier and determine exactly where the seams and bends will be located, we will glue “non-woven fabric” onto the surface of the torpedo using rubber glue. And so we make markings on it ourselves.
- Lay out the material on a flat table. The table must be perfectly level. We check the material for defects; for this we need good lighting. Of course, it is best to do this during the day, in daylight. After the material has passed strict testing, we proceed to the pattern. We put the material and non-woven pattern together. And if all the curves match, we begin cutting. If not, you need to re-mark.
- The finished shape of the pattern is smoothed and pressed to the plane with an iron and special weights with high viscosity. You can also buy weights at the auto market or in a store. Using a pen (preferably gel), the necessary markings are applied to the material in order to establish the boundaries of cutting the flaps. Don’t forget to leave a small margin of 10 mm on all sides, otherwise there will be problems in future stitching.
- We cut the material according to the previously indicated marks. It must be cut into separate pieces. (Use only sharp scissors; dull ones can damage and stretch the material).
- We place the finished pieces on the dashboard and check the ratio of sizes and shapes.
- Then we carefully sew the pieces of material together. This must be done on a special machine. Threads need to be selected of the highest quality (cheap, low-quality threads will lead to rapid unraveling of the material). If you do not have such a machine, you can give this work to any studio.
- On the wrong side of the finished case, you need to trim off all the folded leather, but at the same time so as not to touch or cut the threads.
- Coat the inside of the case with glue (this will be the first layer). We also coat the surface of the torpedo. We wait until it dries completely. And after the glue has dried well, apply a second layer of glue and begin gluing the cover to the torpedo.
- The material is glued with precise placement of stitches along pre-marked lines. All seams should be located at the corners and bends of the torpedo.
- And the last step. We roll out the glued material with a rubber roller and leave it for a day for complete adhesion to the torpedo. A day later we pick up the finished part and install it in place.
Read only on vse-provse.com How to wash a car engine yourself
Door trim
In this case, the fabric for upholstering the interior can be replaced with vinyl, which is easier to process. Naturally, to glue the material you must first remove all the handles from the doors. First you need to measure the part that will be processed and make an appropriate pattern. Please note that the hole for the door handle should be marked on it.
The fabric is cut so that there are allowances on it. Next, apply a small layer of glue to the door near the edge of the trim. Next, slowly and carefully tuck the fabric inside using a flat-head screwdriver. In order for the skin to be even and smooth, it should be straightened and stretched while working.
Do-it-yourself dashboard reupholstery: video
Watch the video
Watch the video
Car door reupholstery
The next step in reupholstering the car interior with your own hands is working with the car doors. Everything here, without exception, is much simpler and easier than with a torpedo, so this procedure for updating the doors will not take too much time. Let's get started:
- First, remove the trim from the door and clear it of debris. To do this, just wipe it with a damp cloth.
- We apply the finishing material to the door and measure the required size. Once we have determined the required size, carefully cut off the unnecessary parts. As a result, the material should take the correct shape, exactly following the contours of the door.
- We trace the material around the perimeter with a pen. The resulting line is the cutting location.
- Apply glue around the perimeter of the material. Then the edges need to be pushed into the plastic, a flathead screwdriver is suitable for this. When inserting material into plastic, you need to ensure that the material lies flat without folds.
- Then you need to cut a hole for the handle and window regulator.
- On the back side of the casing, excess material is cut off, and the edges are tightly glued to the surface of the door.
Preparing for work
Now you can get to work. Naturally, first you need to assemble the entire tool. But reupholstering the interior with eco-leather or other material does not start right away. First, all surfaces must be prepared. For example, you need to remove all the devices from the front panel and the handles from the doors.
Next, you need to remove the seats and thoroughly clean the interior. Naturally, this involves removing all the old upholstery from the ceiling, doors, seats and other parts of the car. This is done carefully. During preparation you will have to use a knife and screwdrivers. Perform all actions carefully so as not to damage the base.
Since the work will be quite dusty, try to vacuum the interior before starting upholstery with new material. Naturally, wear work clothes. Upholstery of the interior with leather, vinyl, Alcantara or other material can be done in the garage or on the street.
Do-it-yourself car door reupholstery: video
Watch the video
Watch the video
Car ceiling reupholstery
The last step will be reupholstering the ceiling. This process is also not complicated and you can do it yourself without specialists. Let’s consider this work, like the previous ones, step by step:
- We remove the old trim from the ceiling. To do this, it is worth tearing the material in such a way that it is completely detached from the surface of the ceiling together with the foam rubber. And the remains of foam rubber can be easily swept away with a brush or hand.
- After removing the old material, glue may remain on the ceiling in some places. It needs to be cleaned. To do this, you can use a regular solvent. When the ceiling is clean, without glue, its surface needs to be sanded with fine-grained sandpaper. And after that you can start gluing new material.
- You should start gluing the material from the center of the ceiling. From the center, gradually move to the sides. When gluing, special attention should be paid to such places as handles and sun visors.
- When the new material is completely glued, all that remains is to trim off any excess parts that may stick out on the sides. Next, you should replace the handles and other ceiling elements that are present in the car.
Read only on vse-provse.com How to check the ignition coil
What material is used for interior upholstery?
Most often, only damaged seats are covered. Doors, in this regard, suffer extremely rarely, and the ceiling is quite difficult to spoil. However, this phenomenon also occurs. Therefore, after detecting the corresponding damage, it is important to decide on the future covering material.
When the question of upholstery is raised, leather comes to mind for many people. After all, this is practically the most practical and beautiful material. But, since it has a fairly high cost, it is bypassed, making a choice towards the material provided in the list below.
1. Carpet . This material is characterized by low cost and great availability. Reminds me of a thin layer of carpet. It has a wide selection of colors and is easy to use.
2. Leather substitute . An excellent alternative to genuine leather, however, it has a rather big disadvantage - it is an unpleasant odor in the cabin, which takes quite a long time to dissipate.
3. Alcantara. It has a more attractive appearance and is similar to suede. In addition, it has a high margin of strength and durability.
Seat trim
The interior reupholstery technology involves changing the upholstery of car seats. It's not that difficult to do. Naturally, you should first draw a pattern that will match the seat and transfer it to the fabric, taking into account the seam allowances. In principle, you can remove the old upholstery, tear it into pieces, and then make a drawing from it. It will be easier and faster this way.
Next you need to cut the material along the drawn lines. After that, foam rubber of small thickness (5 mm) is fixed to the finished flaps using glue. Now, using a sewing machine, the cover can be sewn together. Next, you need to turn it right side out and put it on. Please note that you will need two identical covers for the front seats.
Do-it-yourself car upholstery has a number of features. However, experienced professionals can give some advice that will help you perform the procedure efficiently, even if you have never performed it:
1. If you have not done this kind of work before, it is better to start with a flat and straight surface.
2. On those parts where there are bends, you will have to sew several flaps. At the same time, try to hide the seams so that they are not noticeable.
3. If the material lays flat and beautiful, try not to touch it for 24 hours, even if the instructions say that the glue hardens after a few hours.
In principle, this information is enough to make reupholstering the car interior with your own hands quick and successful.
Over time, the upholstery of any car loses its attractiveness: scuffs and stains appear, and its color fades. There is only one way to solve this problem -. The latter can be done in special automobile workshops, but it is much cheaper and more interesting to reupholster the car interior with your own hands. How? This article will tell you.
Repair and reupholstery of the front panel (dashboard) with artificial leather
In what cases is it necessary to repair or reupholster the front panel of a car ?
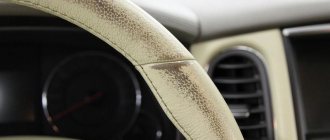
Typically, this operation is carried out with panels on which the passenger airbags have worked, as well as with shot “turtles” - Airbag steering bags. Another option is a panel (dashboard) damaged by some chemicals or burnt by cigarettes or scratched. Also, for those who like to tune their cars. After all, you can choose any color of leatherette, as well as its structure. You just need to turn on your imagination.
I think it would look great if the interior was covered in white or ivory leather, even if it was artificial! In this master class lesson we will consider the repair (upholstery with leatherette) of a plastic panel from a DAEWOO MATIZ car.
Or let's call it:
How to reupholster the front panel with leatherette or vinyl leather with your own hands
Here and now, in this lesson we will consider a specific task. So let's get started!
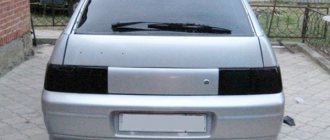
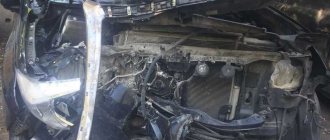
We have: A plastic panel (dashboard) with ugly cuts from a broken windshield. Task: To obtain a panel after repair that will fit into the overall design of the car interior.
To successfully start work, you should buy materials for repairs. In a particular case, artificial leather (vinyl leather) of gray color with pimply shagreen (pictured) was purchased.
The canvas size is 1.40 X 2.00 meters. The cost of this piece was about 350 rubles (all prices are indicated at the time of writing this article) the price varies for different types of artificial leather. Also, a special heat-setting shoe glue (Rabokoll-406) was purchased - 1 liter, for 160 rubles. And naturally, we need a construction knife and brushes for applying glue.
Total: approximately all the materials for reupholstering the dashboard cost us 500-800 rubles. For comparison, for re-upholstery on the side, they ask for 7-10 thousand. The price for a torpedo from disassembly starts from 4 thousand rubles. This material layout is suitable for almost any torpedo, any car. I almost forgot about the main character of this operation - the construction HAIRDRYER. With the help of which the main action will take place - stretching the skin with hot air and gluing it to the base. You can't go anywhere without him!
Technology for car plastic panel repair, dashboard reupholstery
First of all, you should thoroughly wash the surface of the dashboard that will be pasted over. First with water, possibly with soap or powder using a stiff brush, then with any degreaser solvent. The next stage is the repair of surface defects. Plastic putty will work fine. If the surface of the dashboard is covered with a soft material (pressed with a finger), then before applying the putty, you should first apply primer on the plastic, and then 2K acrylic primer, otherwise the putty will not adhere to this coating. The same point applies to “turtles”, inserts on the steering wheel with used Airbags. We will consider this question in more detail below. Before applying glue, be sure to degrease the entire surface.
Selecting material for seat upholstery
The following materials are usually used to reupholster car seats:
- leather,
- suede leather,
- alcantara,
- velours,
- flock
The color scheme is selected to match the interior trim, but the car owner’s preferences can play a major role here. It is easier to reupholster car seats using material of the same color. But the use of inserts from other shades gives solidity and individuality to the entire interior.
The most expensive, but at the same time durable and luxurious material is leather. Only in extreme heat it will not be very comfortable and pleasant to sit on a leather seat.
The most economical solution for upholstering seats would be to use velor and Alcantara. Excellent performance characteristics combined with a low price have allowed these materials to gain popularity among motorists.