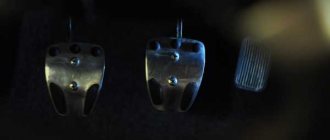
When adjustment is needed
You need to send the car to the garage and start adjusting the clutch system of your VAZ 2110 as soon as you notice signs of deviation from the normal operation of the unit.
The clutch greatly affects the performance of the entire car. What can we say, without it you will not be able to engage a single gear. Therefore, you will not be able to go anywhere.
The pedal may be too tight or fall apart at the slightest pressure. Both situations indicate that the clutch needs to be adjusted.
In general, the work is carried out in two stages:
- Clutch travel is checked;
- The setup itself is carried out directly.
But the first thing you should start with is studying the most important tool for repairing all components, assemblies and mechanisms of the VAZ 2110. Of course, we are talking about the instruction manual. Open it at the clutch section, study the main nuances, understand the essence of the unit, its design, operating principle, and then become familiar with the adjustment process.
Now we will talk about two main setup steps.
How to understand that the clutch needs adjustment
Signs that the clutch needs adjustment are:
- Jerking or vibration when pressing the clutch.
- Slight clutch slipping when pressed for a long time.
- The clutch drives.
In this case, adjusting the clutch cannot be avoided. To carry out this process, you should perform the following steps:
- Turn on neutral position.
- Remove the clutch housing.
- Remove the bearing.
Note: this must be done smoothly and slowly, otherwise you may slightly damage the bearing.
- Turn the adjusting nuts until the pedal travel is adjusted.
- You also need to check whether the clutch is too oily, as this can also cause the clutch to slip.
Note: in this case, to resolve it, it will be enough to just wash it with gasoline.
Every time the fluid in the system is replaced, it is necessary to bleed the clutch. Otherwise, air may enter here, which will lead to rapid failure of the system. The pumping happens like this:
- A hose is placed on the cylinder fitting.
- Its other end should be lowered into a container with liquid.
- Turn the fitting ¾ turn.
- Press the clutch until no more air bubbles come out of the hose.
Note: if the pedal is completely lowered and the release of air has not stopped, then the fitting should be tightened. It is very important that the liquid level in the tank is normal (at least half of the tank).
Adjusting and is a completely simple process. Therefore, there is no point in going to a car service center, where the price even for such trivial work will be high. It is much better to diagnose and repair the car yourself and at home.
But first you need to review a bunch of photos and videos so as not to damage the car. Any instructions will help you get the job done quickly and efficiently.
If there are malfunctions in the clutch mechanism of the “seven”, repair or adjustment of the clutch is required, which should bring this important mechanism of action of the transmission and power plant into working condition, or, as gunsmiths say, into normal combat.
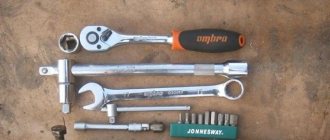
Adjusting the clutch of a VAZ 2107, the video instructions for which are posted on our Internet resource, is carried out in the case when the pedal of the mechanism does not work correctly - there are sharp dips when it is pressed, activation does not occur in full mode, the product loses its elasticity during its operation. A set of tools necessary for repairing and adjusting the clutch mechanism:
- a set of locksmith tools;
- WD-40 solution or equivalent;
- fluid for operating the hydraulic clutch;
- rubber hose;
- storage tank;
- scale bar.
Pedal travel
This is where the whole process begins. The factory manual states that normal travel is about 13 centimeters.
But over time, the parameter increases as the driven disc lining wears out. This leads to the fact that the pedal rises slightly. Measuring the indicator is not difficult.
- Open the door leading to the driver's seat in the cabin.
- Squat down so you are close to the pedals.
- Place a regular ruler on the mat under the pedal, positioning it perpendicular to the clutch pedal.
- Measure the distance from the mat to the extreme point of the pedal, that is, the maximum distance.
- If the indicator is 16 centimeters or more, this indicates an urgent need for adjustment.
If the situation demands it, we will do it. You don’t have to disassemble anything, because this process can be performed even by a beginner who does not have much experience in car repairs.
The setup process is as follows:
- Arm yourself first with a pair of simple keys for 13.
- Open the hood and locate the clutch cable lug in the engine compartment.
- There is a lock nut on it.
- Using the first wrench, slightly loosen the locknut, and with the second, turn the adjusting nut.
- If you turn it closer to the tip, the total pedal travel will increase, and if you move it in the opposite direction, the pedal travel will decrease.
- Tighten the nut and check how the manipulations affect the clutch pedal inside the cabin.
- Having reached the desired mark of 13 centimeters, sharply press the clutch pedal about 5 times and release. If the distance is less or more than required, repeat the operation.
- Having completed the adjustment, tighten the lock nut back, and therefore slide the rubber stopper sleeve as far as it will go.
A correctly adjusted VAZ 2107 clutch ensures normal operation of the vehicle and long-term operation of the machine’s components and parts. It is recommended to check the correctness of the adjustment at every vehicle maintenance.
During operation, incorrect adjustment can result in two types of malfunctions:
- The clutch slips - when the pedal is fully released, the disc slips and does not transmit the full amount of engine power to the transmission;
- The clutch drives - when the pedal is fully depressed, the disc does not move away from the flywheel, which does not allow normal gear changes and makes the car move when it is not needed.
In addition, the clutch may engage too early or late, making it difficult to control the vehicle.
The adjustment process itself consists of two parts. The first is carried out in the cabin, the second - under the bottom of the VAZ 2107, from the inspection hole. Tools you will need:
- Key for 8 or 10, depending on the model of the clutch slave cylinder;
- Open-end wrench 13;
- Open-end wrench 17.
The first adjustment involves setting the clutch pedal travel. It is performed from the interior, under the steering column. To limit the full stroke, use a special adjusting screw secured with a lock nut. By tightening or unscrewing it, we achieve normal pedal travel, which should be approximately 140 mm. Usually there is no need to adjust the full stroke; it is set from the factory and is changed very rarely.
The second part of the adjustment is to set the pedal free play. In normal mode it should be 30-35 mm. However, some car enthusiasts adjust the freewheel to suit their individual habits and preferences. This approach is quite acceptable provided that it does not affect the performance and durability of the parts of the VAZ 2107 car.
So, to check and adjust, we go down into the inspection hole. The clearance is checked by pulling the fork away from the pusher.
The free play distance should be 4-5 mm. If the gap differs significantly from the standard, it must be adjusted. For this:
- Remove the spring that pulls the clutch fork to its original position;
- Loosen the locknut on the pusher;
- Holding the pusher with a 8 (10) wrench, screw or twist the thrust nut until the required clearance is achieved;
- Fix the thrust nut with a locknut;
- Checking the gap;
- We install the spring in place.
At this point the adjustment procedure can be considered complete. However, in order to ensure that the result obtained is correct, it is necessary to check the clutch in action. To do this, start the car, engage the gear and gradually begin to release the pedal. When adjusted correctly, the car should move off at approximately half the pedal stroke. Adjustment is allowed, including the clutch lower or higher, but engagement at the very top or bottom is unacceptable, as there is a risk of the above malfunctions occurring.
The clutch design itself on the VAZ-2114 (Samara-2) car has been changed and differs from what was installed on the “classic” models of the VAZ family. The main changes affected the system of adjustment, control, and movement of the clutch fork. And, if previously they were hydraulic, now its movement is driven by the clutch cable.
It's simple: how to properly adjust the clutch on a VAZ 2107 without the help of specialists?
The procedure for fully setting up the friction clutch control system consists of two parts, one is performed in the cabin, and the other is performed under the car from the inspection pit. To work you will need a set of tools:
- Set of keys.
- Set of screwdrivers and pliers.
- Ruler or square.
Adjusting the initial travel of the clutch pedal
A bracket with a pusher is installed under the steering column in the cabin. By rotating the nuts, you can achieve the desired clearance between the pusher and the clutch master cylinder piston. It is this parameter that is responsible for the initial free play of the pedal; the adjustment technology is quite simple:
- Use a wrench (no. 1 in the photo) to hold the travel stop, and use a second wrench to unscrew the lock nut two turns.
- Rotate the limiting pin with the first key (screw in or unscrew), set the desired initial free play of the pedal - 0.4-2.0 mm.
- Check the free play using a straight edge and, if necessary, repeat the adjustment operation.
- Tighten the locknut with a wrench.
How to adjust the free play of the release fork?
Before you bleed the clutch on a classic VAZ 2107, you need to perform the second adjustment stage, which is done on an overpass or inspection hole. The technology for checking and adjusting the free play of the clutch release fork is as follows:
- Using pliers, remove the spring from the fork and then from the working cylinder. The check can be done without dismantling the spring, but when checking the free play, you will have to apply force to overcome its resistance.
- Check the stroke of the fork with a ruler, pressing it all the way. The readings should be within 4-5 mm; if there are deviations, then the following points should be followed.
- Clean the cylinder of dirt and spray the nuts with WD-40.
Step-by-step procedure for tensioning the clutch cable on a VAZ-2114
In order to change the length of the clutch cable, we only need a wrench.
1.
First of all, open the hood and look for the nuts on the gearbox housing located at the very end of the adjustment unit.
Two bolts for 17.
The clutch cable is marked with a red marker.
The nuts will unscrew easily with any pressure.
3.
When the nut is screwed on, the clutch pedal will rise, increasing the length of its distance, and if it is unscrewed, the distance to the floor will decrease, pressing the pedal closer to the floor.
The arrow marks the nut for fixing.
There is no doubt that such work is much easier to carry out in the company of an assistant.
4.
Upon completion of all adjustment work, the locking nut is tightened as close to the adjusting nut as possible.
When carrying out such procedures, make sure that the clutch cable itself is intact, that there is no damage or scuffing on its body and shell, and that it moves freely inside the elements supporting it. If something like this is discovered, then it is best to replace the cable with a new one, since the wear of the supported one will only increase, and it is impossible to talk about the reliability of the work performed.
Checking work
After you have completed this work, you need to check the correctness of the work performed.
- First, measure the travel of the clutch pedal.
- With the engine turned off, depress the clutch pedal several times and return it to its place.
- Next, we take a new measurement and clarify the received readings.
- If they have not changed compared to the first measurements, then the work has been completed, correctly, and the first stage of verification can be considered completed.
- And if they differ from the first indicators, it means that the locking nut was not tightened tightly, and the adjustment process must be carried out again.
There is one rule among car enthusiasts! A properly adjusted clutch should begin to engage approximately halfway through the pedal stroke.
The following test can definitively indicate the serviceability and correctly adjusted clutch:
- The car must be placed on a flat surface, the handbrake must be turned on, and the engine must be running.
- Next, we turn on the gear and try to start moving.
- If at this moment, when the clutch pedal is not pressed, the car stalls, this means that the adjustment was made correctly.
- And if this does not happen, the car is running in gear with the clutch pedal not pressed, then this will indicate clutch slipping, which will need adjustment.
Final check of the clutch for functionality!
In this case, we will set the gap from inside the car, directly on the pedal itself. A special bracket will be installed here. The latter has a clutch master cylinder pusher and nut. Thanks to them, the required gap is set between the two elements (pushrod and clutch cylinder).
Note that from the interior you can only set the initial pedal stroke. If the gap is two millimeters or less, we proceed to adjusting the gap from the bottom of the car.
It is recommended to check after completion of work, and this check should be done as follows:
Note!
In this case, the reverse gear should engage without grinding or knocking or any other extraneous noise!
- Now you can try another test, for this, when accelerating the car, try to engage each gear at the moment when it is necessary, but if the gears are engaged without grinding or knocking, then in this case the clutch is working properly.
- And finally, try to pay attention to the acceleration of the car, that is, the car should accelerate normally when accelerating, it should not be the case that you press the pedal in the red zone and the car does not move.
Note!
This example indicates that the clutch is slipping!
If this check does not give any results and the clutch still does not work correctly, then in this case, try to bleed the clutch first, and if this does not help, then remove it and, as a result, repair the clutch by replacing its worn parts with new ones.
Didn't find the information you are looking for? on our forum.
Now we need to set the stroke of the fork pusher. It is adjustable up to 5 millimeters. Use a wrench to hold the travel stop. Loosen the locknut two turns. Next, turn the limiter towards the bracket with a wrench. Selectively set the required gap. After this, hold the limiter again and tighten the locknut back.
Design
The mechanical drive on the VAZ-2114, despite the fact that it has the least simple design, is in no way inferior in reliability to its hydraulic counterpart. Its system consists of a cable adjustable in length, sealed in a special anti-corrosion sheath, and the clutch pedal itself located in the car's interior, which, through free movement, is designed to transmit the pressing force to the clutch fork.
Despite the fact that such a scheme is simple, in general it is quite reliable.
Clutch diagram
A new product in the form of a clutch cable for VAZ-2114 cars helped to avoid all the problems that all owners of classics encounter. First of all, this refers to the leakage of hydraulic fluid from the system, and as a result, loss of control over the car. It would also require work to remove air from the clutch system after repair.
At the same time, periodic checking and adjustment of the clutch pedal has remained the same.
Why is it necessary to adjust the cable travel?
This procedure is necessary so that when the pedal, and with it the clutch cable, reaches certain values, the most squat pressing of the flywheel with the basket to the driven disk is made, at the moment when its operation is necessary. At the same time, thanks to the precise adjustment of this drive, the clutch is released at the moment the clutch pedal is released.
Note!
During operation of this system, when the lever is in the neutral position, or when it is turned on, no extraneous sounds or crackles should come from the gearbox housing.
You can monitor the condition of the clutch, preventing such a situation from occurring, visually by positioning the clutch pedal relative to the floor of the car, using only a ruler.
Values
Optimal values should be from 125 to 140 mm
, when taking readings first with the pedal pressed and then with the pedal released.
The maximum value that is allowed when measuring such indicators is 160 mm
, and if they exceed these values, then this will mean severe wear of the friction linings, and therefore, after adjusting it, the clutch itself may soon need to be replaced.
We measure the result along the bottom edge of the pedal - in the photo the result is normal.
Why and how to bleed the clutch on a VAZ 2107 in your garage?
Bleeding is necessary if the clutch does not disengage completely. For example, the pedal is depressed, the first gear is turned on, but before you even have time to release the pedal, the car is already moving. A slight pedal stroke also indicates the need to remove air from the system. The procedure must be performed with an assistant who will press the pedal. To work you will need:
- Brake fluid.
- Rubber hose 50-100 cm long.
- "8" wrench.
- Container for liquid.
- Brake fluid.
Car owners who are interested in how to properly adjust the clutch on a VAZ 2107 should know that bleeding is carried out through a fitting located on the working cylinder under its bottom. The operation is no more complicated than adjusting wheel alignment ; even a novice car enthusiast can perform it.
Pumping technique
It is advisable to carry out the work on an overpass or inspection hole; in extreme cases, the machine should be raised on supports. Further actions are carried out according to transitions:
- Pour new fluid into the clutch reservoir.
- Place one end of the hose onto the working cylinder fitting and lower the other end into a container.
- Ask an assistant to press the clutch pedal 5-6 times and hold it pressed.
- Loosen the fitting on the cylinder with a “8” wrench and release the liquid with air into the container, then tighten the fitting and ask to release the pedal.
- If necessary, add liquid to the tank and repeat the operation until there are no air bubbles in the liquid.
During pumping, do not allow the liquid level in the tank to drop below 15 mm, and top it up in a timely manner. Finally, you need to check the functionality of the coupling:
- Start the car and put the car in reverse gear; the appearance of jamming or extraneous noise is unacceptable.
- Check the gear shift while driving; if acceleration and shifting occur without jerking or extraneous noise, then the clutch control system is configured normally.
Source: autobann.su
The principle of clutch adjustment
If, after a preliminary check, you have determined that the clutch cable needs adjustment (that is, tightening - approx.), then do not be alarmed, since the process of such work is not complicated and will not require any additional effort.
Clutch cable tension is adjusted by tightening it under the hood
Such a process consists of simply changing the length of the cable and its sheath from the adjustment unit, due to which its indicators can change both to the smallest and greatest extent.
As you might have guessed, if the length of the cable is reduced, then the pedal stroke will be less, the same applies to increasing the stroke, all that remains is to achieve those cherished pedal stroke indicators in 12,5
centimeters.
Clutch adjustment in an injection VAZ 2107
The clutch adjustment carried out on the VAZ 2107 injector is somewhat different from the similar operation on the “Seven” with a carburetor engine. The fact is that on vehicles with an injection power plant, an additional shield is installed to protect against mud deposits formed from road dirt. In the frontal projection, the protective casing is secured with bolted connections, and in the rear projection - with 2 self-tapping screws.
To dismantle this protective casing, use an 8-type socket wrench to unscrew the 4 fastening bolts. We also dismantle 2 self-tapping stern fastening screws. To carry out such a technological operation as adjusting the clutch pedal of a VAZ 2107, the following work cycle is required:
- Using a scale ruler, measure the distance from the pedal to the surface of the driver's mat. Using the force of your palm, press the pedal until the resistance force of the reverse action of the pedal begins to act and measure the length of free movement of the pedal. It should be 1-3 mm.
- If the measured value does not fall within the required dimensions, then: loosen the lock nut, give the bolt a rotational movement, carry out an adjustment followed by tightening the lock nut.
After carrying out the adjustment work, tighten the fasteners, after which you need to tighten the locking nut. We turn the pusher until the desired stroke value is determined, and finally tighten the locking nut. Care must be taken to maintain the position of the pusher in relation to the main center coupling.
Upon completion of the adjustment of the VAZ 2107 clutch pedal, it is necessary to clarify that the desired length of free movement is normal. Data for control: the stroke of free movement of the pedal is 1-3 mm. The length from the driver's floor to the pedal is 90 mm.
Welcome!
Clutch adjustment - thanks to this small procedure you can reduce the risk of wear on clutch parts such as the release plate, but only if the clutch is not adjusted, if it is adjusted, then if it works correctly, the risk of wear on clutch parts will be minimal during moderate driving. Therefore, if your clutch is not adjusted, we recommend that you read this manual so that you can adjust it in the future.
Note!
To make adjustments, you will need to stock up on: A basic set of wrenches, and for more correct adjustments, it is recommended to take a ruler or square with you. You will also need to use: Cobra-type pliers and pliers!
Summary:
Where are the clutch slave and master cylinders, which are used to adjust the clutch?
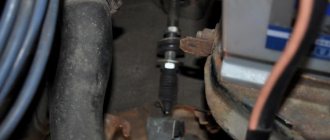
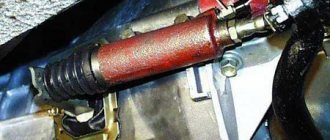
The slave cylinder can be easily seen by looking under the bottom of the car; it is located at one end on the gearbox itself and the other end is inserted into the clutch fork; for more details on the location of the slave cylinder, see the photo below:
The master cylinder is located in the engine compartment of the car; in order to see it, there is no point in climbing under the bottom of the car, because after opening the hood it can be easily seen.
When should you adjust your clutch?
The clutch is adjusted when very significant play appears when the clutch pedal is pressed, or when there is no play at all, just for the record! The initial free play of the pedal should be “0.4 – 2.0 mm”; if it is more or less, then adjust the system.
Note!
And also, just in case, measure the free travel of the clutch pedal before it is turned off, which should be within the norm - “25 - 35 mm”!
The system also needs to be adjusted, if between the pusher, which is indicated by the red arrow, and the clutch fork, which is indicated by the blue arrow, the free play is completely gone or it exceeds “4-5 mm”, it is very easy to check this movement; for this, grab the clutch fork with your hand as shown in the figure, and then rock the fork from side to side.
Note!
In fact, this operation does not need to be carried out, but it is best to focus all your attention on checking the free play of the clutch pedal, because as a rule, if it is normal, then the free play of the pusher and clutch fork will also most likely be normal. But still, if you want to check the fork, then check it, otherwise, due to the large free play in the forks, the release bearing will be subject to constant load, which is why in the near future it may become unusable, and therefore it will have to be replaced!
conclusions
Thanks to these simple steps, adjusting the clutch cable on the VAZ-2114 can be done in the shortest possible time.
The main purpose of the clutch is to temporarily separate the transmission and engine and then smoothly connect them. These operations are important while driving because they provide control of the manual transmission: starting, braking, stopping and shifting gears. If the adjustment of the free play of the corresponding pedal is violated, driving the vehicle becomes difficult - the car accelerates poorly and slips, there is a crunch when changing gears, and it becomes impossible to move. How to adjust the clutch, and what problems can occur if this pedal is not adjusted correctly?
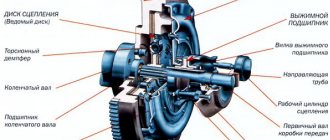
Clutch mechanism
The clutch acts as a link between the transmission and the engine and is designed to disconnect and connect the gearbox input shaft from the crankshaft flywheel. Changing gears in a vehicle with a manual transmission is only possible with the clutch pedal fully depressed. At this moment, no torque transmission is observed, since there is no connection between the gearbox and the flywheel. As for the structure of the node in question, it is represented by the following components:
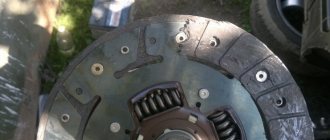
- A flywheel that takes on torque and transfers it to the gearbox through the basket. The basket, in turn, is attached to the flywheel.
- The pressure and driven disks are closely connected to each other. Their contact is affected by the position of the clutch pedal, which is located inside the car.
- The shutdown fork ensures that the disks are disconnected.
- The primary shaft of the gearbox, to which torque is transmitted.
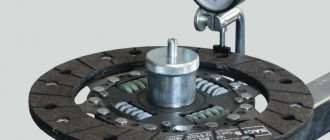
- Among the additional elements, it is worth highlighting the casing, damper springs designed to soften vibration, as well as friction linings. The latter are put on the driven disk and provide mitigation of friction between the basket and the flywheel.
The flywheel is directly connected to the pressure plate and rotates with it. A splined clutch with a gearbox input shaft located inside ensures transmission of rotation to the driven disk. The gear shift mechanism looks like this:
- transmitting pressure to the release fork through the drive system;
- displacement of the release bearing together with the clutch by means of a fork towards the release springs of the pressure plate;
- temporary disconnection of the basket from the flywheel under the influence of bearing pressure;
- lowering the pedal after changing gears, ceasing pressure on the springs from the bearing, and resuming contact between the flywheel and the basket.
Diagnosing the need for clutch adjustment
Active use of the vehicle leads to the fact that over time the shutdown does not occur completely due to an increase in pedal travel. The shafts do not turn off completely when the pedal is depressed as much as possible, and contact with the engine remains, which negatively affects the service life of the unit and increases the load on the teeth.
If the pedal stroke is not sufficiently consolidated, the driven disk is not fully engaged, therefore, not all torque is transmitted during movement and the vehicle’s power is reduced. Also, smoothly releasing the clutch pedal in this case can lead to abrupt engagement of the disc, which is accompanied by jerking of the car and noise in the transmission. The following signs will allow you to reliably determine the need for adjustment:
- clutch pedal sticking;
- bumps or jerks when trying to move;
- extraneous noise when changing gear;
- fluid leakage from the drive system;
- Insufficient free play of the clutch pedal.
To ensure that 100% adjustment is necessary, measure the distance between the pedal and the floor and compare the resulting value with the parameters specified in the operating instructions for your car.
How to adjust the clutch on a Niva?
What is clutch? The mechanism on which the smooth running of the car and the soft shifting of gears depends is practically not noticeable during an external inspection of the car. The driver remembers its presence thanks to the pedal located near the left foot. This mechanism is called a clutch. When you press the pedal, the clutch disengages; when your foot is removed, the clutch engages. Thanks to this simple mechanism, the driver can interrupt the connection between the engine and the transmission at any time. When the clutch adjustment is well adjusted, this allows the car to move off smoothly, pick up the desired speed without jerking, and calmly change gears, slowing down or slowing down the car.
Russian cars traditionally have a so-called “dry clutch”, a single-plate clutch. However, on some brands, for example, Niva, the clutch uses a hydraulic drive. The clutch drive is perhaps the most vulnerable point in the mechanism and requires adjustment.
We check the technical condition
This mechanism needs diagnostics much less often than the steering part or brakes. But it is necessary to check its condition from time to time. Any disruptions or malfunctions in the clutch operation are fraught with serious consequences, especially if the car is located far from service centers or any other place where the driver will receive assistance and bring the car to a “live” state. The car may simply stop and no longer move under its own power, or its mobility will be only partial. The causes of failures can be the wear of one friction lining in the driven disk or several at once, and the breakdown of the driven disk itself - due to a long service life, etc.
How do you know if the clutch needs adjustment?
- when the driver wants to start smoothly, but the car begins to twitch, shocks and jerks are clearly felt;
- the clutch pedal falls under your foot;
- Shifting into gear is accompanied by a special characteristic noise.
You can also test the condition this way: start the engine, then, slowly, take your foot off the clutch pedal and move off. The immediate start of movement indicates that there is no free play. And if the car remained standing even when the pedal was completely released, therefore, its travel is greater than normal. Now you should take a regular ruler and measure the space from the floor in the car to the rubber pedal pad. Ideally it should be 160 millimeters. If the distance is greater, i.e. the pedal is above the specified limit, adjustment of the clutch pedal and drive is necessary.
Lessons from Samodelkin
You can bring the clutch into normal operating condition by adjusting its drive, or more precisely, the adjusting bolt. It is located under the hood, at the end of the cable. It's hard to make a mistake: this bolt is secured with locknuts.
Clutch adjustment is done by adjusting the clutch pedal travel. It should be in the range of 120-130 millimeters. To increase the stroke, you need to screw the nut onto the tip, and to decrease the pedal stroke, the nut is unscrewed.
When debugging is completed, press the pedal three times, and then again measure the space from the floor to the platform with the pedal. If it still does not meet the desired parameters, clutch adjustment must be continued.
If the clutch is hydraulic, the technology for debugging it is somewhat different. It should be remembered that the pusher rod release fork should be spaced at a distance of approximately 5 millimeters. To set this length, the spring is removed from the bracket of the working cylinder with the fork, and the adjusting nut from the cylinder rod is tightened or unscrewed so that the free play of the fork is no less and no more than 5 millimeters.
Note
When starting to adjust the clutch mechanism, be sure to carefully study the registration certificate of your car. Depending on the model of the machine, there may be various modifications of this mechanism.
Timely adjustment of the clutch on a VAZ 2107 will avoid wear of the release plate and other clutch parts. During vehicle operation, the travel of the clutch pedal may change, which leads to increased wear of the release plate. In this article we will tell you how to adjust the clutch on a VAZ 2107, which will help avoid car breakdowns.
Common problems
Lack of timely measures to adjust the clutch leads to the following malfunctions:
- Clutch slipping involves incomplete transmission of torque to the drive wheels and transmission from the crankshaft and flywheel. If the clutch pedal is fully depressed, the car may not move or move extremely slowly. In the second case, you can smell a burning smell in the cabin as a result of the combustion of the friction linings of the driven disk. Jerky movement is also possible. The cause of the malfunction in question is the lack of free play of the clutch pedal, which can be easily eliminated by adjusting the free play. This measure will not be effective if the crankshaft seals are worn out, which leads to oiliness or wear of the friction linings of the driven disk.
- The clutch moves, but it does not disengage completely or the friction disc does not separate from the flywheel surface when the pedal is released. A confirming factor is gear shifting with some difficulty, impacts of gearbox gears and synchronizer teeth. As a result, the teeth may break. The cause of the malfunction may be excess free play of the clutch pedal, air entering the hydraulic drive, or misalignment of the driven disk, or breakage of the friction linings. Both problems cannot be ignored, otherwise the vehicle’s controllability will not only decrease, but the wear rate of the friction material of the driven clutch disc will also increase. The surface of the flywheel and drive plate also wears out.
- The clutch engages too late or too early. With late triggering, the car will begin to move away when the pedal is slowly released only when it is at the end of its stroke, when it is almost completely released. With early actuation, the movement of the vehicle begins at the very beginning of releasing the clutch pedal, that is, there is no cumulative pedal travel. Before adjusting the clutch, you should find information about the exact distance from the pedal to the floor and for its free movement.
Video - How to adjust the VAZ clutch drive
If the clutch release drive is incorrectly adjusted, this can manifest itself in two possible ways. In the first option, the clutch slips. This effect is most clearly manifested at the moment when the driver sharply presses the gas pedal - the engine “roars”, and the car continues to stand still. In the second option, the clutch drives. In this case, it becomes very difficult to engage the gear.
To adjust the clutch on a VAZ, you need to drive the car into an inspection hole and stock up on a 10 mm wrench and two 13 mm wrenches. The adjustment process itself will take no more than 15 minutes.
ADJUSTMENT PROCESS
If we describe the process in general terms, then all the necessary work comes down to setting the correct gaps at two important points:
– between the rod and the piston of the master cylinder of the hydraulic clutch release drive. The rod is located inside the car and comes from the clutch pedal, to which it is attached with an eccentric bolt. At the point of attachment to the pedal there is also a screw for adjustment and a lock nut (the gap is acceptable within the range of 0.1 - 0.5 mm);
– between the rod and the piston of the clutch slave cylinder, which is located at the bottom of the machine and is fixed to the gearbox. The gap of 2 - 3 mm is adjusted with a threaded tip; before this, you just need to loosen the lock nut on the tip.
When the correct clearances are set at these two points, the pedal free play will be adjusted to 25 - 35 mm.
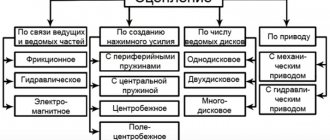
On VAZ models, a mechanical or hydraulic drive is installed. There is also a combined drive, but it is not installed on VAZ. The type of drive installed on the vehicle affects how the clutch will be adjusted.
To determine whether there is a need to adjust the clutch, you need to measure the amplitude of the clutch pedal travel. To do this, you need to depress the clutch pedal all the way and measure the space from the floor mat to the bottom edge of the pedal. Then release the pedal and again measure the distance from the floor mat to its bottom edge. The ruler should rest against the mat at an angle of 90 degrees. Then you need to subtract the smaller one from the larger value - you get the free play of the clutch pedal. Normally, its value should be within the range of 120–130 mm.
While driving a car, the friction linings of the clutch driven disc wear out, and accordingly, the free play of the pedal becomes greater. Therefore, if the machine has been in service for more than a year, it is allowed to exceed the maximum normal value by 30 mm. Thus, the pedal travel should not normally exceed 160 mm.
If the clutch pedal travel is more than 160 cm, you need to find the clutch cable under the hood. Most often it is located to the right of the engine. It is necessary to loosen the cable fastening by unscrewing the locknut on one side if the cable needs to be tightened, and on the other side if it needs to be loosened.
By rotating one or another adjusting nut, adjust the clutch pedal so that its full travel is equal to the optimal value of 120 mm. Now tighten the control nut.
After you get into the car, depress the clutch pedal all the way and measure the distance from the floor mat to the depressed pedal. Repeat this control measurement 2 more times. If necessary, repeat the clutch pedal adjustment - do this until you achieve the desired value.
To adjust the clutch on a VAZ with a hydraulic drive, you need to know the distance from the pusher rod of the clutch slave cylinder to the release fork. Normally it should be 5 mm.
It is necessary to remove the spring from the working cylinder bracket that goes to the fork. This will make it easier to adjust the clutch. Now unscrew or tighten the adjusting nut located on the cylinder rod so that the free play of the fork is 5 mm.
Important! If, after adjusting the clutch, the problem remains, that is, the clutch continues to slip or drive, then, in fact, the problem is more serious, and in order to diagnose it, you will need to remove the box.
Video: Adjusting the VAZ clutch
If the video does not show, refresh the page or
The main task of the clutch is to temporarily separate (uncouple) the engine and transmission and smoothly connect them. These operations are necessary while driving to control a manual transmission: shifting gears, stopping, braking, starting the car.
If the adjustment of the free play of the clutch pedal is disrupted, the car stops moving normally, various problems arise - it becomes impossible to move away, gears are switched with a crunch, and the car can also slip and accelerate poorly.
| The content of the article: |
Clutch adjustment on different brands of cars
For different cars, the distance for the combined pedal stroke may be different and this point must be clarified using the operating instructions. Let's look at the step-by-step adjustment procedure for different models.
VAZ-2108, 2109, 2199
The clutch adjustment procedure is as follows.
- Measure the distance between the bottom edge of the pedal and the floor with the pedal fully depressed. The optimal distance for these models is 18 - 20 cm.
- Press the pedal all the way with your hand and measure the distance from the floor to the bottom edge. The optimal value is 6 - 7 cm.
- Subtract the result of the second measurement from the first, in the end you should get 13 - 14 cm.
- Loosening or tightening the clutch is advisable if the value obtained by subtraction does not correspond to the norm.
- Hold the adjusting nut with one wrench and loosen the locknut with a second. Rotate the adjusting nut clockwise to increase pedal travel. The latter should move down.
- Take control measurements and tighten the locknut if you have achieved the required distance.
"Lada Kalina"
The adjustment occurs as follows:
- Open the hood and unscrew the air filter housing bolts to remove it.
- Disconnect the mass air flow sensor and unscrew the clamp.
- Remove the cable as far as possible, holding it by the threaded end. Be prepared to overcome the resistance that the spring attached to the clutch pedal will provide.
- Use a caliper to measure the distance between the fork arm and the plastic leader. The resulting measurements should correspond to 2.7 cm.
- Use an open-end wrench to loosen or tighten the nut if you get a different result.
- Take repeated measurements by pressing the appropriate pedal.
- Reinstall the air filter.
VAZ-2107
Adjustment in this case requires the use of an overpass or pit. As a last resort, you can install the vehicle on supports using a jack:
- After adjusting the free play, you need to achieve a distance of 0.4-2 mm between the top position of the pedal and the stop. To adjust, if necessary, use a 10mm wrench and lightly unscrew the nut locking the limiter using rotational movements.
- The need to remove the protective shield arises if the engine system involves fuel injection.
- Clean the tappet threads of any dirt before applying the lubricant mixture.
- Check the stroke of the pusher as it affects the stroke of the release bearing. Push the fork back to the very end and measure the distance of the pusher stroke (4 - 5 mm). It is better to disconnect the spring from the lever in advance, otherwise you will have to apply force.
- Use a 17" wrench to adjust the pusher stroke. At the same time, hold the adjusting nut from turning. To loosen the locknut, use a 13mm wrench.
- Use the “8” key to fix the pusher and set the required distance to 4 - 5 mm using the “17” key.
- Lock the locknut and check the pedal travel. The distance between the moment of shutdown and its upper position should be 3 cm.
"Lada Priora"
In the case of the Lada Priora, you can use two methods to measure the position of the cable. In the first case, the reference point should be the clutch pedal travel (123 - 125 mm). In the second case, you can measure the length of the cable that exits the casing. 2.7 cm should be in the released state. In the vast majority of cases, drivers prefer the first method because it is more reliable.
VAZ-2114, 2115
For these models, the auto clutch adjustment is as follows.
Until now, adjusting the clutch on the VAZ 2106 and 2107 is relevant for many car enthusiasts. After all, not all services are willing to work with old domestic cars. But there is still a lot of such equipment on the roads, and its owners have to solve the problems that arise on their own. Of which old cars have plenty. Clutch problems are one of the most common problems. That is why the driver needs to know what to do with this mechanism and in what time frame. Remember that incorrect adjustment leads to breakdowns and complex repairs, which are not cheap these days.
Features of adjusting the clutch release drive of VAZ 2105, 2107 cars
Novice motorists often ask the question: when is the VAZ-2106 clutch adjusted? The clutch drive is designed in such a way that there is free play on the pedal. So, normally it ranges from 0.4 to 2 millimeters. If there is a lot of play in the pedal and noticeable “dips,” it means that the element settings have gone wrong.
Pay attention to the clutch slave cylinder. The VAZ-2106 is equipped with it near the transmission. The element must not contain traces of liquid leakage. If the boot is damaged or the tightness of the connections is broken, the mechanism must be replaced.
During vehicle operation, an incorrectly adjusted clutch is expressed as follows:
- The clutch drives. When the clutch pedal is fully depressed, the disc does not move away from the flywheel, making it impossible to change gears normally. Thus, the car can start moving even when it is not necessary.
- The clutch is slipping. When the clutch pedal is fully released, the disc begins to slip. As a result, it does not transfer all the engine power to the transmission in full.
In addition, problems with the clutch sometimes result in it setting too early or, conversely, too late. As a result, driving may become significantly more difficult.
- Gear shift violation - positions are engaged with knocking, crackling or extraneous sounds.
- The clutch switch response threshold has been violated. A dip of 25 to 35 mm is considered optimal.
- Increased fuel consumption. If the mechanism is faulty, excess gasoline consumption can be up to 20% of the reference value.
- Knocking out positions. During acceleration of the vehicle, the gears “fly out”.
- Dissonance when revving the engine. When you press the gas pedal, the internal combustion engine spins up, and the car lags behind.
- Clutch lever failures, this also includes an increase or absence of operating play in the system.
- Early or late operation of the mechanism when the pedal is pressed.
Correct and precise operation of the clutch on VAZ 2105, 2107 vehicles is ensured by certain adjustments to its drive. There are two of them: adjusting the gap between the pusher and the piston of the clutch master cylinder and adjusting the free play of the clutch pedal.
The gap between the pusher and the clutch master cylinder piston is 0.1 - 0.5 mm. It is regulated by rotating the clutch pedal free travel limiter. In this case, a certain free play of 0.4 - 2.0 mm is formed at the clutch pedal, which the driver selects when starting to press the pedal.
the gap between the pusher and the piston, free play of the clutch pedal of VAZ 2105, 2107 cars
It is measured with a ruler or tape measure, which is installed from the floor to the middle of the lower part of the pedal platform. We move the platform with our hand relative to the ruler scale by pressing the pedal. If there is a gap, at first the pedal moves very easily, and then with difficulty. If there is no gap, turn the pedal travel limiter out a little. We ensure that the free movement along the ruler fits within the required two millimeters.
This gap is necessary for the clutch to disengage completely. If it is missing, then the piston will not be able to fully return to the rear position when the pedal is released and in the working cavity of the master cylinder, and excess pressure will remain in the entire drive. As a result, the clutch will not disengage completely, since the release bearing will press on the leafs of the pressure spring, and the discs will slip (not be fully pressed against the flywheel). Increasing this gap will lead to the fact that the clutch will not disengage completely and will “drive” (the discs do not fully move away from the flywheel).
Adjusting the clutch pedal free play (the gap between the release bearing and the plane of the pressure flange of the clutch “basket” pressure spring)
It is adjusted by a nut on the clutch slave cylinder pusher. With proper adjustment, the free play of the clutch release fork is 4–5 mm (checked by hand: the fork is pulled away from the stop against the adjusting nut on the pusher), and the free play of the clutch pedal is 25–35 mm. It is necessary to unscrew the lock nut on the pusher and rotate the adjusting nut to set the required free play of the fork.
free movement of the clutch slave cylinder pusher for VAZ 2105, 2107 cars
In the absence of this gap, the release bearing presses on the pressure spring of the “basket” - the clutch “slips”. With an increased gap, it “leads.”
The clutch pedal free play of 0.4 – 2.0 mm is included in the pedal free play of 25 – 35 mm. That is, 25 - 35 mm is the total required size.
Notes and additions
— The clutch on VAZ 2105, 2107 cars is of a constantly closed type, that is, constantly on: when the pedal is released, the driven disk is pressed by the drive disk to the flywheel and rotates with it, as well as the release bearing and the input shaft of the gearbox. There is a gap of 1.5 - 2.0 mm between the release bearing and the lining of the thrust flange of the clutch basket pressure leaf spring. This gap is selected when the driver begins to press the pedal.
— The full travel of the clutch pedal on VAZ 2105, 2107 cars is 140 mm.
— After adjusting the clutch drive, check for smooth gear shifting. Particular attention to reverse gear. The smoothness of its activation is an indicator of successful adjustment.
More articles on VAZ 2105, 2107 cars
Why is it needed?
Clutch adjustment on VAZ 2106 and 2107 is done relatively often, but many drivers underestimate the importance of this procedure and do not carry it out. Which leads to unpleasant consequences. If the clutch is clamped, that is, it disengages at the very top, the disk is constantly under load. This leads to increased wear and, accordingly, premature failure of the disk.
If the clutch disengages too low, it means that the contact of the drive disk with the driven disk is incomplete. This leads to increased load on the engine. In any case, the consequences for various parts of the car are most dire.
When is it done?
It is necessary to adjust the clutch on a classic after any work related to the clutch. This includes removing the gearbox, replacing the clutch basket or disc, and replacing the clutch slave cylinder. Also, adjustment is made when there is a clear shift in any direction of the clutch disengagement moment. After all, all structural elements gradually wear out, which necessitates such adjustments. Do not forget to bleed the clutch before carrying out work, releasing air from the hydraulic drive.
For reference, let's look at the drive adjustment data from the manufacturer. The pedal free play should be within 25-35 mm. That is, from its top position to the moment when the pusher rests on the clutch fork, there should be exactly this distance. This is checked using a ruler. To do this, bring the ruler to the pedal and press the clutch with your hand. When you feel slight resistance, this is the desired point. If the difference between the top position and the moment of switching on is greater or less, you will have to make adjustments.
Clutch elements
. Before you start adjusting, you need to decide what and where you need to adjust. In the cabin, the pedal travel is adjusted, sometimes drivers limit themselves to this work, believing that this is enough and if the pedal is adjusted correctly, everything will return to normal. This is partly true. But in practice this does not always happen.
Reason for long clutch travel:
As a rule, the reason for checking the clutch pedal travel is. After replacing the cable, this adjustment must be done 100%. There may also be other reasons for this: the slave pad has worn out over time and requires replacement, and with this the pedal travel has increased. It is allowed that the clutch drive stroke on a VAZ 2110 car should be no more than 160 mm. Good indicators if the pedal travel is within 120-130 mm (the distance between the clutch pedal being depressed and the clutch pedal being pressed all the way into the mat). Measured with a regular long ruler. The procedure is not complicated and allows one car owner to handle it without the help of others.
1. Before starting work, park the car on a level surface and remove one terminal from the battery from the minus contact.
2. To check the travel distance of the clutch drive, place a ruler perpendicular to the pedal and the floor. You should measure from the floor to the beginning of the rubberized pedal pad, and if it is 160 mm or more, then you should adjust the travel distance of the clutch pedal.
3. To adjust the drive, open the hood of the car and find the fastening of the metal clutch cable to the pedal from below. At the end of the cable there are two nuts (1,2), - the first lock nut must be unscrewed significantly, and the second must be tightened to the required free travel of the clutch pedal (within 120 and 130 millimeters).
The pedal stroke will increase when the nut (2) is loosened and will decrease when it is tightened.
4. Now press the clutch pedal all the way 3-4 times and release it, then again check with a ruler the amount of pedal travel from the floor to the rubber pedal pad.
5. If necessary, use the nut to adjust the drive stroke again and then tighten it back until it stops against the second adjusting nut - the lock nut.
That's all, adjusting the clutch pedal with your own hands is finished, good luck and don't break any more!
On the VAZ 2109, clutch adjustment is carried out in several cases. Basically, if VAZ 2109 clutch problems were discovered. In this case, adjustment is what is needed.
Adjustment
To carry out the work, you will need open-end wrenches for 8, 13 and 17. Pliers and a slotted screwdriver will also come in handy. The easiest way to do this work is on a viewing hole or overpass. If you don't have any of the above on hand. Then it is enough to make low races from ordinary boards, this should be enough. The adjustment is made as follows:
- Using pliers, remove the release spring from the clutch fork. This item is optional, but it is still more convenient to carry out the adjustment with the spring removed;
- Using a ruler, measure the travel of the fork; it should be 4-5 millimeters;
- Before adjusting work, clean the rod from dirt and apply a rust converter to it;
- Use a 17 wrench to hold the adjusting nut from turning, and at the same time use a 13 wrench to loosen the lock nut;
- We take an 8 wrench and, holding the rod with it, make adjustments using the adjusting nut;
- Tighten the locknut;
- Use a ruler to check that the settings are correct;
- Put the spring back on. The easiest way to do this is with pliers, helping yourself with a screwdriver:
- We check the pedal travel in the cabin, it must correspond to the standard. If this is not the case, then adjustments need to be made. There is a special nut under the pedal for this purpose. By rotating it, you achieve ideal performance.
Conclusion
. Domestic “classic” models regularly require attention. First of all, you should pay attention to the settings. Clutch adjustment on VAZ 2106 and 2107 is often required, this is due to the design features of the hydraulic drive. But, in fact, this work is quite simple and does not require any special skills.
Clutch pedal adjustment
After any manipulation of the clutch pedal, it must be adjusted, otherwise it will jam. To do this you need:
- Unscrew the nut, which is located directly under the pedal.
- Tighten the locknut as tightly as possible. It is located below the previous nut.
- Tighten the nut under the pedal.
- Tighten the rubber washer to the fork as much as possible.
- To increase the pedal stroke, tighten the nut onto the tip. To reduce it, on the contrary, unscrew the nut.
Note: it is necessary to adjust the pedal travel so that it is within 120-130 mm.
When the adjustment is complete you need to:
- Press the clutch 3 times.
- Measure the distance from the floor to the pedal again.
- Continue adjusting the pedal until its travel reaches normal.
To adjust the hydraulic clutch:
- Remove the spring from the slave cylinder and fork bracket.
- Unscrew or tighten the adjusting nut located on the cylinder rod.
- After this, the fork free play should be approximately 5 mm.
Free play adjustment
This is a completely uncomplicated process. It will only take about 15 minutes to complete, but after that, driving your car will become a much more enjoyable process. Due to the fact that the pedal is too high, its travel is very long. To correct this situation you only need a key for 12 and the following instructions:
- Look at the steering shaft. Here you can see 2 screws (a stop screw with a lock nut, which limits the upper position of the pedal; a lock nut, with which you can change the pedal stroke).
- Unscrew the stop screw.
- Rotate it until the pedal position is normal.
- Tighten the locknut.
To prevent the clutch from slipping after adjusting the clutch, you must carry out the following manipulations:
- Unscrew the master cylinder rod locknut.
- Rotate it until the free play completely disappears (while turning it you will need to apply force).
- Turn the pieces back 1 turn.
- See if the mechanism has free play.
- Rock the cylinder rod back and forth.
- Check how well the gears work.
Note: if some extraneous noise is heard during their operation, it means the actions were performed incorrectly. We need to check everything again.
- Tighten the locknut.