When the windows in the cabin often fog up, the air is poorly ventilated, and the stove heats ineffectively at maximum settings, you should pay attention to the cabin filter. Already all modern cars are equipped with such an element of the air system. However, before changing the cabin filter, you will need to find its structural location.
Sometimes engineers install it unreasonably deep, but in most cars the filter can be replaced by the car owner himself within 10-20 minutes. Having replaced it once, the driver will spend much less time searching and disassembling it next time. It is hardly worth visiting the station for such a procedure.
When to change the cabin filter?
Different car manufacturers' recommendations for when to replace the cabin filter differ markedly. Some manufacturers recommend regular filter replacement every 10,000 kilometers , while others recommend changing the filter every 25,000 kilometers . In most cases, automakers recommend replacing the cabin filter depending on the vehicle's operating conditions. This means that if the car is operated in the southern zone, where there is a high content of sand and other fine sandy substances in the air, then the cabin filter must be changed much more often than on a car that is operated in a region where the air is much cleaner.
So, if you drive your car most of the time in urban conditions with a dense flow of cars, then you need to change the filter much more often than for those cars that drive in the countryside and do not sit for hours in many kilometers of traffic jams. For example, in large cities, the cabin filter becomes unusable much faster. Remember, regardless of the manufacturer’s recommendations for replacing the filter, you must change it at least once a year, despite the low mileage. In any case, check the manufacturer's recommendations for replacing the cabin filter so that you know when it is time to replace the air element in the car's interior.
How to replace a car's cabin filter and how often should it be done?
Surely most owners of modern cars with air conditioning or climate control systems have heard of a cabin filter, which is one of the consumables. The automaker recommends replacing it at a certain interval, which is usually about 15 thousand kilometers.
However, not everyone clearly understands the need for the cabin filter itself and the need for its frequent replacement, in particular. We, in turn, will try to understand this issue in as much detail as possible and talk about the features of replacing the cabin filter on a modern car.
Why do you need a cabin filter in a car?
As the name suggests, a cabin filter is used to purify the air entering the vehicle's interior. It just so happens that the first cabin filters appeared around the same time when automakers began to use air conditioning systems in the cabin.
The need for pre-treatment arose to ensure that particulate matter in the air, as well as pollen and other biological and mineral elements, do not affect the operation of the climate system. In addition, the filter made it possible to partially retain pathogenic microbes that penetrated inside the car.
Video - replacing the Nissan Qashqai cabin filter:
The first cabin filters were very simple in design and were made of ordinary paper, more precisely, cellulose elements. They effectively purified the incoming air, but did not guarantee high protection against pathogenic microbes.
Later, additives based on activated carbon were added to the cellulose, or the filter was impregnated with special antibacterial compounds, which made it possible to solve this problem.
How it works
The design of modern cabin filters is not far from the first models. Essentially, the filter is a plastic frame of rectangular or any other shape. Inside the frame there are cellulose filter elements made in the form of horizontal plates located at the same distance from each other. The air flow, passing through them, is cleaned of contaminants and directed into the climate system.
In fact, the cabin filter is very close in design to the air filter located in front of the intake tract. This similarity is entirely due to the same purpose – air purification.
In this case, the filter itself is also located in a plastic casing, which serves as an external housing. It is through its holes that the air flow is supplied to the filter.
What materials are they made from?
Very often you can hear that the cabin filter, or more precisely, its filter elements, is made of paper.
Indeed, the most common models of such filters (and the cheapest) are made from cellulose-based fibrous material, the main material used in the paper industry. However, calling this material paper can only be a stretch - the cellulose in the filter has high porosity and easily allows incoming air flow to pass through, while retaining various impurities.
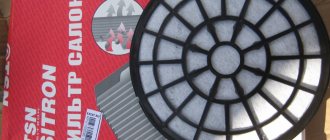
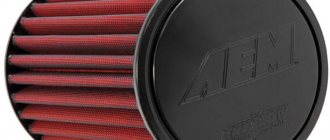
Another type of cabin filters can be considered carbon filters, which provide not only filtration of mechanical particles, but also disinfection of incoming air. It also uses a cellulose fibrous substrate, but it contains particles of activated carbon, a recognized effective cleaner.
Video - replacing the Toyota Corolla cabin filter:
In fact, the design of such a cabin filter is close to that used in gas mask cassettes, only it has fewer filter elements. By the way, if you have gas mask cassettes in the shape of a metal cylinder, it is quite possible to build a similar cabin filter with your own hands, using an old cellulose element that has expired.
There are also ready-made versions of such filters on sale, as well as filter elements for DIY modification, resembling porous black fibrous fabric.
Is it possible to do it yourself?
To make a carbon cabin filter with your own hands, you will need:
- old cabin filter;
- fine-pored metal mesh;
- a carbon filter element from a gas mask or a universal carbon filter, sold in stores for installation in kitchen hoods;
- glue, soldering iron and some free time.
To make a cabin filter, all internal parts are removed from the old element, including plastic partitions and the filter elements themselves. After this, instead of them, a metal mesh is soldered or glued in, which must first be cut to the shape of the base frame. The filter element is placed on top of the mesh and secured, after which the filter is installed in the usual manner.
Service life and how often to change it
As mentioned at the beginning of this article, most automakers recommend changing the air filter every 15 thousand kilometers, combining this procedure with routine vehicle maintenance.
As a matter of fact, while the car is under dealer warranty, this procedure is performed as part of scheduled maintenance. However, later many car enthusiasts wonder whether it is worth changing the cabin filter so often?
The answer to this question is very ambiguous and it depends, first of all, on the operating conditions of the vehicle, as well as the climatic conditions in which the car is located.
For the middle range, contamination of the cabin filter is “seasonal” in nature. For example, you can drive all winter and the filter will remain pristinely clean due to the minimal amount of pollutants in the air, and it is enough to drive just a thousand kilometers on dusty roads or during the poplar flowering season, and we will get a completely clogged filter element.
Thus, when calculating the replacement interval, it makes sense to soberly assess the conditions in which you drive.
In the summer season, it makes sense to change the filter even after a mileage of 10 thousand kilometers, and it can be done more often if you have to constantly drive on dusty roads. In winter, it makes sense to replace the element before the onset of cold weather and drive it until spring, after which it makes a planned replacement.
Video - replacing the Kia Rio cabin filter:
At the same time, do not forget that a clogged filter is a breeding ground for pathogenic microbes, and, coupled with a contaminated air conditioning system, its use can result in serious illnesses.
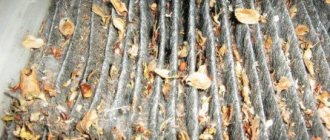
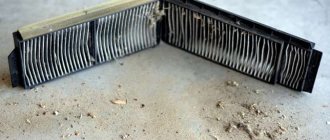
You can determine when to replace the cabin filter by examining it externally - a dirty filter is distinguished by the dark color of the filter elements and the presence of foreign elements between the plates.
This can be done on cars in which access to the cabin filter is made according to a simple scheme. However, not all models can boast of this. For this reason, the first sign of a clogged cabin filter may be foreign odors in the car interior, as well as stale air. The appearance of these “symptoms” eloquently indicates that the cabin filter requires replacement.
Is it possible to wash a car's cabin filter?
Among car enthusiasts, the question often arises: is it possible to wash the cabin filter of a car and reuse it? After all, very often, when taking an element out of the case, it is noticeable that it has relatively little dirt.
However, as practice shows, only the largest polluting elements are visible to the eye, such as pollen, tree leaves, dust, sand and others. In fact, a large number of microscopic particles are retained in the filter elements, which make up the bulk of the pollution.
It is almost impossible to wash them out of the filter, and it will not be possible to fully restore the characteristics of the filter using such a procedure. In addition, the washing procedure is strictly contraindicated for carbon filters, since along with dirt, coal dust will also be removed from the filter elements - the main “working environment” in which the air flow is cleaned of contaminants.
However, for cellulose-based filters, washing is also contraindicated, since many elements contain impregnation or antibacterial additives, which will also be removed. In addition, exposure to moisture will cause deformation of the filter elements, and they will not fully perform their filtering functions.
As a conclusion, it is extremely undesirable to wash the cabin filter. Moreover, the price of new filters is low, and replacement does not cause any difficulties even for a person who is far from car repair skills.
How to choose a cabin filter by car make and size
Before installing a cabin filter in a car, you should find out exactly whether it is used on a particular car model. This is easy to do by referring to the technical documentation for the car.
It is worth remembering that very often, especially in budget trim levels, automakers do not install a cabin filter, but the car still has space and mountings for its installation.
A similar scheme, for example, is used in Chevrolet Lanos (Zaz Chance) cars and some budget Ford Focus trim levels. There are also frequent cases when the cabin filter was not installed at the factory in some versions of the domestic Lada Kalina and Lada Priora.
In this case, installing the cabin filter is very simple - just purchase the filter included in the list of consumables for expensive equipment and install it in a predetermined location.
Video - replacing the cabin filter on VAZ 2110, 2111 and 2112:
In general, the selection of a cabin filter by car make and size should be carried out according to the recommendations of the car manufacturer. This is due to the fact that filters for cars of different brands are not unified with each other, and when purchasing another element, difficulties may arise with its installation.
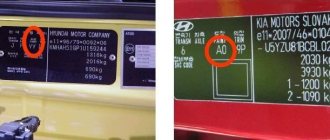
Information about the type of filter can be obtained from the catalog of spare parts for a car with a specific type of power unit. This can be done either directly at an auto parts store (sellers always have similar catalogs) or by searching on the Internet using the car’s VIN code.
It is much more difficult if the design of a particular car did not initially provide for the installation of a cabin filter, as, for example, in most old VAZ models. In this case, many motorists who want to install a cabin filter themselves select a filter element that is similar in size and modify the “stove” air intake with their own hands, where they install it.
Such an operation is quite complex and requires the appropriate skills and tools. At the same time, such modifications on a car that has a factory warranty may lead to the fact that the dealer may refuse warranty obligations, which should be kept in mind.
How to replace the cabin filter yourself
The procedure for replacing the cabin filter differs significantly for cars of different brands and models. This is due to the fact that the shape, size and location of the cabin filter vary depending on the layout of the units in the engine compartment of the car.
Video - replacing the cabin filter of Skoda Octavia A5 body:
However, this operation can be performed independently using a small amount of tools. In most cases, to carry out the replacement procedure, you will only need a screwdriver, with which you can remove the plastic chips that secure the plastic cladding.
After removing it, access to the filter opens. For example, let's look at replacing the cabin filter on the most popular cars on the Russian market - Lada Kalina, Lada Priora and Ford Focus 3 and watch a video that clearly demonstrates this procedure.
Replacing the cabin filter on Lada Kalina
In Lada Kalina, the cabin filter filter element is located under the right plastic trim, located in the lower part of the windshield in the area of the windshield wipers. To perform the filter replacement procedure, you will need a Torx T-20 wrench and regular Phillips and slotted screwdrivers.
Video - replacing the cabin filter Lada Kalina:
In order to remove the cladding, it is necessary to dismantle the plastic plugs that cover the heads of the screws that secure the cladding. This can be done with a slotted screwdriver.
To unscrew a pair of screws, you will need the aforementioned Torx-20 key or a screwdriver that comes with replacement bits. After this, open the hood and unscrew three more mounting screws. Then the plastic lining is carefully dismantled. This should be done carefully so as not to damage the fragile plastic elements.
Having completed dismantling the plastic trim, use a Phillips screwdriver to unscrew the screw securing the windshield washer tube, as well as a couple of screws of the cover that blocks access to the filter element.
After removing the screws, the cover is carefully removed by moving it slightly to the right and up. The procedure must be performed carefully and, preferably, wearing gloves so as not to cut your hands on the sharp plastic edges of the opening. Then you should move apart the latches securing the filter element and remove it.
Installing a new filter is done in the reverse order of removing the old one. However, when installing a fresh filter, you should pay attention to the direction of air flow through the filter, indicated by the arrow. During installation, it should be directed downwards, which will ensure the correct functioning of the filter. It is also worth paying attention to ensure that the latches fit clearly into place and secure the element in the groove. After this, the cover and plastic lining are installed in the reverse order.
Replacing the cabin filter on Lada Priora
Replacing the cabin filter on a Lada Priora is somewhat simpler than a similar operation on a Kalina. However, it should be remembered that this procedure is different for cars with and without air conditioning installed. This is due to the fact that the filters are located in different places.
Video - replacing the cabin filter of a Priora (without air conditioning):
On a Lada Priora without air conditioning, the cabin filter is located under a decorative plastic plug on the left in the area of the windshield. To remove the cover you will need a Phillips screwdriver. Initially, you should open the hood of the car, after which you will need to remove the trims that block access to the filter.
Video - replacing the cabin filter on a Lada Priora (without air conditioning):
After this, you should unscrew the three mounting bolts covering the cabin filter cover and remove it. After removing the old filter element, it makes sense to vacuum the seat, and then install a new cabin filter (part code - 1 987 432 435). In total, this procedure takes about ten minutes of leisurely work.
For Lada Priora, equipped with air conditioning, the procedure is even simpler. To replace the filter element (part code - TSP0325328) you will also need a Phillips screwdriver and five minutes of time.
Video - replacing the cabin filter on a Lada Priora with air conditioning:
The cabin filter in the model with air conditioning is located in a vertical groove almost in the center of the engine compartment. To access the filter element, unscrew a pair of bolts securing the sound insulation.
After this, the sound insulation is folded back and the old filter is removed. The new filter is bent slightly before installation and is smoothly inserted into the groove to replace the old one, after which the sound insulation is returned to its place and again fixed with a pair of bolts.
Replacing the cabin filter on a Ford Focus 3
The cabin filter (part code - 712 319 0006) on the Ford Focus 3 is located differently than on previous models. It is located directly in the car interior, to the right of the center console, at the feet of the front passenger.
Video - replacing the cabin filter for Ford Focus 3:
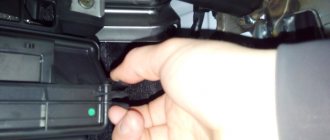
To replace the filter element, a regular Phillips screwdriver is sufficient. Access to the filter is made through a small hatch in a plastic casing measuring approximately 3 by 3 centimeters. This hatch is dismantled, after which the lining clip is removed.
After this, access to the inside of the console and the latches for securing the filter element cover, located on the right side, opens. After disconnecting them, the cover is removed and the old filter is removed. Installation of a new filter element and assembly are carried out in the reverse order.
conclusions
Thus, having considered the purpose of the cabin filter and the aspects of replacing it on cars of the most popular brands, we came to the conclusion that this procedure can be carried out on their own by a person who does not even have much experience in repairs. To carry it out, you do not need a special tool, and you just need to know the location of the filter element, as well as the sequence of actions when replacing it.
At the same time, timely replacement of the cabin filter will avoid not only a deterioration in the air quality in the cabin, but also the appearance of pathogenic bacteria in the ventilation system.
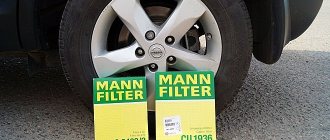
Finally, it is worth mentioning the choice of the cabin filter itself. When choosing a new element, it makes sense to give preference to a part recommended by the manufacturer and officially supplied. Chinese analogues are not always of high quality, and the affordable price of the “original” does not make its purchase financially burdensome.
In addition, if you have a choice, it makes sense to purchase carbon filters, which have better filtering properties. The slight difference in cost is more than compensated by their consumer characteristics.
Taking into account all the above nuances, you can easily make the right choice, as well as carry out all work procedures with minimal time and effort.
Not all drivers know how to find out where the car was towed if you parked in violation of traffic rules.
The new road to St. Petersburg from Moscow pleases with its quality, but not with the cost of travel along it.
About prohibiting traffic signs https://voditeliauto.ru/voditeli-i-gibdd/pdd/dorozhnye-znaki/zapreshhayushhie.html with explanations for each of them.
Video - replacing the cabin filter Nissan X-Trail:
May be of interest:
voditeliauto.ru
What are the signs that it’s time to change the cabin filter?
Based on indirect signs, you can independently determine whether it is time to change the cabin filter . So, if the air outside is fresh and clean, and in the cabin you feel such cleanliness and freshness of the air, then perhaps your filter is already quite dirty and it can no longer cope with its functions of purifying oxygen from harmful substances. This can also be confirmed by the fact that if you turn on the oxygen cabin ventilation system at maximum power and do not feel strong air blowing, then with 100 percent probability it can be said that the cabin filter has become unusable and cannot pass a large amount of air through it.
Where is the cabin filter located in a car?
For many cars, the most common location for the cabin filter is behind the glove box (glove compartment), or under it. How to get the cabin filter out yourself can be found in the car’s operating instructions.
In some cars, the cabin air filter is located under the dashboard. In this case, changing the filter yourself will be problematic. There are also cars in which the filter is located under the hood of the car, in special cassettes.
Replacing the cabin filter, step-by-step instructions using the example of Citroen C4
To replace this filter, open the hood and find its location.
The cabin filter in the Citroen C4 is located in the engine compartment under the sound insulation on the right side. Using a special clip remover, you need to unfasten the sound insulation cover, which is secured with three clips. To dismantle the clip, you need to pry it off with a screwdriver and carefully, so as not to break it, remove it with a puller or pliers. Now we take out the sound insulation cover.
Next, open the filter compartment cover by pulling the handle. After removing the old filter, install a new one in a free niche. The opening flaps should be at the bottom and the slots at the top. Insert the filter all the way and check the installation strength. Then we install the cover in place. Don't forget to secure the sound insulation and insert the clips into place.
How much does a cabin air filter cost?
Some cabin filters are very expensive. Especially for premium brands and if the cabin filter is not small in size (for example, like in SUVs and minibuses). The most expensive prices for filters and for their replacement are from official dealers. So, compared to market prices for cabin filters, prices from official dealers can be more than 2 times more expensive. Purchasing and using an original cabin filter is not necessary. You can buy a non-original cabin filter, which will be significantly cheaper, but in terms of properties and quality it will not differ much from the original. If you can replace the filter yourself, then you will also save money that you could spend at a car service center.