Parktronic
Many modern cars are equipped with special parking sensors that can fail. We will tell you how to check the parking sensor in our material. Some motorists today cannot even imagine parking a car without this useful additional system. Even a schoolchild can park a car with parking sensors, and we are not exaggerating.
The variety of forms and types of parking sensors make these devices very popular. Structurally, these systems are easy to install even by people who are at least somewhat familiar with electronics. Of course, we are not talking about top models with numerous bells and whistles, but about simple parking sensors. In some cases, the device fails, like all other devices in the modern world. We will tell you below how to identify the malfunction and fix it.
How to check the parking sensor yourself
Parktronic
Many modern cars are equipped with special parking sensors that can fail. We will tell you how to check the parking sensor in our material. Some motorists today cannot even imagine parking a car without this useful additional system. Even a schoolchild can park a car with parking sensors, and we are not exaggerating.
The variety of forms and types of parking sensors make these devices very popular. Structurally, these systems are easy to install even by people who are at least somewhat familiar with electronics.
Of course, we are not talking about top models with numerous bells and whistles, but about simple parking sensors. In some cases, the device fails, like all other devices in the modern world.
We will tell you below how to identify the malfunction and fix it.
Diagnostics: how to check the parking sensor
There are different ways to check parking sensors, starting with the simplest ones and ending with connecting a special PC for searching. Depends on the severity of the damage.
First way
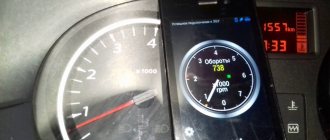
Video: Checking the operation of parking sensors
Engineers note that if you come close to the device, in good condition it should make a click. You can also bring your phone with the voice recorder turned on, and then listen to the recording - you will clearly hear a click if it happens.
Before this, you just have to turn the key to the “start” position, release the handbrake and engage reverse gear. As you understand, all this will take you no more than a few minutes.
Second option
Video: checking parking sensors
Depending on the type of device, you need to turn on neutral, release the handbrake and start the car. Run your fingers over the front and rear parking sensors. In working condition they should vibrate slightly. Note that not all types of parking sensors react to touch in this way.
Diagnostics of parking sensors
Set of parking sensors
There is specialized equipment called "VAG". We will not describe it, since the mechanism is structurally very complex and is intended for use by professionals.
You may notice instability in operation due to sudden temperature changes.
If your parking sensors do not work in cold weather, but as soon as it gets warmer, they are operational again, it is better to replace the system, since the sensors will not work for a very long time.
DIY repair
If you want to try to fix the parking sensors on your car yourself, you should know the main causes of malfunctions:
- mechanical damage due to impact or accident;
- manufacturing defects;
- the consequences of the climatic conditions in which the vehicle was operated;
- problems with electrical wiring.
Checking parking sensors
Of course, we have listed only a general list of problems. So, first you must dismantle the faulty sensor and buy it instead from the market or from a car dealership. Let us immediately note that the sensors are not sold individually, since this is simply not profitable for sellers, so be sure to buy a minimum quantity of three pieces.
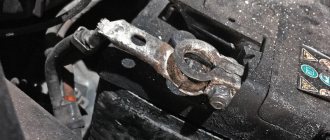
Turn off the car engine, remove the positive terminal of the battery to prevent a short circuit and overload the system. Remove the old sensors and install new ones in their places, connecting all the wires. Place the terminal and test the device.
It should be noted right away that some manufacturers paint the sensors in the color of the car, so when replacing sensors, be prepared to go to a service center for painting or drive like that. There is no difference in operation, but sensors that differ in color spoil the whole look.
So, you now know how parking sensors are checked and what may be required for this.
Source: https://avtozvuk.info/kak-proverit-datchik-parktronika.html
Simple ways to diagnose ultrasonic sonar
There are many methods for diagnosing parking sensors, but we will tell you about the simplest of them, which you can use yourself.
1. Approach the sensor as close as possible. If it is in good condition, you will hear a clicking sound. 2. Run your fingers over the sensor - if the device is OK, you should feel a slight vibration. 3. Use a tester. We will tell you how to do this in a little more detail. For the first and second methods, it is necessary that the car is started and the handbrake is set.
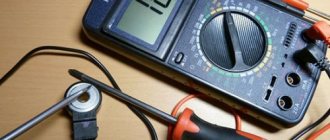
How to check the parking sensor using a tester?
Such a check will take several hours, but will give the most accurate results. Before you begin the test, you need to turn off and remove all ultrasonic sonar sensors from the machine.
When you pick up the sensor, you will see several contacts. You need to connect the tester probe to one of them. Switch the multimeter to the resistance measurement position with a threshold of 2000k and touch the probe contacts with the probes. During this action, you will see the resistance value on the screen. If it is not zero or infinity, the parking sensor is working properly.
This method is good because it allows you to check the serviceability of not only the sensor itself, but also the wiring with which it is connected to the receiving unit. As we have already said, faulty electrical wiring can also cause the ultrasonic sonar to not work correctly. Therefore, if you have already started diagnosing this device, “call” the wiring at the same time. In this simple way, you can find where the integrity of the wire is broken, and either solder it at the break point, or replace it with a new one.
How to fix parking sensors with your own hands?
To repair an ultrasonic sonar, most often it is enough to simply replace the failed sensor. If you buy a replacement at the car market, be prepared for the fact that they will sell you in quantities of at least three pieces - selling them individually is not very profitable.
When starting installation, do not forget to turn off the car engine and remove the positive terminal from the battery. Otherwise, you risk becoming a victim of a short circuit, which, you see, is not very pleasant. Install the new sensor in place of the old one and connect the wiring. If everything was done correctly, after starting the engine your electronic assistant will be back in service!
How to check the parking sensor?
How to check the parking sensor?
Parking sensors help the driver to sense the external dimensions of the car and control the distance to obstacles.
The location of parking sensors may vary. They are installed front and rear. The sensors are made in the form of buttons, the function of which is to inform the driver about the distance to objects. The operating principle of the sensors is based on ultrasonic radiation. The emitted ultrasound reaches the surface and returns, informing about the distance to the obstacle.
If the sensor stops performing its functions, it means it has failed. It needs to be detected and changed.
Methods for determining a non-working sensor
There is a simple way to check sensors without using additional instruments and spending a lot of time. When approaching the working parking sensors, you can hear dull clicks. To do this, you need to get closer to the sensor: raise your ear or put your phone up, and make a recording.
To begin checking the functionality of the sensors, the car starts, the handbrake is tightened and the reverse gear is engaged. The absence of clicks indicates a malfunction of the sensor and the need to replace it.
Another test method is used when parking sensors are located front and rear. Keeping the transmission in neutral activates the sensors. The car starts and the handbrake is put on. Working sensors vibrate gently. You can feel it with a light touch. All sensors are checked. If vibration is not felt, the sensor is broken.
Cold, wet weather can interfere with the functioning of the parking sensors. The sensor is restored as it dries. But after that you need to make sure it works.
Checking sensors with a VAG is somewhat difficult. This requires additional skills. In addition, this procedure takes more time.
Replacing a non-functioning sensor
If you find a failed sensor, replace it. First you need to buy the same model in the same color. The ground is switched off (negative on the battery). The non-working sample is removed and replaced with a new one. The mass is thrown back on, the car starts, and the operation of the new sensor is checked.
It must be remembered that the sensor with a delay. Move slowly enough to allow for reaction.
Return to list
Source: https://ikey.by/statii/kak-proverit-datchik-parktronika/
How to protect yourself from breakdowns?
Preventing malfunctions is easier than eliminating them. In order for the system to always turn on and be operational, you need to follow a few simple rules for its operation:
- The sensors must be cleaned periodically to remove dirt and water. This becomes especially important in rainy weather. The electromagnetic tape should be checked from time to time for damage. It is also necessary to remove dirt from the tape, and this must be done both from the outside and from the inside.
- When cleaning the microprocessor from contaminants, you must be careful, as it can be easily damaged. Only a correctly configured device will work correctly - only in this way will it “feel” obstacles from the distance required by the driver.
Parking sensors do not work: possible sensor malfunctions
Like any normal device, parking sensor malfunctions often occur. By and large, the parking sensors do not work or fail for three reasons: either the wiring is broken, or there are problems in the ECU (electronic control unit), or mechanical damage to the parking sensors.
Repairing parking sensors with your own hands is, in principle, a simple matter under one condition - you must understand and know what you are doing. Otherwise, it is better not to act on your own and contact the service. It will be cheaper. This is especially true for repairing the electronic circuit of the control unit. If you installed the parking sensors with your own hands, then you will not have any problems with the “ringing” of the wiring.
But most often problems occur with parking sensors. And one of them is the parking sensors constantly beeping. According to the rules, the parking sensor is activated when reverse gear is engaged. If, while moving forward, a constant operation occurs and the sensor beeps, then there are two options: either a short circuit occurs in the circuit, or a foreign body has stuck to the sensor: dirt, a piece of ice, the body of a dead insect.
The parking sensor is a delicate creature, and the most common reason for the constant operation of the system is water. Especially in the cold season, after washing. After drying the sensor, the squeak disappears. If not, then you need to diagnose the sensor.
How to check the parking sensor if the indicator does not show an obstacle, but it actually exists. Or rather, how to figure out which sensor is not working. Diagnostics of the sensors is simple: close the sensors one by one, and an assistant watches the indicator readings in the cabin.
Often the cause of a constant squeaking sound from the sensor is an incorrectly adjusted sensitivity of the sensor. For those who are able to adjust it themselves, there is a trimming resistor in the parking sensor control circuit.
Adjusting the sensitivity of the sensor is also necessary in cases where it is triggered by separately growing grass (there are, and often are, such cases).
Replacing the parking sensor
Another common cause of parking sensor malfunction is mechanical damage to the sensor mirror by a small stone, which, according to the “sandwich law,” falls precisely in the center of the sensor.
There are two options here: contact the service, where you will hear the cost of a standard parking sensor, which will include delivery of the sensor from the USA, bonuses for the entire delivery department and a modest price for the sensor itself.
The second option is to buy a sensor that is suitable in size and operating parameters and install it instead of the standard one. In this case, if the replacement sensor is of a different color, then painting the parking sensors, which you can do yourself, can easily improve the situation. The body of the new sensor is degreased and coated with a thin layer of varnish of the color you require.
Basically, we have listed the “folk” methods and methods by which the parking sensor is repaired. The most effective way is to contact a specialized service, naturally at a reasonable cost of repair.
Good luck using the parking sensors.
Why did the parking sensors fail?
If you notice that your device is unstable during temperature changes, or you periodically receive false signals about obstacles behind the car, most likely the ultrasonic sonar sensors have malfunctioned.
The reasons for the breakdown may be different. The most common of them:
— mechanical failure due to a strong impact (accident); - defective product; - faulty electrical wiring; — wear and tear due to use.
However, it is not so important why the parking sensors broke down. It is much more important to detect in time that the device is faulty and replace or repair it.
Basic malfunctions and repairs of parking sensors
Parktronic or parking radar is a small device that not only makes parking a car easier.
It also ensures road safety by signaling if an obstacle or another vehicle is too close.
And if the car’s parking sensors are broken or simply don’t work, then for inexperienced drivers, as well as those who are accustomed to its constant prompts, this can become a real problem.
How to determine that the parking sensors have stopped working?
Determining that the parking sensors have stopped working is quite simple. If your car has a parking sensor installed from the factory, there is an indicator on the dashboard that will indicate that it is broken.
But if you installed an acoustic parking system yourself, then in order to identify a breakdown you should observe its operation.
It will either be constantly silent until you crash into something, or it will constantly give signals about non-existent obstacles. But recognizing what exactly has gone wrong is a little more difficult.
Determining the cause of a parking radar failure and repairing it
Parking sensor malfunctions are often associated with the failure of one of its elements. An acoustic parking system consists of several important components.
- The control unit is its main part, which is responsible for the operation of the entire system.
Quite rarely, this particular element fails. How to check the functionality of the electronic control unit? You need to disconnect it first. Then you should attach the ohmmeter terminals to the terminals.
If the ohmmeter does not show anything, then the cause of the malfunction lies precisely in the electronic control unit. If you are not an electrician and do not have sufficient experience working with such mechanisms, it is better not to repair parking sensors yourself.
Here it is worth turning to specialists.
Discounts on new cars! Advantageous loan from 9.9% Installment plan 0%
Incorrect settings of the control unit may also be one of the reasons why the parking radar does not work.
If the control unit is configured to be more sensitive, the parking radar will respond even to non-existent obstacles. Or the opposite situation, he does not notice the existing obstacles.
This may indicate that sensitivity is too low. In both cases, it is necessary to reconfigure the parking radar.
- Indication devices: monitor (data is transmitted to it regarding the presence of obstacles and the distance to them) and a sound warning system (it emits warning signals). These elements fail the least often, since they work in the most gentle conditions, inside the car.
- Sensors or metallized plates are transmitting devices that detect the presence of obstacles nearby. In a car there can be from 2, 4, 6 or even 8. The most often installed are 4 or 6. If 4, then they are all installed on the rear bumper. If 6 are installed, then 4 of them are on the rear, and 2 on the front bumper. The latter option allows you to control not only the space behind the car, but also in front. The operating principle of the transfer device is very simple. It emits ultrasonic signals, which return back when they hit an obstacle. The system reads the round-trip time of the signal, thus calculating the distance to the interference.
The parking sensor monitor fails less often than other elements, since it is located inside the car
Sensors most often fail, because they are the ones most exposed to the external environment. They are installed on the bumper of the car, and accordingly they can get dirt, snow or water.
How to determine that the parking sensor is not working? Simple enough. You should start the car and touch the sensor with your finger. A working one always vibrates slightly, and if you touch it, it should make a cracking sound. If this was not found, then this is the reason.
But before you go to a car repair shop, you can try to repair the parking sensors yourself. The first thing to do is clean and dry it.
If after these manipulations the system does not work, then perhaps the cause of the breakdown lies in the membrane. In order to identify a membrane malfunction, the sensor should be opened. If it is faulty, it must be replaced.
However, it is not recommended to change the membrane yourself; it is better to entrust this to an auto mechanic.
But sometimes a different situation happens: a pebble hits the sensor, which disables it. In such cases, repairing the parking sensor is no longer possible; it only needs to be replaced.
If the machine has metallized plates, then complete failure and the need to replace them will be indicated by the presence of any external damage.
How to replace the sensor or plate? Simple enough. You should buy a device suitable in size and technical parameters from a spare parts store and install it in place of the broken ones. If the sensor is different in color from what it was, then fixing it is quite simple; it should be repainted.
Sometimes sensors start to fire for no reason, signaling the presence of non-existent obstacles - the cause of the malfunction may be due to contamination, sticking of sensors or metallized plates.
If you have sensors, you should clean them of dirt and snow; if there is moisture, remove it. If plates are installed, it is better to remove them, because water and dirt can accumulate not only on the surface, but also under them.
After this, the bumper must be washed and dried. Only then can you put the dry and clean plates back.
If the parking sensors do not work after washing or in severe frost, then the problem may lie in the wiring, or more precisely, in the connections that get wet. Regular drying of the sensors and wiring connections will also help here.
In what cases can you repair parking sensors yourself?
It will not be possible to repair the parking radar only if the problem lies in the operation of the microprocessor module. Detailed diagnostics of a printed circuit board and its repair involves resoldering the component elements. And to perform this task, special equipment and tools are required.
Sequence of actions when repairing a device
The parking system repair procedure is performed as follows:
- The first stage involves thorough cleaning of all touch sensors installed on the bumpers. For cleaning, use a clean, lint-free rag. Lint may remain on the sensor element and cause it to not work properly.
- Visual diagnostics or continuity testing of electrical circuits is carried out. It is necessary to check the integrity of the wires coming from the electronic module on the connector. If damaged wires are found during diagnostics, they must be replaced. To do this, the plastic cladding under which the power lines are laid is dismantled, the conductors are changed and the upholstery is put in place.
- The electronic module is visually checked. You need to make sure the integrity of its body and the connector to which the wiring is connected. There should be no oxidation or signs of damage to the contacts on the plug. If the contact elements are bent, they are leveled, and traces of acidification are removed using fine-grained sandpaper.
- Then it is recommended to disassemble the unit to assess the condition of the board. Traces of dirt and dust, if present, are removed from the housing. If the board has been exposed to moisture causing the device to not work, it should be dried. It’s not a fact that this will help, but in some cases it can solve the problem. Drying is done with a hair dryer or the board is placed in a warm place, but exposure to high temperatures is not allowed.
- The quality of the connection of wires to the sensor contacts is checked. To do this, you need to dismantle the rear or front bumper or crawl under it and visually assess the condition of the contacts. If the wire on one of the sensor elements is missing, it must be soldered again. Acidification on the contacts is removed, all wet components of the system are dried.
- If diagnostics show that only one of several controllers is faulty, then the device must be removed and replaced. The controllers themselves are usually made in small cylindrical cases filled with hermetic glue. To dismantle and disassemble the sensor element, you must carefully remove the back cover of the plastic case from the clamps and remove the working part of the device from it. If the sensor is equipped with a rubber gasket, it is removed. Damage and wear of the seal often causes the sensor to fail, so this element must be replaced.
- All remaining sealant is then carefully removed. You need to get to the cork gasket on which the metal circuit is installed. One conductor is usually connected to it. If it is missing, a new cable is soldered.
- Depending on the type of parking sensors, after disassembling the housing, you can see a felt gasket with a slot; a second conductor is installed into it. The seal is removed, under it you can see a sensor element made in the form of a small metal disk. If a cable is not soldered to this component, then the conductor is soldered. Further assembly is done in reverse order. When performing this task, the device must be filled with sealant to prevent moisture from getting inside.
The Arsis44 channel presented a detailed guide on how to perform repair steps to restore the functionality of the parking radar.
Advantages and disadvantages
Automatic parking, like any other device, has advantages and disadvantages. Some drivers argue that there is no point in installing it on a car, since previously there were enough rear-view mirrors. This is completely false, as in earlier times technology did not give drivers as many options as it does today.
The presence of automatic parking in the car gives the driver the following advantages:
- the ability to park even where there is little space;
- preventing an accident in bad weather, when icy or fogged windows do not provide a full view and visibility is limited;
- if a pedestrian suddenly appears from behind, the driver can brake urgently;
- It is much easier for insecure motorists to avoid damaging their car.
The only disadvantage of such devices is that obstacle recognition is not always correct. This happens in the following situations:
- the slope of the road is sometimes perceived as an object;
- rain and fog can reflect ultrasonic signals, misleading the driver;
- a fur coat absorbs signals without reflecting them: parking sensors may not detect a pedestrian wearing fur clothing.