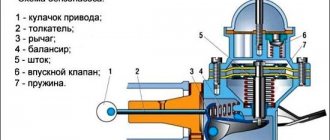
Speedometer not working on Priora? A familiar problem
Compliance with speed limits is not possible when the speedometer on the Priora does not work; at a minimum, this is a nice conversation with the inspector, which will probably end in a fine, and at maximum - an accident.
There have been cases of temporary rather than complete failure of functioning. At first, the speedometer dropped to “zero”, then the electric booster turned off, then the “!” signal came on on the dashboard, and after a couple of minutes everything turned on in the reverse order.
The speedometer on the Priora does not work either for a purely structural reason or as a result of failures in the control microprocessor
, since VAZ installed an electronic speedometer on this Lada model.
What to do if the instrument panel fails?
If the speedometer on the Lada Kalina does not work, this may be due to a breakdown of the instrument panel. It is supplied to the automotive market only assembled, so it needs to be changed completely.
Before replacing, you should check the reliability of the fasteners that go to ground; this may be the cause of the breakdown.
The procedure for removing and replacing the instrument panel consists of the following steps:
- The steering wheel must be moved to the down position.
- Next, the mounting bolts are unscrewed.
- Then, overcoming the resistance of the latches, we pull the cover towards ourselves and remove it.
- Use a Phillips screwdriver to unscrew the center console mounting bolts.
- Having tilted the shield, we disconnect the connector with wires from it. To do this, you need to move the latch.
- We carry out the installation in reverse order.
Speedometer testing
You can test the condition of the speedometer after a complete failure of operation yourself, without resorting to expensive diagnostics at a service station. Since all the main Priora systems are controlled by an on-board CHIP
, you need to reset its settings, which it “increased” for itself during operation.
If after such a simple manipulation the speedometer continues to refuse to function, the next step is to check the power circuit. This check must begin by inspecting the fuse plate on the fuse board.
The speedometer power supply network is connected to the general power supply of the instrument panel and a safety element marked “ IG/METER”
».
Checking fuses
Often the cause of a speedometer malfunction is a blown fuse. Most often, a fuse fails due to water getting on it, which flows onto the contacts, which leads to an interruption in the operation of the electrical circuit. If the check reveals that the fuse responsible for the operation of the dashboard has blown, then the car owner will simply need to replace it with a new one. Finding the right fuse is quite simple by marking “IG/METER”, but if the replacement process does not help solve the problem, then you will have to check the integrity of the wires that go to the dashboard from the speed sensor.
Signal Circuit Test
After making sure that the fuse is intact, proceed to check the wiring from the speed registration sensor to the dashboard. The car is constantly in a state of vibration and dynamic shocks, especially on our roads. From such processes, the contact groups may diverge, and the wiring may lose its conductivity.
In addition to destruction from vibration, the contacts in the connector can oxidize
under the influence of moisture in wet weather or from car washing. Therefore, you should check both the sensor connector itself and the condition of its contacts. Even if they appear clean upon visual inspection, preventive cleaning will not harm them.
Next in line
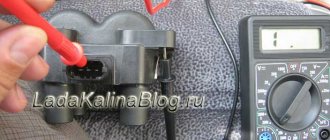
The sensor itself is being tested. It is tested using a special device - a scanner. If you do not have a scanner or if it is impossible to use it, you can check the operation of the speed sensor using a distance meter. If the sensor is functioning correctly, even if the speedometer is broken, the meter will continue to count the distance.
The center of concentration of all signal and control functions of the equipment located on the dashboard is concentrated in the printed circuit board. It must be removed and inspected to identify melted parts or broken tracks. After this, the board must be handed over to a specialist, who will connect it to the stand and check for functionality.
The last option
The easiest damage could be damage to the speedometer needle drive. However, if everything is in order inside the device, the reasons for the failure lie much deeper. It could also be the gearbox, which affects the operation of the sensor and therefore the speedometer on the Priora does not work.
The speed sensor uses the Hall principle and only a fairly experienced specialist can understand its relationship with interruptions in the functioning of the box.
Replacing the speed sensor
This is, in principle, one of the simplest operations in repairing the ECM system. It consists of just a few techniques and requires a minimum of tools, you only need:
- A wrench or a socket with a 10 mm wrench.
- Curly screwdriver.
- New speed reader.
- Marker.
First you need to lift the hood of the Priora. The sensor is located in the gearbox in the same place where the cable input was located on previous VAZ models. That is, access to it is convenient from above.
You need to remove the air pipe between the atmosphere filter and the throttle valve. These are just two clamps tightened with a screwdriver. After this, the sensor is completely accessible. Therefore, it is necessary to remove the connector from it and check the wires. Insulate if necessary.
After this, you need to unscrew the 10mm bolt that holds the sensor fixing plate. Mark its position. Remove the old one and insert the new one, paying attention to the rubber ring. Replace the reader clamp and carefully tighten this bolt. Connect the connector. The operation is completed. Check your computer's memory for errors, and you're ready to go. In the video there are “glitches” of the speed sensor on the Priora:
Why the speedometer on a Priora doesn’t work: we’ll tell you about the reasons and repairs
The speedometer allows you to control your speed and ensure that you are following the appropriate mode while driving on the roads. If the device does not work, it will be difficult to navigate while driving. Very often this problem occurs on the domestic Lada Priora, the faults of which we will talk about.
A broken speedometer on a Priora may not work at all or work incorrectly. Photo: fa.d-cd.net
What are the symptoms of the problem?
The appearance of one of the following signs can definitely indicate that the speedometer on the Priora is not working:
- The needle remains at zero, although the car has been moving for a long time.
- In principle, the definition of speed indicator is not correct. Or the vehicle shuts down altogether.
In practice, the second failure option is the most common. Temporary breakdowns of the speedometer are a situation that is often faced by those who have purchased a Lada Priora car. This often manifests itself in the fact that the needle is at zero, although movement has begun. The instrument panel begins to display an illuminated exclamation mark. The electric power steering stops working. But a few minutes pass, and no trace remains of the problem; the electronic components continue to operate in the old mode.
Electronic speedometer and the basics of its operation
Even before the complete computerization of cars began, the speed indicator system was transferred to an electronic basis. This system consists of the following elements:
- Drive mechanism in the gearbox (gearbox).
- Speed sensor (signal reader) at the gearbox.
- Wiring harness.
- Speed indicator (speedometer) in the instrument cluster.
Although to be precise, the drive mechanism remained the same for both the cable indicator and the electronic one. All the salt was in the sensor and speedometer. Based on the Hall effect, the sensor reads the pulse frequency and transmits information through a wire to the speedometer, where the induction motor system is activated and drives the indicator needle.
Features of the Priora speed indicator drive
The disadvantage of the old sensor or cable rotation mechanism system was the plastic gear built into the gearbox. In case of breakage or wear of its teeth, it was necessary to dismantle the gearbox and completely disassemble it. At Priora, this problem was solved in a new way. The gear is no longer in direct contact with the sensor. Using the Hall principle, the sensor reads the rotation speed from the clearance in the gear. Therefore, the reader itself has a different shape from previous models.
The main reasons for speedometer failure
First, you need to make sure that the source of the trouble is not bugs in the chip itself, on which the vehicle operates. While the machine is in use, the so-called cache in these chips is filled with information. This is why failures occur, including temporary ones. The “mass” from the battery is simply reset in this case. Otherwise, you will not be able to reset your data. In this case, the on-board network in the vehicle is completely de-energized.
What should you do if your car smells like burnt oil? You will find the answer in our material.
How to remove the bumper on a Priora and how difficult it is to replace it - find out here.
If resetting does not help get rid of the problems, conduct a full system check:
- Check the fuse plate installed on the board in the power circuit. The required part will have the designation “IGMETER”.
- After this, it is necessary to diagnose the serviceability of the wiring located in the area, starting with the speed registration sensor and ending with the instrument panel. It is in this section that the wires begin to break. Clinching may occur and other types of defects may appear. This usually occurs due to heavy use of the vehicle.
- The contacts located in the connectors require special attention. And they can become unsuitable for use due to the formation of rust and high acidity. In this case, the contacts of the sensor and connectors can be easily cleaned to get rid of defects.
- The next step is to check the monitoring sensor based on the distance traveled by the vehicle. If you contact a service center, special equipment is used to check this part. If it is missing, then the check is performed when the car drives several kilometers. As the countdown continues, we can say for sure that the system is working properly.
Removing the phase sensor
We remove the sensor when checking and replacing it. Checking the phase sensor is shown in the “Fault Diagnosis” section.
Location of the phase sensor on the engine : 1 - right support of the power unit; 2 — front timing drive cover; 3 — cap of the fuel rail fitting; 4 - phase sensor; 5 - rear timing drive cover With the ignition off, release the latch of the wiring harness block of the engine management system...
...and disconnect the block from the phase sensor.
Using a 10mm socket, unscrew the two sensor mounting bolts (one bolt is not visible in the photo)…
...and remove the sensor from the hole in the rear timing cover. The connection between the sensor and the rear timing cover is sealed with a rubber ring. If the ring is damaged...
...remove it... ...and replace it with a new one. Install the phase sensor in reverse order.
We remove the coolant temperature sensor to check or replace it. Checking the coolant temperature sensor is shown in the “Fault Diagnosis” section. We carry out the work on a cold engine. Remove the plastic engine cover. Drain the coolant from the engine cylinder block (see “Replacing the coolant”). With the ignition off...
...we release the clamp of the engine management system wiring harness block... ...and disconnect the wiring harness block from the coolant temperature sensor.
Use a 19mm spanner to unscrew the sensor...
...and remove it from the hole in the thermostat housing.
The connection between the sensor and the thermostat body is sealed with a copper washer. Install the sensor in reverse order. Add coolant to normal level.
The throttle position sensor is removed for replacement. Checking the sensor and its electrical circuits is shown in the “Fault Diagnostics” section. With the ignition off, release the lock of the engine management system wiring harness block and disconnect the wiring harness block from the throttle position sensor.
Use a Phillips screwdriver to unscrew the two sensor mounting screws.
Remove the sensor from the throttle valve axis. The connection between the sensor and the throttle assembly is sealed with a foam ring. If the foam ring is damaged, it should be replaced. Before installing the sensor, make sure that the throttle valve is completely closed. We install the sensor on the throttle assembly so that the shank of the damper axis fits into the groove of the sensor. We fasten the sensor with screws and connect the wiring harness block to it.
We remove the mass air flow sensor for replacement. With the ignition off, release the block clamp (the clamp is located at the bottom of the block) of the engine management system wiring harness...
...and disconnect the wiring harness block from the sensor.
Use a Phillips screwdriver to loosen the clamp securing the air supply hose to the throttle body...
...and remove the hose from the mass air flow sensor pipe.
Using a 10mm spanner, unscrew the two bolts securing the mass air flow sensor to the air filter cover...
...and remove the sensor.
Remove the sensor seal from the hole in the air filter cover. Before installing the sensor, we put the sealing sleeve on it until it stops. Further installation of the mass air flow sensor is carried out in the reverse order.
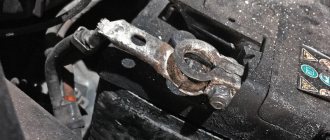
We remove the vehicle speed sensor for replacement and when dismantling the gearbox. Remove the air supply hose from the throttle body pipe (see “Removing the throttle body”) and move it to the side. With the ignition off, press the lock of the engine control system wiring harness block...
...and disconnect the wiring harness block from the speed sensor. For clarity, we show further operations for dismantling the speed sensor on the dismantled gearbox.
Using a 10mm spanner, unscrew the nut securing the speed sensor...
...and remove the sensor from the hole in the clutch housing.
Remove the rubber sealing ring located in the groove of the sensor rod. If the ring is damaged, replace it with a new one. Install the vehicle speed sensor in reverse order.
We remove the knock sensor for replacement and engine repair. Remove the power unit mudguard (see “Removing the power unit mudguard”).
Location of the knock sensor on the engine (intake pipe removed for clarity). With the ignition off, pressing the wire clip of the engine management system wiring harness...
...we disconnect the wiring harness block from the knock sensor (the crankcase ventilation hose has been removed for clarity).
Use a 13mm socket to unscrew the sensor mounting bolt...
...and remove the sensor. Before installing the sensor, clean the surface of the cylinder block at the location where the sensor is installed. Install the knock sensor in reverse order.
Why the speedometer on the Lada Priora does not work: the main reasons
If the speedometer malfunctions, many problems associated with emergency situations will certainly arise. Even an experienced motorist cannot always visually determine the speed of his car, and bad weather conditions and limited visibility aggravate the situation. A problem with the speedometer is a common occurrence on a Lada Priora car. Often, the speedometer does not turn off immediately; it works intermittently for some time.
The principle of operation of the speedometer on Lada Priora
The speedometer is marked with an arrow
The Priora has an electronic speedometer. All information is transmitted through sensors via wires. Therefore, there is no point in looking for the cable to inspect it for kinks or other faults.
In the entire system, the weak element is the speed sensor. It fails most often.
Information from the speed sensor goes directly not to the instrument panel, but to the engine control unit. And from there it is transferred to the instrument panel in the form of a digital signal.
Additional block
Additional relays are mounted on a bar and located under the dashboard, near the front passenger's feet. To get to them, you need to remove the right tunnel lining. Next to the additional relays is the electronic engine control unit (ECU).
If its connector interferes with access to the relay, disconnect it by first removing the negative terminal from the battery.
Circuit breakers
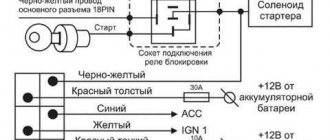
F1 (15 A) – main relay circuit, starter interlock.
F2 (7.5 A) – power circuit of the electronic control unit (ECU).
F3 (15 A) – electric fuel pump . If the fuel pump has stopped pumping (this can be determined by the absence of a sound when the ignition is turned on), check together with relay K2. There may also be problems with the immobilizer, it blocks the pump, see information about F20. If the wiring, this fuse and the relay are good, most likely the fuel pump itself has failed. To remove it, you need to disconnect the battery, remove the rear seat cushion, unscrew the cover, ring and fuel hoses, then carefully remove the entire fuel pump.
K1 – main relay.
K2 – electric fuel pump relay . See above about F3.
The speedometer on the Priora does not work: the cause of the problem, testing, repair
February 16, 2016
Fines, conversations with a traffic inspector, unwanted accidents and other troubles are inevitable if the speedometer on a Priora does not work. Motorists noted that a temporary breakdown, rather than a complete breakdown, is possible. Initially, the speedometer needle drops to zero, the electric booster turns off and the “!” alert appears on the instrument panel. The malfunction is considered temporary, because after 3-5 minutes everything returns to normal and the speedometer continues to function normally.
The speedometer on the VAZ does not work solely because of its design features. The thing is that the engineers made it electronic - these are periodic failures in the operation of the microprocessor that will appear during operation.
Troubleshooting the speedometer is the time when you can make adjustments to the car's mileage. The Priora has an electronic speedometer, and mileage readings are recorded in memory, sometimes this data is copied to several places, so in order to adjust the speedometer on a car correctly and without unpleasant consequences, it is best to entrust this to professionals. They are the ones who have the tools and software necessary for this procedure.
The speedometer on a VAZ does not work: testing
The speedometer on a Priora does not work; the reason can be identified not at a service station with expensive diagnostics, but independently. First, all data accumulated during operation must be reset to “zero”. You don’t need to be a pro to reset the data on the on-board CHIP - we remove the “ground” from the battery and that’s it. Then, we return the terminal block to its place - all system data of the on-board CHIP are reset and the basic settings are set.
If the speedometer does not work after the manipulations have been performed, then the problem is not in the “brains” of the car. Let's move on to checking the power circuit. There is a fuse plate on the fuse board that should be inspected. The required fuse is marked “IG/Meter” - the speedometer is connected to the common power supply circuit.
Speedometer does not work on Lada Priora: deep check
Is the fuse ok? The reason may be in the wiring. We check the wiring coming from the registration speed sensor to the instrument panel. Operation of the Priora (especially on our roads) is associated with constant vibration of the body, which negatively affects the contact group (it diverges) and loses its properties.
The reason may lie in the oxidation of the conductors - moisture ingress negatively affects the functionality of the wiring. Therefore, it is recommended to check not only the sensors, but also the contacts. Clean contacts will not cause damage, but you should not neglect preventive measures - we recommend cleaning them.
What to do if the speedometer does not work on the Lada Priora
The simplest cause of the malfunction is that the sensor pointer drive is broken. If everything is fine under the dash, the wiring is good, the circuit board is functioning and the sensor is normal - the reason lies much deeper. Transmission functionality can also cause problems. Without knowing the laws of physics, the principles of mechanics and electromechanics, you should not delve into the essence of this issue. Take the car to professionals who can test the car on a computer, identify and fix the problem.
Speedometer does not work on Priora
AvtoVAZ cars have a low price, which often leads to a decrease in the quality of their assembly and early failure or damage of some components. One of the most common problems with Lada Priora cars is speedometer failure. According to traffic rules, it is prohibited to drive a car with a faulty speedometer, so it must be repaired as soon as possible. In this article, we will look at what to do if the speedometer on the Lada Priora does not work.
Symptoms of a speedometer failure on a Priora
A car speedometer is necessary to measure speed, as every driver knows. From this we can conclude that its failure is diagnosed due to one of the following problems:
- When the car is moving, the speedometer needle does not deviate from zero;
- The speedometer incorrectly detects the vehicle speed or turns off during operation.
Most often you come to deal with the second option of speedometer failure. A typical problem for Lada Priora cars is a temporary failure of the speedometer, when while the car is moving the needle drops to zero, an exclamation mark lights up on the dashboard and the electric power steering also fails. After a few minutes, the problem disappears and the car’s electronics operate as before.
Please note: Lada Priora cars are equipped with an electronic speedometer, as a result of which there are two options for failure: mechanical or electronic, that is, a failure of the microprocessor that controls the device.
Checking the condition of the wires
When operating the car on not very good roads, one of the wires that goes to the dashboard from the speed sensor may break, which leads to damage to the speedometer. A special tester will help determine the integrity of the wires; if the wires are not damaged, the device will notify you of this with a signal, but if the signal does not arrive, the wire must be replaced with a new one.
Experts recommend not only checking the integrity of the wires, but also analyzing the functionality of the following elements:
- Check whether the contact goes to the column that connects the wires to the speed sensor. Quite often, contact is lost due to oxidation, and it will be possible to resume the operation of this element after the plaque has been thoroughly removed.
- Check the functionality of the motion sensor using a special scanner. If during the test the device reveals interruptions in operation, the element will need to be replaced with a new one.
- Check the functionality of the dashboard. To do this, you need to remove the printed circuit board from the dashboard and visually inspect its condition. If traces of oxidation are noticed at the connection point or a so-called “track break” is detected, the board must be replaced.
Most often, the measures described above help restore the functionality of the speedometer, but if the desired result is not achieved, car owners will only have to check the operation of the speedometer itself, or more precisely, the functionality of its needle drive. If during the test it is confirmed that the arrow drive is faulty, the speedometer will have to be replaced.
It will be much easier to carry out automotive repair work if you use a video tutorial as a hint, which is taught on the Internet resource at any time of the day or night by real professionals in their field.