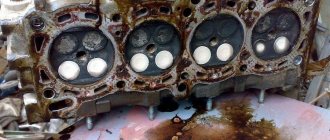
Sensors in the car provide control over the operation of the systems of its components - power plant, transmission, etc. Some of them directly affect the functioning of the engine (crankshaft position sensor, mass air flow sensor, etc.), and if they break down, the engine starts working intermittently. But there are also those that do not have a special impact on the operation of the car, but without them the operation of the car would have some difficulties. One of these is the fuel level sensor (FLS).
Instructions: what a driver should do in case of an accident Traffic police fines 2020 Traffic rules exam tickets online Find out the debt on fines from the federal bailiff service
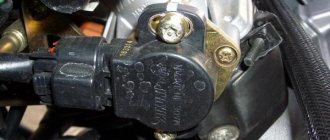
Potentiometer and its problems
Modern cars are equipped with a wide variety of fuel level sensors. The widest niche has been occupied by sensors based on potentiometers. This type of conversion of fuel level information into an electrical signal has many advantages. There are two types of sensors based on this method of measuring fuel level:
- lever (widespread)
- tubular (used mainly on large vehicles)
If the lever-type fuel level sensor does not indicate the fuel level correctly, the reason associated with the potentiometer and causing this malfunction may be as follows:
- Potentiometer contacts have oxidized
- there has been natural wear on the tracks or slider of the resistor
- natural aging of the resistor
- resistor does not match the nominal value
Potentiometer Diagnosis and Troubleshooting
A symptom that the potentiometer contacts have oxidized is a temporary lack of accurate information about the fuel level in the gas tank. The owner notices that from time to time the indicator shows reliable information. Usually, in this case, the light indicating the end of fuel works flawlessly.
To diagnose this malfunction, it is necessary to visually inspect the variable resistor of the fuel level sensor. The oxides will appear different from the normal color. Based on their number, a decision is made on what to do next:
- clean (in case of a small amount of oxides)
- move the slider (if only part of the tracks are oxidized)
- replace the fuel level sensor with a new one (if the oxides are significant and have led to damage to the tracks or slider)
A symptom of natural wear of the tracks and runner is either a complete failure of the sensor, or its correct operation only in certain areas. A visual inspection in this case shows that the tracks are worn out, and in more rare cases, damage to the runner.
If it is possible to move (bend) the slider to an undamaged area, the sensor will please the owner with its long-term, proper operation. But if the runner is damaged, or the tracks are seriously damaged, repairs do not make sense. It is necessary to purchase a new fuel level sensor.
To establish the next reason why the fuel sensor does not work, you need a multimeter or an ohmmeter of any design. A resistor can change its resistance and, as a result, display unreliable information. Checking the resistance value with an empty, full and half-filled gas tank will help identify this problem. Repair in this case is not advisable, since it is safer to install a new sensor.
If problems with inaccurate fuel level arose after installing a new sensor, then a common cause is a resistance mismatch with the nominal value. This situation arises due to the fact that the sensors are similar in appearance, but their different modifications have different resistance values.
Common problems
The fuel volume control system in the gas tank is susceptible to the following malfunctions:
- the pointer indicator lies at zero regardless of the amount of fuel remaining in the tank;
- the device does not display the fuel level correctly - it is lying up or down;
- the needle “jumps” or changes readings in a short period of time;
- The yellow minimum fuel indicator indicator does not light up.
Reference. In some domestic car models, the fuel sensor is lying from the factory. An example is the Chevrolet Niva SUV of the first releases, where the device greatly underestimates the actual level of gasoline. The driver, guided by the sign, pulled into a gas station, only to discover that the tank was full to the top.
There are several reasons why the needle drops to zero:
- Sticking or jamming of the lever.
- The float lost its seal and sank to the bottom.
- An electrical circuit is broken due to oxidized contacts or a wiring problem.
- Failure of the indicator itself or the lever sensor - potentiometer.
Typically, incorrect readings and “jumps” of the needle are a consequence of contamination of the rheostat and slider. On a car with high mileage, these parts can wear out - the thin layer on the plates wears away, causing contact to disappear between them and the runner.
The fuel level sensor in the tank sends conflicting signals that are reflected on the dashboard.
One of the reasons for the minimum level indicator not working is a burnt-out light bulb on the instrument panel. Less common are problems with the end contact located inside the tank, or a break in the electrical wiring. In the newest systems, the lamp even lights up at the command of the controller when the resistance of the lever potentiometer reaches a certain value.
Indicator and its problems
Also, the reason why the fuel sensor does not work may be hidden not in the sensor itself, but in the indicator, which shows an incorrect fuel level as a result of the movable winding of the indicator being wedged and, as a result, the impossibility of its free movement.
A fuel level meter in a tank is a fairly simple mechanism that any car enthusiast with a basic level of technical knowledge can understand. Let's look at why the fuel level sensor does not work, as well as ways to eliminate all possible breakdowns (the needle twitches, "lies", shows only a full or empty tank).
Installation Features
The fuel level sensor (new or repaired) is mounted in place in the opposite order of removal. Initially, we clean the saddle from dirt, dust, and foreign elements, after which we place a special gasket under the body, which is sold complete with the unused device. Carefully place the FLS in the fuel tank, observing the direction of the float. We fix a seal on top of the sensor, which is coated with sealant to prevent moisture from entering the device. Carefully tighten the fasteners, connect all the wires, and connect the terminals on the battery.
After completing all of the above steps, turn on the ignition and compare the readings with the current fuel level in the tank. The arrow should be at the same level and rise to a certain value without jerking. Even when everything is visually in order, a small strength test won't hurt. A gravel surface is ideal for this: drive the car for 10-15 km over small uneven surfaces, and then inspect the sensor for leaks. If they are absent and the instrument displays correctly, the trim in the trunk can be replaced.
Thus, if the fuel level sensor does not work correctly, the cause is probably mechanical wear or a break (distorted signal) in the electrical circuit. There is no point in neglecting the problem, otherwise you may find yourself without fuel on a deserted country road or a busy city road. Repairs to this device may be carried out independently, provided safety precautions are followed, as well as a minimum amount of installation skills.
Did you like the article? Share on social media networks:
Conditions for correct operation
If you have not previously encountered electrical devices and do not know how the fuel level indicating system works, familiarize yourself with the following concepts:
- variable resistance (rheostat) is a device with which you can adjust the value of resistance. The greater the resistance in the circuit, the less current flows in it;
- Fuel level indicator (FLU) is an element of the instrument panel that indicates the amount of fuel in the tank. Can be analog or electronic;
- Fuel level sensor (FLS) is a meter located in the tank.
Most systems for indicating the fuel level in a tank operate on the same principle. There is a float in the tank, on the counterpart of which there is a sliding contact. The sliding contact moves along a plate with contacts (resistive substance), rigidly fixed to the meter body. Moving the sliding contact changes the resistance value, thereby increasing or decreasing the amount of current passing in the circuit. The lower the resistance, the more current flows in the circuit and the more the fuel level indicator needle deviates.
The circuit includes:
- power supply (power appears after turning on the ignition);
- fuse;
- UUT;
- FLS.
The operating principle of a lever-type FLS is described, but in the case of a tubular-type meter, the difference is only in the method of changing the resistance in the circuit. Tubular type meters can be found on BMWs. In the new generation of VAZ cars and foreign-made models, the FLS is most often of the lever type and is attached to the plastic housing of the pump section.
Warning lamp
One of the contacts of the low fuel level lamp can be attached to a rheostat. In this case, as the volume of fuel decreases, the resistance in the circuit drops so much that the current becomes sufficient to ignite the lamp.
Tubular product design
Almost all tubular fuel level sensors today include the following elements:
- float (located in the tank);
- resistive substance;
- sliding contact;
- meter body.
A sliding contact is mounted into the design of the tubular float, which moves along the plate with a resistive substance. It is firmly fixed on the body of the meter, which transmits the signal to the reading device. The arrow on the instrument panel deflects depending on the current resistance. The lower this indicator, the more fuel is contained in the tank.
Malfunctions
For what reasons may the fuel level indicator not work:
- lack of good contact on any part of the circuit (breaking off wires, oxidation at the junctions of connectors, cracks at soldering points);
- malfunction of the instrument panel indicator (for example, broken solder joints);
- disconnecting the float from the sliding contact;
- fuse burned out;
- lack of contact between the resistive track and the sliding contact. The reason may be the formation of oxides and deposits on surfaces, weakening of the pressure of the sliding contact on the resistive layer, and abrasion of the tracks of the resistive layer.
The pointer is lying and works intermittently
Reasons why the gauge incorrectly shows the fuel level in the tank:
- the presence of additional resistance in the circuit (oxidation at the connectors, poor ground contact, formation of oxides, deposits on the resistive layer and sliding contact);
- Float casting defect, causing it to fill with fuel. Failure is extremely rare, but still possible, as is bending of the float rod due to mechanical impact during unqualified repairs;
- formation of deposits on the guide post (typical only for tubular type sensors). In this case, the movement of the float will be difficult.
The arrow always shows a full tank if the system has:
- the float has separated from the sliding contact (in this case, the slider will always be in the extreme position);
- the wire going to the indicator has a short to ground somewhere, which causes the resistance in the circuit to decrease.
A twitching arrow of the UUT indicates partial abrasion of the resistive track of the potentiometer. This will also cause interruptions in the operation of the pointer. Since the car is most often used with a fuel tank filled to 40-60%, it is in this range that abrasion of the resistive layer occurs most quickly. Therefore, the pointer can only work properly when the position of the sliding contact falls on an intact resistive layer.
Signs of malfunction: why does the sensor indicate incorrectly?
The main signs and causes of problems that may require repairing or replacing the controller:
- The fuel values are at zero. The problem with the operation of a proprietary or “homemade” device is the failure or damage of the float travel limiting element.
- The pointer on the dashboard sensor moves, but eventually returns to zero. In this case, the user needs to repair or check the condition of the controller winding and the reliability of the contact between the controller and the current collector.
- The arrow on the dashboard moves sharply, and fluctuations occur in the fuel volume indicators. As a rule, the sensor “glitches” due to critical wear of the contact elements.
- When starting the power unit, the fuel gauge cannot rise above the zero threshold. This problem is usually caused by malfunctions in the car's electronics. It is necessary to diagnose the cables for possible damage or rupture. You also need to make sure that the connections are highly reliable. The user must make sure that the regulator fuse is intact and not blown.
- The low fuel indicator on the dashboard does not light up. This problem is usually caused by a breakdown of the device, failure of its internal components.
- The readings given by the regulator are incorrect. The reason why the sensor “lies” is usually a poor seal on the float, which may be due to the presence of additional resistance. It can occur as a result of oxidation of contacts, poor connection to ground, the presence of oxide, or the formation of deposits on the resistive layer. Incorrect readings may be due to a defect in the float leaves, which leads to its filling with fuel. This problem is often associated with the appearance of plaque on the guide element.
DIY diagnostics
To find the reason why the fuel level sensor does not work, you will need a multimeter (we recommend reading how to use a multimeter) and a tester. The first step is to determine whether the cause of the breakdown is in the sensor located in the tank or in the indicator. To do this, remove the connector connected to the fuel section (located at the gas tank flap, which in most cases is accessible from the passenger compartment). Using the wiring diagram of your car model, determine which wire goes to the dashboard indicator. Turn on the ignition, then apply negative potential to the corresponding pin of the connector through the test lamp. If the pointer arrow quickly points upward, then the problem is in the sensor. For further diagnostics it is necessary to remove the fuel section. A multimeter will measure the resistance of the potentiometer.
If there is no reaction, the problem is in the wiring going to the dashboard, or in the indicator itself inside the dashboard. A broken wire can be checked by measuring the resistance of the wire with a multimeter. But you can check the contacts for “stray” resistance only when checking the wire under load. If you still cannot understand the principle of operation of the sensor, the essence of diagnostic methods and troubleshooting, we recommend entrusting the work to a professional auto electrician. For a visual representation, we recommend watching the videos attached to the article, which show methods for diagnosing the main faults of the fuel level sensor.
Probably many people have had to face the question: why doesn’t the fuel level sensor work? And the following situation also happens: after starting the engine, the sensor shows that the tank is empty, and while driving, the value on the sensor reaches the desired level. The following option is also possible: the needle is stuck at zero, but in fact there is still half a tank or the values on the dashboard are constantly changing.
What to do if the fuel gauge stops working?
To find the reason why the controller is not working, you will need:
- multimeter;
- resistor device;
- control indicator (“control”).
After detecting a malfunction, repairs will be necessary by replacing worn out elements with spare parts from a similarly functioning sensor or completely replacing the regulator.
Where is DUT located?
In all cars the controller is located in the gas tank. To save space and time for searching, the sensor is installed together with the fuel pump. Accordingly, the pumping device will have to be dismantled when removing the regulator.
Diagnostics
Features of checking the device yourself:
- First, you should diagnose the controller using a multimeter. If the car's gas tank is full, then the resistance level should be about 7 ohms (the tester must first be set to resistance measurement mode). When the tank is half filled with fuel, the working value of the sensor increases to 108-128 Ohms. If the tank is empty, the resistance level should increase to 315-345 Ohms.
- To perform diagnostics, the user must disconnect the cable from the device and connect it to a 330 ohm resistance source. Then a resistor device rated at 10 ohms is connected to the electrical circuit. After starting the motor, the resistance value on the resistor element is measured by moving the slider. The indicating component moves from a value corresponding to an empty tank to a full tank.
- Checking the flow meter can be done using a check indicator or a working fuel gauge. If the controller is operational, then the voltage level on the conductors should correspond to the voltage in the machine’s electrical network.
Video: diagnostics and repair of FLS
The Pavel Cherepnin channel in its video talked about how to check and repair the fuel level controller
How to remove the fuel level sensor?
- The engine compartment of the car is opened and the negative terminal is disconnected.
- Provides access to the controller. Depending on the location, you need to dismantle the trim in the luggage compartment or remove the rear seats.
- The mounting screws are unscrewed to remove the fastening safety plate.
- The controller is being cleaned (if it will be used again after repair). All fixing screws and wires must be disconnected from the device.
Sensor repair
After dismantling the device, it is checked and repaired:
- First, the tightness of the float is tested. Diagnostics of the resistive layer on the board is performed. If these elements are worn out, they can be replaced provided that there are spare parts from the “donor”.
- If the resistive layer is worn out, you can shorten the contact on the board to fix the problem. This will allow elements to move around the remaining part of the layer.
- To repair the controller, it must be disassembled. The driver is removed from the latch (the same element serves as the axis of the contact plate).
- The board is unsoldered and removed from the regulator body. Then, using sandpaper, the circuit is cleaned from traces of oxidation. You must proceed with caution as the board is fragile.
- The circuit is installed back. This element must be placed in such a way as to eliminate the possibility of gaps appearing between it and the controller body on the digital coding side. Using a soldering iron, two notches are made in the regulator body. If this is not done, the circuit may move.
- A wire with a connector and grounding are connected to the regulator.
How to install?
The controller is installed as follows:
- The controller seat is cleaned from residual sealant.
- If the user is using a new regulator, then it should have included a rubber gasket. The sealing element is placed on the hole in the tank to align the bolt holes.
- The sensor is installed in the tank or in the fuel pump. When performing installation, you must be careful not to damage or confuse the direction of the built-in float.
- All screws securing the controller are screwed in and tightened. If the new regulator is not supplied with a rubber seal, the old gasket is used. In this case, the installation site of the controller is lubricated with sealant.
- The sealing element is installed and the holes for the mounting screws are aligned. The upper part of the gasket is also treated with sealant.
- The controller is installed, all the holes are aligned, the bolts are tightened. You also need to connect all the conductors and the battery.
- At the final stage, the user needs to turn on the ignition system and study the readings given by the regulator.
Fuel level sensor connection diagram
Content
Why doesn't the fuel level sensor work? What is the cause of the breakdown? In this article we will try to describe possible options for sensor failure, as well as the reasons for the failure in readings. The most commonly encountered sensor can be considered potentiometric. This prevalence is due to its simplicity, low cost and clarity of the obtained values.
However, it also wears out very quickly, and oxidation of the tracks is possible. Due to the high prevalence of this type of sensor, we will consider possible failure problems using its example.
Device types
Before describing the main reasons for product failure, it is necessary to familiarize yourself with its types. Modern vehicles use two types of fuel level sensors:
The lever type FLS is considered universal in the automotive industry. Such analogues were widely used on cars until the 1990s, but even today they are often installed on domestically produced cars, for example, on some VAZ models. The main elements of such a product are a potentiometer, a float, and a lever. The contact part of the sensor is connected to the float by a small metal lever, the movement of which creates current resistance.
Sensor readings fluctuate
The reason for inconsistent sensor values is wear on the contact tracks on the board. The tracks wear out due to the constant impact of the fuel sensor slider. One option to solve this problem with minimal losses is to bend the slider so that it is higher than the worn-out area on the board. However, if a significant area has been wiped, then tucking the problem will not solve the problem.
In this case
you need to replace the sensor with a new one. Before replacing the sensor, you need to study the instructions and read there information about its resistance. This is very important, because for one brand of car there may be sensors with different resistances, and if you install an indicator with an incompatible resistance, it will be very difficult to navigate the readings. The best option is to remove the old device and take it to the store.
Other solutions to the problem
Incorrect operation of the sensor may be due to errors in the Android OS. Try updating and then upgrade to the new version. To do this, follow these steps:
- Go to your phone settings.
- Select "About phone".
- Click on "System Update".
Often, users of mobile devices are faced with the fact that during a conversation, the screen lock does not work, preventing involuntary pressing of the display. The problem in this case lies in the proximity sensor. There are several reasons why this element of the smartphone does not work correctly. Now we will figure out how to enable/disable the proximity sensor on Android, or configure it if necessary.
In this case, we are talking about a small contactless device that recognizes the approach of any object to the smartphone. As a result of the correct operation of this function, the gadget’s display will turn off automatically when you bring the phone to your ear. This will prevent you from accidentally pressing touch buttons during a call (for example, with your ear, finger or cheek).
In addition, the proximity sensor on Android allows you to significantly save battery power, since when the screen is turned on while communicating with another subscriber, the battery power is intensively consumed.
The fuel level sensor is lying
The fuel level indicator can either underestimate or overestimate the practical values of the amount of fuel. With such symptoms, adjusting the sensor may help.
There are two types of adjustment for this type of malfunction.
- First:
move the float pin to two extreme positions, while the arrow on the indicator should also fall into the two extreme positions 0 (empty) and 1 (full). If in the extreme position of the pin the arrow does not set to “0” or “1”, then it is necessary to bend the pin so that it remains movable and adjust with the bent axis; - Second method:
disassemble the instrument panel and get to the fuel level sensor itself, remove the arrow from it and reconnect the wires to the sensor. Start the car and let it sit for about 10 minutes. Then set the pointer axis to the extreme position “1” and connect the pointer.
Common breakdowns
If the fuel level arrow does not work correctly, the cause of the malfunction may be:
- fuse burnout;
- loss of contact in the electrical circuit;
- problems with the dashboard indicator;
- failure of the float or sliding contact.
Problems with the fuel sensor appear on cars either after traveling over rough terrain, or in winter, when aggressive substances (reagents) get into parts of the electrical circuit. Chemical and mechanical influences oxidize contacts and lead to breaks or cracks in solder areas. If oxidation of the contacts can be dealt with by simple stripping, then if the electrical circuit of the wires breaks, they will have to be resoldered or completely replaced.
Disconnecting the float from the sliding contact results in the fuel level needle always being in the upper (maximum) position. When the fuel gauge constantly “shakes”, the resistive track is partially worn out. Since cars are usually driven with a fuel tank 30-70% full, it is in this range that mechanical wear occurs. In this case, it is recommended to dismantle the old analogue and install a working device. A similar procedure should be performed with the fuel level sensor fuse if it is blown.
How to set up (calibrate) a proximity sensor
This element is located at the top of the smartphone, usually to the left or right of the front camera lens:
On some models of Android devices it can be seen with the naked eye, but on others it is quite difficult to detect. If, during a call, you remove the phone from your ear and then move your finger closer to the front camera, the display that goes off after that will tell you the location of the sensor.
It is quite possible that the reason for the incorrect operation of the sensor was simply dust getting on it. In this case, you can restore the normal operation of the function simply by cleaning the device - turn off the smartphone and blow it with a stream of compressed air. Then you need to reboot your gadget and check whether the sensor’s functionality has been restored.
If this manipulation does not bring the desired result, then you can resort to calibrating the sensor, which is performed in several ways.
Using system capabilities
Open " Settings
", select the item "
Accessibility
" (on some devices "
Screen
"), find the line "
Calibrate the proximity sensor
":
Then, we follow the system prompts step by step, and watch the video more clearly:
Through the engineering menu
Using the engineering menu, you can check the correct operation of the sensor and, if necessary, calibrate it.
To do this, enter the following set of characters in the dialing field: *#*#3646633#*#*
Now open the “
Hardware Testing”
and click the “
Sensor
” button, select “
Light/Proximity Sensor”
:
- Select “ PS Data Collection
” (proximity sensor data collection); - In the next window, select “ Get One Data
”; - 0
appears, place your palm on the proximity sensor on your smartphone and press “
Get One Data
” again;
If as a result we see the figure 255
, this means our sensor is functioning normally.
For settings
:
Select " PS Calibration"
", then "
Calibration
".
After that, without covering the sensor, click on “Calculate min value”. Calculate succeed
appears at the bottom of the display, we bring a sheet of paper to the sensor at a distance of 2-3 centimeters and click on “
Calculate Max value
”, after which we just have to click “
Do Calibration
” and restart the smartphone:
Using third party software
If all the previous methods to normalize the sensor’s operation did not help, then you can use the “Proximity Sensor Reset” application (for rooted devices).
Download and install the program from the Play Store
.
After launch, activate the large “ Calibrate Sensor
” button.
Now cover the proximity sensor with your hand and click “ Next
”:
Next” again
", followed by "
Calibrate
" and "
Confirm
". We grant superuser (ROOT) rights to the system request. After completing the steps, wait for the smartphone to reboot.
Now you know how to turn on/off/configure the proximity sensor on Android. However, if in your case the problem has not been solved, then it is possible that you will need to calibrate the display or reflash the smartphone. In addition, sometimes the sensor may not work correctly due to a hardware failure, then you cannot avoid contacting a service center for help.
In modern mobile devices, the presence of complex Xiaomi applications no longer surprises anyone. These include various text and media editors, a fingerprint scanner, and proximity and illumination (light) functionality. The latter are responsible for adjusting the screen brightness during a conversation. It is worth mentioning that the indicator of light, illumination and proximity is one general service.
It happens that the brightness does not drop when the gadget is touched to the ear. The first thing that is important to do is to restart the phone; if the lighting still does not work, then adjust it.
Reasons for non-working sensors on Xiaomi
1. The application is disabled.
First check if it is turned on. To do this, open the “Phone” application by long pressing and select “incoming calls”. Enable proximity if it is turned off.
2. “Harmful” services included.
Often the cause of a sensor not working properly is a “pocket disconnect”. As a result, the Xiaomi light sensor does not work correctly. The fix is simple. Go down to “Calls” - “Inbox” and switch the slider to the other side.
3. Film or glass for protection.
The Xiaomi proximity sensor will definitely not function if its window is closed. It is located near the front camera on top. Therefore, it is important to use original protective coatings to protect against mechanical damage or glue universal ones in such a way that they are not covered.