Purpose and design of the air conditioning system
Most modern cars are equipped with an air conditioning system (AC), which is a set of devices that create and maintain a comfortable microclimate in the vehicle interior. If air conditioning is not available, it can be installed as an additional option.
The IC performs the following main tasks:
- cooling the air circulating in the car interior to a comfortable temperature for the driver and passengers;
- preventing fogging of the windshield and side windows of the car;
- maintaining an optimal level of humidity in the cabin;
- preventing exhaust gases and odors from the street from entering the cabin.
The SC, like any other vehicle component, must be maintained in working condition. For this purpose, it should be periodically maintained and, in some cases, repaired. In addition, at certain intervals the air conditioner needs to be refilled with refrigerant, the functions of which are performed by freon.
Any insurance system consists of the following main elements:
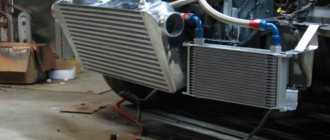
- air conditioning radiator (condenser);
- receiver-dryer;
- expansion valve;
- evaporator;
- pressure meter;
- compressor.
The air conditioner radiator (AC) consists of many ultra-thin channels, thanks to which heat transfer is optimized and refrigerant condensation occurs. It is most often made of aluminum, but other alloys can be used.
In the radiator, freon transitions from a gaseous state to a liquid state, that is, its condensation. Forced circulation of the refrigerant, during which heat transfer occurs, occurs using a compressor pump.
The air conditioner radiator is usually made of aluminum
To increase the efficiency of blowing, the RK can be equipped with additional fans installed in front of it. The radiator is a rather vulnerable unit, subject to mechanical damage and corrosion.
The operating principle of the RK is based on the physical and chemical properties of freon and is as follows:
- Freon is forced to circulate through a closed, sealed circuit of the air conditioning system.
- Freon gas is compressed by the compressor, and its temperature rises significantly.
- The compressor directs boiling freon gas under pressure into the receptacle.
- In the Republic of Kazakhstan, freon cools and condenses.
- Liquid freon is sent to the high pressure circuit to the expansion valve.
- Freon is sprayed and sent to the evaporator.
- Liquid freon evaporates, thereby cooling the interior.
- Cold gas is sent to the compressor through a low pressure circuit.
- The process is repeated.
SC consists of sealed closed circuits with high and low pressure
First, let's estimate the cost of purchasing a radiator
If we go straight to the point, we have the following picture of the original Toyota Camry V40 radiators for different articles:
The difference in price is due to engine power and type of gearbox (models with automatic transmission have a higher cost). At the same time, for article number 8846006070 there are options for non-original replacements, depending on the engines:
The significant difference in the price of spare parts and assemblies is always alarming, and it is not easy to understand where such “inexpensive” analogues come from. The answer is simple, the Toyota company produces the Camry 40 in several modifications, and after receiving supply contracts for the conveyor, all manufacturers begin to produce “spare parts”. That is, the same thing that is supplied to Toyota, but only for the free market and at completely different prices.
The decision on how much to pay for a new radiator will be up to the client, but in this case, keep this in mind. This is simply an evaporator, that is, a closed container in which the liquid changes temperature, and many spare parts manufacturers do an excellent job of making such components and assemblies.
Basic faults
To maintain the functionality of the SC it is necessary:
- carry out timely repairs and maintenance of its components;
- periodically check its tightness;
- Refill the RK with refrigerant (freon) if necessary.
Freon may leak during operation. It is considered normal to reduce its amount in the system by no more than 15% per year. Experts recommend refilling your air conditioner every three years. In cars with high mileage, refueling should be done more often. The technology of this process is almost the same for all cars.
Freon leakage from the SC is possible for the following reasons:
- leakage of connections in SC mains;
All connections in the air conditioning system must be tight and reliable. - mechanical damage to system tubes;
Damaged SC tubes can lead to freon leakage - corrosion or mechanical damage to the RK.
Holes in the air conditioner radiator lead to complete leakage of freon and failure of the air conditioner
Before purchasing new parts and assemblies, assess the level of the problem
The air conditioning system consists of 9 main elements and suddenly fails only when the fan fails. But this is a rather rare occurrence, so before fixing the problem by replacing it, consider the following points:
- Cleaning engine radiators and air conditioning. After cleaning the honeycomb cooling elements, efficiency usually increases by 15-25% after 3 years of car operation;
- Timely replacement of air filters. In hot summers, a filter clogged with dust can reduce the efficiency of the cooling system by 40% (and add humidity);
- Checking the pressure costs money, so after 3 years of operation it is better to drain and fully refill the air conditioner. The difference in price is small, but refilling does not allow you to clean the evaporator, so the efficiency of the system will still decrease;
- Visually inspect and clean all air intake points. Sometimes a simple brush can restore normal interior climate.
And remember that the radiator is not easy to clean even with pneumatic blowing. To clean internal surfaces, you need to use special products, so it is better to turn to professional services.
The second level of problems with the air conditioning system are mechanical - extraneous noise, vibrations, various sounds and other signs of increasing mechanical wear. These problems need to be dealt with quickly, rather than waiting for a breakdown that will lead to more expensive repairs.
Refilling the air conditioner radiator
If necessary, the air conditioner radiator can be refilled independently. Before this, you should check the system for freon leaks and eliminate any detected faults in both the radiator and the pipelines.
Types of refrigerants
Previously, car air conditioners were filled with R-12 freon. However, since mid-1992, R-12 was banned due to its negative impact on the ozone layer. Therefore, since 1992, freon R-134a began to be used.
Freon R12 is used as a refrigerant only in old cars
The problem of the freon brand is relevant only for cars manufactured at the turn of 1992/93, since automakers did not immediately begin to use R-134a. In this case, you should look at the sticker on the inside of the hood, which indicates the type of refrigerant. In addition, R-134a freon is charged through a larger diameter fitting.
Refill volume
The amount of freon required for the SC is also indicated on the sticker on the inside of the hood.
It is recommended to fill the air conditioner radiator with the specified amount of freon
If such a sticker is missing, the necessary information can be obtained from the dealer or found on the Internet. Domestic cars, as a rule, are equipped with air conditioners with an amount of freon from 750 to 1000 g.
The refilling liquid contains not only freon, but also a special oil for lubricating the working parts of the compressor
Refilling equipment and tools
Before refueling, it is necessary to check the pressure in the SC. To do this you will need:
- metrological station (MS);
- hose set;
- adapter with a tap for connecting a cylinder with freon to the SC;
A special adapter is used to connect the freon cylinder and the air conditioner. - freon (R-12 or R-134a) in a special cylinder.
For refilling air conditioners yourself, you can find ready-made kits on sale.
To refill air conditioners yourself, you can find ready-made kits on sale.
Armed with such a kit, you need to assemble a refueling device. To do this you need:
- Calibrate the pressure meter according to the instructions included with the kit.
Instructions for calibrating the meter are usually included in the air conditioner refill kit. - Use the regulator to set the ambient temperature on the calibrator (information can be obtained from the on-board computer).
- Connect the adapter to the freon cylinder (when tightening the adapter, the protective plate in the filling hole of the cylinder will be pierced by the needle of the adapter).
The filling hole of the freon cylinder is protected by a plastic plate, which is pierced when the adapter is connected - Attach a rubber hose to the adapter.
When connecting hoses, it is important to ensure complete tightness of the assembled circuit - Lead the opposite end of the hose to the nozzle of the metrological station.
- Connect the second hose to the MS.
Using the kit, a device for refilling the air conditioner is assembled
The equipment for refilling the air conditioner has been assembled.
The refilling device is connected to the air conditioning system circuit
Procedure for refilling the air conditioner radiator
The general principles for refilling the air conditioner radiator are the same for all cars. To refuel the RA you need:
- Clean the connection point of the SC low-pressure pipe with a brush or vacuum cleaner (if dirt gets into the system, it will most likely lead to compressor failure).
- Remove the protection cap from the low pressure circuit fitting.
Before connecting the hose, it is necessary to remove the cap from the low pressure circuit fitting - Attach a rubber hose to the fitting.
A rubber hose is attached to the fitting of the SC circuit for pumping freon. - Start the engine.
- Using available means, fix the accelerator gas pedal at a power unit speed of 1500 rpm.
The gas pedal is fixed using improvised means - Turn on air recirculation mode to maximum.
- Open the shut-off valve for the low pressure circuit.
- Turn the freon cylinder over with the tap facing down.
When refilling, the freon cylinder must be turned upside down. - Slowly open the tap.
- Monitor the pressure value using the meter - it should be about 285 kPa.
When refueling, the pressure should be about 285 kPa - Close the tap when the air temperature in the cabin reaches 5°C - 8°C (the air in the cabin gradually cools during the refueling process, and the hose of the filling fitting will also become cold).
Recharging the air conditioner continues until the minimum temperature is reached
Video: refilling the air conditioner with your own hands
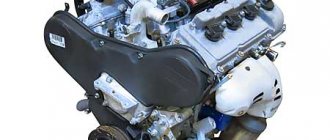
Engine cooling radiator Toyota Camry
The formation of rust and dirty deposits does not only occur in the engine. Similar processes and phenomena can occur in the cooling system. Therefore, when operating a car, it is important to pay attention to regular radiator flushing, since this vital element affects the overall condition of the car.
The engine cooling radiator performs a protective function - it protects the engine from overheating factors, which is caused by the uninterrupted operation of the unit, so the engine operates within certain standards.
Fortunately, flushing the radiator is a simple job that many car enthusiasts and, of course, professionals can handle.
Features of flushing work
What is required to carry out the cleaning procedure for this mechanism:
- antifreeze for Camry 2007;
- distilled water;
- coolant;
- cleaning agent;
- pan for drainage;
- bucket;
- hose;
- safety glasses for working with Camry 50 2007;
- containers;
- screwdrivers and wrenches.
Next, the whole process is carried out in stages, because the engine cooling radiator of the Model 50 requires considerable attention:
- Wait until the engine cools down before cleaning the radiator: the hood must be securely secured to prevent accidental falls; soapy water is used to remove dirt elements.
- Used coolant must be disposed of properly as it is toxic. It is necessary to use a drainage pan that is placed under the car - a valve that has an engine cooling radiator.
- Check the cap to ensure that optimal pressure is maintained.
- Next comes the process of checking the hoses and clamps: one is located on the radiator cap and facilitates the removal of hot liquid, and the second is at the bottom.
- Removing the remnants of liquid that has already spent its life, which the engine cooling radiator retains. After draining, all waste is placed in a pre-prepared container.
- This can be followed by the washing process itself using a garden hose. It is necessary to fill the engine cooling radiator and allow the water to drain out. The steps are repeated until complete purity is achieved. After completing the work, a cooling liquid is added to the element, selected according to all the necessary parameters.
- It is necessary to remove any remaining air from the cooling system of a Toyota Camry from 2007 or another year of manufacture and then start the engine to avoid increased pressure levels. Then you need to turn on the heater to the maximum setting to circulate the liquid.
- The process begins by disconnecting the battery.
- Removing the steering wheel and unscrewing the nut 24.
- Removal of decorative air duct grilles.
- Unscrewing the screws of the trim and storage shelf.
- Next, you need to remove the screws securing the glove compartment, nozzles, and switches under the steering wheel.
- Disabling the torpedo bolts on both sides and removing it.
- Disconnecting air ducts from the side.
- Tightening the heater radiator clamps.
- Disconnecting electrical connectors.
If it can easily be compressed with a couple of steps, it's time to think about replacing it.
Element replacement work
Regardless of the year of manufacture of the car (2007 or any other), it is necessary to regularly carry out work to repair important elements and replace them.
To carry out measures to clean the radiator, you will need keys 8–10, 13–14, 24, a screwdriver and wire cutters. After this, you need to do a number of things to change the element.
Basic actions to be performed:
After you have managed to remove the structure of the original radiator on a 2007 Camry 40 or 50, you can see a lot of debris that needs to be gotten rid of.
Cleaning the air conditioning system
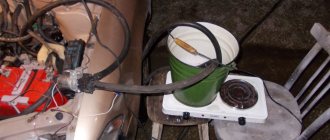
The air conditioner is usually refilled after winter; at the same time it is recommended to clean the air conditioner. To do this, use special foam, sold in cans.
Using foam you can quickly and effectively clean your air conditioning system.
The cleaning procedure is as follows:
- Remove the flexible hose from the drainage pipe (the pipe is located at the bottom, behind the plastic panel in front of the passenger seat).
The drainage pipe is located below the plastic panel in front of the passenger seat - Install the hose from the cleaner onto the drain pipe and pull it upward as far as it will go.
A hose from the cleaner is installed on the drain pipe - Prepare an empty container to collect foam.
- Start the engine.
When cleaning the radiator, the used foam is collected in a separate container and disposed of - Turn on the air conditioner in air recirculation mode.
The heating and air conditioning control unit is located on the front panel - Leave the vehicle and let the engine run for about 15 minutes. During this time, the foam should penetrate into all cavities not only of the heater, but also of the stove radiator.
To clean the radiators of the air conditioner and heater, their dismantling is not required. After carrying out the work, experts recommend replacing the cabin filter.
Video: cleaning the air conditioner radiator with special foam
[photo report] - cleaning the air conditioner evaporator
The car is heavy, it barely blows, it doesn’t blow into my feet at all, the windows sweat. This is the second winter I’ve wanted to clean it, I was as lazy as always, yesterday I couldn’t stand it, everything turned out to be simpler than I thought. (fool I-thoughts after cleaning) [screwdrivers, socket 10, horns: 27,14,17]
1. Open the hood, see 2 air conditioning pipes near the intake, unscrew the caps and bleed out the air. Closer to the shield, unscrew the 2 tubes of the air conditioning system:
2. We remove the front panel and the panel under it, I didn’t even take a photo, it’s all too simple! 3. The following view opens:
4. Unscrew all the nuts and bolts (curly screwdriver, socket size 10) that secure the evaporator casing (about 3 self-tapping screws and 3-4 nuts), the evaporator radiator itself inside this casing:
It is NOT necessary to halve the top and bottom of the casing yet. We throw off the web of wires that may interfere with the removal of the evaporator, everything is on the chips there! We grab it with our hands and pull it towards ourselves, the result is this hole:
We halve the casing, a figured screwdriver and clamps. We gasp at the picture (not everyone, I hope):
By the way, the back side of the radiator is as clean as new. The heater radiator shines, apparently not enough dirt reaches it! Then I went to the nearest car wash, filled it with engine foam, karcher + blowing, the dirt flowed out under pressure for about 10 minutes. I gave him a hundred to celebrate! He returned, warmed it up with a building vein and put it in place.
Question: I filled the condenser in the summer (without checking), it was cold for 2 weeks, then it ran out (of freon), I quickly looked at all the tubes, I didn’t find any leaks, there was still oil there, it could have burned, but on the evaporator itself where the tubes were attached OIL!! Surely that's where it came from. I didn’t have time to deal with it yesterday, but I’ll go and take it again within a month. What's there? pad? And it will work as a sealant.
Evacuation of the air conditioner radiator
If less than 50% of the required amount of freon remains in the system, there is a high probability of air or water entering the system. This, in turn, will lead to breakdown of the compressor and other components of the compressor.
Due to residual moisture in the air conditioning system, the likelihood of internal corrosion damage to the pipes and radiator is very high
To remove moisture or air, you will need to evacuate the water chamber using a special vacuum pump and a manometric manifold. The process is quite complex and requires the purchase of expensive equipment. Therefore, in this case, it is better to contact specialists. Some time after removing air and moisture from the receptacle, you can begin refilling with freon.
A vacuum pump is used to remove air and moisture from the air conditioner.
Replacing the air conditioner evaporator
So, let's begin. I got the car in February 2020. I am the second owner. “Dandruff” certainly didn’t make me happy. But when I found out the price tag for a replacement from the dealer, I was a little stunned. And all sorts of third-party online stores for spare parts were not particularly pleased with the price. But the problem was different. Who can you entrust with such an important task as dismantling half the car and replacing the evaporator, and for reasonable money, and of course I would like to be present to see what and how. And sleep peacefully. In general, I will tell you that everything is fine now, there is no dandruff, there is COLD. I will give you contact information only in private messages so that it is not advertising. Well, guys, this is located in Yekaterinburg.
So the car is driven for the whole day! I don’t recommend doing it yourself. Hemorrhagic. It is better to trust the specialists. This is a new evaporator
This is what it looked like before disassembly:
Well, as they say, off we go:
THE culprit of the event, in his own person:
Guys, does anyone else think that you can roll around with dandruff and use a rag to wipe the dust off the dashboard and not worry too much about it? I definitely didn’t think so and don’t think so. And the fact that this is what a child breathes. This is tough. And I think that it is necessary to change. Don't even think about it. Well, it depends on what stage of dandruff you have. The photo shows not only where these aluminum flakes come from, but also that the air conditioner does not work in principle. 3 oil leaks indicate depressurization of the cooling system; therefore, there is no pressure in the system. And accordingly, there is no cold either.
It holds pressure, which means you can refill the system.
The system has been recharged. Putting it back together:
Well, for dessert. VIDEO:
Removing and installing the capacitor
We place the car on the lift.
We unload the refrigerant from the air conditioning system.
We raise the car for convenient work.
We remove the front bumper, as stated in the article - How to remove the bumper of a Lada Granta car.
Using a 10mm socket, unscrew the four nuts 1, Figure 1, remove the washers and beam 4 of the front bumper.
We remove the sound signal 2.
Disconnect block 3 of the ignition system wires from the block of the electric fan harness 5 of the capacitor.
Using a 10 socket, unscrew two nuts 1, Figure 2, fastening the high pressure pipeline 5 and the suction compressor pipeline 4 to the condenser 3, remove the washers 2.
We disconnect the pipelines and install technological plugs on the pipelines and in the condenser holes.
Using a 10mm head, unscrew the two bolts 1, Figure 3, securing the condenser to the radiator, remove the washers 3, remove the radiator 4 from the clamps and remove the condenser 2 with the electric fan assembly.
Using a 10mm socket, unscrew the four bolts 1, Figure 4, remove the washers 2 and remove the electric fan 4 from the condenser 3.
Condenser installation
We install the electric fan 4, Figure 4, on the capacitor 3 and tighten the four bolts 1 securing the electric fan with washers 2.
We install the capacitor 2, Figure 3, with the electric fan assembly into the radiator clamps 4 and with a 10-point head we tighten the two fastening bolts 1 with washers 3.
We connect block 3 of the ignition system wiring harness to the block of the electric fan harness 5 of the capacitor.
We remove the plugs from the pipelines and the condenser. We install new o-rings. Apply compressor oil FD 46XG to the sealing rings.
Add 15 cm3 of compressor oil to the condenser.
We attach pipelines 4 and 5, Figure 2, to condenser 3, install washers 2 and secure with nuts 1. The tightening torque of the nuts securing the pipelines to the condenser is 3.7 - 4.6 Nm (0.37 - 0.46 kgf.m).
Install sound signal 2, Figure 1.
Install beam 4 of the front bumper, install washers and screw four nuts 1. The tightening torque of the nuts securing the front bumper beam is 5 – 7 Nm (0.5 – 0.7 kgf.m).
Evacuate the system and load the system with refrigerant, loading rate 500±25 grams.
We remove the radiator to check it for leaks (if a leak is suspected) or replace it if damaged. Drain the liquid from the cooling system (see “Replacing the coolant”). Remove the radiator fan (see “Removing the radiator fan”). It is more convenient to dismantle the radiator complete with hoses.
Therefore, we disconnect the radiator inlet and outlet hoses from the pipes of the thermostat housing and the pump inlet pipe, respectively, and disconnect the radiator steam exhaust hose from the expansion tank fitting.
Using a 10mm socket, unscrew the two nuts securing the radiator to the upper cross member of the radiator frame. We tilt the radiator towards the engine so that it comes out from under the upper cross member of the radiator frame, lift the radiator...
...and remove it complete with hoses from the engine compartment.
Radiator complete with hoses. To remove the radiator supply hose...
...we use pliers to compress the ends of the clamp and, sliding the clamp along the hose...
...remove the hose from the pipe of the right radiator tank. We disconnect in the same way...
...from the pipe of the left radiator tank there is a radiator outlet hose...
...and from the fitting of the left tank - a steam removal hose (when removing the hose from the fitting, be careful not to break the fitting). When replacing the radiator...
...using a 12mm head we unscrew the two bolts securing the radiator bar to its tanks.
...and remove the bar. Install the radiator in reverse order. If, when removing the radiator, its lower mounting cushions remain in the holes in the lower cross member of the radiator frame, then remove the cushions from the holes...
Replacing the evaporator air conditioner Camry 40
The car is 6.5 years old and only this year I got around to cleaning the air conditioning system. Before this, I was limited only to timely replacement of the cabin filter. The first time I tried to disinfect the system with chlorhexedine. It seemed to be better, but soon when the air conditioner was turned on, a slightly unpleasant smell appeared in the first minutes (the smell of dampness or something). In general, it turned out to be not a very effective remedy (in my opinion).
I decided to try a special evaporator cleaner. I wanted to order the STEP UP cleaner, but while buying car wash chemicals in a specialized store I saw the ABRO cleaner (also made in the USA) and decided to try it. Next is the cleaning process itself: I dried the evaporator by turning on the stove to maximum for 7-10 minutes (in terms of temperature and blowing power). I peeled back the tunnel trim on the front passenger side in order to get to the drain pipe (through which condensation flows out):
Device
The operation of the air conditioner radiator (RA) is to change the state of freon, that is, from gaseous to liquid. Forced circulation occurs in the system, against the background of which the process of heat transfer occurs. The refrigerant circulates through the system using a special pump.
Air conditioner radiator design
Note! The RK includes special ultra-thin channels, which are designed to improve the processes of heat transfer and refrigerant condensation. Typically, the heatsink is made of aluminum alloy, although other materials can be used.
Additional fans can be installed in the RK design to improve airflow. The radiator itself is essentially a very vulnerable part of the air conditioning system, which is often subject to corrosion and mechanical damage.
Step-by-step instruction
How to solder an aluminum air conditioner radiator at home? The first step is to prepare the place for soldering. It is necessary to clean it from all kinds of dirt, grease, dust, grease and other similar substances. It is necessary to clean it with sanding paper. The part to be soldered must have a dry surface. Since water can be very dangerous during such work.
- An iron rosin substance is applied to the cleaned surface of the part and the part where the soldering will take place is rubbed using a hot soldering iron. It is necessary to ensure that the rosin protects the treated surface of the metal base from open air. At the same time, when the rosin spreads over the entire surface, ordinary solder made of tin and lead should immediately be added to the soldering zone, which will secure the sealed part with the addition of iron filings. They are needed as an abrasive to destroy the oxide film. After which soldering can be done in the usual way.
- In order to obtain a high-strength and high-quality seam when soldering, it is best to use special solders that consist of bismuth or flux. The following recipe is suitable for this. For ninety-five grams of tin, take five grams of bismuth parts. These components must be melted using a torch or in a special ceramic crucible. In this simple way you can get high-quality solder.
- Instead of flux, you can use flux, which, when loaded into a blast furnace, forms low-melting slag. To prepare it, seven percent table salt, four percent sodium sulfate, twenty-three percent lithium chloride, fifty-six percent potassium chloride, and ten percent cryolite are taken. All chemicals must be thoroughly crushed. Then mix all the ingredients. This mixture absorbs moisture very quickly, so you should protect it only in a well-closed container.
- First of all, flux is applied to the soldering area. Then, when it spreads over the heated surface, you need to solder it with bismuth-tin solder. During the soldering process, you should carefully ensure that the entire surface of the part being soldered is covered with this substance.