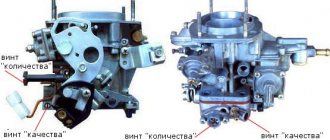
When experienced motorists casually throw out the phrase “before, technology was extremely reliable,” they are, in a certain sense, right. Indeed, is it worth comparing the level of complexity of a modern car and its analogue from 50-60 years ago? And if the product is simple, then by definition it is more reliable. Owners of cars of the latest generations will certainly agree with this: if major breakdowns at the initial stage of operation are very rare, then you only need to have time to deal with minor faults.
In this aspect, the products of the Leningrad Carburetor Plant can be considered legendary, and its flagship is rightfully recognized as the K-151 carburetor, better known under the pseudonym Pekar. Its reliability is legendary; it is no coincidence that it is used on vehicles with ZMZ and UZAM power units, in particular on the famous domestic UAZ SUV. But, as you know, this device demonstrates the greatest efficiency with the correct settings. Today we will tell you how to achieve this.
Functions and design of the carburetor
In modern engines, an electronic system working in tandem with an injector is responsible for preparing fuel assemblies. The predecessor of this circuit is a carburetor, which is able to prepare a high-quality combustible mixture without any participation of electronic brains. And since the proportions of the mixture change depending on the operating mode of the engine, the carburetor must be able to prepare the optimal composition under any load, from idle to maximum crankshaft speed. And, I must say, he copes with this task well. Even today, K-151 can be found on such domestic cars as the Gazelle with all its modifications, IZH, Volga, and, of course, UAZ.
Although there are many models in the assortment of the Pekar brand, the “one hundred and fifty-first” is given pride of place, and there are many modifications of this carburetor, differing in the name by the letter after the numerical designation of the model. In particular, GAZ-3302 (or simply “Gazelle”), as well as GAZ-3102 (“Volga”) cars are equipped with a K-151S modification carburetor. The differences between the modifications consist of jets of different diameters, designed to prepare fuel assemblies for specific power units.
Composition of the Pekar-151 carburetor:
- body with a float chamber;
- a secondary upper housing in which throttle valves are installed, controlled by a drive cable connected to the accelerator pedal;
- PC cover, which serves as a platform for installing a locking mechanism that prevents the chamber from overflowing with fuel. An air damper is also located here, used when starting and warming up a cold engine;
- a dosing system, which is responsible for the formation of the air-fuel mixture and includes channels of a certain diameter, two air and the same number of fuel nozzles;
- idle subsystem used when the power unit operates in idle speed mode. Includes a bypass channel, one fuel and air nozzle each, screws for adjusting the quantity/quality of the combustible mixture, a membrane-type economizer valve;
- accelerator pump, responsible for uniform engine dynamics, without failures with a sharp increase in speed. Includes additional channels passing through the housing with a float chamber, a membrane device, a ball valve and a gasoline sprayer;
- econostat is a part that enriches the mixture when the engine operates at high speeds. Includes a system of additional channels designed to supply an unscheduled portion of fuel to the intake manifold with the throttle valves fully open;
- a transition system, which is activated at the initial stage of opening the remote control, located in the secondary chamber and serves for a smooth increase in speed. Includes a pair of jets of both types.
Thus, the K-151 belongs to the category of two-chamber carburetors, in which the throttle body opens sequentially. A strainer is integrated into the inlet fitting. It also has a fuel line designed to drain excess gasoline back into the tank and to protect against excess pressure in the chamber. As you can see, this device cannot be called simple, so setting it up requires considerable experience.
Connecting hoses
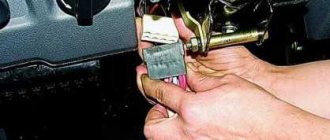
The complex structure of the K-151 is also evident when it is connected to the engine. It provides for the use of a whole range of hoses, but only two different sizes are used, so it is quite possible to confuse them, and the motor will malfunction in certain modes. The order of connecting the hoses to the carburetor:
- Fuel is supplied through the fuel pipe to a fitting located under the float chamber on the engine side;
- the return hose is put on the lower fitting - it looks in the direction opposite from the power unit and is located below the inlet;
- two small cross-section hoses are connected to the solenoid valve, the other end of one of them is connected to the economizer valve;
- the second end of the thin hose is put on the fitting located in the lower part of the K-151 on the back side of the DZ body (there are two of them standing next to each other, we use the lower one);
- onto the upper fitting of this pair we pull the hose that goes to the vacuum ignition advancer (it is located on the distributor);
- a large diameter fitting on the DZ housing is used to connect the forced crankcase ventilation pipe, a device usually located on the valve cover;
- a small diameter fitting located in the middle part of the K-151 is used to connect a thermal vacuum switch, however, this pipe is used only if the engine has an exhaust gas recirculation system. If such a system is not provided for a particular modification of the motor, a plug is simply installed on this fitting. True, such a precaution is unnecessary - there is no air leak through this fitting.
If you lack experience, these connections should be made by consulting the instructions for the device.
Connecting carburetor hoses K-151D
Adjustment of XX on Pekar
Adjusting the idle speed on the St. Petersburg K-151 carburetor is of fundamental importance. This is a special mode of engine operation that requires stable operation. This is exactly what is achieved by correctly configuring the idle, which also helps to minimize the amount of carbon dioxide in the car’s exhaust, which is important from the point of view of modern environmental requirements.
Over time, as a result of clogging of the filter mesh, the amount of fuel burned in the XX mode increases beyond the norm, and in this case the situation can be corrected by appropriate adjustment.
This operation is not particularly difficult:
- First you need to warm up the CA to operating temperature;
- then you need to find the fuel assembly quality screw located on the rotation shank and remove the limiter from it. Please note that the rotation limitation function is not present on all Pekar modifications. If your car does not have it, just proceed to the next step;
- We adjust the quality screw, for which we look for the position of the screw at which the power unit will produce the maximum number of revolutions when operating at idle. This point should be determined by ear (more accurate methods require the use of special equipment);
- Now we move on to the quantity screw located nearby, by adjusting which you should increase the crankshaft rotation speed by 100-120 rpm. After this, you need to completely tighten the quality screw, which will lead to a drop in speed by the same amount (within 100-120 rpm).
If, when turning the quality screw back, the speed does not drop as a result of a slight leaning of the mixture, then this indicates the presence of carburetor malfunctions.
Adjusting the PU carburetor K-151
The starting device is a unit that is the source of the signal informing about the start of the power unit. If the elements of the starting system are faulty or do not work correctly, you will not be able to start the car. But even with a working starting mechanism, problems are possible that make starting difficult. To correct them, the K-151 carburetor is adjusted, and such work can be carried out both on a dismantled and on a working device installed on the engine.
Adjustment on a dismantled Pekar is carried out in the following order:
- open the remote control slightly and look for the control lever;
- turn it to its extreme position and fix it with something suitable (rope, wire);
- release the remote control to its original position. In this case, the gap between the chamber wall and the edge of the damper should be within 1.5±0.3 mm;
- unscrew the locknut that blocks the rotation of the stop screw located on the remote control lever;
- We turn the screw itself in stages, half a turn each time. At the same time, we must ensure that when tightening the locknut, the screw is located perpendicular to the cam, otherwise the control unit will not work;
- We check the thrust valley, with the help of which the PU cam is connected to the air damper levers. With the PU lever turned to its extreme position and the air intake completely closed, it is necessary to achieve a gap between the levers within 0.2-0.8 millimeters. If this is not the case, adjustment is made by releasing or tightening the rod head, which allows the rod itself to be shortened or lengthened.
Modifications
As part of the K-151 series, several modifications of carburetors are produced. They all have the same operating principle, but differ in technical characteristics.
Table: parameters of K-151 series carburetors
| Model | K-151 | K-151V K-151G | K-151I | K-151D |
Diffuser diameter, mm:
| 23/26 10,5/10,5 | 23/26 10,5/10,5 | 23/26 10,5/10,5 | 23/26 10,5/10,5 |
| Mixing chamber diameter, mm | 32/36 | 32/36 | 32/36 | – |
| Nozzle throughput, cm3/min: | ||||
Main dosing system:
| 225/300 330/330 | 225/330 300/230 | 225/380 330/330 | 230/340 330/330 |
Idle system and second chamber transition system
| 95/150 85/280 330/270 1,1* | 95/150 85/280 330/270 1,1* | 95/150 85/280 330/270 1,1* | 95/150 85/200 370/270 2,0* |
| Econostat fuel jet | 280 | 280 | 280 | |
| Diameter of accelerator pump nozzle, mm | 0,4 | 0,4 | 0,4 | 0,35 |
| Acceleration pump performance, cm3/10 cycles | 7,5–12,5 | 5,0–9,0 | 10,0–14,0 | |
Starting clearances, mm:
| 1,4–1,7 1,1–1,3 | 1,4–1,7 1,1–1,3 | 1,4–1,7 1,1–1,3 | |
| Float chamber level, mm | 20,0–23,0 | 20,0–23,0 | 20,0–23,0 | 20,0–23 |
Article on the topic: Spark plug heat rating: what is it?
The modification is determined by the engine power.
Adjusting the fuel level in the float chamber
An incorrectly set gasoline level in the PC is an imbalance in engine operation. If it is too high, the mixture will be enriched, and one of the most noticeable consequences of this state of affairs will be increased fuel consumption. At a level below the norm, the fuel assembly will be lean, which is even worse for the engine, since it can lead to serious damage requiring expensive repairs.
Thus, the fuel level in the float valve is a critical indicator for any carburetor, regardless of the brand and model.
To accurately adjust the float in the K-151 chamber, we will need a ruler and a drill with a diameter of up to 2 mm.
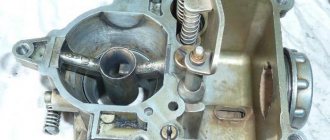
Float chamber of carburetor K-151
- we install the machine on a flat horizontal platform (this is important since we will be working with liquid);
- dismantle the air filter housing located on the power unit;
- we start the engine, let it run at XX for about 5-7 minutes;
- unscrew and remove the top carburetor cover;
- measure the fuel level in the float chamber in millimeters. This operation should be carried out promptly, since gasoline is characterized by a high volatility rate, especially in the heat, which will also be facilitated by engine heating. By delaying, we risk getting distorted results;
- for K-151, measurements should give about 215 millimeters - this is an indicator considered normal for efficient engine operation;
- if the level does not correspond to the standard level, we perform an adjustment, which consists of changing the position of the float;
- To do this, we need to use something that allows us to measure the position of the float during adjustment work - the drill suggested at the very beginning, or a piece of wire, or any similar cylindrical object will come in handy. The main thing is that its diameter does not exceed two millimeters;
- turn the K-151 cover over and place it on a flat horizontal surface - only in this position will the measurements be accurate;
- Using a ruler, measure the distance from the carburetor cover (choose a cardboard gasket as a reference point) to the lower edge of the float. This distance should be no more than two mm;
- if this is not the case, you should bend the tongue of the float lever in such a way as to achieve the standard clearance.
The same operation can be performed using a caliper, but in this case you need to measure the distance from the cardboard spacer to the top edge of the float. The correct result is 30 millimeters. If there is a discrepancy, we again bend the lever tongue, achieving the required value.
Removing the K-151S carburetor cover
Please note that when making all the settings described above, there is a possibility of errors, especially if this is done by an inexperienced car owner. Therefore, after making the adjustment, you must check its correctness. This is done like this:
- move the K-151 cover to a vertical position;
- we monitor the tongue that we bent (or did not touch if the level was normal);
- If everything is done without errors, the tongue should lightly press and press the damping ball located on the IR. In this case, the lever tongue should be located at a level running strictly parallel to the needle valve;
- We also look at the float stamping axis, which should be located at a level coinciding with the carburetor cover.
If at least one of these conditions is not met, the procedure for adjusting the fuel level in the PC will have to be repeated. Many drivers limit themselves to two iterations, even if the situation requires otherwise. We recommend that you complete the setup properly, regardless of the time spent - the experience gained will definitely be useful to us!
Fuel consumption directly depends on the condition of the fuel system, and if there are faults in it, the car's dynamics also deteriorate and the engine begins to operate unstably.
This article will discuss the K151 carburetor: design, repair, adjustment, configuration features, as well as the main problems and their symptoms.
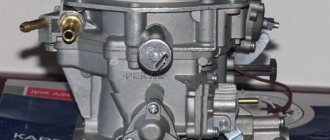
K-151 carburetor design
In the fuel system, the carburetor of the K-151 model performs the function of preparing the air-fuel mixture in the composition necessary for the operation of a car engine under various loads - at idle, at medium or maximum speed. This unit is used on Volga and IZh passenger cars, Gazelle and Sobol commercial vehicles, and UAZ SUVs. There are various modifications of the “one hundred and fifty-first”, and depending on its model, a letter is added to the name at the end, for example, the GAZ-3102/31029, GAZ-3302 “Gazelle” cars are equipped with the K-151S carburetor. Also, depending on the K-151 model, jets can be installed with different sections - much depends on the characteristics and size of the engine.
The 151 series carburetor consists of the following systems and elements:
- main body (middle part) with a float chamber;
- throttle body – the valves rotate due to the drive connected to the accelerator (gas) pedal;
- the top cover of the float chamber - it contains a locking mechanism that prevents the chamber from overfilling with gasoline, as well as an air damper necessary for starting a cold engine and warming it up;
- main dosing system - is the main one in the preparation of the air-fuel mixture (FA), consists of channels of a certain cross-section, two fuel and two air jets;
- idle system, which is necessary for stable operation of the internal combustion engine at idle speed - it includes a bypass channel, adjusting screws (quality and quantity of fuel assemblies), jets (fuel and air), an economizer valve with a membrane mechanism;
- accelerator pump - it allows the car to drive without failures during sudden acceleration, consists of additional channels in the main body, a ball valve, a diaphragm mechanism and a fuel sprayer;
- econostat - the system is designed to enrich fuel assemblies at high engine speeds; it represents additional channels through which, under the influence of high vacuum when the throttle valves are open, an additional portion of fuel enters the intake manifold;
- transition system - it is needed for a smooth increase in speed at the moment the throttle valve begins to open in the secondary chamber; it consists of fuel and air jets.
The K-151 carburetor consists of two chambers, the throttle valves in it open sequentially, and a filter - a protective mesh - is installed at the inlet of the fitting. The unit is also equipped with a return fuel line, through which excess gasoline is discharged back into the gas tank, and the “return” does not allow the creation of excess fuel pressure. The design of the K-151 carburetor itself is quite complex, and in order to repair and adjust the unit, you need experience and strict adherence to the repair instructions.
Modification of the K-151S carburetor — UAZ 469, 2.0 l., 1972 on DRIVE2
Good evening. One summer day, while reading posts on the drive, I came across various types of modifications to carburetors several times, and when there were problems with the fuel system, it was decided to carry out maintenance of the carburetor with some kind of “tuning”. Let me start with the fact that the previous owner of the car had already installed a needle with a rubber tip. And I went further, it seems that before the UAZ didn’t eat much fuel, but it consistently ate more than 15. But there was no way to measure the consumption - the odometer does not work.
Full size
DAAZ
An old carburetor from some VAZ - DAAZ was found, and the accelerator pump nozzle with a discharge valve and small diffusers of the primary (3.5) and secondary (4.5) chambers were removed from it.
Full size
I adjusted the diffusers to the size of the diffusers of my carburetor (K-151C) - sharpening them with a file.
Full size
Afterwards, I installed the diffusers of the primary and secondary chambers along with the springs holding them into my carburetor, and also installed an accelerator pump nozzle with a discharge valve. I didn’t touch the jets, I just unscrewed them, washed them/bleed them out and put them in place.
Full size
WAS
Full size
NOW - just installed on the 1st camera so far
Why did I install an accelerator pump sprayer with 1 spout and direct it into the primary chamber, all because the secondary chamber opens only when the accelerator pedal is fully pressed, and in the case of a UAZ this process occurs extremely rarely, so it is more efficient to do it like I did. And plus this reduces fuel consumption.
Full size
Fully assembled
After installing these modifications and adjusting the carburetor, it can be noted that the UAZ began to respond sensitively to pressing the accelerator pedal, and fuel consumption also decreased. At the moment, when driving on the highway, it freely reaches a speed of about 100 km/h according to the speedometer (and on 33 wheels), and there is still a reserve, but it’s scary. Initially, I did not plan to write a report on this modification, so there is no detailed installation and replacement process.
www.drive2.ru
Connecting hoses to the carburetor
Several hoses of two diameters are connected to the K-151 carburetor - if they are mixed up, the engine will not work properly. We connect the hoses in the following order:
- the main fuel pipe - to the fitting, which is located under the float chamber closer to the engine (in the picture it is held in the hand);
- “return” - to the lower outlet (it is directed on the opposite side of the engine, and is located below the main fitting);
- two thin hoses go from the solenoid valve, one of them goes to the XX economizer valve;
About carburetor maintenance
However, there are cases when configuration is indispensable. The disadvantage of all carburetors is their tendency to become clogged. Today at gas stations you can often fill the tank with low-quality fuel. Yes, someone will say that there is a fuel filter. But often it cannot cope with small debris that gets into the K-151 carburetor. The jets become clogged, and as a result, fuel can no longer enter the chambers in full. To clean them, you cannot use pieces of wire - only a non-contact spray cleaner.
Also, the need for adjustment may arise when some elements of the unit fail. Failed elements are replaced with new ones, but without adjustment you should not count on optimal operation.
Adjustment
If without experience it is quite difficult for car owners to repair the K-151 unit with their own hands, then it is easier to master the adjustment, the main thing is to understand the principle of operation of the device and act according to the instructions. There are several types of “one hundred and fifty-first” adjustments:
- idle move;
- air damper position;
- gasoline level in the float chamber;
- throttle position.
Changing the fuel level in the float chamber should be trusted to experienced carburetor specialists, but any driver can adjust the idle speed independently. We carry out the procedure as follows:
- warm up the engine to operating condition;
- leave the engine running at idle speed, the air damper should be completely open (the choke is recessed);
- turn out the quantity (with spring) and quality screws, allow the motor to reach maximum speed;
- gradually tighten both screws until the internal combustion engine begins to operate intermittently;
- Use the quantity screw to slightly increase the speed, while adjusting the quality to “catch” the stable operation of the motor, but this screw should be tightened as much as possible. It should be taken into account that the position of the quality screw significantly affects fuel consumption, so it is turned as much as possible;
- We tighten the quantity screw a little, achieving stable engine operation at 700-800 rpm. If you tighten the “quantitative” screw too much, failures begin at the moment you sharply press the accelerator pedal. We must also not forget that the stability of the internal combustion engine depends to a large extent on the ignition control.
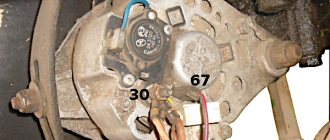
If the engine speed is high, you should reduce it using the screw that adjusts the position of the throttle valves. This screw often boils tightly, and it is impossible to turn it in any direction (in the picture below, under the number 4, under the white paint).
There is one “tricky” way to force the adjusting element to turn - you need to install a flat-head screwdriver in its slot and carefully hit it several times with a hammer (you need to feel the force, otherwise you can break parts of the carburetor). The screw will “come away” and begin to rotate on the thread. If the “trick” does not work the first time, it should be repeated. It is important to take your time and be patient, then everything will work out.
Modification of K 151 C — GAZ 31, 2.3 l., 2002 on DRIVE2
Good day to everyone reading my blog.
Here I will write about the modification of my k151s. Everything that is described here is by no means scientific discoveries, but simply facts. Experienced people talk about this, and they taught me (in particular, I’m trying to learn from my father’s experience). You never know, maybe someone will learn something new.
Preface:
I don’t rev my engine above 4,000 thousand rpm AT ALL!
Therefore, EVERYTHING that is written here does not make the Volga a racing car, but rather is aimed at stable, trouble-free operation of the carburetor. 1) NEEDLE VALVE
I don’t know about you, but what happened to me on k151S, that my father’s needle fell on k151B. It's all about its poor design and nothing can be done about it.
needle from 151
But in its place a needle from SOLEKS 21083 is easily placed. It has a better design, at its end there is a rubber cone, and not a “pimple” with a rubber ring. Then you can simply forget about it.
from Solex 21083
2) ACCELERATING PUMP SPRAYER
On 151C, the so-called “spout” is double, it pours into both chambers at the same time. BUT: the secondary chamber starts working when the first chamber is opened 2/3, i.e. in my case, almost never (rarely when I press the slipper to the floor, usually no more than half the pedal stroke).
stupid, flies anywhere, and not where it should))
Having rummaged through the bins, an old UAZ carb was found, and the UN atomizer was borrowed from it - it is single, just what is needed.
also from 151
3) PRIMARY CHAMBER SPRAYER
This idea was taken from this person.
Evgeniy Travnikov
YouTube
You can find out more in the group on VK: Theory of internal combustion engines
In my case, Ruslan
, for which I bow to him for giving me one DAAZ to be torn to pieces))))
donor
donor
By the way, talking with people online, I saw that even the old Soviet 151 carbs have a normal atomizer, like the one on Ozone. In the picture in the book for my carb they are also drawn, but in the end there are some “left” ones. And I’m not the only one. So if there is no Ozone, look for any other killed 151.
It was disassembled, and the piece of metal I was interested in was removed, washed with carb cleaner, a more or less “wing-shaped” shape was given with a needle file, sanded with zero polish (it would have been possible to polish it with Goi paste, but this is too much, because it will only be useful at high rpm, but for me this is quite enough).
but inside it's empty
For comparison
the most interesting thing is inside))
on the spot
To sum it up: All this was not done at once!
After installing the “spout”, it was noticeable that when you pressed the gas sharply, the dip disappeared, the car began to pull immediately and confidently. The primary sprayer really pleases: with the same pressure on the gas, the car reacts more quickly to it. Also, when earlier (for example) I was driving in 3rd and switching to 4th, giving a slight “pull”, it was necessary to add a little more gas. Now this is no longer the case.
Gentlemen, draw your own conclusions, criticism and further advice are welcome)) I really hope that this was interesting or even useful to someone.
In the meantime, that’s all I have))) to be continued...))))
www.drive2.ru
Repair
During the operation of the car, various malfunctions may occur in the carburetor; the main signs of malfunctions in this device are:
- increased fuel consumption;
- black smoke from the muffler pipe, it is especially noticeable if you press the gas pedal sharply;
- unstable operation at idle, the engine may also stall when the speed is reduced;
- poor car dynamics;
- failures when accelerating.
If the carburetor is faulty, the engine may not develop speed, and popping noises and shots from the muffler are often heard in the intake manifold. K-151 is a rather complex unit, and almost any element of it can fail.
There are reasons why a carburetor most often fails:
- jets, fuel and air channels become clogged;
- heating causes deformation of the body;
- the float chamber shut-off valve stops working;
- Over time, the jets wear out.
Many repairmen, when restoring the functionality of the carburetor, first of all try to replace the jets, believing that because of them, fuel consumption increases and the engine runs unstable. One rather important note - the jets wear out very rarely, and most often wear occurs when the carburetor is often operated in dusty conditions. The most common reason for poor carburetor performance is its clogging, but in order to thoroughly clean the unit, it is necessary to completely disassemble it. Repair of the K-151 carburetor is carried out with the removal of the device, complete washing and purging of all its parts.
Problems with the carburetor when installing gas equipment
Often, car owners switch cars with carburetor engines to gas; for example, it is profitable to install LPG on a working Gazelle. But with the constant use of gas in the carburetor, various types of problems appear, and one of them is a malfunction of the cold start system on the carburetor.
On many cars, the gas system uses a gas spacer for the K-151 carburetor; it is placed between the main body and the throttle body. Due to the additional insert, the distance between the lower and upper parts of the carburetor increases, so the cold engine starting system begins to work irregularly - you have to constantly keep your foot on the gas pedal, while holding the choke. On gas, a choke that is not fully working does not affect the operation of the engine, but the whole point is that cold starts of the engine, and especially in winter, are carried out on gasoline. Therefore, it is quite problematic to start the internal combustion engine with the air damper not completely closing; even due to the resulting vibrations, the fastening of the damper axis is often unscrewed. How to get rid of such an unpleasant problem?
One of the options for solving the problem is to weld an additional strip onto the air damper rod, which allows you to compensate for the difference in the thickness of the standard gasket between the housings and the gas spacer.
The bar can be made from an electrode with a diameter of 2 mm.
Replacing the K-151 carburetor
If the parts are severely worn, the carburetor needs to be replaced; most often it is changed if the housing wears out:
- the lower surface of the middle part is severely deformed;
- the cover (upper part of the body) is warped;
- The seat for the throttle valves in the lower part wears out.
The price of a new K-151 carburetor is quite high (on average 5.5-6.5 thousand rubles), but it is impossible to drive with a faulty device, especially since with high fuel consumption even more money is lost. Changing the K-151 is quite simple; let’s look at the process of replacing it on a Gazelle car:
- turn off the engine, unscrew the air pipe clamp, dismantle the “corrugation”;
- dismantle the air filter housing - first the cover, then the main body (secured with three 10mm nuts);
- loosen the two fastenings of the choke cable, pull out the cable;
- disconnect the throttle cable;
- free the carburetor from all hoses;
- unscrew the 4 nuts that hold the device body;
- dismantle the unit - it can fit very tightly, so you can slightly pry it from below with a screwdriver, but you need to work with the tool carefully so as not to damage the gasket under the carburetor;
- We put the new carburetor in place, start and warm up the internal combustion engine, and adjust the idle speed.
Device
Two channels pass through the body of the device - these are carburetor chambers. At the bottom of each there are mechanically driven valves. There are two chambers in the carburetor. The throttle valves open sequentially one after another as the load increases. The first chamber and its damper operate under low and medium loads. The second camera only works at high levels.
There are diffusers in the middle part of the body. They are designed to create a vacuum, which will then facilitate the intake of gasoline from the carburetor float chamber.
Accelerator pump repair
If malfunctions occur in the carburetor accelerator pump, the engine begins to “choke” and failure occurs when the engine speed increases sharply. Quite often, the reason for such operation of the internal combustion engine is a clogged “nose” of the fuel nozzle; the accelerator pump diaphragm can also fail.
Diaphragm defects are determined by its external inspection; it can be easily reached without removing the carburetor from the engine. To do this, you need to unscrew the four screws of the cover (number 11 in the picture below), but you need to remove it carefully - it is important not to lose the spring, which is located inside the unit.
To determine the serviceability of the accelerator pump atomizer, you need to remove the air filter housing, turn the throttle valve by hand and see if fuel flows through the “spout” of the accelerator. If the nozzle is clogged, you can try to blow it out, but this will require removing the carburetor cover. If the spout does not blow through, it should be replaced; the work of replacing it is also carried out without removing the entire assembly. We replace the accelerator pump nozzle as follows:
- remove the air filter;
- disconnect the choke cable;
- unscrew the seven screws of the carburetor top cover;
- we take out the cotter pin of the trigger mechanism, release the rod, dismantle the cover;
- unscrew the nozzle screw, blow out or change the part;
Revision of K151S - Community "GAZ Volga" on DRIVE2
Dedicated to all owners of the k151s)) I myself have already suffered a lot of troubles with it, and then I also looked at interesting things about it. In general: www.drive2.ru/cars/gaz/31…evi4/journal/570361/#post
Everything that is described here is by no means scientific discoveries, but simply facts. Experienced people talk about this, and they taught me (in particular, I’m trying to learn from my father’s experience). You never know, maybe someone will learn something new.
Preface:
I don’t rev my engine above 4,000 thousand rpm AT ALL!
Therefore, EVERYTHING that is written here does not make the Volga a racing car, but rather is aimed at stable, trouble-free operation of the carburetor. 1) NEEDLE VALVE
I don’t know about you, but what happened to me on k151S, that my father’s needle fell on k151B. It's all about its poor design and nothing can be done about it.
needle from 151
But in its place a needle from SOLEKS 21083 is easily placed. It has a better design, at its end there is a rubber cone, and not a “pimple” with a rubber ring. Then you can simply forget about it.
from Solex 21083
2) ACCELERATING PUMP SPRAYER
On 151C, the so-called “spout” is double, it pours into both chambers at the same time. BUT: the secondary chamber starts working when the first chamber is opened 2/3, i.e. in my case, almost never (rarely when I press the slipper to the floor, usually no more than half the pedal stroke).
stupid, flies anywhere, and not where it should))
Having rummaged through the bins, an old UAZ carb was found, and the UN atomizer was borrowed from it - it is single, just what is needed.
also from 151
3) PRIMARY CHAMBER SPRAYER
This idea was taken from this person.
Evgeniy Travnikov
YouTube
You can find out more in the group on VK: Theory of internal combustion engines
In my case, Ruslan
, for which I bow to him for giving me one DAAZ to be torn to pieces))))
donor
donor
By the way, talking with people online, I saw that even the old Soviet 151 carbs have a normal atomizer, like the one on Ozone. In the picture in the book for my carb they are also drawn, but in the end there are some “left” ones. And I’m not the only one. So if there is no Ozone, look for any other killed 151.
It was disassembled, and the piece of metal I was interested in was removed, washed with carb cleaner, a more or less “wing-shaped” shape was given with a needle file, sanded with zero polish (it would have been possible to polish it with Goi paste, but this is too much, because it will only be useful at high rpm, but for me this is quite enough).
but inside it's empty
For comparison
the most interesting thing is inside))
on the spot
To sum it up: All this was not done at once!
After installing the “spout”, it was noticeable that when you pressed the gas sharply, the dip disappeared, the car began to pull immediately and confidently. The primary sprayer really pleases: with the same pressure on the gas, the car reacts more quickly to it. Also, when earlier (for example) I was driving in 3rd and switching to 4th, giving a slight “pull”, it was necessary to add a little more gas. Now this is no longer the case.
Gentlemen, draw your own conclusions, criticism and further advice are welcome)) I really hope that this was interesting or even useful to someone.
In the meantime, that’s all I have))) to be continued...))))
www.drive2.ru
Replacing the needle valve in the float chamber
If the engine consumes a lot of fuel, one of the reasons for this phenomenon may be a faulty needle valve in the float chamber - it is not sealed, and too much gasoline enters the chamber. In some cases, the valve completely stops holding fuel, then the carburetor is completely filled with gasoline, and the car does not start. Changing the needle valve is very simple:
- remove the top carburetor cover;
- unscrew the screw that holds the float axis;
- dismantle the axle, remove the float to the side along with the needle itself;
- Using a 10mm wrench, unscrew the valve seat, then put new parts in place and assemble the carburetor.
Features of the float mechanism
This mechanism is needed to ensure that there is always a certain level of fuel in the float chamber. The gasoline level must be maintained so that the engine can run smoothly. If there is less fuel, the mixture will become lean, which will affect fuel consumption. The level is controlled using a float and a special valve. When the level is normal and the float is raised, the valve will be closed and will not allow a new portion of gasoline to enter.
When the fuel level is insufficient, the float will move down and open the needle valve, thereby allowing access to gasoline. As the chamber fills, the float will rise up. As a result, the needle valve will close.
At the same time that fuel consumption is not constant, its supply from the fuel pump also changes. This eliminates the increase in pressure at the carburetor inlet. The level in the float chamber is not constant and is not maintained in different operating modes of the motor.