A car mirror is an important tool that is necessary for safe driving. The side mirrors and rearview mirror are adjusted to reduce the number of blind spots.
To adjust your car mirrors correctly:
- first the driver must take the correct position;
- next you need to adjust the driver's seat, steering column for reach and height (if possible), etc.;
- then the side mirrors and rear view mirror are adjusted;
Provided that the mirrors are properly adjusted, only the edges of the car and a maximum of the space on the sides and rear should be visible. Normally, mirrors should provide a “all-round” view. Read more about adjusting car mirrors in our article.
Why do you need to adjust your car mirrors?
The main task of adjusting the mirrors is to be able to control the situation outside the visibility zone as effectively as possible without the need to make unnecessary head movements and be distracted from the road.
In practice, a large number of accidents occur due to the fact that the driver of one vehicle does not notice another vehicle when changing lanes, overtaking, etc. In this case, transport moving in the same direction usually disappears from view in the mirrors for a certain time as a result of their incorrect settings.
We are talking about the so-called “blind” or “dead” zones. Such a “dead” zone of a car is a blind spot in the form of a part of space that does not fall within the visibility range of the mirrors (the driver simply does not see the car moving in the same direction).
It is customary to distinguish two types of “dead” zones:
- left “dead” zone (almost never found in modern cars, since side mirrors with variable curvature are installed, the space in the mirror is distorted and visibility improves);
- right “blind” zone, when a large area is not visible in the side mirror.
It is important to understand that the position of the mirrors should be selected individually for each driver. If you adjust the mirrors correctly, the number of “blind” spots is reduced to a minimum.
How to set up Internet on the DVR
Almost all modern devices have a remote access function, which allows you to control the operation of the device via the Internet. Setting up the connection is possible by connecting via a modem from a mobile operator or a Wi-Fi router.
In the first case, you will additionally need an Internet modem equipped with a SIM card. All data for connecting a computer and a video device can be obtained from your cellular operator. The car owner must independently perform the following actions:
- Go to the network settings on the DVR and select the connection type (usually 3G or 4G standard), and then enter the information received from the operator;
- A special application is installed on the computer, usually included in the package. The program opens the Device Manager section, where the IP of the connected car device is indicated;
- Set similar parameters in the Internet browser, which will allow you to control the device via the Internet.
If a Wi-Fi connection is used, the device is configured with a static IP. Then the signal is sent from it to the direct IP address of the smartphone or router.
You will also need to enter the mask, gateway and current address. Next, the device reboots, and the ports on the router are activated. The last point is the organization of remote control via the Internet.
In order to properly configure the DVR, it usually takes no more than 20-30 minutes. The result of the work will be uninterrupted and efficient operation of the device in various shooting conditions and guaranteed high-quality images.
How to properly adjust car mirrors
To adjust the mirrors in your car correctly, you need to take into account a number of features:
- the driver must take the correct position and adjust the driver's seat;
- adjust the steering column by reach and height (if possible);
- adjust the side mirrors and rear view mirror;
Please note that only after completing the seat and steering wheel adjustments can you move on to the question of how to properly adjust the mirrors. Let us note right away that adjusting the mirrors in a car comes down to getting the best (all-round) view around the car. In this case, the adjustment of the side mirrors (external) and rear view mirror (interior) must be performed simultaneously.
Adjusting the side mirrors
To understand how to properly adjust external side mirrors, you need to divide such mirrors into a left (driver's) and a right mirror. The left side mirror should be adjusted as follows:
- the driver takes a comfortable position in the pre-adjusted driver's seat,
- next you need to turn your head a little to the left and look out the window, adjusting the position of the mirror so that you see only a small part of the rear wing of your car and maximum space behind the car;
To adjust the right outside mirror:
- the head needs to be turned towards the center of the car;
- then, by making adjustments, you need to ensure that you can see the right wing in the right mirror;
- When viewed from the driver's seat, instead of the entire wing, only its edge will be visible.
Please note that if from the driver's seat in the right side mirror most of the rear wing of the car is visible, and not its edge, then the mirror is not adjusted correctly. It is important to immediately get used to the fact that in correctly configured side mirrors (both left and right) there is practically no reflection of your car.
How to adjust the rear view mirror in the cabin
The interior mirror is designed to view the road from behind the car and from the side. To understand how to adjust the interior mirror correctly, you should focus on the central point of visibility of the rear window. The center of the mirror should coincide with the center of the rear window.
To adjust the rear view mirror:
- the driver must take the correct position in the seat;
- then you need to adjust the mirror so that through it you can fully see the rear window of the car, and also be able to partially view the side sections of the road.
SETTING UP A CAR DECORDER IN PICTURES
EQUIPMENT AND SECURITY SYSTEMS
OPS CCTV ARTICLES MORE…
Video surveillance » Video recorders » Car recorders » Car recorder setup » Setup in pictures
This page is an addition to the article “setting up a car DVR”
and illustrates the main points of setup without using instructions. When preparing this material, I used my existing DIGMA DVR. Since I periodically set up various recorders for my friends and acquaintances, mostly “economy” class ones, I can assure you that the instructions are not particularly needed, and sometimes they are simply useless (lately a good manual is a rarity).
This is what the DVR monitor looks like in recording mode. You can't enter the menu from here.
Having selected this mode with the MODE button, you can press MENU.
The car DVR may have several menu pages that can be scrolled through by pressing the MENU button again.
Here we are on another menu page. Please note that the presence of an arrow (triangle) at the bottom left of the screen indicates that the list of items in the current menu continues in the indicated direction. In this case, down.
And here - up. Moving is carried out using the DOWN and UP buttons or buttons with triangles (arrows). Look, the “SETTINGS” tab may say “next menu”. This indicates the presence of a submenu (submenu) that you can access by pressing REC/SNAP or OK (depending on the recorder model).
In this case, the date and time can be set (adjusted) . Select by pressing DOWN or UP “INSTALL”, confirm the selection by pressing REC/SNAP (OK)
Using the navigation buttons, we select the date display format, after which we habitually press OK and exit this menu, as the inscription on the monitor honestly warns about. We freak out, repeat several times, and make sure that we cannot adjust the date/time values. This is such a cartoon from the manufacturer. Press MENU instead of OK.
Who would have thought - it worked! We select the date by pressing DOWN and UP, through MENU we go to the month and so on - until the bitter end.
Settings for other modes are made in the same way, I gave the algorithm.
In conclusion, I want to say that you may encounter other absurdities inherent in some recorder models. For example, I had the pleasure of setting up a recorder in which the date display format was configured on one menu page, and the values of these parameters were configured on another. However, attentiveness, patience, and lack of fear of experimenting will allow you to overcome any device.
The worst thing that can happen is that you click on the “FORMAT” item. This will erase all video recordings on the memory card; everything else is reversible.
After completing the settings, install the video recorder on the car and turn on the recording mode.
© 2010-2020. All rights reserved. The materials presented on the site are for informational purposes only and cannot be used as guidance documents.
Checking the quality of car mirror settings
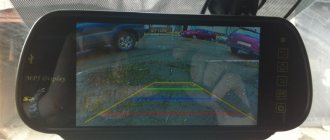
Having figured out how to adjust the mirrors, it is also advisable to check the overall quality of the adjustment. With properly adjusted mirrors, the object partially disappears from the rear view mirror and appears in the side mirror.
Adjusting the mirrors on the car while driving is prohibited! To understand whether all mirrors are configured correctly, it is best to invite an assistant.
- To check, just sit in the driver's seat, while an assistant should slowly walk around the car at a distance of about 2 meters from the car. The driver needs to monitor the assistant’s movement exclusively through the mirrors.
- If the assistant’s reflection disappears in the side mirror, but immediately appears in the rear-view mirror in the cabin, this indicates the correct adjustment and setting of all the car’s mirrors.
We also recommend reading the article on how to install and connect a rear view camera to the radio. From this article you will learn about connection features and nuances that need to be taken into account during installation.
This setting reduces the number of blind spots.” For example, the driver may see another vehicle in the rearview mirror. If this car starts overtaking, part of this car will be visible in the side mirror, and part in the interior mirror.
How to configure additional DVR settings yourself
Here, priority attention is paid to the following points:
- Recording an audio stream. Activating it allows you to use the microphone, which is especially necessary during a conversation with traffic police officers or, for example, when communicating with other participants in an accident;
- G-sensor. This option is responsible for continuing video recording in cases of emergency braking or when the car collides with any obstacle. Manufacturing companies recommend setting the sensitivity to medium, which allows you to quickly respond to emergency situations and at the same time eliminates the possibility of triggering when driving on rough roads;
- Motion Sensor. Shooting automatically starts if any movement is detected in the field of view of the device. It is useful to use when placing a car in a parking lot, so it is better to also set the sensitivity to a medium level;
- Enabling the WDR function. It is actively used on DVRs from Xiaomi and other leading global manufacturers. Enabling it allows you to maintain a clear picture when there is a sudden change in the lighting level (for example, when leaving a tunnel or turning off the headlights at night);
- Network frequency. The standard value varies between 50-70 GHz, which eliminates the possibility of flickering in the frame and provides better video quality in artificial lighting conditions;
- Turn on GPS. Setting the parameter is necessary to obtain the exact coordinates of the car in space, as well as to display the speed of movement on the recorded video.
In order to correctly set up a car DVR, before using it, you need to set the screen contrast, brightness and sharpness values. To select the optimal values, it is recommended to “play” with these parameters and compare the quality of different videos.
Tips and tricks
- When driving a car, the mirrors should be adjusted so that a slight turn of the head or shift of the gaze is enough to control the situation on the road.
At the same time, you can look in the side mirrors or rearview mirror only if the driver is convinced of complete safety ahead and is sure that a change in the situation will not happen in the next 1-2 seconds. We also recommend reading the article on how to connect a subwoofer to a radio. From this article you will learn about the features of connecting a subwoofer to a radio. - It is necessary to constantly monitor the situation using the mirrors, and not just before changing lanes or starting other maneuvers.
Control of the road situation allows you to safely perform emergency and unforeseen maneuvers (sharp lane changes, avoiding obstacles, emergency braking, etc.). It should be remembered that even in correctly configured mirrors, “dead” zones are still present. For this reason, it is recommended to take a quick glance over your shoulder during active maneuvers, especially when changing lanes from the left lane to the right lane. By the way, a slight tilt of the body towards the steering wheel allows you to increase the viewing angle. - Also, various troubles can be avoided by visually assessing the situation through the rear window when reversing or during turns. In other words, in addition to orienting by mirrors, in this case you can also turn your head and further assess the situation.
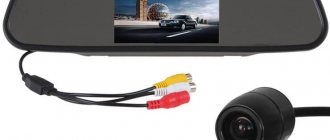
How to connect a rear view camera to a mirror with a monitor
If you want to prove that a rear view camera can be installed behind glass, then this is your decision. Some car owners can solve the issue of camera cleanliness by simply connecting an additional nozzle to the rear view camera from the rear window washer. Let’s immediately dispel the myth that your camera is of interest to vandals and drug addicts: you can’t dismantle it without cutting the wires, therefore, it won’t cost anything if it’s damaged, and the second point, in practice, these are isolated cases, and who will buy it, even if she is whole. Ask yourself a simple question: you remove doors, antennas, side mirrors, fog lights, nameplates - after all, they are also of interest to vandals. Rear view cameras are not suitable as a dash cam, leave this dream alone and don’t waste your time on this. For comparison, here is a photo next to the standard mirror.
There is a single button on the front, the function of which is to adjust the brightness of the video image in steps; it does not allow you to turn the device on/off.
To the left of the button there is a light sensor eye, to the right is an LED indicating the operation of the device
At the back, in addition to the seat for attaching the mirror, there is another peephole, most likely intended for another sensor, but I don’t understand whether it is there or not, at least I didn’t notice any reaction to changes in illumination on this side of the device.
Attention
When you turn on the ignition, the mirror automatically turns on, as indicated by the green LED. This LED is of course beautiful and all that... but its flickering before your eyes, especially at night, is quite distracting. Therefore, I had to use the old proven method and cover it with a piece of black electrical tape with a small hole