Painting over chipped paintwork - educational program: how I do it.
Earlier (www.drive2.ru/l/1392150/) I already wrote that I bought an original kit for touching up body chips. My paint is white pearlescent (34K), so it’s a 3-component paint: paint (primer), pearlescent and varnish.
I painted over it last year and had to do the same this year. As time passes, I want to share my own experience as a “non-pro” in this matter.
I want to say right away that it doesn’t turn out perfect. The painting area is still visible. Especially to the one who painted over or to the one who knows where the chip was, because... you know exactly this place and your eyes themselves look for it, and, naturally, find it. But if a stranger does not know where you painted over (of course, provided that you painted over it carefully), then finding this place is quite difficult.
I recently became convinced of this myself. Here is an example from life. By March 1, I needed to conclude a CASCO agreement with a new insurance company. They asked me to wash the car. The appraiser himself drove up to my parking lot, I got out and showed him an absolutely clean car. He examined it for a long time and identified two chips on the hood. I haven’t even seen them myself, they appeared this winter - fresh (here I wrote about this later: www.drive2.ru/l/3524813/). At the same time, I knew that I had two chips that I personally painted over in the fall. But the appraiser didn’t notice them! Perhaps this is a good indicator. Those. A kit for touching up chips has a right to life. It’s just that there is often no time or desire to tinker with these chips. They don’t rust and that’s okay.
I will describe my new procedure for fairly trouble-free painting of chips with the original set in three passes.
The original set for the color of my car (34K pearl) consists of two boxes with two jars each: primer, pearl, varnish and an empty jar. Just like the original paintwork of a car - everything is applied in layers, there is no need to mix anything.
So, we have a chip:
As you can see in the photo, it has chipped down to the metal. I traveled with it all winter and only now, when it’s finally warmer, did I get around to doing something with it.
There is a second chip, but it is smaller.
Step 1:
— warm weather, preferably +15 and above, sunny. — we have with us a plastic card and a piece of non-fibrous fabric (a female swab for removing makeup or “suede” or felt for wiping the monitor screen), as well as a wooden toothpick. — carefully wash the small space around the chip. - degrease the chip (alcohol, degreaser) - take out the primer (a jar labeled Primer) and shake it (the ball inside the jar stirs the primer). A minute is enough. The primer, apparently, is water-soluble, because... It dries for a very long time, does not shrink in size (does not dry out) and is easily washed off with the same alcohol. - Using a brush from a jar of primer, apply the primer to the tip of a toothpick. A little. Slightly larger in volume than the chip. - Apply primer directly to the chip. You could say we’re dripping into it. Let there be more chips and let them go beyond the edges of the chip - the main thing is that it doesn’t flow. Because The primer is easily removed, then we will then eliminate its excess beyond the edges of the chip. - we wait. We've been waiting for a long time. then we still wait. I would recommend waiting - a couple of hours, no less. — the primer dries out and compacts in the chip:
Do-it-yourself chip repair on a car
In order for the repair of defects on the body to go as expected, you need to adhere to a number of simple rules:
- Read the safety rules for body repair. Find out more about the technique of preparing the working surface, the criteria for selecting materials, and checking whether the tools are in good working order;
- follow the instructions, do not skimp on consumables, mix the solutions exactly as indicated in the instructions for them;
- Buy consumables from the same manufacturer to avoid chemical conflicts;
- do not rush, as this is one of the main reasons for failure in body repairs.
Removing chips on the body is an important task because such areas are vulnerable to moisture and chemical attack, which can destroy the coating and body of the car. If insufficient attention is paid to the problem, it can develop into a serious defect that will have to be fixed at great expense.
So, a very small chip of a couple of millimeters in size will eventually turn into a large concentration of rust. This means that if you start repairing earlier, then you will need significantly less consumables (varnish, paint, putty).
Before you begin painting and restoration work, you need to decide on its volume. If you use modern equipment to repair scratches and chips, you will save a lot of time.
As an experienced painter, I can give you the right advice: check the serviceability of all tools and read the operating instructions, because even after prolonged use, you can learn something new from the instructions that will help you achieve better painting quality.
Treat your equipment as thoroughly as possible. It happens that it fails quickly precisely because the owner did not pay enough attention to proper storage of the tool.
To ensure that painting chips on a car with your own hands is done correctly, use tools such as polishing machines, spot welders and other modern devices. After you find a place that violates the aesthetic appearance of the car body, carefully inspect the damage and determine how badly the body is damaged.
If the integrity damage has affected only the top layer of varnish or paint, you can hope for a very simple repair. It is enough to buy a cosmetic pencil or polish of the same color as the car’s coating.
Also in this case, you can use a quick polishing machine or regular P2000 sandpaper. These tools will help you repair minor chips and scratches. Once you polish the top layer, there will be no trace of the scratch left.
If the situation is not so rosy, and you notice that the soil layer has also been damaged, more serious intervention is needed. Do not delay the operation, because over time the consequences of a minor scratch will worsen, and you will have to repair a much larger area on the body of your car.
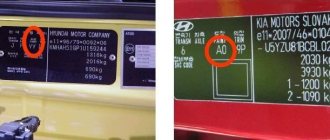
If you have not yet allowed rust to form, start choosing paint. The code for the required color is usually indicated on the vehicle information plate, which is attached to the rear of the trunk. In addition, you can find the desired tone using the car's VIN code and a special computer program.
You can also contact specialists who will analyze the color of the paint applied to the car body. If you don’t want to expose the defective body to risk on the road, you can get to the car service in another car, taking, for example, a gas tank cap from yours. Based on its color, specialists will also be able to determine the tone of the paint.
But this is not the only way to deal with defects that have appeared on the body. There are special paint kits that can help you save money. Usually the kit includes chip paint along with brushes.
Depending on the amount of work to be done, choose a kit with one or two bottles of coloring liquid. You can make chips less noticeable by blending them out with a brush and paint liquid.
This will also protect the car body from rusting. To successfully complete a paint job using the Quick Repair Kit, follow these steps:
- Clean the damaged area;
- Degrease the area;
- Prime the deepest defects;
- Apply paint;
- Apply varnish.
And, of course, do not lose sight of such an important thing as drying the surface after applying each layer. This will help make the scratches as invisible as possible. But you still won’t achieve the ideal effect.
So that no one can see the place of the repair being carried out, you will need to carry out a full-fledged local repair of chips and scratches on the car. We will consider the sequence of actions in the next paragraph.
Local repair of scratches and chips
Let us describe the local repair process using the example of a hood restoration situation. First you need to thoroughly wash the part with water; it is better to use detergents such as white spirit. Make sure that the work area is well lit and that you do not block the light. Examine the areas that have been injured. The beak and front part of the hood are usually affected.
After inspection, make a choice in terms of the type of coverage. There are several types of it: acrylic, which was often used to cover old foreign cars and vases, acrylic under varnish (these are usually all foreign cars produced in the nineties), and also metallic (it contains a base pigment and acrylic clear varnish).
If you can’t decide for sure, you can do a little experiment: take a white cloth, put a drop of abrasive polishing paste on it and polish any area on the hood for a couple of minutes.
After polishing, take a look at the cloth. If there is dirt left on it, it means there is a layer of varnish on top of the paint. If there is no dirt, then you washed the hood really well. Well, if a color mark remains on the rag, you can say with a high degree of confidence that the hood is covered with ordinary paint without varnish.
This is acrylic or synthetic paint. Thus, you will need to make a choice in favor of one of the discovered coatings.
The next stage is removing chips on the body yourself. If you see that rust has already begun to form at the chip site, go over it with any tool that will clear this rust. You can use a needle file, a knife or a special rust remover. After this, use sanding paper. Use P1500 or so. Wrap it around a small area around the area to be treated so that the paint or varnish adheres well to the surface. And then this will help to avoid sharp color transitions.
If you did a hard scrubbing of the rust, apply a primer to the chip. Painting chips and scratches on your car will end well if you use a two-part primer. Squeeze out just a couple of drops and no more.
Apply the mixture using a thin brush or sharpened match to the areas where the metal is exposed. Wait a quarter of an hour and then repeat the procedure. Then you have to wait a couple of hours, after which use a hairdryer to speed up the drying of the surface. As soon as the soil is dry, fill the treated chips with paint.
Repairing chips on a car body will end very quickly if the car is painted with regular acrylic. You will need to take a brush or toothpick and, just as in the situation with primer, apply a thin layer of paint to the chip. You probably stirred the paint before applying it, but if not, now is the time to do it.
Repeat the application of paint every 15 minutes, allowing the coating to dry. The fact is that during the drying process the paint shrinks greatly, and you will have to apply layers repeatedly until the result is satisfactory and the new coating rises above the surface with a small bump.
The next important stage is grinding the resulting bump at the site of the former chip. Your task is to level the tubercle with the rest of the coating. You must secure the area around the edges of the bump so as not to rub off the paint in that place. To do this, apply a thin layer of nitro putty along the edges of the tubercle being processed.
After it dries, start sanding the problem area. To do this, select a small flat beam (about the size of half a matchbox). This could be a small wooden slatted piece. Then cut a small piece from a roll of sandpaper with a grit size of P1500 and cover the block with it.
Hold it tightly with your fingers and sand. When sanding, be sure to use water to rinse the area being treated and the sandpaper itself. Don't press too hard and keep an eye on the surface beyond the bump.
When it begins to noticeably decrease in size, know that the layer of putty applied will also be wiped off. If you see that there is nothing left of it, and sanding still takes a long time, to be sure, apply an additional layer of putty to avoid problems with another section of the hood.
When you realize that the bump has decreased to an acceptable size and is level with the surface, change the sandpaper to P2000 and finish with the small details.
After you have sanded the problem area, you can see that the paint has a mottled texture. To eliminate this defect, go over the hood in a circular motion with P2000 sandpaper. When doing this, use plenty of water. When you're done, you'll have a smooth, matte finish. To ensure the result is exactly what you expect, polish the surface until it shines.
Now you know well how to remove chips on your car. However, there is a high chance that something could go wrong, especially if you are doing this for the first time. Therefore, we will consider the main defects of coatings after treatment.
Option 3: the chip reached the metal and caused corrosion
If you don't have to deal with a huge amount of chipping, the painting process will be much simpler and faster. The most important thing here is to choose high-quality paint that will fully match the body color of your car. Such repairs are simpler and faster, so it is better to deal with chips before they reach the metal and begin the corrosion process.
If the chip is very small, take a match or toothpick and apply a drop of paint to the washed and dry area of the chip. When the paint has hardened a little, you can smooth it out with a small brush. Do not use varnish for such repairs, otherwise the place of the former chip will be very noticeable. If the damage is relatively large, you need to do the following procedure:
- wash and dry the body repair area;
- Never use solvents for degreasing - they get under the paint and cause further corrosion;
- take the softest artistic brush possible;
- apply paint with neat strokes exactly at the place of the chip;
- carry out this painting until you get satisfactory spreading of the enamel over the chip;
- Allow the paint to dry and correct any visual imperfections using a minimal amount of enamel.
After a few days, you can polish the entire body part or the entire car using an abrasive polish, and focus on the area of the chip. If all the tasks are completed efficiently, you will not be able to distinguish the point where the repair was carried out.
If the paint is chosen poorly, serious problems can arise. The chip will become a dark or light spot on the body, which will require repainting the entire body part. Therefore, it is important to choose high-quality paint in the ideal color for your car.
In this case, repairing the chip will be more difficult and time-consuming, because it is necessary to remove the rust spreading processes that have begun. To do this, you need to use traditional body repair, which will remove corrosion and allow you to locally paint over the part without visible differences from the rest of the body.
https://www.youtube.com/watch?v=qAEvoUcO1EE
To work with this chip, you will need sandpaper with a grit of 600, 800 and 1000, possibly putty, primer and paint, as well as tools for their application, and a degreasing solvent. The work process in this case looks like this:
- The local area of the chip is cleaned, taking into account the possible spread of corrosion under the paint;
- the rust must be cleaned down to the metal, then the surface must be washed and degreased;
- if necessary, apply putty, let it dry and use 600 and 800 sandpaper to bring the surface into compliance with the requirements;
- degrease the surface again and apply a primer, which then needs to be washed with 1000 grit sandpaper and water;
- After this, the body part or the chipped area is degreased and painted.
While painting, be careful not to get the spray on other areas of your car. To do this, they often use masking tape and newspapers. Once the paint has completely dried, you can polish it and enjoy the beautiful visual properties of your car.
Many people also apply car paint, believing that this step will improve the visual properties of the car. In fact, under varnish any difference in paint becomes more noticeable, so it is better not to use varnish for local repairs.
If you think that a cunning device in the form of a pencil for removing scratches will help completely remove chips on your car, watch this educational video.
No car owner is insured against damage to the paintwork. In addition to careless driving, chips on a car appear for the following reasons:
- unfavorable weather conditions - hail, temperature changes;
- road covered with crushed stone;
- insects crashing into a car at full speed;
- carelessness of others, physical damage;
- improper car washing.
The car owner does not notice the formation of small paint chips. Only a careful examination of the body after the trip and cleaning the car of dirt helps to find possible defects. If they are detected, it is advisable to repair the body as quickly as possible. Leaving minor damage unattended can have consequences.
Microdamages violate the integrity of the paintwork and cause further corrosion, and an increase in the defect area will make repairs expensive. While waiting, the situation will worsen when the body begins to rust. Damaged paint will not be able to prevent the oxidation of the metal. In this case, the car body will require lengthy and costly professional repairs.
Neglected defects cause corrosion. If the damage reaches the metal, urgent repair of the chip on the car body is required.
To remove such a flaw, you should clean the surface around it with coarse sandpaper. In order for the paint to adhere better, the boundaries of the restored area should be flat. After cleaning the surface, treat it with a primer and wait for the layer to dry.
Post-repair defects
When you repair scratches on your car, follow the basic rules and instructions that are designed to ensure that the painting process goes without surprises.
But if you deviate from the well-known principles of painting, wanting, for example, to save materials, time or finances, then you will definitely encounter problems. Sometimes it is difficult to correct such errors, sometimes it is simply impossible. Let's list the main problems that arise among careless painters:
- Uneven drying of varnish and paint on parts.
It may happen that stains of primer will show through the paint or stains in the form of stripes will appear - this is the base coat.
- Matte surface.
If after painting your surface does not want to become glossy, it is all due to the high humidity of the air in which the car was painted. In addition, the reason may lie in exceeding the proportion of hardener in the varnish. This usually causes the surface to cool and moisture to condense on it.
- Varnish stains and drips.
This defect may appear due to the fact that the paint has an excessively liquid composition or the previous layer of paint was not completely dried.
As you can now see, repairing chips and scratches is not an easy task. If you do not have minimal knowledge about this process, it is better not to undertake it. But if you know well how to prime, putty, and apply the paint itself, then you are on the right track.
For a professional painter, chips and scratches on a car will not be a problem, but you still need to be well prepared for the upcoming painting. Prepare all the necessary equipment, as well as consumables, and concentrate.
Otherwise, you can always contact a workshop where they will provide you with high-quality repairs for a small amount. Then a positive result is definitely guaranteed.
There are situations when a vehicle is hit or a heavy object falls on it. In these cases, scratches, dents, and chips form. The metal can corrode and rust appears after a while. The cause of various chips, scratches, damage, in addition to accidents, are also pebbles and insects falling on the hood while driving at speed. Fine cracks form next to the abrasions. The destruction of the machine will continue until the defect is corrected.
These technicians will work on your car.
Alexander, master technologist.
The real problem with cars is chips. Most of them are in cars with highway mileage. On high-speed roads, cars are literally bombarded with gravel flying from the wheels of oncoming and passing cars. The stones penetrate the varnish and tear out the paint in pieces. Even small, seemingly insignificant chips are fraught with serious danger. Every hole in the varnish opens the way for water and dirt to the porous colored layer and metal. Chips collect dirt, they tend to increase in size and depth. Therefore, very often it is in them that pockets of corrosion arise.
Arthur, senior master technologist.
Chips need to be repaired on time. Ideally, the car is protected with anti-gravel film. This is the maximum possible and excellent protection against impacts of sand and gravel. But if you do notice that chips have appeared on your car, they need to be repaired urgently. Fresh, clean chips are easier to remove and cause minimal damage. Old dirty chips have to be cleaned. During the cleaning process, the area of damage inevitably increases. Then the paintwork is restored. We make every effort to ensure that the restoration is as discreet as possible. However, in some cases, 100% color accuracy is unattainable.
Removing chips on a car without painting
First, the degree of damage is diagnosed:
- A scratch, a slight chip that has not affected the paintwork (here it is enough to carry out local polishing).
- Not too large a chip that affected the main layer of paint (paint only the damaged part).
- Old damage, rusted, with corrosion (the part is cleaned to bare metal using a rust converter).
If the defect turns out to be small, then simply polish the slightly damaged area. There are special technologies for this. If the car receives a dent, but the paintwork remains undamaged, the damage is removed without repainting. The result is achieved by leveling the surface using special tools. In case of deep chips, scratches, abrasions, when the paint layer is destroyed, you must contact a professional, otherwise the metal will begin to corrode. This problem can only be solved by re-painting.
Damage and chips
As the vehicle is used, various damage to the protective paint coating may appear on its body:
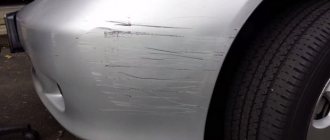
- Minor scratches on the top layer of the coating that do not affect the base layer. They can be eliminated by polishing the body with polish, pencil or wax.
Minor damage to the body, which can be removed by polishing
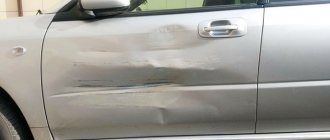
- Medium depth scratches on the top layer. They are removed by painting the damaged area.
Damage eliminated by painting the area
- Scratches down to the ground layer. With a pencil you can remove only those of them that are not very wide. The remaining damage is either painted in two layers or eliminated locally with restoration of the body geometry.
Defects that can be eliminated by painting in several layers
- Scratches reaching to the metal of the body. They are eliminated by priming the damaged area and then painting it in three layers. The primer is applied very thinly so that the area does not stand out.
Can be removed by priming and painting damaged areas
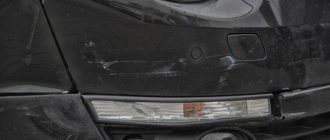
- Scratches on the surface of the bumper. Such defects are painted over with a repair balloon.
Painted over using a repair paint can
- Scratches that cause rust and corrosion. The damaged area is cleaned of paint and primer using special means, after which it is re-primed and painted.
The most complex defects eliminated using special anti-corrosion compounds
- Chips. If the defect affects the metal, then it is painted over, if only a primer, then it is polished.
Chips of paint on a car hood that can be removed by painting or polishing
- Bubbles of paint. They are removed by painting the area in several layers and polishing it.
Bubbles in body paint that can be removed by polishing or repainting
Types of repairs
The car body provides safety and comfort. Its damage can occur not only due to an accident, but also as a result of improper operation. Weather conditions also cause damage, such as hail, which leaves marks.
As a result, the appearance of the vehicle loses its attractiveness and needs restoration. Repair work is divided into two types:
- local (minor body repairs);
- complex.
Local repairs have a number of advantages:
- Saving money and time.
The factory coating is preserved.
The cost of the car does not change, since there were no additional restoration work.
The tightness is not broken.
Repairs are carried out quickly.
Removing various types of damage on the bumper, hood, fender or car door does not require dismantling parts, complete painting of the entire element, or reinforcing work. Only the damaged area is repaired.
But with a comprehensive repair, the geometry is completely restored - find out in detail how major body repairs are carried out https://borauto-tambov.ru/auto-body-shops/.
How to remove chips on the hood without painting
To perform this type of repair, the algorithm of actions will be as follows:
- The chip site is cleaned to eliminate the risk of corrosion spreading.
- The rust is cleaned down to metal.
- Wash and degrease the surface.
- Puttying is carried out (with sandpaper 600 and 800 the surface is leveled according to the standards).
- Degrease.
- Locally painted with enamel, pigment (without painting the entire element).
- Grinding.
- To prevent the spray from getting on other parts, use tape and newsprint.
The following technology includes:
- Polishing.
- Applying a layer of ceramics.
Polishing instead of painting
Surface chips, when only the varnish layer is affected, can be easily removed using abrasive polishing. Another method involves melting the chip if it reaches half of the paintwork. In this case, the varnish is directed towards the chip, as if filling it.
The “Vacuum Extraction” technique involves attaching a special applicator to the chip site with special glue. After the glue has dried, a vacuum is created behind the sphere using a mini lifter, and the metal falls into place, notifying you with a slight click.
To remove a chip on the hood, the adhesive technique is used, when a special clip or piston is smeared with glue and pressed to the center of the defect, followed by pulling it out. The procedure is carried out several times. It is classified as PDR technology, which includes some other methods:
- Thermal recovery (local heating of the affected area).
- Mechanical impact (body elements are partially dismantled using hooks and sticks. Sometimes combined with adhesive technology.)
For partial painting, it is better to take paint in cans, which will not leave streaks when sprayed. Instead of paint, you can use putty and enamel made on a polymer base. It is only important to choose the right tone, nuance, and materials.
Materials
This series includes:
- pigments;
- varnishes;
- Consumables;
- sandpaper;
- adhesive system;
- putties;
- primers;
- dye;
- nitro putty;
- abrasive grain.
Tools:
- Lamp with a powerful diffuser.
- Hooks of different sizes (help to squeeze out dents from the inside out).
- Adhesive system (corrects the geometry of the part from the outside, if it is impossible to do this from the inside).
- Levers of different sizes.
- Clubs.
- A set of tools for car repair.
Make repairs at home
To correct the appearance of your car yourself, you need to perform the following sequence of actions:
- The hood should be thoroughly washed (using detergents, acetone).
- Using lighting, chips are revealed.
- Determine the type of paint coating.
- Rust is removed (using a sharp object).
- The place of the chip and next to it is cleaned with sandpaper.
- Prime with a small brush (leave the first layer for 15 minutes, the second dries for 2-3 hours).
- Paint the chipped area (the paint should be shaken first. The procedure is carried out several times, since each layer of paint sags).
- Grinding.
- Varnish (instead of acrylic, you can use varnish).
- Polished.
The car may become spotty; to even out the tone, sand it with R 2000 sandpaper, with a constant supply of water.
Here's another way:
- Clean the area where the chip was found;
- The rust is cleaned down to metal, followed by washing and degreasing.
- Putty. Using sandpaper 600 and 800, bring it to standard.
- Degrease and prime, followed by washing with water and 1000 grit sandpaper.
- Degrease and paint again (or polish and then apply a ceramic protective layer).
Repairs at home are carried out when the top paint layer is affected, and the factory coating is not damaged. In case of a more serious defect, it is better to contact a car repair shop.
Over the course of use, minor defects appear on the car in the form of scratches and chips. These body damages are not only disadvantages from an aesthetic point of view, but also pose a practical danger to the car. Therefore, it is necessary to eliminate any chips that appear as quickly as possible. This will protect the body from the harmful effects of corrosion. This article discusses removing chips with your own hands.
When should chips be repaired?
A chip is a section of paintwork with a destroyed protective layer. Through chips, water and aggressive chemical components dissolved in it penetrate deep into the coating and can reach the metal. Every chip is a potential source of corrosion. Unrepaired chips weaken the factory coating. Pressure washing, caustic detergents, and road reagents increase the area and depth of damage. The faster the resulting chips are eliminated, the more intact the factory paintwork is. Therefore, it is recommended to repair them immediately or at least at the beginning of each new season.
Relevance
Chips occur on any car, even under careful operating conditions. This is explained by the fact that the principle of their appearance is the impact of small particles such as stones on the paintwork. It is impossible to avoid this, you can only try to protect the car. Most often, these minor defects appear on the front bumper and hood of the car.
Not only the appearance of the car, but also its body suffers from the presence of chips, since at the points of chips the metal is open to interaction with the environment. Therefore, this is where corrosion appears. In view of this, it is necessary to regularly remove chips or protect the car from their occurrence.
Methods for protecting the hood from chips
Polishes
Protective polishes for the car body, protecting it from damage and giving it an aesthetic appearance.
Protective polishes not only protect the car body from damage, precipitation and exposure to chemicals and ultraviolet rays, but also give the paintwork shine.
The service life of polishes may vary depending on their composition. For Teflon compounds, the service life is three months, while resin-based polishes protect the body for a year. This difference in timing is explained by the different reaction of the paint and varnish material with the composition of the protective substance.
Nanopolishing is considered the most durable and reliable: it keeps the paintwork intact for two to three years, while being resistant to chemical and physical influences.
Liquid glass
A protective composition applied to the surface of the car body and forming a durable glass film. This coating gives the car a mirror-like shine, protecting it from damage, repelling dirt, moisture and protecting it from environmental influences.
An unusual protective agent for the body - liquid glass made by Japanese Willson
Japan is considered the main manufacturer of liquid glass - they produce Willson composition, the service life of which is up to three years. In the climatic conditions of our country, the shelf life of glass is reduced to one year.
Liquid case
A protective composition applied to the car body and forming a dense film
A protective substance applied to the surface of the body using a spray or brush and forming a film that protects the car from the effects of small particles and corrosion. The composition is applied to the surface of the body in three layers. This protection is resistant to atmospheric influences, is not afraid of sudden temperature changes and can be easily removed - just roll the material.
We recommend: What to do if the heating in a Lada Priora car is not working well
However, such a protective composition has its drawbacks: a short service life - no more than 10 days, an unattractive appearance and the harmful effects of moisture, which forces the film to peel off.
Protective case
The simplest and most cost-effective way to protect the body from damage
The simplest and most common way to protect the body. However, using a leather case has its disadvantages:
- The cover must be selected for the specific make and model of the car;
- There should be no moisture, dirt or debris between the car body and the cover, otherwise such proximity can lead to corrosion and rust.
Preparation and materials
The peculiarity of chips on a car body is that even with a small depth they are large in area. If the depth is really small, that is, part of the paintwork is damaged, it is possible to remove the defect on the body by treating this point with a color-enriched polish, and apply a protective polish on top of it. You must first remove all dirt and degrease the work surface.
If a chip on a car is so deep that it reaches the ground, or even more so metal, it cannot be eliminated using this method; touch-up paint will be required. It should be taken into account that the technology for removing chips is determined by the type of paintwork on the car.
Repairing chips involves the use of tools and materials such as a set of polishing pastes, sandpaper for wet sanding with abrasiveness R 1500 and R 2000, a polishing machine, nitro putty, paint, varnish. If the chip has reached the metal and corrosion begins to appear on the body, primer will be required. Naturally, if we are talking about corrosion, we are talking about the hood of the car, since the bumpers of most cars are made of plastic. Typically, the largest number of chips on the hood appear on the leading edge.
Removal technology
At the first stage of work, you need to remove all dirt on the body by washing with detergents. Next, the damaged area of the car is degreased. After this, you need to inspect the car in good lighting conditions. Small chips may be discovered that were not initially noticed.
Next, before you begin removing detected defects, you need to determine what type of paintwork the car has. There are acrylic paint, acrylic paint under varnish, metallics. The first type of coating is used on Soviet and Russian cars and old foreign cars; the second type was used to paint foreign cars of the nineties; it is still relevant today, with the exception of those models or trim levels for which metallic finishes are provided.
When it is not known what type of paint coating a given car has, you need to polish a small area of the body with a white rag and abrasive paste. If as a result of this the paint was removed, that is, it remained on the rag, then the car has an acrylic coating, otherwise there is a layer of varnish on top. Based on this, acrylic paint or pigment with varnish is purchased, and after that they begin to remove chips. If corrosion is found at these points on the body, it must be removed with a sharp object.
Then you need to remove some of the old paint material around the detected defects by sanding with P 1500 sandpaper so that the new coating, which will be sealed, adheres well to the original one. In addition, this will make the transition zone less noticeable.
How to get a chip repair service?
Scratch removal service is available by appointment. Orders for the service are accepted:
- directly in the workshop;
- by phone;
- in Viber and WhatsApp messengers;
- Online.
Do you have any questions or want to order a service? Write to us and our specialist will contact you!
Submit your application
At the restoration stage, the paintwork is restored layer by layer. Transitions between fresh and old paintwork are also removed. The edge of the roof was finally protected with film.
Priming and painting
Places where corrosion was removed from the car must be covered with a primer. The sealing begins with removing the acrylic two-component primer from the can. A few drops will be needed for this work. Then you need to cover the metal points with it using a thin brush or a sharpened match. After 10-15 minutes it is necessary to cover the second layer. After this, wait about 2 hours for the soil to dry or speed it up by heating.
Next you need to repair the damaged areas with paint. If the car is covered with acrylic paint, the seal can be done with your own hands. To cover the area to be treated with paint, use a brush or a sharpened match.
First, the material must be mixed well and the damaged areas on the car must be repaired in several layers, since the paint shrinks greatly when drying.
The sealing is carried out at intervals of 10-15 minutes, upon completion of the work you should get a bump of paint with a slight influx.
The difference between applying a coating with varnish is that several top layers are represented by varnish. Moreover, it is applied 15-25 minutes after the paint, so as not to dissolve it, since the pigment dries slowly. At this point, this stage is considered completed. They move on to the next stage after 2-3 days: it consists of grinding the tubercles. First apply nitro putty around them with a soft spatula and leave to dry. It will protect the adjacent paintwork from damage.
Sanding is carried out with sandpaper R 1500. You should stretch its fragment onto a wooden block the size of half a matchbox. During the work process, it is necessary to constantly wet both the abrasive material and the surface. When erasing the putty, you need to apply it again after drying. The final processing is carried out with sandpaper P 2000. Upon completion of this work, the hood will be covered with matte dots.
At the last stage, you need to smooth out these places by sanding the entire surface of the part with sandpaper R 2000. Water is also used, the result should be a completely matte surface that needs to be polished.
If the chip does not reach the ground, you just need to repair it with paint, and the shade can be selected according to the code. The paint should be poured from the original container into the lid and applied with a toothpick no higher than the level of the varnish. After an hour, you need to apply varnish over the paint with a brush. This will level out if the paint was applied unevenly. At the end of the work, you need to grind the point using an abrasive grinder.
In order to clearly see the implementation of the described work, you should watch the video.
I was thinking about how to remove chips on the hood. A person who truly cares about the condition of his car thinks not only about its technical component, but also about its attractive appearance. The opinion, which consists solely in the need to wash your faithful iron friend about once a week and thoroughly polish the surface of the body, naturally, is not without common sense. However, the reality is that this may not be enough; the above-described manipulations are not able to guarantee complete protection against corrosion.
With age, more and more chips appear on the hood of a car.
In addition to constant damage, it is necessary to take care of chips, which during the operation of the car mostly form on the paintwork of the hood. Their appearance is caused by small stones hitting the surface of the car, which fly from under the wheels of the vehicle moving ahead. It is possible that chips may appear due to heavy hail, which deforms the entire car. The article below discusses several effective methods that help eliminate both minor and deep chips on the hood of a vehicle.
Remedies to get rid of chips on the hood of a car
It is no secret that before purchasing this or that product, you should carefully study the nature of the defects on the hood. Depending on the depth of damage to the paintwork, you can use:
- abrasive or polishing paste;
- special wax tinting pencil;
- masking tape;
- any modern car marker;
- sandpaper.
The motorist must be prepared for anything, which is why he must know how to remove small chips on the hood. You can purchase the above-described products at the car market or at a car dealership. It is worth noting that when choosing a tinting pencil, you must choose an element that has a color identical to the body. The sandpaper purchased should be number 2000.
Types of chips
There are several methods that can help get rid of chips on the hood without painting. Before measures to eliminate all existing defects begin, it is necessary to carefully study the nature of all damage. The car's paintwork may contain:
- shallow chips. Damage of this kind affects exclusively the top layer of paint, while the main paint and primer are not affected;
- cracks and scratches. Damage of this kind damages the hood deeper, and the primer is most often visible underneath;
- deep body defects. Chips, due to which the car loses not only the factory paint, but also the primer, can damage parts so that metal is visible in them;
- neglected damage. This definition refers to chips that were left without proper attention and were “gifted” to the car over time.
Tools for repairing chips
To eliminate defects on the body, special kits are sold in car dealerships. They include primer, paint and varnish, and coating brushes. The kit for repairing chips on the body has a large assortment of colors and allows you to repair almost any defects and scratches.
If you find minor damage to the car body, you should not ignore it. Careful handling of the machine, as well as timely repairs, will keep the paintwork of the machine in good condition for more than 10 years.
Getting rid of shallow chips
If a motorist does not know how to repair cracks and scratches that can be neutralized without painting, he can contact any auto shop. Purchasing a tinting pencil allows you to hide chips formed on the hood and affecting the top layer of paint. You must purchase a tinting pencil according to one condition - its color must match the color scheme of the car itself. In order not to make a mistake in your choice, you should open the hood and read the information contained in the table. If there is no data, you can remove the hatch from the gas tank, which will make the purchase more accurate and correct.
After the chips on the hood are removed (the damaged surface of the car will be treated with a pencil), the improved part of the hood must be covered with a special protective polish. If this is not done, the tinting pencil will not hide scratches and cracks, and the car owner will waste money and time.
Getting rid of deep serious defects
If small parts do not require a scrupulous approach, then with deeper chips everything is much more complicated. In order to get rid of serious damage, you must:
- using special car shampoos. Those areas of the body where there are problems should be treated most thoroughly. Of course, if you have a Karcher, you should not neglect its use;
- allow the car to dry, cleaned of various types of contaminants;
- assess the nature of all existing chips and damage;
- in areas of the hood where the paint has chipped off but the primer remains, apply a special polishing paste. Then you should leave the treated defect for 20 minutes and then polish it using felt. At this stage the rough polishing can be considered completed. The next step is to treat the damage with polish and polish it with felt. This method helps to hide even deep cracks from view;
- in areas with chipped paint and primer, all cracks and gaps must be hidden under a layer of new paint that is identical to the color of the car. After drying, the next layer of abrasive paste should be applied, after which the car should stand for about 20 minutes. All processed defects. The resulting coating should be a thin layer of polish, after which you need to polish again.
How to eliminate deep defects
If after inspection it turns out that the damage exposes the metal base, then such repairs cause the most problems when repairing chips on the hood.
To repair deep cracks yourself, you will need to perform several sequential steps:
- Wash all surfaces using car shampoo, especially carefully scrubbing damaged marks.
- Rinse with clean water.
- Leave the car until completely dry.
- Carefully assess the nature of the damage.
- If deep damage is found down to the metal base, sand it with sandpaper and degrease it.
- Then spread and level with a rubber spatula a small amount of acrylic putty.
- When this layer is dry, apply primer.
- Let it dry and then coat it with paint matched to the shade of the part.
- It is advisable to completely remove marks by applying several layers of paint, and then applying a finishing coat of varnish.
If the cracks have damaged only the paint without affecting the soil, then to eliminate them use a polishing paste for grouting. Then, after 20 minutes, distribute the polish and apply gloss using a felt napkin.
