How to remove an old windshield
Replacing the shield yourself is not difficult, but you will need special tools, chemicals and an assistant.
Before starting work you need:
- purchase a new part;
- prepare all the necessary tools;
- devote at least 5-6 hours to work.
find a clean room with a positive air temperature;
Before going to the store, you need to measure the luggage compartment and understand whether the part will fit in size or not. If loading is not possible, you should arrange a delivery truck in advance.
To dismantle the part, you need to disassemble the decorative trims on the racks, remove the mirror, DVR and additional accessories.
Why replacement is required
You need to re-stick the windshield if you find any defects:
- leak;
- crunching, squeaking when driving;
- the appearance of long cracks or large defects;
- complete destruction of the shield by airbags in an accident.
Replacing and installing auto glass is a responsible and labor-intensive task. You should not start work without reading the instructions and preparing the necessary materials.
Repair or replacement?
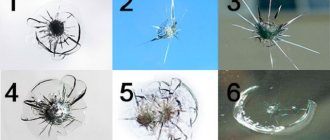
Many car enthusiasts are faced with a situation where they cannot decide to change their glass or repair it. After all, we (motorists) know that cosmetic repairs to a windshield are significantly cheaper than purchasing and replacing a new windshield. But here’s the question: When is it advisable to carry out such repairs and in reality, when is it necessary and necessary to replace the windshield?
As a rule, experts advise carrying out a complete replacement of the windshield if the length of the crack in the glass is greater than the five thousand dollar bill itself (i.e. more than 157 mm). Also, the glass must be completely replaced when the chip diameter is more than 0.5 - 1.0 cm.
It should also be taken into account that a complete replacement of the windshield is also necessary if the damage to the windshield is at the driver’s eye level. It is also noteworthy here that such a replacement should be carried out even in this case, if the size of these chips or cracks is less than the criteria described above.
Tools and materials
To remove the shield from the car struts you will need:
- screwdriver;
- spanners;
- small diameter steel cable;
- suction cups for easy replacement;
- textile.
As an additional safety measure, it is necessary to use fabric gloves with rubber fingers, a respirator and goggles when working. This will help protect your eyes and respiratory organs from small fragments, and gloves will protect your hands and prevent slipping.
Auto glass replacement tool:
- knife for cutting glue from racks;
- degreaser and primer for preparatory work;
- glue gun;
- a high-quality glass gluing kit from a trusted manufacturer, for example 3M;
- Lightning equipment;
- adhesive tape for gluing glass or masking tape;
- sandpaper.
If corrosion is detected on the racks, the area will need to be cleaned, degreased, and painted over with enamel using a sponge or brush.
If left unattended, the source of corrosion will lead to leaks and a loose fit of the shield to the landing pads.
How to replace a windshield
Replacing a car windshield includes the following operations:
- dismantling the interior racks and removing all accessories from the inside of the part;
- removal of plastic frill and cleaner brushes;
- cutting off the adhesive base by machine;
- extrusion of the shield;
- inspection of sites;
- cleaning and degreasing;
- corrosion removal;
- padding;
- applying the composition;
- installing the part in place;
- inserting a rubber seal;
- Reassembly of the interior and purifier system.
Questions about plywood windshield
What glue should I use to re-glue my windshield?
To re-glue glass, you need a special polyurethane adhesive-sealant for gluing car windows, specifically for a car windshield. It is best to buy glue at a good auto store and do not skimp on the purchase. Before purchasing glue, read the description, instructions and check its expiration date. The editorial team of the website vse-sekrety.ru recommends using Liqui Moly glue – Liquifast 1400.
Where to buy everything you need for plywood
You need to buy everything at the auto store. Adhesive, degreaser, primer and swab can be found in a windshield repair kit - all in one package. If you understand all this, then buy separately.
How long should glue dry after gluing glass?
To find out the answer to this question, you need to read the description on the packaging of the glue you used to glue the windshield. Most manufacturers indicate that their glue dries in about three hours, but let’s say this is a very relative indicator.
Based on practice, it is worth noting that in 3 hours the glue simply hardens, after a day it dries and becomes more or less durable, but only after 72 hours does it completely crystallize. That is why after replacing the windshield you need to wait at least a day for it to dry.
When can you move a car after re-gluing the glass?
Many owners, after replacing the glass, already want to drive the car within an hour. In general, after an hour you can only transport the car to another place, for example, from the box or workshop where the glass was glued to another box located nearby, but in general it is very undesirable to move the car. Any movement of the car will cause vibrations on the glass, so you understand that when moving, the glass can move and stick in this position, not to mention if there is a hill or descent on your way, or you drive into a hole. Personally, we recommend, if possible, not to use the car for at least a day after re-gluing the glass.
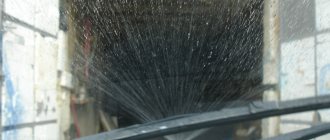
How to check re-glued glass?
Of course, when you have re-glued the glass, its connection must be checked for both strength and tightness. To do this, press a little on the glass from the inside, then go to the wash. It is best to wash your car at a professional car wash that uses high-pressure machines. Watering the glass from a bottle or hose will not be enough; you need to carefully check the seam for poorly sealed areas; the best way to do this is with a high-pressure washer. You need to pour the glass well, about two minutes. It is best to check the seam for leaks with the strut maps removed so you can immediately see where the leak will be. Additionally, run a paper towel around the perimeter of the seam from the inside to make sure it is dry. If the glass does not leak, we put on the pillar cards and other removed interior trim elements, as well as electronics, sensors, etc.
What to do if the glass leaks after replacing / re-gluing?
If the glass was re-glued by craftsmen at a service station, they will solve the problem with the leak: look for where the water is getting into the interior and seal this place. Re-gluing the glass in this case is not advisable unless a defect is discovered during the work (for example: you will not be able to install or eliminate the leak, or water will leak from several places). If you re-glued the windshield yourself, then all of the above needs to be done and decided by you.
This video shows how glass is replaced on a Volkswagen car.
If previously the windows on most cars were essentially removable, now in 99% of cases in order to replace the windshield or rear window, it is necessary to cut it off using a special device. From the factory, these glasses are glued to the body with a special sealant so that everything is sealed and safe.
The only disadvantage of fixing the glass this way is the difficulty of removal. But if you have the necessary tools at hand, the process of cutting glass will not be difficult. So, you need to take care of the list of necessary tools in advance:
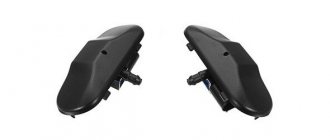
- a special awl for threading the string from the outside in
- string for cutting - preferably square and not braided
- handles for fastening and fixing the string in the hands
The photo above clearly shows an approximate set that can be bought in specialized stores. It is worth noting that the price for such suitcases is about 2,500 rubles, and the procedure for replacing glass at a service station itself is approximately the same amount. That is, having purchased this set once, you can essentially immediately pay for it with the first repair.
How is glass cut?
The cutting procedure is quite simple, but requires care and attention, since glass tends to crack, break off and even crumble into small pieces.
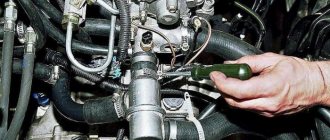
First of all, from the interior side, you need to remove the side pillars near the windshield (if it is the windshield that needs to be cut off). After this, the ceiling also needs to be unscrewed in its front part. Usually it is mounted under the lampshade and under the visor mounts. You need to unscrew them and move the front part of the casing down so that the string does not damage it as a result of work.
After this, from the interior side we thread the string outwards and a special awl with a hole will help us with this. Thus we thread the string, as shown in the photo:
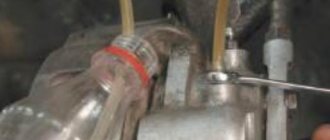
When the string is tucked into the awl, we thread it through the glue at the junction of the glass and the body. The effort required is average, so you shouldn’t think that all this will happen with ease.
When the second end appears outside, you can hook it and thread both ends of the string into special handles. As a result, you can get something like the following picture.
And now the main work remains: carefully cut the glass, working with the string like a saw, pulling it back and forth with a certain force. You should not make such movements too quickly, as the string will heat up and may break.
It is important to keep in mind: under no circumstances attempt to remove the glass until it is completely cut around the perimeter. If there is at least 1 cm of uncut glue left, there is a high probability of damage to the glass.
If my review was useful to you, be sure to subscribe to the channel so as not to miss new interesting articles on similar topics. Like and share with your friends on social networks. Thank you for attention.
Rear window replacement
Replacing a car's rear window is no different from removing and installing a windshield. If the part is equipped with heating, then before removal you should disconnect the contacts and move them to the side.
Installation of the shield requires special care, since the hardened part is very fragile and easily crumbles upon impact or pressure. Before applying the sealant, do not forget about treating with a special primer, which increases adhesion and protects the frames from corrosion.
Replacing side shields
Door windows do not contain the film that is used in windshields for strength and to help glue broken pieces together. Therefore, when performing work, you must be careful and avoid impacts.
- Remove the negative terminal from the battery.
- Remove all visible screws and retaining bolts.
- Carefully pry up the trim and remove it.
- Disconnect the window lift power supply.
- Unscrew the guide rod and move it away.
- Unscrew the 2 bolts directly on the shield.
- Spread the velvets around the entire perimeter.
- Pull out the window.
Many brands of cars are equipped with technological holes through which the latches are visible. In this case, you need to connect the lift chip and lower the window to the desired position. When the guides are unscrewed, you should not slam the car doors, this can damage the structure and deform the rods.
To insert the glass into the frame, you need to bend the velvets and place the part at an acute angle into the door cavity. After this, install it in the grooves and tighten the retaining screws.
Important points
Gluing a windshield with your own hands is a process that needs to be approached with all responsibility and where it is important not only to strictly follow the instructions, but also to choose a high-quality part.
It is almost impossible to glue glass that is deformed at the factory. In this case, it is better to supply another part and return the defective one to the supplier. The original windows are inserted tightly without forming large gaps. However, the cost of the original often exceeds 90,000 rubles and is inaccessible to the average driver.
The result of replacing car glass in a garage is no different from the work of professionals, if there were no gross violations of technology in the process.
Drivers often make mistakes:
- do not follow recommendations for applying sealant;
- they do not get rid of old adhesive well;
- ignore the restrictions specified in the instructions;
- turn on the music after pasting and wait for the composition to harden;
- They begin to actively drive after replacement, not allowing the glue to set.
Severe violations negatively affect the crystallization of the glue, which dries completely only after a day. In this case, as a rule, the result is not the best, and you won’t have to wait long for rust, leaks, or squeaks to appear.
If there is room for replacement, but there is no assistant or any tools, then you can order the installation of auto glass with qualified employees on site. Professionals will check the correctness of the preparatory work and indicate where to change the rubber band or add primer.
When to replace your windshield.
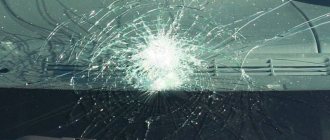
Every time you and I get behind the wheel of a car, the windshield contemplates and looms before our eyes. As long as the glass is new and does not have various chips, cracks and abrasions, nothing threatens our visible view. But over time, as soon as small chips and various cracks appear on the glass, we begin to think about replacing the windshield. But unfortunately, most of us often delay such a replacement and all because of the reluctance to spend extra money on glass or when we personally believe that the time for replacement has not yet come. So, when is it necessary to change the windshield on a car? Or does it still make sense to repair the old glass instead and save money on it? Dear reader, you can find answers to these and other questions in our review today (in the article).
Any damage or chips on the windshield can lead to poor visibility and visibility, as well as serious eye strain, which jeopardizes the driver's safety on the road. Therefore, we must remember that when the time comes to replace or repair the windshield, there is no need to put it off until better times. Damage to the windshield differs in its extent from damage to the side windows (as well as to the rear window). The point here is this. Most cars are equipped with side and rear windows made of tempered glass, because of this, if the side or rear windows are damaged, they break into small pieces, unlike the same windshield, on which chips and cracks appear when such damage occurs. This was done just so that the driver would not be injured in the car while driving if a stone or something similar suddenly gets into the glass.
Replacing car glass
The procedure for replacing car windows most often involves replacing the windshield or rear window, since side windows have to be replaced much less frequently (unless hooligans broke it) and the procedure does not require special tools and materials. Therefore, in our case, we will analyze the process of replacing the front glass on a car.
The process of replacing a windshield on a car.
Replacing front windows is much more difficult than it might seem at first glance, and only professionals undertake such work. Not only because certain materials and tools are needed, but also because your life depends on the correct installation of glass. The windshield is an important part of protecting a modern car in an emergency, as it represents an essential element of the strength of the body structure. It determines how deformation will occur in case of an accident. In a head-on collision or rollover, the strength of the glass is vital to stabilizing the vehicle's body. That is why car glass replacement must be carried out in compliance with all installation standards and technologies.
If you do not doubt your abilities and are confident that replacing glass will be possible, then read on to find out what set of tools and materials you will need to replace glass on a car, as well as understand the sequence of preparation and the glass installation itself.
How to choose a windshield for a car
The harsh Russian climate and difficult road situations make replacing car windshields every few years an inevitable ritual. This can be caused by both road accidents and careless driving, and accidentally falling cobblestones. Even the most careful driver will sooner or later face this need. With constant contact with the wipers, streaks and “wiping” of the surface will form. And even small particles, such as grains of sand, can leave barely noticeable scratches on the windshield of a car.
At first glance, replacing an old product with a new one does not seem such a difficult task. It is enough to select the desired model from a specific manufacturer on one of the Internet sites. In addition, any car repair service offers a replacement service. But it is worth paying attention to a few points. Glass intended for the front and rear openings must be firmly attached to the base of the body, thereby serving as a strength element during the use of the car. The replacement procedure requires appropriate experience, time and money. The characteristics of the purchased product depend both on the use of high-quality materials in production and on following all the rules during production. Before purchasing a product that does not inspire confidence, remember that a replacement will cost you the same amount, but such glass is unlikely to last too long.
If your budget allows, then give preference to the original product. If you want to save a little, choose the products of companies produced for the assembly line. Well, if you have very minimal funds to purchase, then choose a windshield, following the recommendations described below.
Nowadays, the highest quality windshields are produced using the triplex system, as evidenced by the WL designation on the product. A hardened product marked T is much less common on the automotive market; experts advise against installing such a specimen on a car.
Counterfeits and low-quality windshields can be easily identified by missing markings in the corner part of the product. It is important to check the date of production, manufacturer and homologation mark confirming the registered trademark. It is strongly not recommended to purchase tempered glass, as its low quality indicators affect the safety of passengers. A stone caught in a window can easily break it, or the window will soon cease to be transparent, which is very dangerous in conditions of heavy traffic congestion and can lead to an accident.
A high-quality car windshield must meet strictly established requirements, have no dents or chips, and the edge of the product must be clear and even. When purchasing, pay attention to the size; it may differ from the declared one by a maximum of 5 mm. On a windshield of poor quality, as a rule, there is no silk-screen printing or its appearance is greatly changed: the stripes are replaced with red, blue or green. You will never see this with large companies.
One of the secondary proofs of a good triplex is its thickness. Resistance to loads directly depends on this indicator; a thick product is much more difficult to break through. Such an instance can serve much longer than usual without losing its basic properties and will provide a high level of noise insulation. When choosing, keep in mind that the thickness must be equal at every point on the surface!
In a high-quality product, the glass edges are perfectly aligned, the edges are rounded, and the adhesive layer should not be visible.
Examining a windshield for distortion is very simple: point the light at a slightly tilted product and look closely at the screen located behind the glass. When dark lines appear, it is easy to identify all defects.
Reliable companies producing auto glass have the appropriate certificates and product warranties. The holographic label clearly states the manufacturer's data, batch parameters and data on compliance with quality standards.
Among the wide variety of products you can find windshields of Chinese origin. Experts do not recommend purchasing such specimens due to their small thickness and chemical composition, which differs from the standard one. This inevitably leads to the rapid appearance of marks from the wipers and other external influences.
The high price of triplex from leading brands is fully justified by the high quality of all materials. The final cost is also affected by the place of production.
In conclusion, we’ll tell you about an interesting nuance that motorists, out of ignorance, often ignore. On a car that is subject to repair under MTPL or CASCO insurance, the original windshield with the specified catalog number and factory markings on the surface must be installed as a replacement. Often, wanting to save money, services take advantage of the fact that car owners do not know this rule, and install low-quality, cheaper glass analogues, and pocket the difference in cost. At the same time, the cost of the vehicle is automatically reduced: by 5% according to the “Methodological Guide for Experts”. If replacement is necessary, such an analog windshield will be considered a duplicate and will be replaced with an equivalent one.
We recommend
“How they deceive you at a car service center and what you can do to protect yourself” Read more
Tools and materials
Before you start replacing glass, you need to collect all the necessary tools and materials for cutting out the old glass and installing (gluing in) new glass.
- A string for cutting glass and a knife for cleaning the landing site from glue residues;
- Special adhesive-sealant for gluing glass on cars;
- Mounting gun with which glue will be applied;
- Activator-cleaner and primer-primer , to prepare the area before applying glue;
- Masking or regular tape to secure the glass until the glue dries completely.
Windshield replacement procedure
We will analyze the correct technology for replacing glass on a car, as is done in workshops, and then it’s up to you to decide whether to change it yourself or leave it in the hands of a specialist.
Glass dismantling
- The first step is to gain access to cut out the old glass (remove the wipers, moldings and rubber seal).
- If possible, cover areas of the interior trim with masking tape or dismantle individual trim elements in order to protect them from damage and contamination by glue. Also disconnect the wires if any (for example, rain sensor or heated parking wipers).
- Thread a string for cutting glass and, together with an assistant, carefully cut the glass.
- To remove old glass, it is recommended to use special suction cups, which can be used to easily dismantle it.
Basic steps when replacing glass on a car. Installation and dismantling of glass; removing old glue from the opening on the car body; preparing glass and applying glue.
Preparation and installation of a new stele on a car
- After cutting the glass, to completely remove the old glue, you need to go through it with a knife. remove any remaining sealant as carefully as possible so as not to damage the paintwork or damage the plastic upholstery.
- We degrease the glass installation area around the perimeter.
- We apply the activator to the surface of the new glass along the perimeter at the place where the glue is applied (apply with a clean, lint-free cloth in one motion, without rubbing). Then, after a minute, remove the remaining activator with a dry cloth using the same method.
- The next step in preparing glass for gluing is to apply a primer in the place where the glass adhesive-sealant will be applied, as well as on the edges of the glass. This is done to protect the glue from UV rays, since standard silk-screen printing may not cope with such protection well enough. The soil should dry for 15 minutes at a temperature of +23 degrees.
- Turn the glass over to install the suction cups so that after applying the sealant it is convenient to install it on the car.
- To improve adhesion and to avoid corrosion on the edges of the body where the glass is installed, experts also recommend treating it with a primer.
- If the installation of glass also involves the presence of a rubber molding that is still in good condition, then before applying glue to the glass, clean it from dirt and dust, and after degreasing, install it in place and secure it with tape so that the glue does not squeeze the seal out during installation.
- Having turned the glass back over, we install the glue can into a special gun and apply glue-sealant to the prepared surface of the glass without breaks and with a uniform ridge height (some craftsmen apply glue not to the glass, but to the body at the installation site).
- Holding the suction cup handles, we install the glass into the opening . The insertion is carried out as carefully as possible; the process must occur without shocks or displacements while simultaneously controlling the placement of the rubber molding.
- Using light pressure, press the glass along the entire perimeter of the car opening. Then secure it with safety tape. If the sealant has come out in some places, do not rush to remove it, you need to wait for polymerization. Before installing the glass, it is recommended to lower the side windows to avoid air impact when closing the door. Now all that remains is to wait 7-10 hours until the glue dries . During this period, it is prohibited to slam the door or touch the glass. Create all the conditions for proper drying of the sealant specified in the instructions for it. At this point, replacing the glass on the car is considered complete; all that remains is to remove the tape and check the quality of the work done by spilling plenty of water.
When a chip or crack in the glass cannot be repaired, it is then that the glass on your car needs to be replaced. And although the whole process does not look very difficult, failure to follow all the rules and technologies when gluing in new glass can result in, at a minimum, falling out on the first bump or behind a hot interior after rain, not to mention the situation in the event of an accident.
How to remove the windshield yourself. Adviсe.
We all know such situations in the life of our cars, in which you can often see a lot of glass fragments. The worst thing about all this is that many car enthusiasts neglect such an affordable and reliable means as correct window cutting. We will talk not only about the front glass, this will also affect the rear windows, let's take a look and reveal the secret of dismantling the glass. As we know, all modern glass samples are glued with a special glue, this is silicone. As car enthusiasts, we often neglect one available tool that makes the job easier when dismantling old glass. People who use this product make good money from reinstalling car windows, this is their right. You and I will take a different path, a path that will save us from problems with unnecessary costs. The tool and secret used by specialists in the field of glass reinstallation is called a simple copper string. Many of us have had to deal with broken glass in our lives, and the fact that after removal we scatter a lot of fragments, which are a huge problem for the interior. In order to avoid additional work on cleaning the interior from all kinds of residues, glass, which must be said is very difficult to remove, even with a vacuum cleaner, we will continue the conversation about how to properly remove car glass. So, if you are faced with a situation in which the car glass is broken into pieces, or is jammed by the car body, remaining intact and needs to be carefully removed, then the following recommendations are for you: To properly remove the glass and then install a new one, take one , copper string. Look carefully so that the string is braided; on a guitar it will be called 3, 4 or 5, this is the size. The braid will serve us for the powerful process of cutting the silicone structure. All glass, and especially that of foreign cars, sits on silicone, so we take an awl and carefully make a hole in one of the convenient corner parts of the glass seat. Then we’ll run a string there, and we need to add that two people should work on these, that is, when dismantling or installing glass, at least two people are needed. On the one hand, we pull towards ourselves and pull the edge of the string in the desired direction for cutting the silicone on which the glass is glued. We do it in the same way on the other side of the glass, therefore the person who will do this must be inside the car. Then, when you have gone through the entire area of the glass seat in this way and cut the silicone, small steps of silicone will remain at the cutting site; there is no need to remove them. This residual silicone will be of great help to you in firmly adhering to the new glass that you will be installing. Further, since we have not read the instructions on the technique of working with the string, I can assure you that this process is quite easy, just keep the string wrapped in a mitten. If someone tells you that you shouldn’t mess with this, that it’s better to trust the specialists, I’ll tell you openly, from my own experience I know that you will do it no worse than them, or even better, this is just a bluff with which they are trying to knock you off. to no avail. So, in fact, we have analyzed the entire process of installing a windshield or rear window, this does not matter much, since the installation is the same, and then you can freely apply this theoretical material in practice. Use the practical story of this article in practice, because it was worked out personally by me and my friend in one of the everyday situations with a personal car. And in conclusion, I would like to add that this method is simply irreplaceable; when we first had to face this problematic situation of dismantling glass, we did not know what to do. Only from our own experience, and with a little advice from specialists, who, by the way, still didn’t believe us, that together with a friend, we removed the windshield for the first time in our lives, we were able to calmly and simply dismantle it. And the gluing process is even simpler, you will need silicone glue in a special gun for these purposes, and degrease the surfaces of the glass edges and the edges of the body, the glass easily hardens within 24 hours, and your car is transformed before your eyes.