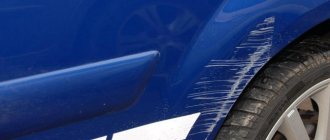
Minor scratches and chips on the car body are the most serious and common types of damage. Small branches, contact with small pebbles and other objects - all this will certainly leave typos, making the owner quite nervous and wondering how to remove scratches on a car with minimal time and money at home. You can pay a visit to the service. Another option is to carry out the work yourself.
How to paint over a scratch on a car
Removing an average scratch on the surface of a car body is carried out in several stages. The first step is always to thoroughly clean and degrease the surface. The second phase may be resurfacing the area surrounding the furrow. This is an optional part of the work, as it is required only in serious cases when the scratch is deep.
A mandatory point is tinting, that is, selecting a paint that completely matches the factory enamel of your “iron horse”. After this, the actual scratch area is painted over. The final stage, as a rule, is the opening of the paint with automotive varnish and subsequent polishing of the top layer with an abrasive compound. However, alternative ways to eliminate paintwork damage are possible; they will be discussed below.
Video instructions for getting rid of scratches
Eliminating small chips
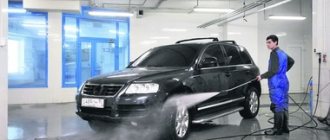
Proper use of polish can prevent scratches on your car body. If you need to remove only a few stripes that spoil the appearance of the part, this method is the most convenient. You will need a non-abrasive polish. Eliminate the defect as follows:
- Wash away dirt from the damaged area.
- Degrease the working area.
- Cover the corners that you do not want to touch with tape, leaving this problem area to make it more convenient to work.
- Spread a little of the substance over the scratches and, using a terry cloth, begin polishing in a circular motion.
- You can apply several layers of the composition until a satisfactory effect is obtained.
This way you can get rid of small and shallow chips. Scratches on the car will disappear when everything is done correctly.
If there is no effect, you must stop processing and choose another remedy.
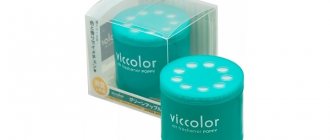
An alternative could be a special anti-scratch pencil.
This product is effective for small and medium-sized defects, but the coating will have to be renewed every few months - keep this in mind.
You can remove scratches on a car body using a pencil as follows:
- Prepare the defective area, degrease and clean it of dirt.
- The pencil should be the same shade as the paint on your car.
- Using smooth movements, cover the scratch with a pencil and wait for it to dry.
- If a little of the substance gets on an undamaged area, the shade will change slightly, so be prepared for such consequences.
- Sand the area with a rubber sponge or fine-grit sandpaper.
- Polish is applied over the rubbed area, and, as in the previous example, work is carried out until shine is achieved.
- The procedure can be performed several times until the desired effect is achieved.
Price issue
The cost of the materials needed for repair depends not so much on the size of the scratch, but on its depth. Accordingly, the deeper the damage goes into the paint layer, the more serious arsenal will be required for restoration work.
On average, financially, removing a scratch costs from 300 to 1000 rubles. At the same time, the “branding” of the compositions used and the goals pursued (pre-sale preparation, temporary measure until the body is repainted, or complete removal of the scratch) are of great importance. But this does not include the cost of the work itself. Accordingly, at the service station everything will result in more impressive figures.
Restoration: preparation and stages
Before you take on restoration work and mask minor problems, you need to have information about the layers of the car’s surface. Let's look at how the coverages follow each other:
- varnish;
- enamel - base;
- primer;
- phosphate layer;
- sheet of steel.
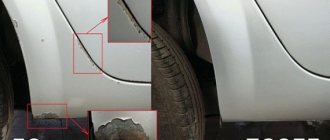
Due to such an extensive structure of the coating, all damage is also classified - abrasions in the upper part, damage to the ground level (anti-corrosion treatment will be required) and the formation of deep scratches and chips. If there is damage in only 30% or less of the part area, only the local area of the defect is processed. If your car is in trouble, then using the above methods on how to paint over a scratch on a car, you can mask the defects at no additional cost.
What to seal: popular options
The base material for filling the scratch cavity is automotive enamel of the appropriate shade plus varnish for finishing the damaged area and reliable protection for the future. But you can choose endlessly among alternative compositions. In this segment there are many competing products that appeal to the buyer with their ease of use and minimal price.
True, you need to be careful here, since you can run into an ineffective product, essentially intended only for very minor abrasions. First of all, this applies to colorless one-part products that are quickly washed off from the paintwork surface and can only temporarily mask a scratch on metallic paint. It is necessary to clearly understand that miracles do not happen, and each time weigh the credibility of the advertisement, taking the time to read reviews on independent resources.
Local application products
These include specific pencils, gel or wax correctors. In the automotive market, such compositions are presented in several colors. For example, wax pencils help to paint over a scratch on a car, and then using a napkin you can wipe away excess wax residue. This method has a number of advantages:
- low cost of use;
- high processing speed;
- simplicity of the work process.
But there are also disadvantages, namely the fragility of the result, so the procedure needs to be repeated frequently. The corrector is similar in appearance to a felt-tip pen filled with acrylic paint. It helps fill the scratch with its own composition and forms a new, invisible layer after hardening.
Removing minor damage with a special pencil
There are a great variety of universal products that look like a regular marker in the category of inexpensive products for removing body damage. This is due to the high popularity of such a simple and cheap way to solve the problem.
But in practice, everything turns out to be not as beautiful as the advertising brochure or video presentation says. According to the instructions, all the contractor needs to do is degrease the contact area and apply a restoring layer of the product coming from the pencil core along the entire length of the scratch. After this, just wait a couple of hours and wipe the area with a napkin.
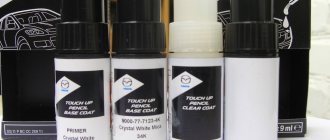
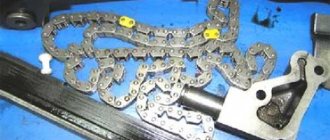
With the help of a repair kit you can do everything yourself
The repair kit includes a pencil, varnish, a special spray with an applicator for subsequent abrasive treatment and a local polishing agent
More “advanced” technologies involve the use of a whole complex of compositions, which, in addition to the above pencil, also includes varnish, a special spray with an applicator for subsequent abrasive treatment, and a local polishing agent using a microfiber cloth.
In this case, the basic means for repairing the damaged area is paint that completely matches the factory color with which the body being repaired is painted. Instead of a pencil format with a ball-point core, a bottle with a brush can be used, but the essence of the procedure does not change. The cost of such kits will be higher, but the result of efforts to eliminate minor damage can be comparable to professional work.
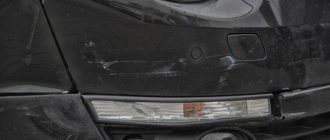
How to remove deep scratches
It is important to realize that all of the above methods are relevant only for eliminating surface scratches, which at most deepen to the level of the base enamel and certainly do not spoil the primer layer. But more and more serious violations of the paintwork structure should be corrected only with an integrated approach.
Here is a list of tools and resources that will be required to complete the work:
- sandpaper P150, P240, P320 and P600;
- sanding block;
- putty knife;
- acrylic automotive putty;
- priming;
- car paint;
- car varnish.
Do-it-yourself step-by-step removal of a serious scratch
The process begins by grinding the damaged area down to the metal itself or the level at which the depth of the scratch ends. This means that the end result should not be a worn groove, but a smooth, uniform surface. A flat-sided block of sandpaper can help with this. For initial sanding, use P150 sandpaper. All paint around the damaged area must be sanded with a finer fraction - P240. Then the prepared area is cleaned, degreased, after which a layer or several thin layers of acrylic-based putty are applied.
After complete drying, priming is done with P320 sandpaper. Before applying the primer layer, you need to sand the entire surface of the part with P600 sandpaper. When the primer layer has dried, it must also be sanded (remove shagreen) until it is glossy using P600 paper soaked in plain water.
The final stage is painting and applying a varnish layer. This is the most expensive and time-consuming way to eliminate defects, but this is the only way to really achieve maximum quality. In addition, repainting an entire body part is sometimes much easier than making an imperceptible transition between old and new paint.
The actual painting stage
The paint must be matched exactly to the color of the car body. It must be applied in two or three layers. Each layer must dry before applying the next one. Before painting, you can apply an antistatic agent to the surface to be painted. This will prevent it from attracting dust and lint that could ruin the entire job.
After the paint has dried, a layer of varnish is applied. It needs to be given time to dry, and only then can you remove the polyethylene with masking tape. If you do this too early, debris may fall onto the varnish.
It is also useful to read: How to paint a plastic bumper with a stain (without transition)?
Painting and removing scratches is not a very difficult procedure. But when performing these works, accuracy and patience are required. You also need a room with minimal dust.
The primer and paint should be from the same company. And since painting car scratches takes place indoors, you need to purchase a mask or respirator, as well as gloves to protect your hands.
For very small scratches, provided that no corrosion has appeared underneath, you can use special markers. They are filled with automotive paint and allow a thin layer of paint to be applied directly to scratches. At the end of the work, it is advisable to polish the body to hide the places where the old paintwork transitions to the new one.
Determining the color correctly
Proper tinting is the key to ensuring that money is not wasted
Proper tinting is one of the most important points, because paint is usually the main cost item when repairing damage to the paintwork. Purchasing an unsuitable shade will entail either a waste of money with the need for subsequent reworking of the work results, or the obvious unaestheticness of the restored body area.
By the way, even the color black can have a dozen different varieties. You can find out what you need to buy by the color number - it is on the plate, not far from the VIN code. As a last resort, if there is no code either on the plate or in the service book, you can remove the painted part from the car (usually the gas tank flap cover) and check the company’s catalog of color options on the spot.
Spray for medium damage
Another good scratch remover is spray paint. In stores on the shelf you can find special body paint that eliminates defects. She will be needed. Repair scratches as follows:
- Degrease and clean the defective area.
- To ensure that the paint is applied only to a specific point or area, make a stencil. It is enough to take rough paper and cut a hole in it of the appropriate size. This way you will not splatter paint on other areas of the body.
- The stencil should be kept at a short distance from the work area.
- Start spraying the composition. Do not spray too much, otherwise the paint will form unsightly streaks.
- Let it dry.
- We arm ourselves with sandpaper and clean the surface until the level of the painted area is equal to the original paintwork of the car.
- It may be necessary to carry out the entire procedure again, since it is extremely difficult to level deep chips in one go. Re-painting should be done only after 24 hours.
- Polish the surface.
Is it possible to simply polish out a scratch?
There is a lot of controversy regarding the effectiveness of polishing as a scratch remover. Many will say that the result will last until the first wash. But that's not true. To correct minor damage to the body that does not go deeper than the varnish layer, a special so-called abrasive or restorative polishing is provided. This procedure involves the use of abrasive pastes, which remove the top layer of paintwork several microns thick. Of course, you can’t do this without a grinding machine.
As a result, chips, abrasions and small scratches are leveled out, and the surface becomes perfectly smooth. After this, the top layer is restored using a different composition. The end result is an absolutely smooth and glossy finish, as if the car had just rolled off the assembly line.
Carrying out cosmetic polishing
By carrying out this procedure, you can independently get rid of defects that arise from contact with branches and stones. Proper execution of the work will provide, in addition to eliminating noticeable damage, protection from rust.
Types of polishing
It is classified based on the functions it performs and the tasks it solves. The process can be of any nature:
- Abrasive polishing is aimed at carrying out restoration work and provides a beautiful appearance. Based on the size of the abrasive elements, there are several categories of polishes designed to smooth out the upper layers of damage and remove scratches. Abuse of recommendations is fraught with damage to the body, because along with chips, the protective layer is also neutralized. There are several stages in carrying out such work.
- Protective polishing involves the use of waxes and mastics, which create a film in the body area, allowing you to repair a scratch on the car. The principle of the procedure is based on the same principles as the previous type of operation.
Technology
You can do the work yourself or using a machine. If you don’t have a machine in the garage, you can use a napkin.
- Sanding is carried out using circular movements on the damaged area, and it is important to ensure that the paste does not dry out, since the composition can easily damage the coating.
- After sanding, the result is secured with mastic or wax.
The polishing process is relevant for severe scratches; if you need to get rid of smaller damage, you can do it yourself using special tools.