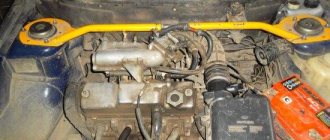
A fuel injector is an electromagnetic valve with a small hole that opens at the command of the electronic control unit for a certain time. Through this hole, the fuel required to form the fuel-air mixture is supplied under high pressure.
The following signs usually indicate problems with injectors:
- the engine is difficult to start;
- the engine is unstable;
- the power unit is troit;
- dips and loss of power are noticeable;
- revolutions float;
- increased fuel consumption;
In such a situation, the injection nozzles must be cleaned or replaced regularly. At the same time, you can check, clean or replace injectors 2114-2115 on a VAZ yourself. Read more in our article.
Why does the VAZ-2107 twitch - let’s understand the operation of the “distributor”
Well, if the engine of your VAZ-2107 suddenly stalls and does not start, we will find the reason and eliminate it quickly. Everyone knows that this happens if the “spark” disappears or there is no gasoline supplied at all. It’s much worse when the car seems to be moving, but the nerves are fraying - uneven idling, jerking and twitching when driving. Finding the root of the problem can take a lot of time and take a lot of money out of your pocket. And more often than not, these searches ultimately lead to a distributor. This material will help you correctly replace it with a working one, select a suitable replacement, and understand the device and operation. Before delving into the “electrics”, it must be said that the reason for the “jerking” of the VAZ-2107 and other “classic” VAZ models may be an unsuccessful combination of the clutch driven disc damper and the elastic coupling of the driveshaft. Spare parts are supplied with parts whose characteristics may differ greatly from the factory ones, therefore, if the “jerking” intensifies after replacing the clutch or “soft connection”, you need to look for the cause there. Try installing a unit from another manufacturer - its characteristics will be different, the resonance in the transmission will disappear and the “jerking” will stop.
Flushing fluids
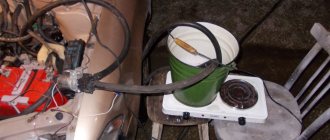
The cheapest and easiest way to clean the injector from impurities is to purchase a special flushing fluid, which is sold in every car dealership. Their cost varies from 80 to 250 rubles. This method is undoubtedly the cheapest, because you do everything, but many experts still recommend abandoning it, since in addition to the notorious dirt, they also corrode all deposits inside the gas line and gas tank.
This leads to the fact that all this dirt, after dissolving, turns into flakes and begins to travel along all fuel lines.
You'll be lucky if it all ends up on the filters, but it could be worse. Subsequently, such a trip requires repairing the electric pump, and sometimes the injectors themselves. The cost of this procedure can reach $350. Agree, this is not the most profitable savings.
Let's look at a practical example:
What signs indicate a malfunction of the VAZ car distributor?
1. The engine does not start: - there is no gap or too large a gap between the breaker contacts; -burnt and dirty contacts; - the capacitor has failed; - the noise suppression resistance of the “slider” has burned out; - the distributor cover is “broken”; - the low voltage wire is broken or its terminals are oxidized; -Hall sensor burnt out (non-contact ignition). 2. The engine “shakes” at idle: - the gap between the contacts is not normal; - ignition too early. 3. The engine “jerks” at high speeds: - the gap between the breaker contacts is too large; - the spring of the movable contact of the breaker has weakened; - the springs of the centrifugal regulator have weakened. 4. “Jerking”, interruptions in all engine modes: -damage to high voltage wires, oxidized or loose in the sockets; -dirty, oily, burnt breaker contacts; - the corner of the moving contact in the distributor cover is worn out or broken; -cracks and burnouts of the “runner” and the distributor cover; - the capacitor is “half broken” and needs to be replaced; - the bushings are worn out and the distributor shaft is “playing”; - the contactless ignition system switch is faulty. 5. The car accelerates slowly, consumes a lot of fuel: -the ignition timing is incorrectly set. Note! Signs of a malfunction of the VAZ-2107 distributor are very easily confused with manifestations of malfunctions in the power system . Therefore, never start disassembling the distributor and carburetor with the fuel pump at the same time!
Distributor function in the ignition system of a carburetor car
The full name of this device “ignition switch-distributor” reveals part of its “responsibilities” - at a strictly defined time to break the low-voltage circuit of the ignition coil and distribute the resulting high-voltage energy, in a given order (1-3-4-2), among the cylinders . It is also “responsible” for changing the ignition timing depending on the speed of the engine crankshaft (crankshaft) using a centrifugal regulator and “correcting” this angle depending on the load on the engine using a vacuum corrector.
Carburetor engine
In a VAZ 2107 car, the operation diagram of a carburetor engine is as follows:
- When you turn the key, the electrical network supplies power to the starter.
- When the starter is cranked, a discharge begins to flow to the ignition coil. The coil forms low-voltage pulses into high-voltage voltage, which is supplied to the switchgear.
- The switchgear drive rotates the engine crankshaft. The engine starts (author of the video channel Homa526).
Classic ignition
The classic ignition system consists of the following components:
- lock,
- coil,
- distributor or distributor (breaker),
- candles,
- high voltage cables that transmit charge.
Electronic ignition
In some models, the VAZ 2107 circuit includes contactless ignition. The fundamental difference between such a system is the use of an electronic switch, which was installed between the breaker and the coil.
The contactless system consists of:
- switching device
- castle,
- coils,
- distribution center,
- spark plugs and high-voltage cables.
Photo gallery “Classical and electronic circuits”
1. Classic scheme
2. Electronic ignition circuit
Which distributor is suitable for the VAZ-2107
On all carburetor rear-wheel drive VAZ cars, the device has almost identical components and a similar operating principle. Distributors for engines with a volume of 1200-1300 cc differ in that: - the drive rod is 7 mm shorter; — no vacuum ignition timing regulator; — the settings of the weights and springs of the centrifugal regulator are different. For engines with a volume of 1500-1600 cc, all distributors are suitable in terms of mounting dimensions and characteristics. Only “Nivovskie” ones differ. They are tuned for stable traction at low speeds and the VAZ-2107 with such a distributor will accelerate slowly. The brands of “Nivovsky” distributors are: 3810.3706, 038.3706-10. And distributors of brands 0.3706 (contact) and 38.3706 (non-contact) are suitable for the “Seven” and other classic cars.
Additional designations
The fuses of the VAZ 2107 car are located as follows:
- taillights and reversing lights;
- electric motor of the heater fan, headlight washer and glass wiper pumps;
- indicator for turning on the rear window heater VAZ 2107;
- direction indicators and hazard warning relays;
- fog lights;
- tachometer, voltmeter;
- control lamps for oil pressure, fluid, fuel level and reserve indicators on the instrument panel, instrument panel lighting;
- cigarette lighter and clock;
- VAZ sound signal;
- interior lighting (up to 2000 there was one lamp on the ceiling, for those manufactured after 2000 there were two lamps on the rear door pillars);
- high beam headlights;
- high beam warning lamp;
- engine compartment lighting and license plate lighting;
- glove compartment lighting;
- right headlight;
- left headlight.
A detailed wiring diagram of the VAZ 2107 will help you understand the intricacy of electrical wiring elements, find the air cover switch or the windshield and headlight wiper relay.
The main components of the distributor and a description of its operation
VAZ classic distributor device
Device
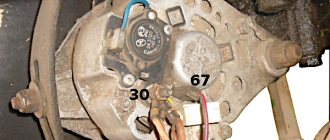
The distributor is assembled in a housing. Inside it, a contact group is mounted on a bearing: moving and fixed contacts or a Hall sensor (for contactless ignition). To correct the advance angle, the vacuum regulator can rotate the contact group at a small angle relative to the housing. The capacitor is attached to the bottom of the case with screws. A drive roller is mounted on bushings in the center of the body. Its bottom has splines with which it engages with the drive gear. In the upper part of the roller there are contact drive cams (for contact ignition) or a steel cup with four slots - a screen (for contactless ignition). At the very top, on a steel platform, two weights and two springs of the centrifugal ignition regulator are installed. A plastic housing with a moving contact and noise suppression resistance of the high voltage distributor (slider) is screwed onto the top with two screws. The entire structure is closed with a lid on two spring latches. The body and cover have a tongue and groove so that they fit together in only one position. The cover contains contact terminals for high voltage wires from the spark plugs and from the ignition coil. The distributor is secured to the engine block using a stud, nut and pressure washer. To adjust the ignition timing, the housing can be rotated relative to the block.
Job
The distributor is connected through the drive to the engine crankshaft and rotates with it. For two full revolutions of the crankshaft, the distributor shaft makes one revolution. This is due to the fact that our engine is four-stroke. When installing the distributor in place, the roller is oriented in strict accordance with the operating order of the engine. This is done so that the contacts open and the spark jumps on the spark plug when the piston of each cylinder, compressing the combustible mixture, does not reach top dead center (TDC) by a few millimeters. This is called ignition advance. When the number of revolutions increases, the distance must be increased, and when it decreases, it must be decreased, which is what the centrifugal regulator does. Its weights, under the influence of centrifugal force, which is greater the higher the engine speed, diverge to the sides and move the cams relative to the roller, making ignition “earlier.” When the engine speed decreases, the springs return the weights to their place and the ignition becomes “later”. This is necessary to increase engine power and efficiency. In addition to the centrifugal one, a vacuum ignition timing regulator is also installed on the distributor. Its function is to fire “earlier” at low throttle opening angles and “later” at sharp throttle opening angles. At idle and at full throttle, the vacuum seal does not work. The regulators are adjusted only at the stands, so there is no need to change the settings yourself.
The process of dismantling and disassembling the transmission
Disassembly and reassembly of the gearbox if any malfunction is detected should be performed in the following sequence:
- de-energize the system by removing the negative contact from the battery;
- dismantle the radio panel;
- slightly move the locking sleeve down and remove it from the rod cavity;
- with a sharp movement we pull the rod out of the gear shift lever;
- remove the upper and lower bushings from the lever;
- dismantle the gearbox cover, which is fixed with four screws;
- remove the cover that protects the handbrake from dirt, and then unscrew all the fasteners located on the floor of the car;
- dismantle the hoses through which warm air is supplied to the air filter;
- move the starter forward a little, then unscrew the gearbox housing plug and drain the transmission oil;
- dismantle the muffler and disconnect the universal joint, the reverse switch and the speedometer cable, which connects the part to the gearbox;
- disassemble the clutch housing cover and the cardan drive;
- disconnect the last fastenings of the gearbox, move it back a little and remove it out.
Removal and installation of distributor VAZ-2107, 2104, 2105, 2106
Preparation
Before installing a new VAZ-2107 distributor for a contact ignition system, you need to adjust the gap between the contacts of the breaker. It is more convenient to do this with the device removed from the car. We check the gap with a flat feeler gauge. The value is set from 0.35 to 0.45 mm. In this case, the protrusion of the cam should move the moving contact away from the stationary contact as much as possible. We adjust by slightly loosening the screws, and then tighten them more firmly and check the gap again. Contacts that have worked hard may have a protrusion on one and a depression on the other, which interferes with adjustment. You can get around this problem by grinding off the protrusion with a needle file. It is better not to use sandpaper, because... small particles of abrasive will definitely “eat” into the surface and interfere with the operation of the contacts.
Checking the ignition timing of the VAZ-2107 engine
The methods described below make it possible to independently adjust the ignition timing. They are suitable equally well for both contact and non-contact distributors. We adjust the ignition timing at idle speed . We warm up the engine to operating temperature, at idle speed, turning the body relative to the block, “catch” the position in which the speed will be the highest. We fix the distributor in this position. We check the correct setting of the ignition timing “on the fly”. Having looked at a free section of a flat road, we drive out onto it. We keep the speed at 40 km/h in fourth gear and sharply press the gas pedal. a loud metallic knock should be heard under the hood, disappearing by itself after a few (four to six) seconds. Is everything exactly like this for you? This means the adjustment is complete. If the knocking does not go away for a long time, we stop, loosen the distributor and turn the distributor clockwise a couple of millimeters, making the ignition later. We start the engine again, accelerate, and repeat the test. If there is no knocking at all, then the distributor needs to be turned counterclockwise, setting the ignition “early” and checked again while driving. After doing these steps several times, you get the optimal ignition timing specifically for your VAZ engine. Still have questions? Watch this video
Ignition faults VAZ-2107
In the article we will consider possible malfunctions associated with the car’s ignition system and methods of elimination.
Cause of malfunction (Remedy)
Engine won't start
Current does not pass through the breaker contacts:
— the contacts of the breaker are dirty, oxidized or burnt; increased gap between contacts;
clean the contacts and adjust the gap between them
— the fastenings are loose or the tips of the wires in the low voltage circuit are oxidized, there is a break in the wires or they are shorted to ground;
check the wires and their connections; replace damaged wires;
— the switch is faulty (contacts “30/1” and '15 do not close”) or the ignition relay;
check and replace the faulty contact part of the ignition switch or ignition relay;
— break in the primary winding of the ignition coil
replace the ignition coil
Breaker contacts do not open:
— the adjustment of the gap between the contacts of the breaker is broken;
— the textolite block or bushing of the breaker lever is badly worn;
adjust the gap between the contacts;
replace the contact group;
— the bearing of the movable plate of the breaker has failed;
replace the bearing or ignition distributor
High voltage is not supplied to the spark plugs:
— the tips of the high voltage wires are loose or oxidized; they are not seated tightly in the sockets; the wires are heavily soiled or their insulation is damaged;
check and restore connections, clean or replace wires;
— wear or damage to the contact carbon, its hanging in the ignition distributor cap;
check and, if necessary, replace the contact angle;
— current leakage through cracks or burnouts in the cap or rotor of the ignition distributor, through carbon deposits or moisture on the inner surface of the cap;
check, clean the cover from moisture and carbon deposits, replace the cover and rotor if they have cracks;
- burnout of the resistor in the rotor
— Spark plugs are damaged (crack on the insulator)
Replace the spark plugs with new ones
— The order of connecting high-voltage wires to the terminals of the ignition distributor cover is violated
Connect the wires in firing order 1-3-4-2
— Incorrect ignition timing setting
Check and adjust ignition timing
The switch does not receive voltage pulses from the contactless sensor:
— a break in the wires between the ignition distributor sensor and the switch;
check the wires and their connections, replace damaged wires;
- contactless sensor is faulty
check the sensor using an adapter connector and a voltmeter; faulty sensor replace
No current pulses are supplied to the primary winding of the ignition coil:
— a break in the wires connecting the switch to the relay or ignition coil;
check the wires and their connections; replace damaged wires;
check the switch with an oscilloscope; replace faulty switch
The engine runs erratically or stalls at idle:
— Too early ignition in the engine cylinders
Check and adjust ignition timing
— Large gap between spark plug electrodes
Check and adjust the gap between the electrodes
— Small gap between breaker contacts
Adjust the gap between the contacts
The engine runs unevenly and unstably at high crankshaft speeds:
— The spring of the moving contact of the breaker has weakened
Replace contact group
— Large gap between breaker contacts
Check and adjust the gap between the contacts
— The springs of the weights of the ignition timing regulator in the ignition distributor sensor have weakened
Replace the springs, check the operation of the centrifugal regulator on the stand
Interruptions in engine operation in all modes:
Damaged wires in the system
Check the wires and their connections.
— Wear of electrodes or oiling of spark plugs, significant carbon deposits; cracks in spark plug insulator
Check the spark plugs, adjust the gap between the electrodes, replace damaged spark plugs
— Wear or damage to the contact carbon in the ignition distributor cap
Replace the contact angle
— Severe burning of the central contact of the ignition distributor rotor
Clean the center contact
— Cracks, contamination or burnouts in the rotor or ignition distributor cap
Check, replace rotor or cover
— Reduced capacitance of the capacitor or a break in it
— Excessively large runout of the ignition distributor shaft; increased wear of the roller bushing
Replace the ignition distributor
- The switch is faulty - the shape of the pulses on the primary winding of the ignition coil does not correspond to the norm
Device and purpose
Connection diagram of the distributor to the ignition system
The ignition distributor on the VAZ 2107 performs the following functions:
- It contributes to the start of spark formation as a result of opening the node contacts. In more modern cars, including “sevens” of later years, this function is performed by a Hall sensor.
- The device directs the generated voltage in the coil to the required spark plug.
- The unit also changes the beginning of the moment of spark formation in accordance with driving modes and the quality of gasoline used. For this, appropriate regulators are used.
- The ignition distributor ensures the accumulation of energy, as well as its discharge in the coil.
As for the device of the VAZ distributor, it is as follows:
- unit body;
- roller with so-called cams;
- centrifugal regulator device;
- mechanism contacts;
- rotor;
- distributor cover;
- vacuum regulator.
It should be noted that contact versions are also equipped with capacitors designed to improve spark formation and protect contacts from burnout. As stated above, in more modern, contactless systems, the interruption process is ensured by a Hall sensor (how to properly lubricate the breaker to prevent its failure, see the video, author - VAZ 2101-2107 REPAIR AND MAINTENANCE).
How to replace wiring
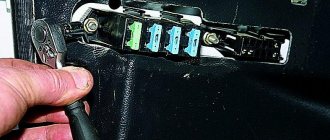
If regular interruptions in the operation of electrical equipment begin due to faulty wiring, experts recommend replacing all wiring in the car. The same should be done after purchasing a car from an owner who made changes to the scheme, added or improved something. Such changes affect the parameters of the on-board network, for example, the battery may discharge faster, etc. Therefore, it would be better for the new owner to restore everything to its original form.
To replace the wiring in the cabin you need:
- Remove the connectors from the mounting block.
If it is necessary to replace the wiring of any electrical component of the VAZ 21074, but there are no “original” wires at hand, you can use similar products. For example, for the “seven”, wiring with the following indices is suitable:
- 21053–3724030 — on the dashboard;
- 21053–3724035–42 — on the instrument panel;
- 21214–3724036 — for fuel injectors;
- 2101–3724060 — to the starter;
- 21073–3724026 — to the ignition system;
- 21073–3724210–10 — flat rear harness.
As a rule, the mounting block is also replaced at the same time as the wiring. It is better to install a new type of mounting block with plug-type fuses. It should be remembered that, despite the external similarity, mounting blocks can be of different types, so you need to look at the markings of the old block and install the same one. Otherwise, the electrical equipment may not work correctly.
Video: a specialist troubleshoots the electrical problems of a VAZ 21074
We remove the panel and install it slowly, there is nothing complicated there. First, we connect the panel and interior, stretch the braid under the hood to the location of the block. We spread the wiring in the engine compartment: corrugations, clamps, so that nothing hangs or dangles. Place the block, connect it and you're done. I would also advise installing normal terminals on the battery, the standard ones are garbage (at least on the standard ninth wiring). And buy two sets of Czech fuses, not impenetrable Chinese ones.
rapid
Typical faults
The ignition breaker on the VAZ 2107 may need repair as a result of mechanical damage, wear of structural elements, and also due to moisture getting inside the device.
Distributor repair occurs when:
- the appearance of cracks and other damage on the cover of the device, usually the contacts burn out in this part of the structure;
- breakage of the runner;
- failure of the Hall sensor;
- wear of shaft bearing parts;
- broken contact of the regulator;
- broken diaphragm of the vacuum regulator.
If we are talking about a contact structure, then the capacitor in it can also fail.
As for the symptoms of node failure, they are as follows:
- the power unit is unable to develop power;
- the engine begins to triple, one or more cylinders may not function;
- the operation of the power unit is accompanied by popping sounds in the exhaust pipe or carburetor;
- when the driver presses the gas pedal during acceleration, detonation may be heard;
- the motor does not start.
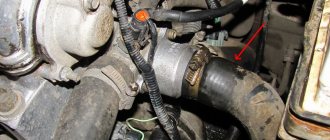
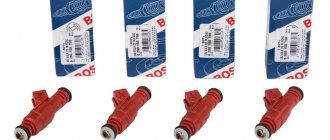
Why do you need to clean or replace injectors?
The main problem is contamination of the nozzle hole when the fuel cannot be sprayed normally.
If the injector stops working completely, no fuel enters the cylinder. Another problem occurs when the injectors do not open/close completely, do not hold pressure and “pour” fuel into the manifold.
These malfunctions and problems indicate the need to clean the injector. Experts recommend performing this procedure every 40 thousand kilometers. If cleaning cannot solve the problem, then the injectors should be replaced.
Otherwise:
- the efficiency of fuel supply to the engine is impaired;
- engine power disappears;
- the quality of the fuel-air mixture deteriorates;
- the power unit operates unevenly;
- fuel consumption increases.
Causes of injector malfunctions
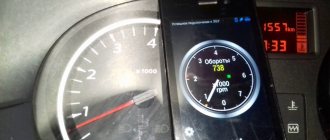
Normally, the injectors should work with high precision, their operating speed is also very high (opening and closing occurs several times in 1 second).
This is necessary for uninterrupted supply of the engine with an “optimal” mixture in different modes, as well as to ensure fine atomization of gasoline (for better mixing of fuel with air). It is also important that the injector closes tightly, preventing fuel leaks into the intake manifold.
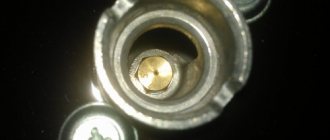
However, during the operation of the car, the condition of the injector is directly affected by the quality of gasoline and the overall cleanliness of the fuel system. Even small debris can clog the injector holes, causing the spray pattern to become very poor. Also, deposits form on the nozzles, which leads to jamming, untimely and/or incomplete opening and closing, etc.
Please note that the need to replace 2114 injectors occurs much less frequently than the need for cleaning. The reason is the fairly high reliability of the injectors. As a result, problems can often be eliminated by cleaning the injectors.
Do-it-yourself distributor repair
To repair the device, it must be disassembled. If you do not know how to install, repair or replace a unit, our instructions will help you complete this task (visual repair instructions are presented in the video below, author - VAZ 2101-2107 REPAIR AND MAINTENANCE channel).
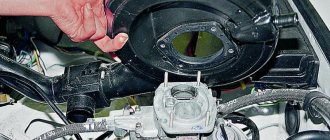
Removal and disassembly
To make a replacement, the mechanism must first be dismantled.
To do this, follow these steps:
- First, turn off the power to the on-board network, because if work to replace the unit is carried out with the battery turned on, this may lead to the burnout of the new mechanism. Disconnect the negative terminal from the battery.
- After this, the crankshaft must be aligned to the mark - turn it until the marks are aligned. Having done this, it is necessary to remove the tips of the high-voltage cables from the spark plugs and disconnect the two fastenings of the breaker cover. Having done this, you can see the slider - if it is directed to cylinder 2, then the crankshaft should be turned one revolution.
- Next, move the pipe from the vacuum regulator, using a 13mm wrench, unscrew the nut securing the breaker, then the assembly can be removed.
- To disassemble the device, you need to unscrew the fastening bolts of the runner; having done this, you can remove the rotor. After this, you can unscrew the nut located on the breaker body, while on the opposite side you need to fix the screw; you can use a screwdriver for this.
- Remove the clamp and remove the plastic insulator from the structure. After these steps, you can unscrew the bolts that secure the contact group. The group itself can be dismantled.
- Using available tools, you can knock out the shaft pin. The oil deflector along with the washer should be removed directly from the roller itself. Having done this, the shaft can be pulled out of the housing.
- In order to gain access to the bearing, it is necessary to remove the advance control rod washer from the upper part of the housing.
- Unscrew the screws securing the regulator, after which you can remove the advance mechanism. Remove two more screws that secure the bearing plates. Dismantle it by prying it from different sides.
Repair
Dismantling and disassembly is now complete. To install new parts, you need to carefully inspect the structure, first of all pay attention to the cover. If defects are visible on it or its condition is in doubt, then the cover should be replaced. Also pay attention to the slider - it should look intact and there should be no defects. To check the slider, use a multimeter - the resistance level should be around 5-6 kOhm.
If the contacts of the contact group are closed tightly, there are no backlashes, there are no signs of wear and burning, then this part can be left untouched. Otherwise, you need to install a new contact group. As for the weights on the shaft, these elements must move freely and without jamming, and under the action of springs they must return to their place. If there are jams during operation of the element, then the moving parts of the structure must be lubricated with motor fluid.
There should be no signs of wear on the shaft, and if there are any, the element must also be replaced. It is also necessary to diagnose the vacuum regulator. You can check it at home without any problems - to do this, you need to draw in air through the fitting of the mechanism.
If the vacuum regulator is operating normally, the rod will begin to move when trying to draw in air, otherwise it will need to be replaced. The last item to check is the bearing. During operation, it should turn without jamming, and there should be no gaps. If there is even a slight play, the bearing part will need to be replaced.
Sorry, there are no surveys available at this time.