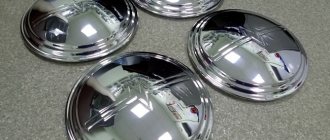
Brake discs for VAZ 2110
VAZ 2110 is one of the most popular Russian models.
The cost of consumables for Russian cars is usually cheap, and you can always save a lot. But there are components on which it is not worth saving; it will cost you more. These components include the brake system. The basis of the braking system is the brake disc. Disc brakes on the VAZ 2110 are installed only on the front axle, which is where the main force during braking occurs.
Wheels on the VAZ 2110 are divided, depending on the engine, as follows:
- 8 valve VAZ 2110 engines are equipped with R13 brake discs
- 16 valve VAZ 2110 engines are equipped with R14 brake discs
Due to the low cost, many people do not hesitate to install original disks:
- 2108-3501070 — front brake disc r13, not ventilated, cost from 898 rubles.
Today, perhaps, the most unfortunate and unacceptable option. Due to the lack of ventilation, the disc is susceptible to overheating , which means the brake fluid will overheat and boil; this can be clearly felt when the pedal begins to go down. When brake fluid boils, the effectiveness of the brakes drops sharply and you risk being left without brakes at all.
- 2110-3501070 — front ventilated brake disc r13, cost from 3,758 rubles.
An improved version of the previous disc. The main improvement is the appearance of ventilation. The discs do not heat up so much and behave well during quiet driving.
- 2112-3501070 — front ventilated brake disc r14, cost from 919 rubles.
Perhaps the best option among the original discs. Here you have ventilation and an increased contact area with the block. Consequently, you have a lower chance of disc overheating and improved braking properties compared to previous options. Despite their advantages, such discs are not suitable for a driving style with constant brake loads, but remain reliable and comfortable brakes for quiet, everyday driving.
But the choice is not limited to originals. The VAZ 2110 is a popular model and a large number of analogue brake discs are produced for it. So, if you want to save money, you can take BM BD 5222.
- BM BD5222 front brake disc r13, not ventilated, cost from 512 rubles.
- BM BDV221 front ventilated brake disc r13, price from 622 rubles.
- BM BDV220 front ventilated brake disc r14, price from 842 rubles.
BM discs are made in China, and you can't count on improved braking quality. The main advantage of these discs is the price, which in percentage terms is significantly lower than the original discs. But due to the low cost of original disks, the real savings are negligible and it is better to overpay slightly and install original disks.
Thus, there is no point in chasing cheapness, but you can choose an analogue to improve the quality of braking, but here you will have to overpay in comparison with the original ones.
- TRW DF1748 front brake disc r13, not ventilated, cost from 893 rubles.
- TRW DF4108 front ventilated brake disc r13, cost from 920 rubles.
- TRW DF4107 front ventilated brake disc r14, price from 1013 rubles.
TRW is a good option. The brakes under normal conditions are comparable to the originals, but in extreme conditions they behave much better. The discs withstand overheating better , cool faster and provide better braking.
- Brembo 08.5211.10 front brake disc R13, not ventilated, cost from 784 rubles.
- Brembo 09.8894.14 front ventilated brake disc r13, cost from 1100 rubles.
- Brembo 09.8903.14 front ventilated brake disc r14, price from 1063 rubles.
Many people choose Brembo for their sporting history. Brembo discs are a truly high-quality product, although it is far from their sports developments. But the VAZ is not a sports car, so Brembo wheels fully meet the requirements of the car . Brembos withstand overheating well and provide excellent braking in all conditions.
- Ate 24.0112-0125.1 front brake disc r13, not ventilated, cost from 990 rubles.
- Ate 24.0120-0186.1 front ventilated brake disc r13, cost from 1590 rubles.
- Ate 24.0120-0187.1 front ventilated brake disc r14, price from 1596 rubles.
Ate is significantly more expensive than the original discs. But there is something to pay for: high quality materials, comfortable and predictable braking in any conditions, resistant to overheating and deformation. And most importantly, everyone who decided to install them is very satisfied with both the new brakes and their service life.
Prices are indicated for Moscow and the region as of winter 2016.
Articles (original)
The VAZ-2110 offers a fairly wide selection of brake discs.
- The original catalog number of the disk is 2110-3501070 (ventilated) or 2110-3501090 (non-ventilated).
- The average cost of a set of two products is 5,000 rubles.
New brake disc on the car.
Analogs
In addition to the original parts, the automotive market offers a fairly wide range of analogues, which in terms of quality and cost can cover the needs of any motorist.
Let's look at the table of manufacturers, catalog numbers and average prices for VAZ-2110 brake discs:
| Manufacturer | vendor code | Price in rubles for 1 piece |
| Profit | 5010-1142 | 1000 |
| Denckermann | B130406 | 1000 |
| Ferodo | DDF1142 | 1200 |
| LPR | L1053V | 1200 |
| Brembo | 09.8894.14 | 2000 |
| ABS | 17339 | 1500 |
| Metelli | 23-0553 | 1500 |
| Bosch | 0 986 479 082 | 1500 |
| Cifam | 800-553 | 1600 |
| Trialli | DF 135 | 1750 |
| Pilenga | 4221 SPORT | 1750 |
| Pilenga | V221 | 1200 |
| QML | BD1003 | 1300 |
| Valeo | 297781 | 1500 |
| TRW | DF4108 | 2000 |
| Allied Nippon | ADC1710V | 2000 |
| Hola | HD904 | 2000 |
| Textar | 92109200 | 3000 |
As you can see, the automotive spare parts market is quite wide, and if original wheels are expensive, then there is always the opportunity to buy an analogue.
Captain-Smollett › Blog › VAZ front drive brakes
This article will help answer all the questions about switching from one brake to another. It will also help you figure out what kind of brakes you currently have. To do this, consider the stock front brakes for front-wheel drive VAZ: 2108-21099, 2110-2112, 2113-2115, Kalina, Priora, Granta
R13 not ventilated
They were installed on the SAMAR and SAMAR-2 families, as well as on the 10th family (only with an 8-liter carburetor engine).
Explosion diagram Caliper
Visually, they can be distinguished by the lack of ventilation on the brake discs, in addition to the characteristic 2108 boot.
R13 ventilated
They were placed on families 10, Kalin, Grant exclusively with 8kl.
engine. Explosion diagram Caliper
Visually, it is easy to distinguish from 08 by a wider disk with ventilation. Brakes from R14 can be visually distinguished by the brake disc boot ratio.
R14 ventilated
They were installed on families 10, Prior (even with 8kl. ICE), Kalin, Grant with 16kl.
engine. Explosion diagram Caliper
Visually easily determined by the ratio of the brake disc boot. The disc will completely cover the boot. There is another option, remove the fixed bracket and 2112 should be stamped on it. In addition, it is simply impossible to install wheels of 13 radius.
R15 ventilated
They were placed on the Kalin and Grant families from 16kl.
engine in the sport version. Explosion diagram
Standard R13″ ventilated calipers are used (movable caliper 2110, fixed caliper 2110 which is machined to fit a wider brake disc).
And to extend the guide to a larger radius, the plant uses “bone” adapters
When installing them, you need to file the ears on the fist
There is another option that is almost factory-made. Install the Volga calipers using a special spacer. They have their own brake pad, which, in addition to everything, has an even larger area compared to the VAZ one.
RESULT:
1) When moving from R13 non-ventilated to R13 ventilated, you will need: - Caliper bracket 2110 movable 2110-3501017 - Caliper bracket 2110 fixed 2110-3501155 - Brake disc housing right VAZ-2110 (14 inches) 2112-3501146 - Brake disc housing left VA Z -2110 (14 inches) 2112-3501147 — Brake disc VAZ 2110 (13 inches) 2110-3501070 As you can see, we will need brackets, boots and the brake discs themselves. You can leave the old calipers.
2) When moving from R13 non-ventilated to R14 ventilated, you will need: - Caliper bracket 2110 movable 2110-3501017 - Caliper bracket 2112 fixed 2112-3501155 - Brake disc housing right VAZ-2110 (14 inches) 2112-3501146 - Brake disc housing left VA Z -2110 (14 inches) 2112-3501147 — Brake disc VAZ 2112 (14 inches) 2112-3501070 As you can see, we will need brackets, boots and the brake discs themselves. You can leave the old calipers.
3) When switching from R13 ventilated to R14 ventilated, you will need: - Caliper bracket 2112 fixed 2112-3501155 - Brake disc VAZ 2112 (14 inches) 2112-3501070 As you can see, we only need a movable bracket and the brake discs themselves. The calipers can be left as old, the boots were originally designed for R14 brakes, the movable caliper remains the same.
4) When switching to R15 ventilated ones, you will need: - Movable caliper bracket 2110 2110-3501017 (but it needs to be sharpened) - Fixed caliper bracket 2112 2112-3501155 (only if you have R13 not ventilated) - Spacer for the fixed bracket - Disc 15 inch brake
Replacing rear wheel wheel bearings on a VAZ yourself
The rear wheel bearing of the VAZ 2110 is changed according to the instructions, but first consider the following points:
- The bearing cannot be reinstalled.
- It is recommended to replace the second bearing immediately, on the other hand.
We disassemble the hub assembly and dismantle the product
- First, loosen the bolts securing the wheel and the hub nut.
- Next, we jack up the car.
- Now unscrew the bolts and nuts completely and remove the chassis.
Brake disc diagnostics
Disc brakes, having burst into our lives in the middle of the last century, confidently won a leading position in car design. Today, almost 90% of passenger cars leave production lines with disc brakes already installed. The reason is simple - disc brakes are more efficient and simpler in design. Which means it’s cheaper for mass production.
A not entirely good feature of disc brakes is the small contact area between the pad and the brake disc. This, in turn, requires more pressure in the brake system, and increased wear on both the brake pads and the brake disc.
What should be the minimum thickness of a brake disc to allow operation of a car? We will not give you a single figure, which varies significantly between manufacturers of both cars and brake discs. And although there are average mileage figures, it's all relative.
On forums, many novice motorists ask the question where they can find out numbers about the thickness of the brake disc. Let’s answer this: right on the disk it’s possible. The fact is that the manufacturer took care of our comfort when repairing brake discs and indicated two numbers on the end of the brake disc: the original thickness and the minimum thickness of the brake disc. After this figure, operating the car is strictly not recommended.
Numbers are numbers, but too many factors influence accelerated wear of brake discs. Among the first is your aggressive driving style within the city.
Replacement procedure
Lubricate
So, we have determined that this cannot be done with a little blood, and the car really needs to replace the bearing. Therefore, we adhere to a clear procedure and begin work.
- Remove the brake drum. There should be no problems with this, since it is fixed quite simply on the rear wheel.
- Pry up the hub cap using a flathead screwdriver and remove it.
- Now, using a narrow chisel, straighten the collar of the nut, which was jammed in two places at once. Don’t be afraid, it wasn’t you who did something, such a jam is provided at production so that the element does not fly out of its rightful place.
- Use a 30mm socket to unscrew the fastening nut.
- Remove the unscrewed nut and also dismantle the thrust washer.
- Arm yourself with a three-legged or two-legged puller, which will allow you to remove the hub from its place.
- If you don't have a three-jaw tool, press out the hub using two bolts or screws. As the practice of craftsmen has shown, bolts for fastening the head of a power unit are excellent for these purposes.
- Screw the screws into the opposite holes for fastening the wheel and rest their ends against the heads of the bolts securing the hub axle to the rear suspension beam of your car.
- Try to tighten the screws evenly to allow the hub to press out. There is no need to remove the pads.
- As a rule, the inner race of the bearing should remain on the hub axis.
- Secure the ring using a puller, then remove it.
- If you don’t have a puller, you will have to additionally dismantle the brake pads and use a chisel to mix the ring to the axle.
- Next, the ring moves. Two mounting blades will help you with this.
- Do not be afraid that after processing with a chisel, some kind of defects or nicks will form on the hub axis. This is not terrible, but it is highly recommended to process them with a needle file.
- Arm yourself with pliers, thanks to which you can carefully remove the retaining ring.
- Using a piece of suitable pipe, also carefully knock out the bearing, leaning on the inner ring.
- Another option is to press it out using a wheel bearing puller.
- Clean and effectively lubricate the hub into which the new rear wheel bearing is pressed with a puller or vice. The pressing force must be applied to the outer ring. It will be most convenient for you to do this using the outer ring from an old bearing.
- Install the new retaining ring in its proper place.
- Using light blows on the inner ring, press the bearing onto the axle. Drive until deep enough to fit the nut.
- Full pressing is carried out with the nut already on.
- Be sure to use only the specified torque to tighten the fastener.
- Press the collar of the nut into the two grooves of your hub axle to restore the element to its original appearance.
This procedure cannot be called incredibly complicated, but you will have to “tinker” in your garage. But this is better and more cost-effective than going to a service station and entrusting your car to unknown specialists.
Sources:
https://remontautohelp.ru/vaz-2110-vaz-2112-zamena-zadnego-stupichnogo-podshipnika-svoimi-rukami-video-instrukciya/ https://umelyeruki.info/avto/zamena-podshipnika-zadnej-stupicy- vaz-2110/ https://masteravaza.ru/hodovka/stupica/zamena-zadnego-podshipnika-stupicy-vaz-2110-541 https://ladaprofi.ru/vaz-2110/kak-sdelat-zamenu-stupichnogo-podshipnika -na-vaz-2110-zadnego-kolesa.html https://avtgid.ru/zamena-podshipnika-zadnej-stupicy-na-vaz-2110.html https://luxvaz.ru/vaz-2110/72-zamena -podshipnika-zadney-stupicy.html
How to understand that the thickness of the brake disc is approaching a critical level
First of all, monitor the behavior of the car during braking, especially emergency braking. If there is a beating in the steering column, then it’s time to take a closer look at the brake discs. A visual inspection to determine the thickness of the brake disc should be carried out with the wheel removed.
The first thing to do is take a caliper and measure the thickness of the brake disc in several places. Why in different places? Because there is such a thing as uneven brake disc wear. It happens for various reasons.
When measuring brake discs, do not forget to pay attention to collars, deep scratches and other mechanical damage to the working surface of the brake disc. If they are, then it's time to think about brake disc repair.
Product added to bookmarks!
- Description
- Reviews
APPLICABILITY: VAZ 2108, 2109, 21099, VAZ 2110, 2111, 2112, VAZ 2113, 2114, 2115, VAZ 1117, 1118, 1119 (Lada-Kalina), VAZ 2170, 2171, 2172 (Lada-Priora ), VAZ 2190, 2191 (Lada-Granta), VAZ 2192, 2194 (Lada-Kalina 2).
– four-piston caliper TM5.260 – 2 pcs.;
– composite brake disc TD 260x20 mm with a light alloy hub, BREMBO rotor – 2 pcs.;
– caliper mounting bolt with washer and nut – 4 pcs.;
– banjo bolt for fastening the brake hose with a washer – 2 pcs.
Brake hoses and pads are not included.
Currently, calipers are produced without the PROMA inscription (check before ordering).
Distinctive features of the PROMA caliper.
– Designed specifically for front-wheel drive VAZ models with wheels with a diameter of 14 inches or more
.
– Four-piston, consists of two parts.
– Cast from high-strength aircraft grade aluminum alloy.
– The pistons are made of forged aluminum alloy and have different outer diameters, which ensures optimal distribution of forces acting on the pad to obtain maximum braking performance and prevent uneven pad wear.
– Installed together with brake discs with a diameter of 260 mm and a width of 20 mm*.
– Fastening is carried out directly to the steering knuckle.
– The design includes anthers that protect the pistons from dirt.
– Has a durable anti-corrosion coating, painted in your choice of red or black.
– The design provides for the use of brake pads with both racing and road friction compounds.
– There is a certificate of conformity.
For installation with other brake discs, modifications will be required to adjust the position of the caliper relative to the disc.
The following brake pads can be installed on the PROMA caliper in urban
operating conditions:
FERODO FDSR218 and FERODO FRP218.
A multi-piston caliper is wider than the original caliper and, as a rule, the spokes of your wheel rest against it. There are two possible solutions: buy wheels with a suitable X-factor (X-factor is the distance between the mating plane of the disk and the inner surface of the spokes) or install distance wheel spacers. Initially, when designing the brake hub and caliper mounting bracket, we position the brake disc individually for each brand of vehicle as far inward as possible.
The window in the brake disc guard will need to be enlarged to accommodate the new brake caliper. On some vehicles it will be necessary to move it a few mm inwards. Do not remove the brake disc protective cover.
What do we do with brake discs?
There aren't many answers. If the minimum thickness of the brake disc corresponds to the figure specified by the manufacturer, then do not tempt fate, just replace the brake discs. They must be changed in pairs on the same axis.
If the thickness of the brake disc corresponds to the norm, but there is some mechanical damage on it, then you need to re-groove the brake discs. Grooving the discs will allow you to bring the brake system back to normal and extend the service life of the brake disc for a certain time. You shouldn’t get carried away with grooving – it’s not a panacea.
Front ventilated discs VAZ 2114, VAZ 2115, VAZ 2113, Lada Samara 2
With frequent and intense braking from speeds above 100 km/h, the brakes may overheat, accompanied by an unpleasant effect: the brake pedal “failed”! This is most often due to the boiling of the brake fluid, which heats up when the pads rub against the discs. Indeed, the temperature of brake parts during braking can reach 600 °C, which can sometimes be checked visually: in the dark, the discs can emit a dark red glow. And if the liquid has not been changed for a long time and has become “saturated” with water over its long service life.
Tuning enthusiasts can protect themselves from this by installing ventilated front brake discs from the VAZ-2110 (catalog number - 2110-3501017). Experts note that the ventilated brakes of the VAZ-2110 have approximately twice the cooling ability of the VAZ-2108. A good reason for tuning, moreover, using available parts and at a low price. No modifications to the chassis are required. But some parts of the brake mechanisms will be needed.
Please note that the design of the new VAZ 2113 shoe guide (unlike the part to be replaced, it is a closed loop) allows it to be made more rigid.
Brake wheel cylinders and pads will not require replacement.
For installation on our car, we took ventilated brake discs with additional perforations for better cooling from the well-known company Zimmermann (Germany).
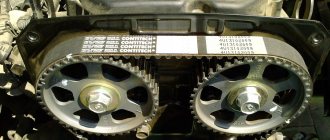
Caliper 2108-3501017 (pictured on the right) will have to be replaced with a caliper 2110-3501017 (pictured on the left) designed for increased disk thickness.
Instead of the pad guide 2108-3501155 (pictured below), you will need part 2110-3501155 (pictured above)
We carry out the work on an overpass or a flat area with a hard surface.
We hang and remove the front wheel.
Using a chisel, bend the edge of the locking plate of the lower bolt securing the brake cylinder of fret 2115 to the guide pin.
Holding the guide pin with an open-end wrench “17”, use a wrench “13” to unscrew the lower bolt.
Unscrew the top bolt in the same way.
Remove the brake cylinder assembly with the caliper and remove the brake pads from the guide.
Using a screwdriver, pry up the protective cover and remove the guide pin.
Similarly, remove the second finger.
We install the caliper on the guide of the VAZ 2114 pads...
...and, holding the caliper with a mounting blade, use a 10-point hexagon to unscrew the two screws securing the brake cylinder to the caliper.
We remove the caliper and, without disconnecting the brake hose of the VAZ 2115, tie the cylinder to the guide spring strut.
Using a 17mm wrench, unscrew the two bolts securing the shoe guide to the steering knuckle.
Remove the pad guide.
Use a 12mm wrench to unscrew the guide pins...
...and remove the standard brake disc of Lada 2113.
Installing a ventilated brake disc...
...and tighten the guide pins.
We attach the brake cylinder to the new (wider) caliper with screws.
Holding the caliper with a mounting blade, tighten the screws (tightening torque 115–150 Nm).
We move the caliper with the cylinder to the side.
We fill the pin holes in the new brake pad guide with graphite grease...
...and install the guide pins.
We install the pad guide and attach it with bolts to the steering knuckle (tightening torque 30–36 N.m).
We install the brake cylinder with the Lada 2114 caliper on the pad guide and tighten the bolt of the upper guide pin.
We install brake pads.
We tighten the bolt of the lower guide pin and tighten both bolts (tightening torque 31–38 N.m).
Use a chisel to bend the edges of the bolt locking plates.
This is what a unit assembled from new parts looks like.
Absolutely do not do this!
Some home-grown “Kulibins”, trying to save money on buying new brake discs, perform sometimes mind-boggling procedures in order to compensate for the minimum thickness of the brake discs.
For example, two brake pads are installed. To prevent the brake cylinder pistons from falling out. This ultimately leads to the fact that at speed the brake pads simply fly off to... nowhere. At the same time, the path of the car is known - into a ditch, and it’s good if there are no casualties.
Replacing worn brake discs at the wrong time can also lead to failure of the pistons of the working brake cylinders, CV joints, ball joints, etc. That is, by trying to save money and procrastinate, you can then lose more money. Remember the stingy...
Monitor the condition and thickness of the brake discs, and take measures to eliminate any defects noticed - there is too much at stake to neglect this.
Good luck determining the thickness of your brake rotors and replacing them.
Front
Before starting work on replacing the front brake pads on a VAZ 2110, be sure to arm yourself with a set of tools, which includes:
- Hammer with short handle;
- A small sharp chisel;
- Two wrenches - socket and socket 13;
- Open-end wrench 17;
- Pliers;
- Small crowbar;
- Jack;
- Balloon wrench;
- New pads.
When everything is ready to go, you can begin the replacement process.
- Park the car in such a way that it cannot roll away. It is best to put some kind of stoppers under the wheels. It is advisable to use special devices rather than simple bricks.
- Loosen the bolts on the front wheels and lift the car to one side using a jack.
- Completely remove the wheel mounting bolts, remove it and place it under a raised part of the machine. This is a simple safety measure in case the jack accidentally comes off.
- Now we determine the location of the front brake pads on the VAZ 2110. The calipers are located in front of the brake disc, so to easily replace the left pad, turn the steering wheel all the way to the left, and vice versa.
- To make it easier for you to access the part, arm yourself with a thin chisel and a hammer. These tools will unlock the top bolt.
- Unscrew it with a 13 socket wrench, holding it on the other side of the caliper with a 17 socket wrench.
- There is no need to remove the pad yet, since the caliper is now in its extreme position. That is, the new part will not fit into place.
- Do not completely unscrew the bolt; use a crowbar and insert it between the body and the pad, pressing the caliper all the way.
- Once this is done, unscrew the top bolt all the way. This will move part of the caliper to the side, thereby providing access to the pad itself.
- Remove the old pads and put new ones in their place.
- During assembly, simply follow the reverse order of dismantling. Just remember the importance of bolt countering. The washer must be bent onto the edge of the fastener. At this point the replacement can be considered complete.
Stories from our readers
“Fucking basin. "
Hi all! My name is Mikhail, now I’ll tell you a story about how I managed to exchange my two-wheeler for a 2010 Camry. It all started with the fact that I began to be wildly irritated by the breakdowns of the two-wheeler, it seemed like nothing serious was broken, but damn it, there were so many little things that really started to irritate me. This is where the idea arose that it was time to change the car to a foreign car. The choice fell on the melting Camry of the tenth years.
Yes, I had matured morally, but financially I just couldn’t handle it. I’ll say right away that I am against loans and taking a car, especially not a new one, on credit is unreasonable. My salary is 24k a month, so collecting 600-700 thousand is almost impossible for me. I started looking for different ways to make money on the Internet. You can’t imagine how many scams there are, what I haven’t tried: sports betting, network marketing, and even the volcano casino, where I successfully lost about 10 thousand ((The only direction in which it seemed to me that I could make money was currency trading on the stock exchange, they call it Forex. But when I started delving into it, I realized that it was very difficult for me. I continued to dig further and came across binary options. The essence is the same as in Forex, but it’s much easier to understand. I started reading forums, studying trading strategies. I tried it on a demo account, then opened a real account. To be honest, I didn’t manage to start earning money right away, until I understood all the mechanics of options, I lost about 3,000 rubles, but as it turned out, it was a precious experience. Now I earn 5-7 thousand rubles a day. I managed to get the car buy after half a year, but in my opinion this is a good result, and it’s not about the car, my life has changed, I naturally quit my job, I have more free time for myself and my family. You’ll laugh, but I work directly on the phone)) If If you want to change your life like me, then here’s what I advise you to do right now: 1. Register on the site 2. Practice on a Demo account (it’s free). 3. As soon as you get something on the Demo account, top up your REAL ACCOUNT and go to REAL MONEY! I also advise you to download the application to your phone, it’s much more convenient to work from your phone. Download here.
Replacing clutch cylinders
VAZ-2109, Kalina and Oka cars have a mechanical drive implemented by means of a cable. Rear-wheel drive cars, such as the VAZ-2107, have a hydraulic drive, and periodically leaks occur in it, which can only be dealt with by replacing problematic components.
Despite the fact that you can buy a repair kit for any cylinder in stores, it is better to replace the entire assembly. After completing the work, you need to refill the working fluid into the system and perform bleeding. There are a large number of videos on how to replace the master or slave cylinder.
Having a foreign car in your own garage is very prestigious and cool, but even today hundreds of thousands of drivers are owners of domestically produced cars. Firstly, they are much cheaper compared to foreign cars, and secondly, they are economical to operate and repair. In addition, car markets are simply overflowing with a variety of spare parts and components for all VAZ models, both new and used.
Repairing a car, no matter what the breakdown, always requires an investment of money and effort. However, repairing or replacing spare parts with your own hands is much cheaper and more profitable. The clutch is a very important component of any car, so if you suspect that this particular part is faulty, you need to replace it immediately.
Replacing brake discs on a VAZ 2110
No one will argue that a car is a high-risk device. If the operation of the car is characterized by stable reliability, then it will be safe not only for the driver, but also for the people around him. In this regard, one of the safety components is the condition of the car’s braking system, which includes VAZ 2110 brake discs.
When a seasonal replacement of tires occurs, the driver must pay attention to the condition of the brake discs and the degree of wear. A situation may arise in which it is necessary to replace the brake discs of the VAZ 2110. A legitimate question is what kind of resource does the brake disc 2110 have. It must be said that not only on this model, but also on other representatives of this family it has quite high performance. It happens that they have to be changed only after the car has “run” almost 150,000 km. But, nevertheless, the time will still come when you need to replace the brake discs.
It should be said that the discs on the front wheels wear out faster than on the rear wheel drive. This is due to the fact that the 2110 model is a front-wheel drive car. Of course, when braking occurs, the main load falls on the front wheels. With the standard configuration, the manufacturer installs a drum design on the rear-wheel drive wheels, which has long been obsolete. Foreign manufacturers have been equipping all wheels with brake discs for a long time.
On models with a sixteen-valve engine, R14 wheels are included as standard. On models with an 8-valve engine, R13 wheels are installed. When purchasing this part, it is almost impossible to determine the degree of its quality. What matters is how accurately the part is made and the quality characteristics of the material used for manufacturing. In the case of ventilated disks, the thickness of the bulkheads and the design features themselves are important. Therefore, good advice would be to purchase brake discs only from proven, reliable brands.
What types of brake discs are there?
The part in question can exist in the following forms:
- Ventilated disc. Its design includes two rotating parts that have blades. They are necessary to remove excess heat from the wheel.
- A disk having gas outlet holes.
- Perforated wheel rim.
- Option with collapsible discs. This disc has holes through which dirt and water trapped in the wheel are removed.
The front axle of the “ten” is equipped by the manufacturer with ventilated discs. This model is driven by the front wheels, and installing this type of discs reduces the load on them. The use of ventilated discs leads to faster cooling, which improves braking efficiency. This allows us to fairly accurately answer the question of which brake discs are better for the VAZ 2110.
The place where the disk is mounted is the hub, and the wheel itself is attached to it on top. Of course, when moving, it is heated, but is immediately cooled due to the forced air.
Returning to the question of the quality of disks, we cannot fail to mention their thickness. A reasonable question is what is the permissible thickness of the VAZ 2110 brake disc. According to the manufacturer, the permissible wear value is a thickness of 17.8 mm. This applies to ventilated structures. In the usual version, this figure is 10.8 mm. But if scratches or cracks appear on the disc, they must be replaced immediately. The main condition is the immediate replacement of a pair of disks at once. They are never replaced one at a time, since they wear out at the same time.
Replacement steps
The entire replacement process can be divided into several stages:
- Removing wheels;
- Removing the old brake pad;
- Frame disassembly;
- Cleaning the hub and checking it;
- Removing coating from new disks;
- Runout check;
- Installation of new brake system elements.
Now let's talk about this in more detail.
Removing the wheel
In fact, dismantling the wheel for subsequent replacement of the brake elements is not difficult.
But a certain sequence of actions will have to be followed.
- Place a jack under the car.
- Lift it up so that it doesn't tip over, but still allows you to easily remove the wheels.
- Unscrew the wheel fasteners.
- Remove the hubcaps and the wheels themselves.
As you can see, the procedure is really simple, but it requires attention and accuracy.
Removing the pads
- Try to move the piston as far as possible from the brake mechanism. But do not exceed the distance beyond that which will allow you to comfortably remove the brake pads.
- Take out the block.
- To make the job easier, you can disassemble the brake frame. To do this, unscrew the two bolts securing the block and disconnect the device.
It must be cleaned, since all accumulated debris, dirt, and rust will negatively affect the effectiveness of the new brakes.
Dirty
For cleaning, alcohol-based solvents and metal brushes are used. If cleaning is not performed, the operation of the brakes will be accompanied by beating - this should absolutely not be allowed.
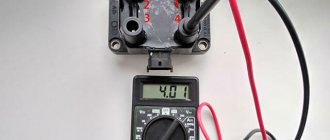
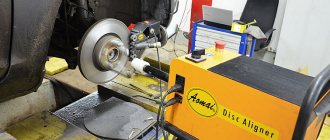
Be sure to check the hub for runout. Normally it does not exceed 0.1 mm. There is a special tool for checking. If the indicator is within normal limits, then a full assembly is performed.
Working with new disks
Many owners of the “Ten” are interested in which brake discs are best to choose for the VAZ 2110. The question is quite logical.
Choose certified replacements from reputable manufacturers such as Bosch, or stay true to factory parts. These are the two best options in terms of quality and compliance with the car itself.
New
Some take similar discs that partially fit the “ten”, sharpen them, and adjust the design. This is a dubious undertaking, since it requires serious skills in such a matter, additional time and financial costs. At the same time, it is far from a fact that such brakes will work better than those offered by the AvtoVAZ plant.
You've already figured out how to remove the brake element, so it's time to work on a new one. It’s not enough to just buy another brake disc and put it in place. First, it is prepared and a runout check is performed. Let's talk about this in more detail.
- The coating must be removed from a new disc.
- This coating serves as a kind of preservative.
- The layer is removed using any solvent.
- Clean thoroughly and wipe the part dry after finishing work.
- Now you can put the disk in a new place and check the runout.
- The permissible runout is no more than 0.15 millimeters.
- If the value is exceeded, this can lead to an increase in the sensitivity of the brake pedal, as well as the formation of vibrations during braking.
Installation and testing
Before changing brake discs, make sure that the problem with the brake system lies precisely in them. There are a number of other problems that are typical for the “ten” and all cars in general. A full diagnostic will be required so that the replacement is not in vain.
Adjustment
In fact, installation is performed in the reverse order of disassembling the brake discs. Therefore, there should not be any special problems.
But checking functionality is a more important and, to a certain extent, complex issue.
The first thing that experts advise is a full running-in of new discs. To do this, you need to travel about 500 kilometers. In this case, you need to brake smoothly, without making sudden impacts on the brake pedal. If this is not done, defects may form on the disks, and the cause will be simple overheating.
How to determine brake disc wear: acceptable standards and features
The brake disc is no less important in the braking system of a car than the pads. And if the latter are replaced when worn out, then almost no attention is paid to the former. But the efficiency of the system also depends on them. Let's find out how to determine the wear of brake discs so that they can be replaced on time.
Most of the discs that lie on the shelves of car dealerships are made of cast iron. The popularity of such products lies in their low cost and good friction characteristics. But the problem is that in the process of reducing the speed, the cast iron alloy product heats up. This leads to deformation, warping, and uneven abrasion. To reduce wear and tear from heat, manufacturers began to produce products with ventilation. Grooves are also cut on the surface of the disk. This allows you to increase the life of the disk.
The procedure for replacing the clutch with your own hands
Dismantling the gearbox
Before you begin dismantling the gearbox, you can watch a video on this topic.
Replacing the VAZ 2110 clutch with your own hands is carried out as follows. First of all, you need to disconnect the battery from the on-board network, then disconnect the speed sensor, remove the mass air flow sensor and the air filter. Then you need to disconnect the cable from the fork; to do this, you will need to unscrew the two nuts securing the cable to the bracket on the gearbox. By the way, if you only need to replace the clutch cable, you won’t need to dismantle anything else.
After disconnecting the cable, you need to jack up the car and remove the left front wheel. Next, the starter is removed and the upper bolts that secure the gearbox to the engine are unscrewed. The drive nut on the right side needs to be unscrewed, but not completely; the nut on the left must be unscrewed completely. Then you need to unscrew the suspension arm and ball joint. After this, the torque rod is unscrewed from the gearbox and the clutch housing is dismantled, and the gearbox control drive rod is also dismantled, for which the bolt on its clamp is loosened.
After this, you need to place a stop under the motor so that the hoses do not break if it drops too much. It is important to be careful not to damage the crankcase. Then the lower nut and bolt securing the gearbox to the engine are unscrewed, after which you can carefully remove the box from the engine and lower it to the floor, while it hangs on the axle shafts.
DIY clutch repair
First, the bolts securing the basket are unscrewed. You should pay attention to the petals of the basket - their severe wear indicates the need to replace the clutch basket. In order to replace the disc, you will need a mandrel or gearbox input shaft, otherwise the disc will most likely move and it will not be possible to install the gearbox back. Regardless of the degree of wear, it is also recommended to replace the clutch release bearing, since its cost is not high, and doing all the work again is too troublesome.
Replacing the clutch on a classic is not much different from this procedure on cars such as the VAZ-2109, Kalina or Oka. The only difference is that if on front-wheel drive cars you can do without removing the gearbox, then on the VAZ-2107 and others like it, the gearbox will have to be removed in any case. Therefore, if you have to change the clutch yourself, it is advisable to do it with an assistant - this will greatly simplify the task.
What affects wear?
Each manufacturer prescribes brake disc wear standards. These parameters are obtained based on engine power, vehicle weight and other factors. But it is very difficult to calculate the mileage after which you will need to change the discs. Wear is influenced by various factors that cannot be taken into account.
First of all, it's your driving style. If the car owner prefers to drive more extreme, where sharp accelerations are replaced by equally sharp braking, then the service life of the disc is significantly reduced.
Mechanical factors also affect the service life. The material from which the brake disc is made is important here, as well as the quality of the pads. Often, discs are made from cast iron and its alloys - the material wears out more often than ceramics. The use of low-quality pads (for example, with asbestos) also leads to uneven wear.
When is replacement needed?
The wheel bearing located on the rear wheel of the VAZ-2110 fails quite rarely - the manufacturer indicates that its service life is 100,000 kilometers. Of course, we are talking about ideal conditions.
In real life, bearings fail more often. The main reason for premature wear is serious problems with the quality of roads. Our more than harsh and humid climate, as well as many other factors, also play a negative role.
In any case, the fact that the wheel bearing has flown is indicated by very characteristic sounds coming from the rear wheels of the car. Some drivers describe it as a howl, others as a roar. What is important is that the noise increases noticeably during turns.
Confirming a breakdown is not difficult - there are several ways. The most accurate one is:
- lift one of the rear wheels with a jack;
- manually unwind it with all your might;
- listen.
If extraneous noise occurs, you will have to replace it.
There is another test - for backlash. To do this, the VAZ-2110 is also raised above the ground, and then they grasp the wheel with their hands and try to swing it. If it dangles, then the element in question is definitely damaged.
Experienced car enthusiasts advise immediately getting rid of two old wheel bearings for the rear wheels. But in reality this is not necessary.
Symptoms of wear
Many people do not know how to determine the wear of brake discs, but it is very simple. There are several signs that it is time to change the disk.
The first indicator is vibrations, grinding noises, and extraneous sounds during the process of reducing speed. The second symptom is the car skidding due to the brake system being blocked. After the driver presses the pedal, the brakes may jam.
Step-by-step instruction
1. Using a flat-head screwdriver, remove the hub nut cap.
2. Loosen the hub nut using a 30mm socket. The nut is tightened with great force, so you can put a pipe on the knob to pull through a larger lever.
3. Loosen the wheel bolts and jack up the car.
4. Completely unscrew the wheel bolts and remove the wheel.
5. Now you need to remove the brake drum. To do this, unscrew the drum studs using a seven-deep socket. Next, screw the drum studs into the other holes only. This should be done evenly, twisting each pin a little. As you twist, you will see the drum move away.
After the studs have been completely screwed in, unscrew them and remove the drum by hand. If it doesn’t work, you can hit it with a mallet from the back side.
If it is difficult for anyone to imagine how to do this, watch the video.
6. After removing the drum, completely unscrew the hub nut and remove the washer.
7. We put on the puller and pull the hub off the shaft. She doesn't sit very well.
8. Remove the bearing retaining ring.
9. Remove the ring on the hub. We clamp the hub in a vice and knock it down with a blunt chisel.
The ring must be removed for subsequent pressing of the bearing.
10. We select the head according to the size of the bearing, put it in the hub, clamp everything in a vice and squeeze the bearing out. He will reach the jaw of the vice and rest against it. We install spacers, for example, as in the photo below and press them out completely.
11. Clean the bearing seat from dirt and rust.
12. Lubricate the bearing seat with oil.
13. Place the bearing in the hub, clamp it in a vice and press it flush with the hub. Make sure that at the beginning the bearing moves without distortion.
Next, we substitute the old bearing as a cage and press it in until it stops.
14. Install the retaining ring.
15. Install the ring. We hit it through the spacer with a hammer so that it sits in its place.
16. We put the hub on the shaft and attach the hub nut.
17. Tighten the hub nut with a torque of 185–225 Nm. If there is no torque wrench, then tighten it with a 1 meter lever with a force 2 times greater than the tightening of the wheel bolts.
Make sure that the car does not fall off the jack; it is better to place a stop.
18. After tightening the nut, tighten it so that it does not unscrew.
19. Next we do the assembly in reverse order:
- install the drum
- install the wheel
- cap the nut
The work takes about an hour.
Video lesson
How to find out the abrasion thickness?
In order to find out the permissible maximum thickness of the brake disc, you should look at the end of the product. There are two meanings to this part. This is the original thickness, as well as the minimum allowable. The numbers may vary depending on the car and wheel manufacturer. How to determine the degree of wear of brake discs? It is enough to simply measure with a caliper and compare the numbers with acceptable standards. This is how you determine whether the product can still be used or not. The disc should also be changed if it has different thicknesses at different points.
How long does it last
Typically, the first replacement of discs coincides with a similar procedure for brake pads. The wear of a disc is judged by its thickness, and how quickly the discs become unusable depends on your driving style. As a rule, this takes not even months, but years. There is also a dependence on which manufacturer the pads are installed. Some of them wear out discs faster.
The permissible wear of the brake disc on the “ten”, according to the manufacturer, is 17.8 millimeters for ventilated ones and at least 10.8 for regular ones. Disc wear can be determined visually by the presence of abrasions or by hearing (suspicious noise begins in the wheels). Experts recommend immediate replacement of discs if scratches or cracks appear on their surfaces, and the thickness of the discs becomes less than acceptable. The main thing is that brake discs are replaced only in pairs, since they wear out approximately equally on both sides. Failure to comply with this rule is fraught with loss of vehicle controllability (the car will noticeably drift to the side).
On the VAZ-2110, wear on the front axle discs occurs faster than on the rear ones, since this car is front-wheel drive, and most of the energy during braking is transferred to the front wheels. In addition, as standard, the rear brakes on the “ten” are not disc, but long-outdated drum ones. They are outdated, since most automakers in other countries install brake discs on all wheels. It is worth noting that there is no specific wear and tear time frame for them, so their condition must be monitored by the owner of the car himself. They are supposed to be inspected during scheduled technical inspections. There is nothing difficult about this, since, unlike brake drums, it is easier to inspect the disc on the rear axle; you just need to remove the wheel. It makes no sense to change disks early, and not changing them when the need arises is dangerous.
Fix defects or replace?
When the measurements are completed and the exact diagnosis is clear, the car owner is faced with the question of whether to restore the old product or purchase a new one. It should be remembered that the disc can be sharpened only if there is residual thickness (from 22 millimeters). This is true for ventilated discs. Many experts recommend replacing only. However, if the price of a new disk is too high, and there is a spare thickness, you can try to restore it.
Small beads and grooves can be removed by grooving using special equipment. Some even do the grooving with a file, but this is unreliable. The essence of the operation is that a thin layer is removed from each side of the disc. Then the product receives a perfectly flat surface.
Before boring the disc, the cause that caused the deformation or beads on the surface should be resolved. Otherwise there is no point in restoration. Among the causes of uneven wear, brake pads are in first place. If they are of poor quality or installed incorrectly, they can easily damage the surface of the disk.
Replacement: sequence of actions
To change these parts you will need:
- Hammer.
- The key is 13.
- The key is 17.
- Wire cutters.
- New brake discs and pads.
- Jack.
- Puller for brake discs.
- New discs and pads must be from the same manufacturer. If you do not replace the pads, they will not be in sufficient contact with the surfaces of the discs, which means braking will not be safe. Work on replacing parts of the brake system must begin by placing the car on a jack and securing it securely.
- Next you need to remove the wheel. To do this, use a spanner to unscrew the nuts holding it. Now you need to turn the steering knuckle outward and clean the outer surfaces of the disc and brake caliper from dirt.
The brake disc is immediately visible, you just need to remove the wheel
The caliper is held on the disc by two bolts
These screws hold the brake disc to the hub
These screws hold the brake disc to the hub
To remove the disk itself, there are two ways: use a puller with special grips or remove it gradually, tapping its inner side with a hammer and turning it a quarter turn from time to time. It will be faster and easier to use a special tool. We remind you that discs can only be replaced in pairs.
The surface of the wheel hub in contact with the disc must be thoroughly cleaned and treated with a special copper or graphite lubricant that is resistant to high temperatures.
We knock down the brake disc with a hammer. Slowly
When to change pads?
We know how to determine the permissible wear of brake discs. But it’s worth paying attention to the pads, since these elements work in pairs and together affect braking efficiency.
One of the signs of pad wear is a squeaking sound when the speed is reduced. The sound is produced by a special wear sensor. This is a special plate. When the friction layer of the pad is worn away, the plate touches the disc and causes the sensor to operate.
You can determine that the pads are worn out by the operation of the brake system. Brakes that are too weak or too harsh can indicate wear. In the first case, the braking is not intense, although the pedal is pressed quite deeply. In the second, the wheels are blocked due to the lack of friction lining.
How to determine the wear of brake discs and pads? This can be determined by vibrations during braking, as well as by visual inspection and a measuring tool. There are no other options.
conclusions
Buying and replacing brake discs on a VAZ-2110 is quite simple. This will require a little constructive knowledge and skills. The process itself will take about half an hour. If the car enthusiast cannot carry out the procedure on his own, it is recommended to contact a car service center.
Published on August 29, 2016
What if the heads of these two bolts that hold the brake disc are missing? The carvings are located inside; it looks like the former owner tore them off. How can I extract it? By the way, there is no garage, much less a pit.
Well done! Purity and beauty. Well done.
I changed the disc and pads and the vibration appeared. what to do?
everything is well shown and told! no unnecessary advertising, etc.
website about repair and tuning of your favorite cars
We determine the mileage based on the condition of the disks
Today, cars are sold by so-called resellers, who often deceive buyers. Cars come with low mileage. Many of them only look normal outwardly, but technically they are in a deplorable state. Resellers often change the pads, but simply forget about the discs. And this is in vain - the average mileage of a car can be determined by the condition of the disk.
On average, brake discs are changed every 180-200 thousand kilometers. But this is not true for all cars. Also, different drivers drive differently. Some people manage to drive 150 thousand kilometers until they are completely worn out, and some even 250. But if the mileage of a car is 70 thousand, and the total thickness of the disk is 20 millimeters, this car has probably traveled at least two hundred. It is worth refusing to purchase such a copy.
Choice
Today the market is represented by an extensive list of alternatives made in Europe and China. We strongly do not recommend using Chinese spare parts, but European analogues should be considered as a replacement for VIS.
According to a study conducted among VAZ 2110 owners, the five best kits for the domestic “ten” were determined:
As we have already noted, VIS is installed as standard and works quite well. An important advantage compared to European counterparts is financial accessibility. But if your wallet allows it, replace the old clutch with a better and more expensive one.
In defense of the VIS system, we note that repairs often require simply adjusting the pedal and tightening the cable . And if you are going to completely change VIS to VIS, it will not cost you a pretty penny.
TD COST
The cost of brake discs on a VAZ 2114 depends on the manufacturer: standard Avto-VAZ units have proven themselves well, they are inexpensive, about 1 thousand rubles per piece, and at the same time they are durable and reliable - an excellent option for a quiet ride.
Owners of the fourteenth, preferring more aggressive driving, praise the ventilated front brake discs on the VAZ 2114 “MasterSport 14” and “BremboMax 14”, their prices are 2200 and 1600 rubles, respectively.