Replacing the wheel bearing of VAZ 2108, VAZ 2109, VAZ 21099
/ / / / / Do-it-yourself maintenance and diagnostics of faults in the suspension of a Lada 2108 Lada 2109 car. Elimination of knocks, noise and vibrations, replacement of suspension parts of VAZ 21099, VAZ 2108, VAZ 2109. Rear wheel hub bearing Rear suspension device of VAZ 2108, VAZ 2109, VAZ 21099 chassis repair rear suspension, device and repair
| PERFORMANCE ORDER 3. Engage first gear and install wheel chocks (“shoes”) under the front wheels. Lift and place the rear part of the Lada Satellite on supports. Remove the wheel. | ||
| 1. Remove the protective cap of the hub nut by picking it up with a screwdriver. | 2. Unlock the hub nut and loosen it. | |
| When removing the hub nut, the vehicle must be on the ground. Loosen and tighten wheel bolts only with the vehicle on the ground. The tightening torque of the bolts is 65–95 N m (6.5–9.5 kgf m). | ||
| 4. Remove the brake pads. | ||
| 5. Unscrew the hub nut completely and remove the thrust washer. | 6. Using a puller, press the hub off the axle. | |
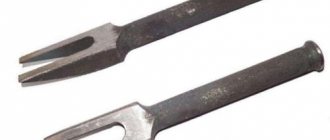
| 7. Secure the hub in a vice, remove the retaining ring from the inside of the VAZ 2109 hub. | 8. Using a puller, press the bearing out of the hub. | Universal puller for pressing out wheel bearings of VAZ 2108. |
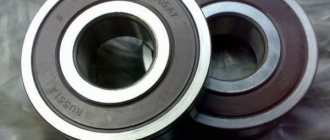
| The wheel hub is equipped with a double-row ball bearing VAZ 2108, VAZ 2109, VAZ 21099, which does not require adjustment or lubrication during operation. When pressed out, the bearing is destroyed. Therefore, press the hub only to replace the bearing. If you do not have a mandrel or puller to press out and press in the bearing, you can use the rings of the old bearing. 9. Press in the new bearing using a puller and install the retaining ring. Before assembly, thoroughly clean all parts of dirt. | ||
| 10. Press the hub onto the axle, applying force to the inner race of the bearing. | ||
| 11. Install the pads and brake drum VAZ 21099. | ||
| 12. Install the wheel. | ||
| 13. Place the car on the ground and tighten the Lada Samara hub nut to a torque of 225–250 N·m (22.5–25 kgf·m). | 14. Then tighten the collar of the nut into the grooves of the threaded part of the drive shaft. Put on the protective cap. |
Removal and installation of shock absorber strut VAZ 2108, VAZ 2109, VAZ 21099 |
| Replacement of the rear beam of VAZ 2108, VAZ 2109, VAZ 21099 |
| Replacing the wheel bearing of VAZ 2108, VAZ 2109, VAZ 21099 |
Checking and repairing the chassis of the Lada 2108 with your own hands. Instructions for servicing and replacing the chassis components of fret 2109, front and rear suspension of fret 21099.
How to easily unscrew a hub nut - 10 tips
pages:
- ➡️Features of the hub nut design
- ➡️ Which way to unscrew the nut
- ➡️ Basic ways to remove the hub nut
- ➡️ Standard method of unscrewing the locknut
- ➡️ Power options for removing the nut
- ➡️ How to remove a hub nut from a thread - methods for VAZ owners
- ➡️ Removing the nut using chemicals
- ➡️ Frequent problems during work and safety measures
- ➡️ What to do after the nut is removed
- ➡️ Useful videos and links
Wheel nuts secure the hub and bearing to the drive shaft or axle. When carrying out diagnostics and repairs, when it is necessary to remove the hub, you cannot do without unscrewing the lock nut.
It is necessary to unscrew the nut when carrying out the following types of work:
- replacing front bearings;
- replacing rear bearings;
- wear of bolts, threaded rods;
- brake system repair;
- replacing the CV joint of a front-wheel drive car;
- adjusting the bearing, checking the tightening torque;
- types of repairs when it is necessary to free the drive shafts;
Design features of the hub nut
The hub nut is located in a unit whose operation occurs under conditions of high temperatures, mechanical and external influences. Therefore, alloy steel with anti-corrosion coating is used for manufacturing.
The part, in addition to the standard nut elements, has grooves. After reaching the required torque, a locking pin is inserted into them or mechanically fixed with a chisel. The outside of the nut is surrounded by 6 standard edges. We gain access to the locknut after removing the protective cap.
Which way do the hub nuts unscrew?
When making repairs, car owners without experience have a question: “In which direction can the part be unscrewed in the easiest way?” Of course, it all depends on the brand of car, for example, in Chinese, the design and direction of the thread may differ, but there are two basic rules:
- On older car models, where fixation with a cotter pin and groove is not provided, we try counterclockwise on the left wheel, and clockwise on the right wheel.
- On modern machines this problem does not exist; the lever must be applied counterclockwise, regardless of the place of work. The pressure will be high, so it is necessary to use a stopper.
How to unscrew the hub nut - the main 5 ways
To solve the problem of how to unscrew the hub nut, it is necessary to determine the dismantling method. This can be done in one of two main ways:
- With the wheel removed.
- The car is on wheels.
replacement
Front wheel bearing puller VAZ 2109
The necessary parts for replacement have been selected.
For repairs, you will need, in addition to the standard set of tools, special bearing mandrels. If these are not available, you can use a pipe that matches the diameter.
By following the instructions and video tutorials, you can manually replace the front wheel bearing.
- Loosen the tension of the wheel bolts, remove the decorative plastic plug from the hub bearing and disconnect the mounting nut.
- Using a socket and lever, loosen the bearing mounting nut.
- Raise the car with a jack, then remove the wheels from the part of the front of the VAZ 2109 where you plan to replace the pod.
- Remove anything that might prevent you from disassembling the hub. These items include the brake rotor, pivot mount, ball joint, steering knuckle bolt, and A-pillar fasteners. Dismantle it all and continue.
- Unscrew the front hub nut completely, remove it and remove the thrust washer.
- The hubs must be removed from the A-pillar bracket and removed.
- The hub has been dismantled, so you can push the damaged bearing out of it and install the working unit in its place.
- Place the hub in a vise or place it in any other way that suits you.
- Using a knockout that matches the diameter, press the hub out of the inner ring of the pod.
- In some cases, the outer portion of the inner ring may remain on the hub. In this situation, you cannot do without a puller. In general, it is better to work with a special tool. It will definitely be among your friends or neighbors in the garage.
- The same knockout requires the bearing to be done from the rod. To do this job you will need to remove the retaining rings first. They are obtained from any improvised tool, such as awl. Although there are special clamps for such purposes.
- That's it, you can remove the wheel bearing.
- Carefully adjust all dismantled parts using clean kerosene. Follow fire safety regulations.
- Assess the condition of the hub itself. If it shows signs of damage, defects, chips, it must be replaced with a new one.
- The new bearing is pressed into place using a clamp or press. The force is applied to the outer rings.
- Using a tool such as a hammer to drive a bearing is strictly prohibited, as this will lead to destruction of the new part.
- With the front wheel bearing installed, follow the assembly return procedure
- Don't forget to replace the hub nut.
- Once the assembly is fully assembled and the vehicle is lowered to the ground, the mounting nuts must be fully tightened.
Eliminate front hub wear or bearing failure. Our instructions, complete with video guides, will walk you through the process from start to finish.
CV joint nut, how to unscrew, in which direction and why it does not unscrew, overview of types and types of nuts
The spline connection of the outer CV joint is a critical unit. It is this part that bears the torque load. It is no wonder that the grenade nut, which holds the floating axle shaft in the drive wheel hub, should not unscrew on its own.
Before unscrewing the hub nut, it is advisable to read the instructions for routine maintenance of your car. It indicates the method of fixation, the direction of the thread and other nuances.
- Changing the geometry of the nut (one side is oval). Anyone who has repeatedly unscrewed such a nut has seen that the threads gradually become unusable;
- Punching after tightening. This solution is not suitable for replaceable units, since this will damage the screw part. However, many car manufacturers fix the hub nut in this way so that it does not unscrew while driving;
- Hairpin. The most reliable method of fixation. The nut does not unscrew on its own, and the thread does not deteriorate. For some reason, not all car designers use this simple method;
- The retainer is a “shoulder-groove”. A common method, more reliable than core punching, but detrimental to carvings. Longitudinal grooves (one or two) are made on the threaded connection of the axle shaft. The CV joint nut has the same number of collars, which bend into grooves after tightening. It is almost impossible to unscrew the nut without damaging the thread;
- A variety of fixing paints and adhesives. Not used on hub connections.
Since the connection is in unfavorable conditions (especially if the boot cap is lost), the nut does not unscrew the first time. An inexperienced driver panics, starts turning the nut in the wrong direction, uses attachments on the wrench in the form of a meter-long pipe, and as a result breaks the thread. The consequences are a forced replacement of a still-living CV joint.
How to unscrew the hub nut without ruining the threaded connection
First of all, stock up on quality tools. An ordinary wrench is not suitable for plumbing work, although many car owners stubbornly use them to repair CV joints (the size is the same, but the cost of the tool is lower). An open-end wrench can only be used to unscrew an already “undermined” nut, this is really more convenient.
For the hub (CV joint), only a union head is used. The end cap can be cast or stamped (the second option is cheaper), and exactly match the size of the nut. If you “lick” the edges using a tool with backlash, you will be working with an angle grinder, and you will have to say goodbye to the CV joint.
Important! Reuse of nuts is not permitted. Before unscrewing the old nut, make sure you have a new one.
- Thoroughly clean the surface from corrosion and dirt. If a spline-shoulder pair is used, you need to pick out everything that is in the holes;
- Treat the joint with a penetrating compound for soured threads. For example, WD-40 liquid, or regular kerosene. You may need to "soak" the thread for several hours;
- Remove all fixing devices;
- Place the socket on the nut and try to turn it using the lever. At this stage, it is better not to use handles with ratchets, as the mechanism may be damaged;
- After “undermining”, the nut can be unscrewed with any wrench that is more convenient.
Throw away the old nut and stud. Clean the threaded connection from rust and traces of fixing compounds.
How to unscrew the CV joint nut if a fixing collar is used
It is this method of fixation that most often leads to “licking” of the thread. VAZ drivers know what they are talking about. An inexperienced master, delighted at the easy movement of the nut, will ruin your grenade in 2-3 turns of the key.
For proper release, you need a special punch that exactly matches the size of the spline collar. You won’t find them during the day with a fire, so it’s wise to make a useful tool yourself. For example, from an old file. With its help, you can unscrew the nut while maintaining the threads on the axle shaft.
After disassembly, it is necessary to slightly grind the shoulder to remove burrs.
What to do if the nuts do not unscrew?
Have you removed the clamps, “soaked off” the rust, bought a wrench with a 1 meter lever, but it still doesn’t work? There are proven ways to unscrew a nut without a grinder.
- Reverse rotation. Sometimes it is enough to first move the nut in the direction of tightening, and the process will begin;
- Tap the nut. Use a small hammer (preferably brass or copper) to tap the edges;
- Heat. A gas torch or blowtorch is an almost 100% guarantee of success due to the expansion of the metal. In an electrified garage you can use a hair dryer. Heat for at least 5 minutes.
Don’t panic, hit the key with a sledgehammer, or cut the hub with a grinder. Rust on the threads is not welding. The connection is still removable, it just requires a little patience.
SwapMotor.ru
- Wheel bearing, how to replace the wheel bearing on a Daewoo Nexia with your own hands. Replacing the wheel bearing. How to replace the wheel bearing on a Daewoo Nexia?
- Replacing the front wheel bearing of a Chevrolet Aveo T300 Instructions on how to replace the hub and wheel bearing of the Aveo new T300
- Replacing the front hub of a VAZ 2110. Photo instructions on how to change the front hub on a VAZ 2110.
- Replacing the front wheel bearing Niva Chevrolet
Symptoms of a problem
Hyundai Accent silver Logbook Replacing the heater fan
If the VAZ-2109 wheel bearing has outlived its useful life, the driver will be notified of this by the following symptoms:
- Quite a loud characteristic crunching sound. This sound is caused by balls rolling freely inside the broken bearing housing. It is clearly audible from inside the car, and it is extremely unlikely to confuse it with anything else.
- The occurrence of vibration. The vibrations are quite strong and are transmitted to the body, as well as to the steering wheel. They feel good in the driver's hands. The appearance of this sign indicates an extreme degree of wear of the wheel bearing and warns that in the near future the element will fall apart with all the ensuing consequences in the form of a “wedge” of the wheel.
- Loss of the vehicle's ability to move straight - the driver is forced to steer in order to maintain a straight trajectory. This is caused by partial locking of the wheel, the hub bearing of which does not perform its function.
If these signs are detected, the wheel bearing must be replaced immediately. It should be said that this task is quite simple, and even an inexperienced car enthusiast, after carefully reading the replacement guide and watching the video materials attached to the article, is able to change the faulty part with his own hands.
It is necessary to take into account that wheel bearings should be replaced in pairs, on both wheels located on the axle.
To perform this task, it is necessary to have a garage with an equipped inspection pit. You will also need to arm yourself with a set of tools, accessories and, of course, two new wheel bearings (2108-3104020).
Causes and symptoms of hub wear
You will have to replace the front wheel bearing if you notice several signs of wear.
Sign
Your actions
This may manifest itself as wheel swaying. Play can be caused by loss of efficiency of both the hub itself and its bearing.
When driving, you may hear strange, extraneous sounds coming from the wheels. As the speed increases, the hum only increases, but after that, when the speed decreases, the noise remains at the same level. If the hum comes from one side, then the hub and bearing should be replaced only on that side. If on both sides, then replace both
Fast bearing heating
A rather dangerous diagnosis that leads to overheating of the calipers. As a result, they also fail. Plus, the brake fluid begins to boil faster, which leads to brake failure. Therefore, the problem should be corrected immediately
Checking the bearing for play
Diagnostics of the play will allow you to determine whether it is necessary to remove and replace the wheel bearing, or you can correct the condition of the unit and calmly continue to operate your VAZ 2109 for some time.
Checking for play
Checking the front wheel bearing play is a simple task that even a beginner can handle. It’s not worth going to a service station and spending money.
By following the instructions, you can easily determine the backlash.
- Raise the vehicle high enough so that the wheels are off the ground. You'll need a good jack.
- If there is an inspection hole, then you can do without a jack.
- Bleed the wheel. It is important to hold the wheel on both sides and clamp it as firmly as possible. You need to swing away from yourself in the same direction.
- If a slight play is felt, try tightening the bearing nut more firmly. Sometimes, while driving on bad roads, it loses its grip, hence the backlash.
- If tightening the nut does not help, you will have to replace the hub or bearing.
- It would be a good idea to check for play by swinging the wheel in different directions, pressing the wheel towards you with one hand, and shaking it away from you with the other.
- If such a swing shows that there is play, the culprit is no longer the bearing and hub, but the steering tips. They need to be replaced.
- Replacing the upper ball joint will be necessary if you pull the wheel with emphasis on its upper part and detect play.
- Pull the lower part already. Play indicates the need to replace the lower support.
If wear is detected on the front wheel bearing, both elements should be replaced immediately, and not only replaced on the side where the problem is found.
Replacing a VAZ 2109 wheel bearing
Replacing a VAZ-2109 pump in the garage
The VAZ 2108, 2109 series is the first Russian front-wheel drive car. Replacing the VAZ 2109 wheel bearing is necessary if, while driving, you hear an increasing hum in the wheel area, sensitive vibration appears during braking, and the hub overheats greatly. Wear of the wheel bearing threatens to increase wheel play and wear out the hub. In the most advanced cases, this can lead to bearing destruction and wheel jamming, so do not delay replacement.
Preparing to replace the wheel bearing
Before you replace a worn wheel bearing, you need to select a replacement. AvtoVAZ recommends installing only original factory bearings. But the experience of many car owners has shown that the most “unkillable” and long-lasting are the wheel bearings from the Vologda Bearing Plant. They are marked with the abbreviation VBF. These bearings can last at least 100 thousand kilometers without replacement. You can also install similar “Craft” or “SKF” bearings. The latter are more expensive, but their service life is much longer.
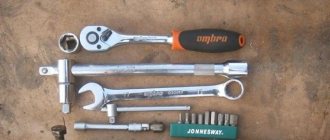
To replace a wheel bearing on a VAZ 2109, you will need: a jack, supports for the housing, a bearing puller, a vice, a 30-mm socket with a knob, 12-, 17- and 19-mm spanners, a torque wrench, a small chisel, a hammer, Litol-lubricant. 24", flat-head screwdriver and pliers.
How to unscrew the hub nut on a VAZ 2109
Yes, you may very well be one of the lucky ones who won't need any extra effort as the problem with unscrewing the hub nut may simply be a matter of going in the wrong direction.
So, we take the wrench and, when your car is far from new, try, if the nut does not lock, on the left wheel, unscrew the nut counterclockwise, and on the right wheel, unscrew it clockwise. In modern brands, it is usually necessary to unscrew the hub counterclockwise .
Before you start unscrewing the hub nut, do not forget that it comes off when the car is standing on the wheels and the stops are placed under them. On the side from which the nut will be unscrewed, a stop is securely installed.
Although if the nut is located deep and the brake disc is ventilated, then you can try to unscrew it (fixing it with a powerful screwdriver) and only after making sure that the car is securely secured. Remember about personal safety precautions: protect your eyes, do not overdo it, because in the spirit of enthusiasm you can accidentally get hurt or damage the car body.
Unfortunately, in most cases, it is not enough to use a wrench with a large lever; you have to use additional tools and special mixtures. Let's consider the other options.
Which way should I unscrew the hub nut?
On the left wheel - counterclockwise. On the right wheel - clockwise.
On modern cars, the hub nut is most often unscrewed counterclockwise.
Five ways to unscrew a car hub nut
This method involves replacing the hub nut; you will have to buy a new one. It is necessary to drill the nut along the groove in order to loosen it, and then use a chisel and hammer to break it. To do this you will need a drill, drill, chisel and hammer.
2. Humane way
It is necessary to treat the hub nut with Vedashka penetrating lubricant (WD-40), wait a little for the rust to soak. Next, you need to install the wrench head on the nut and make a few blows. After that, try to unscrew the nut. For this method, you will need a hammer, a heavy-duty screwdriver, WD-40, and a heavy-duty tubular socket wrench.
3. Method “Use force”
We install a wrench of the required size on the nut, and a long pipe on the wrench itself. We tear off the structure by force and pull the pipe down and gradually increase the pressure on the pipe. For this method you will need a powerful and high-quality socket wrench and a long pipe.
Source: https://AutoManya.ru/avtovaz/kak-otkrutit-gajku-stupicy.html
Repair kit
Please note that new bearings must include retaining rings. You will also need a new nut.
It is forbidden to use an old nut, as you will not be able to tighten with the required force. The first step is to remove the cap that covers the hub nut. After this, you need to straighten the edge of the nut using a hammer and a thin drift. This way you will be able to unlock it so you can unscrew it later. Note that the side of the car has not yet been raised. First you need to loosen the hub nut. To do this, use a 30mm socket with a large lever. It is possible that you will need to extend this lever with a piece of pipe. After this, you just need to loosen all four hub bolts and raise the side of the car as much as possible. Now you can finally unscrew the bolts and hub nut on the wheels.
Replacing the front hub
- Unscrew the wheel nut with a 30 mm socket.
- Raise the car on a jack.
- Remove the wheel.
- Remove the brake caliper.
- By removing the brake disc, you will have access to the front hub.
- Unscrew the hub nut. It is secured with three bolts. The bolts are too close to each other, so the head becomes very tight here and is difficult to rotate.
Note: You can loosen these bolts slightly and then remove them. If the bolt is very tight, you can warm it up.
- Using a screwdriver, pull the hub out of its seat.
Mounting the front hub on a VAZ 2109
- Thoroughly clean the seat.
- An oil seal must be inserted into the hub housing. It needs to be pryed off, as it will get in the way (it can be inserted into a new hub). To make it fit better, its seat should be lubricated with oil.
- Traces of dirt will remain under the oil seal, so that in the future dirt does not get under the new oil seal, it is necessary to lubricate it with a special liquid.
- Put the hub in place. Lightly tighten the hub nut so that the hub does not fall out.
- Press it in.
- Tighten all the necessary screws on the reverse side.
Checking the wheel bearing for functionality
It can be checked in two ways without removing it from the car, but for this you will need to stock up on a jack, in both cases it will be needed and without it it will be more difficult to check the wheel bearing for functionality, well, let's get started, the first method is, on the one hand, more successful but on the other hand, it is the most dangerous, since when hanging the wheel you do not need to throttle as most people do, in general, watch the video clip carefully and you will understand everything.
Note! The first method is done only if your differential is not welded and locked, otherwise if it is blocked, then after turning on the fifth speed your car will simply go!
And the second method of verification is also successful, but in the first case you can be 100% sure of this, although the second method implies approximately the same percentages, in general, watch the video below, which says everything in detail.
Additional video clip: If you want to visually see how the front wheel bearing is replaced in general, then watch the short video just below, which clearly shows without words how to change the bearing on a car!
And if you want to see more detailed instructions for replacing this bearing, then watch the second video in which everything is described in detail.
Note! By the way, this video shows how to replace a bearing on a steering knuckle installed on a car, and the article was written taking into account the removal of the steering knuckle from a car, so if you do not want to remove the steering knuckle, then study in detail the video that shows how you can replace a bearing on a steering knuckle installed on a car. !
How to diagnose bearing play
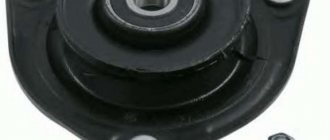
VAZ 2109 front wheel hub
In fact, this process is very simple, and even a beginner can do it. For this:
- Raise the car using a jack to the optimal distance.
Note: It is much easier to diagnose using an inspection hole, but if you don’t have one, a jack will also work.
- Bleed the wheel. This should be done according to a certain pattern: hold the wheel on both sides, squeezing it as much as possible. You should swing your arms in the same direction (preferably away from you). By the way, this procedure is also carried out in car services, so it is advisable to attend it in order to be prepared for its implementation later.
VAZ 2109 front hub
- If there is slight play, the bearing nut should be tightened as much as possible.
Note: if this does not eliminate the play, then the hub or its bearing must be replaced.
- You should still hold the wheel on both sides. However, now you need to pump it not in one, but in different directions. What does it mean? You just need to press the wheel towards you with your left hand, and away from you with your right. If play is also observed, then the reason is not in the hub. In this case, the steering tip is faulty. It should be replaced.
Note: In some cases, tie rod ends are sold complete with tie rods. However, these thrusts do not always need to be changed either. They can be left, replaced if they break soon.
- Pull the wheel, placing maximum emphasis on the top of the wheel. If in this case there is also play in the bearing, then the upper ball joint should be replaced.
VAZ 21093 front hub
- Pull the wheel by the bottom. Accordingly, if there is still play, then the lower ball joint needs to be changed.
Note: if only one bearing has failed, then it is better to immediately change the second one, since it will most likely also break very soon.
What tools are needed for replacement
So, now we need to talk about what devices you may need during the work. Of course, first of all you need a jack and supports. With their help, you can lift the side of the car that is being repaired and fix it in this position. Also, it is necessary to place stops under the rear wheels, which will prevent the car from moving.
You will also need a large and good vice. To press in a new bearing, a special mandrel is needed. It can be made from an old bearing race. Of course, you can’t do anything without a good set of keys and sockets, small pliers, and it is advisable to have a puller for locking rings in addition to them. Phillips and flathead screwdrivers of various sizes will come in handy. It is also worth noting that the front wheel bearing of the VAZ-2108, the dimensions and price of which are indicated in the article, must be changed using special tools. The cost of a set of bearings for one hub is about 400 rubles.
And now about the heavy instrument. The most important thing is the 30mm head with a very large lever. You can also use a spanner of the same size. But not everyone, unfortunately, will be comfortable in this matter. A mounting spatula or small crowbar is also required. When removing the hub, you will need a good marker that will not wear off with impact. And the most important thing is a bearing puller. Without it, repairs will be tedious and very long.
Bearing installation
The mud ring is put on first and secured to the hub with a hog. Clean and lubricate the inner surface of the steering knuckle. Then the bearing is pressed into place using a puller. If there is no mandrel, you need to press it in with used bearing races.
Note: work on installing the bearing and hub is carried out:
Note: pressing with hammer blows is strictly prohibited, as it is destroyed by mechanical shock.
The bearing can be pressed in by applying pressure to the outer race:
- Install the bearing;
- Place the retaining ring in the steering knuckle.
- Using a puller or mandrel, press the hub into the holder.
- When carrying out work, apply force to the inside of the cage.
Note. When installing the steering knuckle, you must use a new nut to secure the hub.
- Stretch it by hand;
- Put on the wheel rim:
- Tighten the bolts.
- Lower the machine from the stands.
- When the front of the car touches the floor, the suspension structure is loaded, tighten the hub nuts.
- Using a core, bend the side of the nut in two places to prevent the nut from twisting itself.
- Replace the protective caps, then tighten the bolts on the wheel rims;
- Collect all the tools and drive the car out.
- Listen to the work of the replaced parts in motion.
The cost of a front wheel bearing starts from 320 rubles. up to 560 rubles, depending on the manufacturer’s plant and configuration. Independent work on replacing the VAZ-2109 front wheel bearing should begin after a detailed study of the literature. It is also necessary to carefully watch the video and remember the stages of the repair. Number the photos according to the order of the processes. After this, you can begin replacing the wheel bearing yourself. The instructions presented above will help you do this. The cost of repairs will be low, because you will only have to buy consumables.
Removing the hub
Arm yourself with a 17 key and remove the brake caliper. Using a wire, hang it from a spring or body. No need to drain brake fluid
Please note that with the caliper removed, do not press the brake pedal. Now you need to use a 17mm wrench to unscrew the two bolts that secure the ball joint to the hub
There is also a mount on top. Using two 19mm wrenches you need to unscrew the bolts on the rack. Be sure to first mark the position of the steering knuckle relative to the shock absorber strut. That's all, the fasteners are disconnected, now you can start removing. The entire hub will be removed along with the disc. To prevent it from interfering with you during repairs, you need to unscrew the two guide pins. This is how the front wheel hub on a VAZ-2108 is replaced.
Front hub wear
Replacing the front hub on a VAZ 2109
Typically hub wear manifests itself in the following ways:
- There is play in the hub bearings, that is, they wobble slightly.
Note: the play should not be allowed to be too strong, as this will require replacing not only the hub, but also the bearing.
- The bearings are “humming”. While driving, strange sounds are heard coming from the wheels. As a rule, with increasing speed they become even more pronounced. After this, when the speed decreases, the noise does not become less quiet.
Note: If the hum is heard on only one side, then only one hub needs to be replaced. If it occurs in both wheels, both hubs need to be replaced immediately.
- Bearings This can cause the caliper to overheat as well, causing it to fly off as well. In addition, the brake fluid also boils too quickly. This leads to rapid failure of the braking system.
Causes of hub wear
Replacing the front hub on a VAZ 2109
Usually there are the following reasons due to which the hub wears out:
- The wheel bearing has completely fallen apart. Perhaps it is only in the early stages of destruction. In any case, it will have to be changed, but after appropriate diagnostics.
Selection of spare parts
To replace the bearing, we naturally need the bearing itself and the hub nut.
They can come either as a set or separately. Replacing the bearing is allowed on one wheel, but still, it would be better to change the axles on both wheels. The table below shows the main manufacturers of spare parts, indicating their catalog numbers.
| Manufacturer | Parts catalog number |
| LADA | 21083104020 |
| Complex | CX 081 |
| AUTOKIT | 01.280 |
| Euroex | 2108-3104020 |
| ABS | 200068 |
| FEBEST | DAC30600037 |
| BORG & BECK | BWK468 |
| CORAM | CR001 |
| BENDIX | 050841B |
| BREDA LORETT | CR 2552 |
| FIAT | 4178737 |
| BREDA | C171 |
| CORTECO | 19017731 |
| Finwhale | 2108-3104020 |
| Marketoem | 2108-3104020 |
| FINWHALE | HB321 |
| FIRST LINE | FBK468 |
| FLENNOR | FR891547 |
| IPD | 309110 |
| KAWE | FR891547 |
| Kemp | 77644281 |
| LEMFOERDER | 2006801 |
| LONGHO | 8751615_ |
| LSA | 21083104020 |
| SNR | R17204 |
| Mastersport | 2108-3104020 |
| MEYLE | 2146330001 |
| M.G.A. | KR3106 |
| MOOG | LA-WB-11604 |
| SBS | 1401762312 |
| N.K. | 762312 |
| SCT GERMANY | SCP 1307 |
| OPTIMAL | 802658 |
| SPIDAN | 26727 |
| SKF | VKBA 559 |
| TRISCAN | 853070201 |
| ZKL | 2108-3104020 |
Unscrew the hub nut with your own hands
The main element that holds a car wheel and allows it to rotate is the hub. Driving safety directly depends on the serviceability of this part. It is for this reason that even the laziest car owners do a mini-hub check at least once a month: they take the wheel with both hands and try to pull it in different directions. The presence of any extraneous sounds or play requires immediate repair. And then, when the car owner finally gets to the hub, it may turn out that the hub nut is stuck to the drive shaft and cannot be unscrewed. Fortunately, this problem can be solved, which we will talk about in today’s article. We will also mention why she can “stick” so much.
Car wheel hubs: how to unscrew the hub nut?
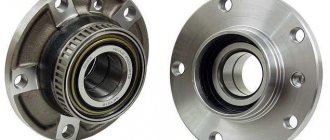
The hub is one of the main parts that allows a car wheel to hold and rotate. This is why a hub is installed on each wheel. The hubs of the drive wheels also transmit to them the rotational motion that comes to it from the transmission. The hub unit can be made in two versions. The first is when it and the axle shaft of the CV joint (constant velocity joint) are made as a single integral element. In the second option, the hub has a special spline hole intended for the CV joint axle shaft.
It is not difficult to guess that even the braking of a car is carried out only thanks to the hubs. It is on this part that the brake drum (or disc, depending on the type of brake system of the car) is attached. On almost all modern cars, the hubs are equipped with special sensors that allow full control over the vehicle’s movement and timely detection of faults, including hub faults. The functions performed by the part we describe include:
1. Fixing and holding the wheel rim.
2. Fastening the main working elements of the brake system and anti-lock brake system.
3. Rotation of wheels around an axis.
4. Transfer of torque to the wheels.
5. Holding all the main components of the car on the axle.
As for the design of a car wheel hub, it is quite simple. Due to the loads this part has to endure, it itself and all the main components of this part are made of very durable metal. Often this is a solid cast piece made of the highest quality steel, which is adjusted in shape and size thanks to processing on lathes and milling machines. In appearance it is a slightly rounded piece that has an outer rim and a very complex inner hole. There are additional holes on the rim, which are intended for screwing in bolts and bushings that hold the car wheel. But on some cars, instead of bolts, studs are used, which are fastened with ordinary nuts. The number of these elements is always in pairs and can range from four to eight.
Wheel bearings are installed on the inside of the hub in a special hole. They are the most problematic part of the hub, because due to intense loads they very soon fail - they simply wear out and require replacement. In addition, due to wear of the wheel bearing, the part itself begins to heat up very much during movement, which leads to sticking of the wheel nut in the wheel drive shaft. As we have already said, such a phenomenon cannot be called positive, since removing such a nut, and behind it the wheels, is a very difficult task, requiring from the driver not only good ingenuity, but also physical strength.
Thus, one of the main tasks in operating a car is to prevent wear of the wheel bearings and the part itself. It is also worth noting that different bearings on the hub can be used. Often closed roller or conical ones are installed, which can be disassembled. Ball bearings are the least used element in this element, since they are unable to provide a large contact area.
Fortunately for domestic motorists, bearings can be replaced without replacing the entire wheel drive. Although a large number of foreign cars are equipped with non-removable bearings, which, after wear, have to be replaced simultaneously with the hub. As for the other reasons why you will have to unscrew the hub nut and remove the wheel, there are not so many of them. After all, the hub itself breaks very rarely, which ensures durable metal. This can only occur in the event of serious mechanical damage caused by an accident. Otherwise, replacing the hub is only possible if the bearing is faulty, or when the threaded connections of the bolts are worn out.
In this case, the car owner’s first task (and sometimes the most important) is to unscrew the hub nut. If she sits normally, this will be very easy to do. To do this, you only need a special wrench designed for unscrewing the hub nuts. It is correctly called a “collar”. You can find it very easily at any auto store. The wrench accessory is placed on the head of the hub nut, after which its lever rotates and the nut gradually begins to come out. Either way, it got stuck to the wheel drive shaft. In this case, you can spend a lot of time, but the nut will remain in the same place. In this case, in addition to the wrench, you will have to prepare several more tools and call a friend for help, otherwise you will not be able to remove the wheel.
What do you need to unscrew a stuck hub nut?
The wrench does not need to be put aside, since it has been and will be the main tool for unscrewing the hub nut. But besides this, you will also need:
1. A pipe of small diameter, but made of durable metal. Approximate length is about a meter.
2. A very powerful and durable 30 head (it must have a hole in it).
3. A small crowbar or extension cord.
4. Gas burner (autogen) - may be needed to heat the nut.
Often it is not necessary to use all these tools at the same time. But since we don’t know how firmly your nut is stuck, we are going to voice all possible options for getting out of this situation.
Methods and procedure for unscrewing the hub nut.
Let's start with the simplest situation, when the hub nut simply did not give in to you on the first approach. In this case, it is necessary to use the same wrench, as well as a pre-prepared pipe. Thanks to it, you will be able to apply a force to the nut several times greater than that which you applied to the handle of the wrench. You must proceed as follows:
1. We put the car on the handbrake so that it does not move during operation.
2. We put the head of the driver on the head of the hub nut we need. It is very important that they fit together as closely as possible. Otherwise, the knob will jump off the nut. It is necessary to put the knob on so that the handle is almost parallel to the ground (perhaps slightly above parallel).
3. We put a pipe on the handle of the crank.
4. We try to press the pipe with maximum force with our hands, literally leaning on it with our entire body weight. If the nut does not turn even a millimeter, you can even try standing on the pipe. But at the same time, it is important that the connection between the collar and the head of the hub nut is controlled by another person, because if the collar starts to slip, there is a high probability that with your weight you will simply break off the head of the nut.
This method very often does not work for another reason that the knob itself cannot withstand pressing the handle. This is possible if the hub nut is literally tightly stuck to the drive shaft. If the knob breaks, you will have to replace it with a 30 socket with a hole into which you can insert a crowbar. It is very important to choose a head of maximum strength so that the same thing does not happen to it as with the knob. Otherwise, the procedure for unscrewing the hub nut will be the same: put the head on the nut, insert a crowbar into it and try to turn it at least a little.
If failure befalls you this time, you will only have to use one more method of unscrewing the stuck hub nut. It consists in the use of a gas burner, or autogen. A very simple principle is used here: as a result of heating, the metal will expand, and this will make it much easier to unscrew the nut. The only disadvantage of this method is the possibility of damaging the wheel and its parts. Particular care must be taken when handling wheel rims, which may have traces of heat on them. Therefore, during work they need to be covered with something.
We hope that after this you will still be able to remove the wheel from the car and get to the hub and its bearings. It is only worth noting that after unscrewing the nut, under no circumstances should you move the car, as this can lead to serious damage to the loose drive.
Subscribe to our feeds on Facebook, Vkontakte and Instagram: all the most interesting automotive events in one place.
Was this article helpful?
auto.today
We solve a difficult problem, how to unscrew the hub nut of a VAZ 2110
The question of how to unscrew the hub nut of a VAZ 2110 rarely arises, but most often the word “difficult” is heard in the answers, and this is not by chance. It turns out that sometimes you have to make titanic physical efforts to perform the necessary manipulations. To solve the problem of how to unscrew the VAZ 2110 hub nut, some car enthusiasts have thought of using bold and unusual dismantling methods. And it turns out there are a great many extraordinary approaches to repair!
VAZ 2110
Where is the hub nut seat?
If repair work is carried out in exceptional cases, then the question of how to unscrew the VAZ 2110 hub nut most often arises among newcomers to the automotive world, and they will also have to figure out where this part is located and why it gets damaged. Let us note that it is really rare that during the process of repairing the chassis of a car, craftsmen pay attention to the condition of the wheel bearing, because many believe that the product does not require special repairs and monitoring. And such a forgotten and abandoned element, at the moment of deciding how to unscrew the hub nut of a VAZ 2110, is responsible for all its grievances and does not want to voluntarily unscrew, it seems that all the fasteners are tightly stuck. And then every second person thinks where to get the incredible physical strength to turn the required nut. It is also very important to use the right tools. The choice will fall on false or weak helpers, then there are two options - they will either be broken or useless. So what is better to choose in terms of tools?
Hub nut seat
How to unscrew the VAZ 2110 hub nut and what tools are needed
- You will definitely need a socket wrench with an existing 3/4 inch driver.
Tested by many car enthusiasts who have learned in practice how to unscrew the hub nut of a VAZ 2110. A socket wrench with an existing wrench - A set of powerful screwdrivers, they are necessary for “tapping”, “implementing” into narrow parts of fastener seats and for working with a nut.
Screwdrivers - An iron pipe that can act as a support and a simple lever.
As they say, during the repair process you will have to remember your physics lessons. Iron pipe - Buy WD-40 lubricant, it can make the master’s work at least a little easier and give at least a little hope that everything will pass quickly and how to unscrew the VAZ 2110 hub nut will become clear after a successfully completed work process.
WD-40 lubricant - To complete the process and its completion, it is recommended to also prepare sandpaper, a powerful hammer, perhaps kerosene, water and other liquids will help make unscrewing easier.
Sandpaper
Reasons why you should start unscrewing the VAZ 2110 hub nut
The main reason is a malfunction of the car's chassis, and delays are not welcome. The problems that arise are caused by problems with the hub nut. If it is damaged, the car will move from side to side while driving, and the wheel will seem to hold weakly and become loose.
Imagine that suddenly a situation arose: on the road, without special conditions, you had to change a tire, everything was done in a hurry, so mistakes were made. What could this lead to? Threads are broken and bolts are loosened, that is, the fastenings become unusable, which means you need to think about how to tighten the VAZ 2110 hub nut and whether it’s worth buying a new one.
Wheel replacement
Initially, you will need to remove the bearing from the hub and take a good look at it. We check that if it calmly returns to its place and fits tightly, then the part does not need to be changed. But sometimes the situation is the opposite, all the components are worn out, so there is play, and it is undesirable at the location of the bearing, then the issue of how to tighten the VAZ 2110 hub nut cannot be solved; more decisive actions will have to be taken. Under no circumstances should you drive a car with a loose wheel.
The usual algorithm for how to unscrew the hub nut of a VAZ 2110
- The machine is sent for in-line repair, its body is well fixed on the bars, and placed on wheel chocks, if necessary.
Another option for preparing the car is using the parking brake, as well as engaging first gear. But in this case, a “shoe” is needed to secure the vehicle. Wheel chocks - Initially, you need to remove the hub cap without any problems.
It’s worth taking a closer look; there is a collar on the nut itself; it should be pressed out a little either with a screwdriver or a chisel. And then a double grip is applied using a 30mm head and a long wrench. But they must be reliable, because force will have to be used for the first time. Removing the hub cap - The wheel nuts of the wheel are unscrewed very carefully and gradually, and the wheel is eventually removed, freeing access to the hub. It is recommended to use a wrench size 17. The result of the repair is to put into practice the knowledge on the question of how to tighten the hub nut of a VAZ 2110.
- Work is underway with the brake caliper; when dismantling it, it must be carefully picked up and hung on the body so that the existing hoses do not have bends or breaks. It will be difficult to fasten, then use WD-40. At the same time, do not forget to use a convenient screwdriver to work with the brake pads, unclench them and move them apart.
- Using a powerful screwdriver or a 12mm wrench, remove the brake disc, and gradually creep up to the main field of activity, deciding how to unscrew the VAZ 2110 hub nut and perform all the necessary procedures with it.
Removing the brake disc - We are working on the hub bearing, and when we come to the ball joint, all fasteners must be removed from it.
At a certain point, it will be necessary to press out the steering tip; it is removed from the swing arm. After the work has been completed, we are already trying to knock the hub nut out of its seat. It is recommended to first use the head 19. Work with the hub bearing - Next begins the painstaking and small work, when it is important to locate and remove the protective ring of the product; it is installed in a special niche to prevent dirt from passing through.
The ring fits tightly, so you need to be smart to remove it from its special niche. If you do everything correctly, then think about how to tighten the hub nut on a VAZ 2110, you will soon come to this point. Unlock the hub nut - We carry out a visual inspection of the part. To do this, the product is prepared for inspection, that is, the existing layer of dirt and grease is removed. You can easily use sandpaper. Check the surface of the part for cracks, chips, scratches, and signs of wear.
- The final point is processing the surfaces and installing the hub in its place, checking the correctness of the fastenings, assessing whether the VAZ 2109 hub nut was tightened well or poorly. And all actions are performed in reverse order.
Thus, it turns out that how to tighten the hub nut of a VAZ 2109 is not difficult to understand, but in practice a lot of surprises can come out. That’s when you’ll have to use your wits, maneuvering in the flow of repairs, choosing only the right solutions. For example, some people heat a nut with a soldering iron; as a result, the metal expands under the influence of temperature, and the rust seems to be destroyed. And there is a chance to unscrew the soured fasteners.
What kind of force majeure did you encounter when you were doing work and thinking about how to tighten the VAZ 2109 hub nut, how to select the keys for dismantling?
tire1.ru