How to check the thermostat without removing it from the car
Sometimes the car's cooling system fails.
The engine temperature arrow on the dashboard goes off scale after a few minutes of warming up. And sometimes the opposite happens - the temperature, especially while driving, does not reach the operating value of 90 degrees. These are all sure signs that it's time to check the important device that controls coolant flow. Many people know that this completely closed assembly consists of a valve and a heat-sensitive substance. The latter, when heated, opens a large circuit - the radiator - through the coolant valve.
But how to check the thermostat, because that’s what we’re talking about, on your car? And most of all, car enthusiasts are interested in how to check the thermostat without removing it from the car? Let's try to give some advice on this matter.
Without dismantling the device, this is the only way to correctly diagnose it.
- Start the engine, then wait two minutes.
- Touch the hose directed from the device being tested to the radiator.
- If the hose is hot, the device is faulty; most likely, the valve never closes.
- If the hose remains cold even after 5 - 10 minutes of warming up, and the temperature on the panel is already more than 90 degrees, the unit is also faulty. Most likely, the valve, on the contrary, does not open.
Checking the Thermostat
The problems described above can appear at any time. To avoid engine overheating and damage, you need to know how to check the thermostat directly on the car and after dismantling it at home.
It is important to know that after starting the engine, the thermostat is still closed and the coolant flows through a small circuit (through the cooling jacket and the stove). This allows the power unit to quickly reach the desired temperature.
As soon as the required level is reached, the valve opens and coolant flows through the main radiator.
Understanding this principle is very important when checking the thermostat.
Therefore, we invite you to familiarize yourself with the diagram.
Let's consider two diagnostic options.
Without dismantling
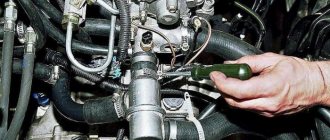
The easiest way is not to remove the unit, but to check it directly on the car. The main condition is a cold engine.
The diagnostic process begins with starting the power unit and warming it up for 2-3 minutes at idle.
Possibility to do without removing the device
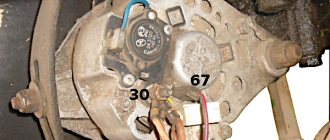
Next, we’ll figure out how to check the thermostat on VAZ cars. Let's start with the "classics". Here are the instructions for the VAZ 2106 car.
- Initially, you need to determine that the coolant level is normal, that the temperature arrow on the instrument panel works, and that the belt driving the antifreeze pump (pump) is tensioned normally.
- Next you need to start the engine and warm it up. If more than five minutes have passed and the temperature needle has not risen above 70 degrees, you should touch the return pipe from the radiator. If it is slightly warm, it means that the coolant immediately enters the large system circuit. Consequently, the valve of the device is constantly open.
- If the engine overheats after five minutes or more, you need to touch the upper radiator hose. Suppose it turns out to be cold - this means that the valve of the device being tested is jammed.
This instruction describes how to check the serviceability of a thermostat that has not been removed from the car.
But the following describes the procedure - how to check a removed thermostat at home.
- Make sure that the unit valve is closed at room temperature. If not, the device is faulty.
- Hang the device under test using a harness on some bracket, and the device should be inside a container of water, without contact with the walls. After heating the water, just before boiling, the valve should open. Its incomplete opening is acceptable.
- Allow the device under test to cool. In this case, the through element must be closed.
If the device turns out to be broken, it is better to replace it completely.
This instruction describes how to diagnose the operation of a dismantled device. However, to complete the picture, let’s add a few words about dismantling the unit. To do this, use a screwdriver to loosen the clamps of the three pipes suitable for the device. Then pull out the pipes and dismantle the necessary device, placing the container under the antifreeze leak.
During reinstallation you will have to add coolant.
What to do with front-wheel drive and Kalina
Next, let's talk about front-wheel drive VAZs. First of all, let's figure out how to check a suspicious thermostat on a VAZ 2109. This device should allow antifreeze access to a large circle when it reaches a temperature of 87 degrees.
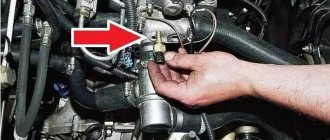
- To diagnose the element directly on the car, you first need to start the engine and wait until the panel arrow shows 90 degrees.
- Then you also need, as has already been indicated, to touch the pipes - the one going from the element being tested to the radiator, as well as the one going from the radiator to the engine. They should be equally warm. If the hose from the unit being diagnosed to the radiator is cold, the device is faulty.
- But suppose the tubes are warm and the piston unit overheats, you need to look at the radiator fan switch and pump - are they working properly?
- It's another matter if the engine does not reach 90 degrees. You should also feel the hoses. If the pipe from the device being tested to the radiator is warm, the device being tested is faulty, and the antifreeze constantly circulates in a large circle.
Sometimes other troubles happen. Let's describe it using the example of a more modern front-wheel drive Lada. We will enclose the information within the framework of instructions on how to check a thermostat that has not been removed on a VAZ 2114:
- Let’s assume that the temperature arrow on the panel shows more than 90 degrees, and a little time has passed since the engine started;
- we open the hood, first of all we remember how to check whether the thermostat is working or not, after which we touch the pipe going from the device being diagnosed to the radiator;
- we find out that the pipe is warm, in addition, the pipe going from the radiator to the engine is also warm;
- turn off the engine, let it cool, determine that the pump drive belt tension is normal, start the engine again;
- we find out that the tube from the element being diagnosed to the grid cooler is cold;
- wait for the fan to warm up and start working;
- we conclude: the car’s temperature sensor on the cylinder block is faulty.
It remains to add that the description of how to check a thermostat that has not been removed on a VAZ 2110 will be similar to the previous instructions. So we'll leave it out here.
Now let’s look at how to check the thermostat on Kalina yourself.
- You must first start the engine. This method shows how to check the thermostat on Kalina without even removing it. However, the method is identical to those previously described - you just need to touch the pipe from the element being diagnosed to the cooling grid assembly. Up to 90 degrees it should be cold, after 90 - warm.
- For more accurate diagnostics of the device, we remove it from the car.
- To dismantle, first drain the antifreeze from the system.
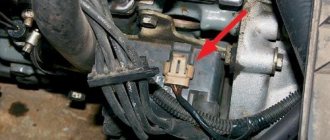
- We remove the recirculation valve and the mass air flow sensor.
- Remove the air filter housing.
- Having loosened the clamps, we remove 4 pipes from the system link we need.
- After unscrewing the nut, remove the ground wire.
- Having unscrewed the fastenings, we remove the device under test from the mounting socket.
Next, we’ll figure out how to check whether this Kalina thermostat is working at home. To do this, it is enough:
- lower the device inside a large volume of water in the pan, so that it does not touch the walls;
- turn on the stove, heat this water;
- when boiling, the valve will open;
- Allow everything to cool; when the device cools down, the valve will close.
If any of the above does not occur, the unit is faulty.
What not to do
Well, so far several methods have been described on how to check the functionality of a car thermostat. But you should also definitely indicate the incorrect options for how car enthusiasts can check the thermostat.
For clarity, this information is summarized in a table. Here she is.
| Way | What is it? | Why is it dangerous? |
| Dismantling the home inspection device immediately after the engine is running. | On a warm engine, the device is removed in order to test it at home. | You can get serious skin burns from hot antifreeze. |
| Probing the radiator after warming up the engine. | To diagnose a unit, they do not touch the pipe leading from it to the grate cooler, but the cooler itself. | You can get burned on a hot metal surface. The hot surface of the pipe is safe for the skin. |
Diagnosis of the thermostat directly on the car
Checking the thermostat on a car is carried out with a cold engine. After starting the engine, you need to check the radiator outlet pipe by touch. The norm is the absence of heating of the pipe until the coolant temperature sensor on the instrument panel shows warming up to 80-90 degrees.
If the pipe heats up before this time, it can be assumed that the valve is not operating correctly, which leads to an increase in engine warm-up time and a significant increase in fuel consumption. If the pipe continues to remain cold at high coolant temperatures, then the reason may lie in a jammed valve. In this case, it is necessary to replace the thermostat as quickly as possible.
Check and replacement
If the thermostat fails, it should be replaced immediately. It is impossible to say that the device has failed only on the basis of an initial check.
If the engine overheats during operation or does not warm up to operating temperatures quickly enough, the condition of the unit is checked. Based on the results obtained, replacement or repair is carried out.
The most effective way to check the thermostat is to remove it. The procedure is performed as follows:
- Unscrew the crankcase protection mounting bolts, after which the protection must be removed and placed aside for a while.
- Remove the cap from the expansion tank where the coolant is located.
- Place a clean container under the drain hole (if you plan to pour the same coolant back into the system), unscrew the drain plug from the cylinder block and remove all coolant from the cylinder block.
- Place a container under the drain hole of the cooling radiator, unscrew the plug and drain the antifreeze or antifreeze.
- Loosen the clamps holding the hoses.
- Disconnect the three hoses that are connected to your thermostat housing.
- Loosen the tension on the clamps and remove the thermostat along with the hose. The short hose is disconnected from the thermostat.
- Place the dismantled device in a container of water, which must be preheated to 78-80 degrees Celsius.
- Start heating the water, stirring the liquid occasionally. The water needs to be heated to approximately 87 degrees Celsius.
- If the thermostat is working properly, when the temperature reaches 87 degrees with an error of plus or minus 2 degrees, the main valve should open. If this does not happen, the device is faulty and requires replacement.
Replacement process
To replace the thermostat, it is enough to remove the old one in accordance with the specified dismantling instructions, and reassemble the unit with an already working device in the reverse order.
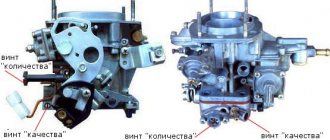
What to choose?
Many owners of a VAZ 2109 with a carburetor complain that the factory thermostat is insufficiently efficient. Because of this, especially in winter, you have to suffer from slow heating, when it is difficult to achieve even 60 degrees.
To solve this problem, it is recommended to install a thermostat from an injection VAZ 2110 with 8 valves for the winter and for the entire period of operation of the nine. This is an improved element that has obvious advantages compared to the original thermostat for the carburetor VAZ 2109.
- You should install an injection thermostat starting from tens, taking into account the fact that we are not talking about the first versions of the VAZ 2110, but later, modernized ones.
- On 8-valve engines, dozens of thermostats have become dismountable, unlike the 16-valve VAZ 2110 and those devices that were initially installed from the factory on the VAZ 2109. This allows, in the event of a unit breakdown, to disassemble it and partially repair it without completely replacing the device.
- To repair a new thermostat, borrowed from a VAZ 2110 with an injector and 8 valves, it is often enough to disassemble the device and replace the thermoelement there.
- The new unit turned out to be 50 millimeters shorter, which allows for more free space.
- The new element has lost many of the clamps that are relevant for thermostats from the VAZ 2109.
- The component has undergone quite a serious modification, which allows it to effectively maintain a stable temperature inside the engine cooling system.
Device from the tens
When replacing the thermostat on a VAZ 21099, make sure that you choose the device from the 8 valve “tens”. Cars with 16 valve engines use different devices in which the circulation system does not work the same way. Therefore, the elements will simply be incompatible.
Connection
To connect a new element from an 8-valve VAZ 2110 to a VAZ 2109, you will need to perform the following steps:
- Remove the old element from its seat according to the instructions given above;
- Be sure to disconnect the return pipe of the heater radiator, and do not spill the coolant;
- To install a new device, you will need to connect according to the standard scheme, but with the addition of a new tube. This is the so-called saxophone, through which the coolant can be directed back to the pump;
- The main nuance of using a thermostat on nine from ten is that when starting a cold engine, the cooling liquid will now circulate through a small circuit. First, the heater radiator will heat up, the interior will warm up as quickly as possible;
- When the required temperature is reached, the new unit will open and the liquid from the cooling system will begin to move along a large circuit through the main radiator.
Replacing the thermostat is a useful solution for those who do not want to suffer from the long warm-up of the interior in the winter. Plus, a new element, borrowed from the VAZ 2110 on the VAZ 2109, will allow the engine to warm up faster, and therefore hit the road faster, even in severe frost.
Preparing for replacement
View gallery
In order for the car to be completely ready to replace the thermostat, you need to wait until the engine cools down to at least 40-50 degrees. It is extremely dangerous to work while it is hot; you can get burned. The thermostat on a VAZ-2109 is replaced quite quickly; the most difficult and tedious procedure is emptying the system. To do this, you need to use two drain holes, which are located in the lower part of the radiator (the plug is unscrewed by hand) and in the engine block (head bolt 13).
But what should you do if the system is filled with antifreeze, which is quite expensive? We must try to preserve it so that it is not expensive to repair the car. To do this, first of all, by opening the stove tap, unscrew the clamp on the pipe that goes to the throttle valve. It is necessary to drain the maximum possible amount of antifreeze through it. Yes, this procedure is slow, but it will save almost all the liquid. Only after this can you unscrew the plug on the radiator and on the engine block. And don’t forget to unscrew the cap on the expansion tank to increase the pressure.
The operating principle of the thermostat VAZ 2115, 2114, 2113, 2109
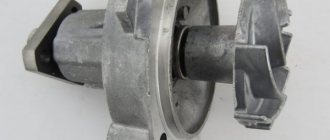
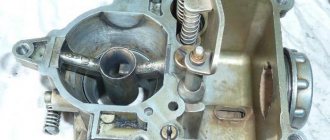
What does a thermostat consist of? Let's get a look!
The thermostat consists of a housing, a bypass valve, a main valve, a temperature sensing element (usually located near the main valve) and a spring.
How does the thermostat work on VAZ 2115, 2114, 2113, 2109
When the car is not warmed up, the thermostat valve is closed, as in the photo. In this case, the coolant moves in a small circle, as in the photo below.
When the machine warms up to operating temperature (87-90 degrees), the temperature-sensitive element slowly begins to heat up, as a result of which the spring compresses, the main valve opens and the liquid flows in a large circle.
How to correctly determine that the device is in working condition?
We warm up the engine to such a temperature that the needle does not reach the critical value, and turn it off. We open the hood, find a hose on top of the radiator (a black rubber hose with a metal clamp at the end) and the same one on the bottom. Then, very carefully, they may be quite hot, touch them. If one of them becomes hot, and the other is still cold, and the sensor shows a high engine temperature, this means that most likely the liquid does not enter the engine, but is retained in the radiator, and you need to change the thermostat to a new one.
There is another way of checking, better known as “folk”. It echoes the “experiment” that was described above, to observe the process of the thermostat, only this time you will have to put the thermostat, the functionality of which you doubt, removed from your car, into a container with water, and then the procedure is repeated as Once the water reaches a temperature of 87–90 degrees, the valve should open, however, if this does not happen, then the thermostat is no longer suitable for operation. It is also worth remembering that different thermostats may have different critical valve opening temperatures, so when purchasing a new one, check this with the seller. Since it is no secret to the driver that it is impossible to install a thermostat in a car that has a high valve opening temperature - the engine will not cool.
Video, checking the thermostat VAZ 2101-2107 and Tama (Toyota):
Basic thermostat malfunctions
The thermostat is a fairly simple device that rarely fails. If you have problems with your thermostat, they are most often associated with the following reasons:
- The valve for switching the liquid circulation from a large to a small circle has stopped closing tightly. Because of this, immediately after starting the engine, antifreeze circulates in a complete large circle, which is why warming up to an operating temperature of 90 degrees Celsius takes many times longer than with a working thermostat;
- The fluid circulation switch valve is stuck closed. In such a situation, the sensor to open it is triggered, but the damper cannot move. This leads to the fact that the antifreeze continues to circulate in a small circle even after the engine has warmed up. Accordingly, the engine parts do not receive the necessary cooling, and it overheats.
Which thermostat to install for the winter on a VAZ 2109
If the thermostat fails, the engine will take a very long time to heat up to the required operating temperature, and while driving, the engine temperature will drop sharply. This is especially felt in winter due to a poorly heating stove.
To quickly check the condition of the thermostat, it is not necessary to remove it. To do this, start the cold engine and touch the lower radiator hose. In the normal state of the element, it will first be cold for a short time, but then quickly begin to heat up. This indicates that the coolant is moving along a large contour.
Appearance of the device
How to understand that the thermostat of the VAZ 2115, 2114, 2113, 2109 is faulty?
There are two reasons why you can understand that the thermostat on the VAZ 2115, 2114, 2113, 2109 is faulty:
- The car does not warm up.
- The car overheats and boils.
There are also two ways to check the thermostat:
- Check the removed thermostat for functionality.
- Check the thermostat without removing it from the car.
Let's take a closer look at each of the options.
How to check the removed thermostat of a VAZ 2115, 2114, 2113, 2109 for functionality?
In theory, everything is simple. Take a pan with cold water, a thermometer up to at least one hundred degrees and a thermostat. We put it all on the tile to warm up and wait... We wait until the water temperature reaches 85 degrees, at which point we begin to look at the main thermostat valve. At 87 degrees it should open. If it does not open or opened earlier, then the thermostat is faulty.
How to check the thermostat of VAZ 2115, 2114, 2113, 2109 without removing it from the car?
A prerequisite in this case is that the car must be cold. After starting the engine, grab the lower pipe coming from the radiator with your hands. Until the temperature reaches 80 degrees it should be completely cold. When it reaches 85 degrees, the tube should begin to warm up slowly. And when 90 degrees is reached, full circulation of hot coolant should begin (i.e. the valve is completely open). The lower tube should be hot.
It happens that immediately after starting the engine, when it has warmed up only 50 degrees, warm liquid begins to flow through the lower tube. This shouldn't happen either. This means that the valve is constantly open.
I hope my article helped you solve your problem. If you have any questions, leave them in the comments and I will definitely answer them.
Replacing the thermostat
View gallery
Remove the old one, install a new one in its place - this is the entire replacement procedure. But you need to carefully inspect all the pipes of the system. The VAZ-2109 thermostat is connected. The injector or carburetor in the injection system does not matter.
When carrying out work, pay special attention to the clamps. It is highly undesirable to use old ones; it is better to install new ones. Moreover, reliability is an important criterion. Worm-type clamps are very delicate: as soon as you apply a little more force, it breaks. And the possibility of damaging the pipe is very high. If you tighten the clamp too much, you can puncture the rubber. But, of course, you can’t tighten it loosely, as liquid leaks will appear. In other words, this is a double-edged sword. And a little advice: before installation, it is advisable to apply a thin layer of sealant to the surface of the thermostat that will be in contact with the pipe.
About the operating principle of the thermostat
The part is a heat-sensitive element that opens the damper when heated to a certain temperature (from 87 to 93 ° C). The actuator is triggered by the expansion of the working fluid - a special liquid that responds to changes in ambient temperature (in this case, antifreeze).
The thermostat with a hermetically sealed damper is usually placed in its own housing and is a separate part. But there are also open-frame products that are installed inside a designated channel in the engine. The operating algorithm is the same for all models:
- After starting a cold engine, the coolant flows in a small circle - through the water jacket of the power unit and the small heat exchanger of the stove. The passage to the main radiator is blocked by a damper, which speeds up engine warming up.
- When the set temperature threshold is reached, the damper begins to open, allowing part of the antifreeze to cool in the main radiator.
- When the engine warms up to operating temperature (over 90 °C), the passage opens completely and all the antifreeze moves along a large circulation circuit.
Primary signs of a thermostat malfunction come down to two symptoms: constant “boiling” or the inability to warm up the power unit, especially in winter.
What is better than a thermostat with “ten”?
View gallery
Of course, we are not talking about the models that were included in the first “ten” releases. The VAZ-2109 thermostat (carburetor) is very similar to the one that was installed in the first “ten” models. But now we are talking about more modern models. Their main advantage is that the number of clamps is reduced to a minimum. But the thermostat is not attached to the engine block using a short pipe. The housing is screwed to the engine block using two studs. The temperature sensor is screwed into the thermostat, therefore, the second hole must be plugged.
In addition, when installing the thermostat from “ten” to “nine”, it becomes possible to save a little, because you can only change the sensitive element. Passive benefits include freeing up space under the hood. The thermostat housing becomes five centimeters shorter, which makes it possible to easily reach, for example, the adjusting nuts of the clutch cable.
Ways to check an element
You can check the operation of the thermostat yourself directly in the car. In the vast majority of cases, such diagnostics give reliable results. You need to start checking when the engine has completely cooled down: start it and periodically feel the lower part of the radiator and the pipe extending from the bottom back to the engine.
The serviceability of the thermostat is determined by the following signs:
- at the initial stage of warming up, the radiator and the pipes suitable for it are completely cold;
- at an antifreeze temperature of 40–60 °C, the upper supply hose begins to warm up, the lower one remains cold;
- when the antifreeze heats up to 90–95 °C, the entire area of the heat exchanger and the lower pipe become hot, which indicates the opening of the damper and the movement of liquid along a large circuit.
It is recommended to carry out diagnostics until the sensor is triggered and the fan automatically turns on.
Deviations from the norm are interpreted as follows:
- If the inlet and outlet pipes together with the radiator immediately warm up, the thermostat is stuck in the open position. Antifreeze initially flows in a large circle, hence the heating.
- When the temperature reaches 90 °C, the bottom of the heat exchanger and the outgoing hose remain cold - the thermoelement damper is tightly closed, the part has become unusable.
- When the top of the radiator is hot and the bottom is slightly warm, the thermostat is stuck half-closed.
Unlike the first two points, the last conclusion requires mandatory confirmation. It is quite difficult to make a clear diagnosis when the coolant is divided into two streams moving along different circuits. Uneven heating of the heat exchanger fins, turning on of the fan and temperature surges are indirect signs. Symptoms of an air lock in the cooling system appear similarly.
To clearly check the functionality of the thermostat, it will have to be removed from the car. Disassembly and diagnostics are performed in the following order:
- Let the engine cool and drain the antifreeze - first from the cylinder block, then from the radiator. It is more convenient to empty the system into a wide container with low sides.
- Loosen the clamps securing the pipes to the thermostat. Disable them and remove the element.
- Inspect the part for a slightly open damper. If a malfunction is detected, further checking is pointless - you need to buy and install a new spare part.
- Heat a pan of water on the stove. When its temperature approaches boiling, lower the thermostat into the container and watch the damper. It should open without delay.
- Remove the part from the pan. When cooled, the thermoelement should immediately close the passage.
Reminder. After draining the cooling system, immediately disconnect the throttle body heating pipe. When you start pouring antifreeze back in, air will escape through the removed hose.
If during the inspection it turns out that the damper does not work or is jammed, the part must be replaced, since it cannot be repaired. Considering the large number of fakes on the auto parts market, you can first test a new thermostat in a store. Close the outlet pipe with your finger and try to blow air through the inlet pipe. A hermetically sealed damper will prevent this from happening.
Retest the new part at home by immersing it in a pan of boiling water. If the heat-sensitive mechanism does not work, return the defective part to the store or exchange it for another one.
Types of thermostats
Today there are several types of thermostats, each of which has its own characteristics (both in terms of operation and price).
For example, domestic devices cost less, while German ones are of better quality, but are also more expensive.
IMPORTANT: Since 2006, there are no manufacturers of automobile thermostats in Russia! The only village of Stavrovo, Vladimir region, which produced from scratch thermostats for all domestic passenger cars and trucks, was absorbed by the PRAMO concern and stopped producing them, switching to the purchase and repackaging of Chinese-made thermostats and producing them under its own brand.
Later, several more “manufacturers” appeared, working according to the same scheme. But, I would like to note that the only company that carries out 100% quality control and has testing equipment for monitoring thermostat parameters is ELEKTON CJSC, Raduzhny, Vladimir region.
So-called universal thermostats, which can fit almost any type of engine, are also in demand.
So, the main types of thermostats include:
The most popular type of device, which is installed on many brands and models of cars. Many believe that this type is already outdated and is not able to meet the needs of the motor. But that's not true.
This type of thermostat is not outdated and is successfully used, in particular, on UMZ 4216 engines (Ulyanovsk Motor Plant). The use of single-valve and two-valve thermostats depends on the layout of the engine cooling system.
But still, the use of two-valve thermostats has become widespread.
2. Two-valve or two-stage thermostats.
These devices have many common features with a single-valve type unit. The only advantage is the expanded capabilities regarding the cooling process.
3. Electronically controlled thermostat.
The most advanced type of device, characterized by increased potential.
Advantages: accuracy and increased functionality.
Thanks to the efficient operation of the system, a normal coolant cycle is guaranteed, as well as timely opening and closing of the valve.
Work can be carried out in two modes - manual or automatic.
An electronically controlled thermostat is installed only on the newest cars. A prerequisite for the system to operate is the presence of a good on-board computer capable of controlling the operation of the device.
There are cars that have two thermostats at the same time. They are installed to increase the efficiency of the cooling system on powerful engines, such as engines produced by PJSC Avtodizel (Yaroslavl Motor Plant), and on engines from the Tutaevsky Motor Plant they even install 3 thermostats in one circuit of the cooling system.
Features of device verification
Today there are three main methods for diagnosing a thermostat. Let's briefly look at each of them:
- Start the engine and wait for 7-10 minutes. Then lift the hood and touch the lower pipe extending from the radiator. During normal operation of the device, the temperature of the hoses should be identical. If the temperature is different, then the thermostat is faulty. But it is important to understand that there may be air pockets in the system that interfere with the circulation of fluid. The presence of air pockets can lead to overheating and incorrect diagnosis. A good thermostat may be considered defective.
- Start the engine and touch the coolant pipe to the top of the radiator. If the thermostat is working correctly, the tube should be cold until the engine warms up to the desired temperature.
- The most effective and complex method is to remove the thermostat. In this case, it is necessary to dismantle the device and then immerse it in liquid.
The latter is heated in a special container until the valve is activated. But the opening and closing temperatures cannot be determined this way. In a pan, you can only check in principle the fact that the thermostat is working, but not its actual parameters.
To determine the actual indicators, the thermostat must be installed on a tripod with a dial indicator (for example, ICH-10), the indicator rod must rest against the main valve or other structural element rigidly connected to it.
After this, raising the temperature and monitoring it with a thermometer with a division value of 0.1 °C, we record the beginning of the opening, corresponding to the valve stroke of 0.1 mm. Further raising the temperature, we determine the valve opening value using the indicator.
- If the engine still does not reach 90
degrees Celsius 10-12 minutes after starting (provided the outside temperature is about 0), then we can talk about a breakdown of the device we are considering.
Most likely the valve is stuck and the coolant is constantly flowing in a large circle.
Description and operating diagrams for VAZ 2106, 2107, 2109, 2114
In VAZ cars, the cooling system has a number of features. In particular, a special 2-valve thermostat (additional and main) with a solid (wax) filler is mounted in front of the pump.
While the engine has not yet warmed up, most of the coolant will flow in a small circle, that is, covering the system pump, the cooling jacket of the power unit and cylinders, as well as the thermostat.
The liquid then returns to the pump. At the same time, coolant circulates through the jacket of the intake pipe and the mixing chamber in the carburetor.
If the cabin heater valve is open, then the liquid passes through its radiator.
In the case when the engine is not fully warmed up, that is, the coolant temperature has not yet reached the desired level (90
degrees Celsius), the main valve partially opens, the other (bypass or bypass) valve partially closes, and part of the hot liquid goes to the main radiator.
This allows the power unit to warm up faster. As soon as the temperature reaches 90 degrees Celsius, the valve opens completely, allowing all flow to be directed through the radiator.
The main metals from which the thermostat elements are made are copper and brass.
The principle of operation is similar to what was already discussed above.