And thanks to tinting, staying inside the vehicle can be made more comfortable. Tinted windows not only serve as protection against sunlight entering the interior, but also hide what is happening inside the car from prying eyes.
The tinting process is a procedure for darkening car windows using a special film with different throughput. The most common films for tinting are dark-colored films, but sometimes you can find cars tinted with colored films.
Car owners often tint their car windows on their own, which costs much less than if they turned to a specialized service for this. In fact, the whole process is not that complicated, and all the tools and supplies can be easily purchased.
Preparing for work
First, you need to check the integrity of the glass, because the film will adhere well and will only look good on undamaged windows. Secondly, it’s worth deciding on the color of the tint film; it’s best to take a shade that matches the color of the car - then you definitely won’t go wrong.
VAZ 2109
Next, you need to select the light transmittance of the tint. It is important to take a film with a color transmission rate of no higher than 70 percent in order to take into account the requirements of existing legislation. The main thing is not to save money, because cheap film will adhere much worse , come off in the corners, and will last much less than its more expensive counterparts. A good example of high-quality film are American samples; for example, for VAZ cars, a 20 percent film would be very convenient.
In the end, it is important to remember that, as with any car, tuning a VAZ 2109 car is quite a feasible job.
Hooks and shovels
Most often, high-quality tinting is applied to the dismantled glass, some do it directly on the car, and the first option is the most acceptable.
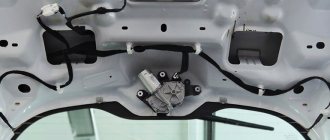
To remove glass from a car, it is necessary to disassemble the door - this requires not only screwdrivers and keys, but also special spatulas and hooks. Using these tools, it is much easier to pry off plastic parts under which fasteners are hidden.
Hooks and shovels help to carefully assemble the door into its original position. Often the applied tint film is damaged precisely at the assembly stage - one careless or rough movement, and the result is burrs, scratches or peeling of the material. To prevent this from happening, all decorative elements and seals are adjusted using spatulas and hooks.
Required tools and materials
- Tinting film, for VAZ 2109 - at least 3 m.
- Baby shampoo or any high-quality detergent, at least 100 ml.
- Rubber scraper.
- A sharpened knife or blade.
- Sprayer in the amount of 2 pieces (needed to dilute the shampoo).
- Warm water.
- Dry wipes or lint-free cloth.
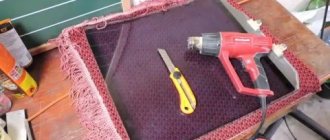
- Special hairdryer.
- Metal meter ruler.
- Assistant.
LLumar film
To quickly complete the task, the assistant will provide significant savings in time and resources, and will also significantly increase productivity. Prepare all this before starting work and your successfully tinted car is almost ready.
Glass scrapers
Many people also neglect this tool, believing that before applying the tint film it is enough to simply wash the glass with detergent. However, small deposits of ingrained dirt and other defects always remain on the surface of the windows. Previously, they were removed using a regular straight razor blade, and there was always a high risk of not guessing the angle of the blade, which is why scratches or abrasions appeared on the glass, which were clearly visible even on a tinted car.
Nowadays, convenient scrapers are used for this, which are equipped with a handle and replaceable blades. Thanks to the rigid frame, the edge of the tool is always at the same angle, which eliminates the formation of scratches and abrasions. This device allows you to prepare a perfectly flat surface before applying the film. As a result, the glued material will not have protrusions or other defects.
Stages of work
To begin with, let’s note the ideal conditions necessary for high-quality work, namely:
- Closed, dry and warm room with minimal dust in the air;
- Full set of tools;
- Clean windows;
- Experience in tinting.
First stage
Do-it-yourself car window tinting is, first of all, giving the car a pleasant appearance. And you need to start this process by removing the glass and washing them on both sides in a special shower; if this is not possible, then you can stop by driving your car out of town or into a place that is located far enough from the road in wet weather. (removal of glass is written in the machine's operating manual).
Thus, the car will be protected from city dust. As a last resort, washing windows can be done at home in the shower, under running hot water. All stains, dirt, etc. will need to be washed off with a soapy solution of shampoo or other product, and after washing, all glass will need to be wiped dry with rags prepared in advance. It is important to completely clean the surfaces, because any foreign particles will cause swelling of the tint film.
First stage
It’s easiest to apply film from the side windows, so it’s best to start there to get used to it. The presence of a partner will be very helpful. At this stage, you should measure the dimensions of the side window and make a template with an allowance of 5 centimeters on all sides. Next, you need to cut out suitable shapes from the tint film using a knife and a meter-long metal ruler. The main thing: you need to place the transparent side of the film on a hard, clean surface and cut it. First you need to make templates for the windows. As an alternative, you can apply the film to the glass and, after carefully smoothing it, trace the glass around the perimeter.
Second phase
After this, you need to prepare a special solution that is needed to fix the tint: it consists of water and a small amount of detergent. After cutting out the side windows, you should move on to the windshields, and the most difficult ones to make are the rear windows of the car. Everything must be done clearly and carefully so as not to have problems in the future.
Next, using a spray bottle, the solution is applied to the glass by spraying it from a spray bottle.
Third stage
And now, the car window tint has been cut out. The entire tinting process is already half completed. Now is the time to apply tint to the surface of the glass. At this stage, it will be necessary to separate the two parts of the car film; this can be done using adhesive tape, which is glued on both sides at several levels, after which it is stretched in all four directions. This is where a soap solution comes in handy: spray it on the glass from a spray bottle, then apply the film tightly to the glass and move the tint as much as necessary so that it fits best on the glass.
Now the most important thing is to smooth the tint film using a rubber scraper. Gently remove water and remove water bubbles with a dry, lint-free cloth. The protective layer of the film must be carefully and slowly removed and carefully smoothed. This kind of car tuning at home will take time, so set aside at least 5 hours to solve this problem.
The final stage
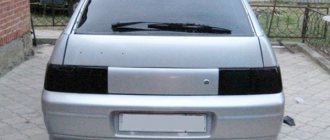
Tinting the windshield and rear windows is a more complex process, so be sure to start with the side windows of the car. But for a VAZ 2109 car, removing the rear windows is not such a big task: you just need to pull out the cord and squeeze out the glass. In fact, the process of applying film to these glasses is exactly the same as for side windows. The only thing is that large glass needs to be glued in two passes. It is necessary to divide the rear glass into two equal zones and cut out the film. Next we glue the film from top to bottom. We don’t leave gaps, we don’t glue overlaps. Subsequently, the protective layer is carefully removed, first one third, then gradually the rest.
The main thing is not to forget to spray the glass with a soapy solution and to smooth out the film on the rear glass with special care, since it is curved and can cause a lot of trouble. Upon completion of all operations and after the films have dried on the glass, that is, after about 9 hours have passed, you need to put the windows in place, which is done using nylon thread or another method. That's all - the car is tinted. As a result, it will be necessary to rinse all the windows again, this time with ordinary water from a spray bottle, and carefully scrape off the remaining adhesive substance.
What you need to do your own window tinting
Do-it-yourself tinting of the VAZ 2109 begins with going to the store and buying the following things:
- tint film
- soap or shampoo
- spray
- wallpaper knife
- silicone scraper
Film for tinting comes in different light transmission capacities. When choosing a film, keep in mind that the darker it is, the worse the visibility at dusk and at night. If you darken your “nine” with too dark a film, then sooner or later you will have to deal with the traffic police. At the same time, even a light one can cause a stop, for example, to check its light transmittance with a special device.
In addition to the usual “disposable” film, removable silicone-based tinting has recently appeared on sale. This film is easy to remove and just as easy to stick on the glass again. It’s not difficult to guess why: if the inspector forces you to remove the tint, then it will not be difficult to return it to its place.
The advantage of the removable silicone film is that it is very easy to remove. Usually it is enough to pry the edge and pull it. In this case, the tint is not torn into pieces, but is removed entirely. You can put it in the back seat without fear of lint and debris sticking to it. Silicone film can be washed and it will not lose its properties.
Detergent will be needed to prepare a solution that helps adjust the film after it is applied to the glass. Using the same solution, the film is smoothed and bubbles are squeezed out. A silicone scraper glides much better over a soapy surface.
A sprayer or “squirter” is needed to apply water or soap solution to the glass. Even if you already have such a sprinkler at home, it is better to purchase a new one that will not be clogged with sediment from tap water.
On a note
The water used for DIY tinting must be absolutely clean. Ideally, it will be distillate or water from a reverse osmosis filter. It is not recommended to use hard tap water as it can leave permanent stains.
The blade of a wallpaper knife is the best tool for cutting film. An ordinary knife is rarely razor-sharp, and when trying to cut the film, it often tears it. It is not recommended to use ordinary razor blades when tinting yourself, because... They are extremely inconvenient to work with.
It is also useful to read: Athermal film on the windshield
The silicone scraper allows you to push the air out from under the film without scratching it. Do not use scrapers made of ordinary plastic, as... they may have jagged edges; In addition, the plastic itself may be harder than the film and leave scratches. Often the scraper comes complete with a tint film, but if you don’t have one, you can wrap a school triangle in a soft cloth.
To achieve the best tinting effect, it is a good idea to have a hair dryer. Using a hair dryer, you can heat the film, making it pliable. But you need to handle the hairdryer very carefully. The hair dryer nozzle should not be brought closer than 25 cm to the film, and the temperature of the air stream should not exceed 100 °C.
Before starting work, also prepare several pieces of clean flannel fabric and a foam sponge. They are useful when leveling the film and squeezing out air. You should also prepare a separate clean container for rags and place it only there.
pay special attention
Important points that should not be overlooked when applying tinting to car windows, especially if you do the work yourself:
- Washing glass should be done meticulously, rinse it several times so that the tinting work goes as smoothly as possible. Particular attention should be paid to the edges of the glass.
- If there is dirt on the glass that is very difficult to wash off, do not hesitate, boldly but carefully scrape the glass with a sharp knife, or better yet, with an ordinary stationery knife.
- Under no circumstances should the glass be dried after washing; it should dry on its own so that there are no streaks.
- Do not forget to protect the internal parts of the car in case there is no way to remove the glass.
- It is better to level the film from the middle to the edges of the glass to remove excess air and solution.
- The film will adhere more easily to the glass if two people apply it, so ask for help.
- The main thing is not to allow any residual solution under the film, even in small quantities.
- As long as the film is wet, it can still be adjusted.
- Some write that you can apply a soap solution to the film itself, but in fact it is better not to get carried away with this, otherwise over time the tint film will slide off the glass.
- If bubbles appear on the surface of the rear windows, a special industrial hair dryer will be very helpful. It is very important not to overcook or exceed the permissible temperature limits, i.e. 200 degrees Celsius.
- Drying takes up to 9 hours, so the best option is to start cutting off the excess film from the glass after lunch and leave it in the garage overnight.
- Until the windows are dry, do not lower them or raise the windows under any circumstances!
- It is recommended not to install seals on glass for 2 weeks!
How to protect the coating of your car with vinyl film is described in our article.
You will learn how to fix and remove the resulting dent on your car at https://avtopolza.ru/remont-i-ekspluataciya/vytyagivanie-vmyatiny-na-kuzove-avtomobilya/ link.
It is difficult to make Dagestan auto tuning, but it is possible. Choose a darker film and apply it to all glass. Do not skimp on materials and do not rush in the process of completing the work. Take on the task with confidence and patience, and a wonderful result will not keep you waiting long. Tinting a car yourself is a pleasant technical task and a good option for saving money.
Calculation of the cost of tinting VAZ (LADA) 2109
To calculate the cost of tinting, select the elements of the VAZ (LADA) 2109 car that you want to cover with tinting film
The indicated price includes the material and installation services. Warranty from 1 to 3 years depending on the film.
Order tinting for VAZ (LADA) 2109
Thank you!
Llumar protective automotive films for glass occupy first place in the Russian tinting market. Films from CPFilms (USA) have a wide range of colors and options that can satisfy even the most sophisticated consumer.
Composition of Llumar films
Llumar coating is multi-layered. It usually includes 5–7 layers, each of which has its own functions.
The first layer is mounting adhesive adjacent to the glass.
The second is a colored polymer (grey dyed polyester film) of a bronze or gray hue.
The third is a transparent intermediate bonding layer (laminating adhesive).
This is followed by metal spraying (melallized polyester film).
The last layer is a protective coating (scratch resistant), which protects the tint film from clouding and rubbing.