Specifics and indicators of the sensor on GAZ cars
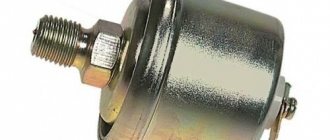
In cars of the GAZ family, one type of mechanical sensors of this type is used. Its marking is MM358. As additional equipment, this device comes with an indicator that informs the driver about the current state of the lubrication system. The indicator can be installed both in the cabin and in the engine compartment.
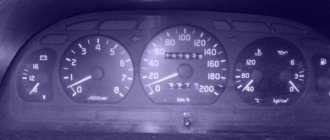
The specificity of the MM358 device is its design: the membrane is fixed together with the pusher. The sensitive element is a rheostat, the winding of which is made of nichrome thread. Oil pressure puts pressure on the membrane, and therefore the pressure on the sliders, which closely interact with the rheostat winding, also changes. Depending on the pressure characteristics in the system, the slider creeps up or down (the data is immediately transmitted to the pointer), but if the pressure is critical, an indicator lamp in the form of a red oil can lights up in the cabin.
Oil pressure sensor, which is used on all GAZ car models
MM358 sensors in GAZ have the following performance indicators:
- power supply voltage - 12 V;
- current strength is not higher than 0.15 A;
- operating pressure range of the device is from 0 to 6 kg/cm;
- output resistance in the absence of operating pressure - from 159 to 173 Ohms;
- mounting thread ¼ inch;
- connection via screw M.
Diagnostics of emergency DDM
The emergency sensor has two “troubles”: a break and a short circuit. For which the break design is intended, the pressure lamp on the dashboard does not light up. With a small short circuit, it burns constantly.
If the ignition is on, the engine is not running, but the light does not glow, disconnect the wire from the sensor and touch the body, clearing the contact area of any dirt.
Did the light come on? This means the pressure sensor needs to be changed; it is faulty. On the contrary, the alarm does not go on as before, perhaps there is a problem with a broken wiring or a faulty lamp.
If the wire from the sensor is disconnected, but when the ignition is turned on, the oil light still glows, the wiring is most likely shorted to the housing.
The serviceability of the emergency DDM removed from the engine can be checked with a tester or using a car light bulb and a battery.
Of course, check the serviceability of the emergency DDM removed from the engine with a tester
The resistance of a working sensor is very small, about zero. If you connect a light bulb to a battery through the sensor, it will light up.
If you connect a light bulb to a battery through the sensor, it will light up
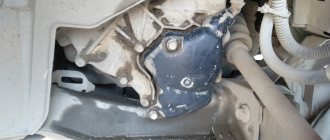
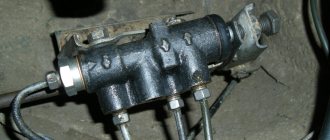
Location of DDM in Gazelles and other cars of this family
In cars of the GAZ family, it is quite easy to find the DDM due to the specifics of its connection. If you open the hood and look at the mechanisms from above, then at the top right you can see the DDM directly above the engine cylinder head.
GAZ sometimes uses two types of devices: one shows the current pressure in the system, and the other performs the function of transmitting a signal to the cabin about a critical pressure condition. Two sensors for the display meter and for the lamp are screwed into a tee, which is connected to the cylinder head. The unit is installed immediately after the thermostat.
Thanks to its convenient placement, dismantling and installation work will be very simple
Checking the oil pressure sensor yourself
If, while driving, a sharp warning sound is suddenly heard in the cabin and a light comes on on the instrument panel, this can be caused by a variety of reasons:
- the oil level has dropped;
- wear of liners in crankshaft bearings;
- incorrect operation of the pumping device;
- The DDM is out of order or there is a short circuit in its wiring.
As soon as the signal appears in the form of an oil can, you must immediately turn off the engine and stop. The first step, of course, is to check the engine oil level - it is quite possible that the sensor has tripped due to a lack of lubricant in the engine system. If this is indeed the case, then you will need to add the required amount of oil and you can start the engine and drive on.
However, if the signal is caused by DDM, it will be necessary to diagnose the faults. Owners of GAZ cars can cope with this procedure on their own.
Video: self-diagnosis of the device
Check procedure
- Open the hood and find the sensor location.
- Unscrew the device and connect it to the pressure gauge.
- Connect the pressure gauge adapter to the sensor socket.
- Connect the ground wire of the pressure gauge to vehicle ground.
- You will need to use an additional wire: connect a light bulb or LED to the “+” terminal on the battery and short the wire to the sensor contact. The light fixture should light up.
- After this you will need to start the engine.
- Smoothly pressing the gas pedal, you need to increase the engine speed. As soon as a pressure of 1.2–1.6 bar (gasoline power units) or 0.7–1.05 bar (diesel units) is created, the light should go out. If the light/LED continues to light even when the system pressure is high, the unit is faulty.
- You will need to increase the speed to 2 thousand rpm. The oil should already warm up to 80–90º C, so the pressure in the system should not be less than 2 bar. If the reading on the pressure gauge is lower, it means that the car has severe wear on the crankshaft bearings: the sensor itself is normal.
Checking the functionality of the sensors
DDMs provide very important information about the condition of the engine. A responsible driver treats them with great care, and rightly so. You can’t drive “without pressure,” but you also shouldn’t disassemble the engine every time the warning light turns on.
Although pressure sensors - both emergency and control - are reliable devices, they, like all car parts, may well break. Their common “diseases” are shown in the table.
Table: malfunctions of oil pressure sensors
| Type of oil pressure sensor | Malfunction | Manifestation |
| Emergency | break or increase in contact resistance | The warning light does not light up |
| sticking of contact electrodes | The warning light is constantly on | |
| violation of the integrity of the diaphragm | low sensitivity of the sensor, the warning light goes out only at high speeds | |
| sensor leakage | oil leakage from the sensor | |
| Control | rheostat break | no pressure indicator readings |
| increase in moving contact resistance | low blood pressure readings | |
| violation of the integrity of the diaphragm | no readings or low blood pressure readings | |
| sensor leakage | oil leakage from the sensor |
The most reliable way to check sensor readings is to measure pressure using an external test pressure gauge. It is connected in a convenient place to replace any (control or emergency) standard meter.
The most reliable way to check sensor readings is to measure pressure using an external control pressure gauge
Video: checking oil pressure with a pressure gauge
GAZ-3302 became the first domestic car designed using the world-leading method of end-to-end computer technology for production design using CAD-CAM technology, analytical calculations of dies and molds using the CATIA computer program and many others.
Oleg Filimonov
Using a mechanical pressure gauge as a reference device eliminates doubts about the serviceability of the bearings, crankshaft and rings. But you can evaluate DDM without it.
GAZ car engines use one or two DDMs. The alarm gives a signal (turns on the lamp) when the pressure value drops below the permissible value. The control controls the readings of the pressure indicator installed on the dashboard, which indicates the current value of the parameter.
Diagnostics of emergency DDM
The emergency sensor has two “troubles”: a break and a short circuit. In the event of a break, the pressure lamp on the dashboard does not light up. In the event of a short circuit, it lights up constantly.
If the ignition is on, the engine is not running, but the light is not on, disconnect the wire from the sensor and touch the body, clearing the contact area of any dirt.
Did the light come on? This means that the pressure sensor needs to be changed; it is faulty. If the alarm still does not turn on, the problem may be a broken wiring or a faulty lamp.
Read more: DIY wire clamp
If the wire from the sensor is disconnected, but the oil light still lights up when the ignition is turned on, the wiring is most likely shorted to the housing.
The serviceability of the emergency DDM removed from the engine can be checked with a tester or using a car light bulb and battery.
The serviceability of the emergency DDM removed from the engine can be checked with a tester
The resistance of a working sensor is very small, about zero. If you connect a light bulb to a battery through the sensor, it will light up.
If you connect a light bulb to a battery through the sensor, it will light up
Without turning off the avometer, press the hose of a pump or compressor to inflate the tires to the sensor fitting and create pressure. The tester should respond to this by increasing the readings. If you used a light bulb, it will go out. Otherwise, the sensor can no longer be used.
Oil leaks from the sensor indicate a leak in the seal. To check the assumption, cover the sensor with soapy foam or immerse it in water, connect the fitting to the pump and pump it. Bubbles will indicate the location of the damage.
In the same way, check the tightness of the control sensor.
Video: checking emergency DDM
Checking the control DDM
There is a variable resistor inside the control sensor. Its resistance changes under pressure, which is reflected in the indicator readings on the instrument panel.
There is a variable resistor inside the control sensor
When the instrument needle goes off scale, remove the wire from the sensor without turning off the ignition. The arrow will either return to the zero mark or remain in place at the right limit. The arrow has reacted - throw away the sensor. Left in place - look for a short circuit in the wiring.
If the readings are zero, remove the wire from the sensor and connect it to the body, turn on the ignition. If after this the indicator needle goes off scale, it means that the sensor has worked. Otherwise, most likely the wiring is broken or the pointer is faulty.
When the engine is running, the resistance value of a serviceable control DDM measured by the tester responds to revolutions and should be approximately 100–300 Ohms. Exact numbers can be found in the technical documentation.
To evaluate the functioning of the control sensor at home, you will need a tester and a compressor or pump with a pressure gauge.
The resistance of the sensor strictly corresponds to the inlet pressure. Tables or graphs for each DDM model are in the technical specifications and reference books.
The sensor resistance strictly corresponds to the inlet pressure
The possibility of using the sensor for its intended purpose is assessed by checking the resistance and inlet pressure measured by the tester with the passport data.
According to the recollections of plant veterans, Nizhny Novgorod residents came running to see the first, still experimental copies of the Gazelle, as if they were an unprecedented technical wonder. I couldn’t believe that it was made at my own enterprise. Drivers of large and power-hungry trucks literally chased after it to find out where and for how much the new product could be bought.
Alexander Klimnov
How to replace a pressure sensor yourself
Replacing the DDM on GAZ family cars is a fairly simple operation. Thanks to the convenient location of the device itself in the engine compartment, removing a failed sensor and replacing it with a new one is not difficult. The only thing is that you will need to wait until the machine cools down, since you can seriously burn your hands on hot metal parts.
Replacing a DDM with a GAZ involves dismantling and installing two devices at once: both the sensor itself and the alarm sensor, which is inextricably linked with it.
To carry out the replacement, you must prepare the tool in advance:
- flat screwdriver;
- open-end wrench 17;
- open-end wrench 22;
- sealant.
The first step in almost any operation to replace instruments and mechanisms is lifting the hood
The step-by-step algorithm for replacing DDM with GAZ is as follows:
- Open the car hood.
- Using a screwdriver, unscrew the screw securing the wire to the sensor contact.
- In the same way, unscrew the wires from the signaling device, which sends a command to the instrument panel in the cabin.
- The sensor itself is unscrewed with a 17 wrench.
- Use a 22 key to unscrew the alarm sensor.
- After which two new devices are inserted into the mounting sockets, it is recommended to first apply sealant to the threaded connections.
- The wires are connected to the sensors by screwing in the mounting screws.
- After replacement, you need to start the engine and check the functionality of the new devices.
- If an oil leak is detected, the connections must be tightened again.
Self-replacement of DDM of GAZ cars
Changing sensors usually does not cause problems. For ease of operation and access to the device, you will need to remove any parts in advance. Both sensors - control and emergency - are dismantled using the same method.
Be careful not to install a sensor other than the standard one without making sure that the parameters match. High or low internal resistance distorts the indicator readings on the dashboard.
To carry out the work, the tools included with the car will be useful.
- Before starting work, de-energize the on-board network by turning off the ignition and disconnecting the battery.
- If necessary, remove individual parts to gain access.
- Disconnect the wires from the sensor.
- Unscrew the old sensor.
- Install the correct one. When twisting, do not use much force.
- Restore the wiring.
- Start the engine and check the operation of the engine.
- After a few minutes of operation, inspect the sensor. If oil leaks, tighten the connection with a wrench. Do not overdo it, otherwise the sensor may “stick” next time.