Have you ever had a desperate desire to “unstick the eyelids” of your car on a dark night so that the path is illuminated by a bright light? If the answer is yes, then your headlights clearly need polishing. With regular use, the plastic head optics gradually become cloudy, and road lighting becomes dim. It is not always possible to solve the problem simply by changing the headlights, at least because of the cost of new or even good used ones. The author of these lines was once saddened by the appearance of the headlights and the dimness of the light on his old-fashioned Volvo, but it was not possible to install fresh optics with the transparency of a mountain stream - the personal toad, having learned about the rather impressive prices, used a technique called combat strangulation. I had to pick up a sanding machine, stock up on props and put the plastic in order myself. Polishing headlights with your own hands at home is not a difficult task. The main thing is to approach the process properly prepared and having the necessary knowledge.
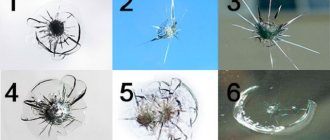
The reasons for their appearance are:
- Constant dust on the roads remaining on the headlights
- All kinds of stones, sand, soil falling on the headlights
- Worn rubber bands on headlight wipers causing scratches
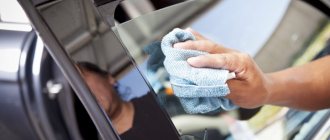
Washing headlights with various cleaning liquids and wiping with dry or wet wipes do not bring the desired result? This means it's time to clean them.
Naturally, there are many drivers who immediately rush to buy and replace optics. First you need to point the light at the road. And if you see a shapeless spot of light, instead of a brightly lit road, then try polishing the headlights with your own hands and making them look as good as new. Save your budget.
Self-polishing of headlight glasses for lenses. Step by step, point by point
We need to start with the fact that polishing headlight glasses for lenses is not an easy task for the average person. In such a situation, people prefer to entrust the work to professionals in this field or buy glass in a store rather than try to do the work with their own hands. To perform this operation, a number of tools, certain skill and experience will be useful. It is worth noting that ready-made polished glass in a store can cost a tidy sum, which raises the question: do the work yourself or spend money on the right part? If the scales have tipped towards doing it yourself, then this article is just for you.
Preparing for work
Polishing headlight lenses for lenses requires the following steps. First you need to prepare your workplace. You need to take a board and 4 slats. 3 of them must be nailed to the board so that the structure resembles the letter “P”. The fourth one needs to be secured a little further from all the others so that the water can drain.
Next, a logical question may arise: “What size should a U-shaped structure have?” We answer: “Depends on the glass that needs to be polished.” On the one hand, the structure should not be too small so that the glass can fit in, and on the other, not too large so that the glass does not feel too loose.
Work process
It's worth starting with a coarse-grained stone. There is one trick here. It is advisable to use only one side of this stone because it has a flat shape, and the glass itself is rounded, and when doing the work, the stone is deformed under the glass and polishes the surface more effectively.
- If you constantly maintain a high number of revolutions, then there is a high chance of the part overheating and damaging it, but the work will be of better quality;
- If you maintain low speeds, then the question of glass overheating is not at all worthwhile, but you can easily get a scratch;
- A large amount of water dramatically increases the working time, but also minimizes the possibility of making a scratch on the surface being treated;
- The use of “sandpaper” in work contributes to tearing the working tool out of your hands;
- It is better to take a larger diameter of the circles
because the tool moves less in the hand, and polishing proceeds smoothly and efficiently; - By the way, monitoring the temperature of the glass is a top priority. It depends on this whether you will have to go to the store for new glass or successfully and efficiently complete the work on your own;
- After processing with a coarse-grained stone, we move on to sandpaper (waterproof): 100-180. The next step is to take a drill with a circle attachment, on which sandpaper from 220 to 1500 is already attached. The last step when polishing glass for lenses is to take the polishing attachment and diamond paste. It is important to understand that you do not need to spread the diamond paste on the glass or dilute it in water. You just need to apply it to the felt.
Do-it-yourself polishing of headlight glass under the lens
The question that I think concerns any person who is thinking about installing lenses in headlights with corrugated glasses is the headlight glasses... here, of course, there are also several options for execution - attaching smooth glasses from a Golf or completely headlights from it, gluing ordinary window glass, removing glass from Chinese DLAA, or install the DLAA headlights yourself, and a rather expensive option is grinding the original glass to fit the lens... I like the last option the most, it looks the most acceptable on the car, there is still a certain bias under the stock... you can also grind the glass to the size of the lens or larger... The cost of such work ranges from 400 to 500 UAH. (50-58 cu), it used to be a little cheaper... of course the cost is space, this doesn’t suit me, that’s why it was decided to do everything at home with my own hands... well, since this question will be of interest to many, but there is not much information on the Internet a lot, I’ll try to tell you as best as possible...
Let's start with the purchase of glass - I bought 2 glasses produced by Osvar, the price of a pair of glasses is 20 UAH = 1.2 USD, this is good)) the glass has this corrugation (I don’t really like it, but since half of it will be sawed off, then I haven’t even looked for others...)
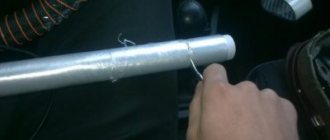
In order to roughly cut off the corrugation, you need to purchase a diamond disc for the turbine (diameter 125mm), its price is 125 UAH = 16 USD.
pour some water into the glass and polish it with a turbine at the lowest speed (there are already a lot of them, so if you have one, it is advisable to use a polishing machine), you don’t need to hold it in one place for a long time, you need to move it to the sides so that the glass does not overheat, otherwise it will there are overcooked strips left...
after sanding we get this:
there is no longer any corrugation, but the glass has become completely opaque and has deep scratches... in order to remove them I used a circle with sandpaper glued to the side, I only had 80 and 120 sandpaper, naturally I chose a finer one... so again pour some water and grind with a 120 wheel until the glass becomes transparent...
This is what happens, it’s not clearly visible in the photo, of course, but the glass is very transparent, only a little cloudy, but not much at all...
Of course, it’s best to take even finer sandpaper after 120, but unfortunately I didn’t have anything like that, so I rubbed it with a mug of water, lightly, to remove the scratches, in principle, as it turned out, this is real) after sandpaper it shouldn’t be on the glass scratches remain, since they cannot be removed by polishing...
Next, in order for the glass to become as transparent as ever, you need to polish it, for this you need diamond pastes of different grain sizes, I bought three types - 6040, 1410 and 1
Grinding and polishing glass headlights
Any motorist knows that using a car necessarily entails some wear and tear on all its elements. This is caused both by various external influences and by certain internal factors that arise in the car.
Headlights are the elements of the car that are most susceptible to external influences. If we talk about the factors influencing the reduction in the service life of the headlight, we can make the following list:
- dust and dirt;
- small stones flying from under the wheels of other cars;
- ultraviolet radiation;
- chemically active substances;
- external mechanical influences;
- influence of atmospheric factors.
Preparing car headlights for polishing
Due to all of the above factors, scratches and chips appear on the surface of the headlights. They may also become cloudy, and the light-transmitting surface may turn yellow. Glass lanterns are more durable and less susceptible to various types of damage than plastic ones.
Preparation of materials and equipment
Polishing car lighting fixtures with your own hands requires the availability of the necessary equipment and materials. First you need to stock up on everything you need. This will give you the opportunity to polish your car's headlights yourself.
So, to complete the work you will need the following tools and materials:
- clean rags;
- a container with clean water and a tap;
- pastes that will be used for polishing. One is with abrasive, the other is protective;
- abrasive paper or grinding wheels with varying degrees of grit;
- grinder or electric drill.
Equipment for polishing
If you don’t have a machine, polishing can be done with an electric drill, but you need to use it very carefully.
Glass has higher hardness than plastic. Therefore, at the final stage of processing you will need diamond paste.
How to polish manually with GOI paste and other means
If you want to save on polishing lenses without much damage to the final result, it is recommended to choose GOI paste. Let's take a closer look at the technology of polishing headlights with your own hands.
Preliminary stage
Work should be carried out in a clean room to prevent solid particles from entering the working surface of the tool. The garage floor needs to be washed to prevent dust from rising into the air. Headlights or lenses are removed from the car and processed separately at home or polished without dismantling.
For a beginner, it is preferable to remove the headlights so as not to accidentally ruin the paintwork
In the second case, at the preparatory stage it is necessary to wash the headlights and wipe them dry with a soft, clean cloth. The rubber seals between the headlight and the body are treated with a special product for the car or an aqueous solution of vinegar. Then strips of masking tape are glued around the perimeter of the diffuser - it will protect the paintwork of the body from accidental damage. The radiator grille and other parts that interfere with operation can be removed. It is better if the surface of the lenses is degreased.
Tools and materials to perform the job correctly
Work to restore the transparency of headlights can be done manually, but this activity requires a lot of effort and time. It's easier to use a power tool. During the work you will need:
- polishing machine/electric drill/grinder with grinding wheel;
- abrasive wheels from 600 to 2000 (for glass headlights - from 400);
- GOI paste or other polishing agent;
- felt circle (for polish - foam nozzle);
- protective varnish;
- napkins;
- protective gloves.
Important! When processing a polymer surface, it is important to avoid overheating, otherwise the plastic diffuser will deform or lose transparency. Therefore, an electric drill or angle grinder (grinder) must have a speed regulator.
Pressing too hard with a sander and overheating can lead to more serious damage than what you wanted to deal with in the first place!
How to polish plastic and glass
- Inspect the diffuser carefully. The presence of deep chips that cannot be leveled, as well as through cracks in which dirt accumulates, indicates that the part should be replaced rather than polished.
- To remove deep scratches, sand the headlight with a 600-grit abrasive wheel at low speed with the power tool. Machine movements are performed from top to bottom and left to right. Do not press the working surface of the circle too hard against the headlight and constantly monitor the degree of heating of the plastic with your free hand. If necessary, interrupt work to allow the diffuser to cool. As a result of processing, the surface should become uniformly matte.
Note! It is better to start processing glass headlights with 400 abrasive. During the work, the surface of the lens is watered. For each stage of polishing a headlight made of thick glass, 2–3 minutes is enough.
- Next, the headlight needs to be rinsed with water and several more treatment cycles are carried out using alternately abrasive wheels 1000, 1500, 2000, achieving almost perfect transparency of the headlight.
- For finishing with GOI paste or toothpaste, a felt circle is used - the polishing compound is applied to it, and not to the surface of the headlight. If you have GOI paste in the form of a bar, the felt circle is moistened with a solvent and rubbed with a piece of hard paste. Headlight polish is applied to a foam circle.
- After two to three minutes of final polishing, carefully remove any traces of paste with a napkin, rinse the headlight and wipe it dry. To restore the protective layer of a plastic diffuser, treat it with a special compound. Moisten a cloth with varnish and apply it to the headlight in one layer using longitudinal movements.
Good tips in videos from the experts
Preparing headlights for processing
Before you polish your car's headlights, they must be properly protected in those areas that will not be treated:
- To begin with, it is recommended to remove the lighting fixtures from the car - this will make it more convenient to carry out any work.
- Carefully clean the glass surface from dirt and dust using water, a cloth and detergents. You can also use a washing brush.
- We seal all adjacent areas with masking tape - it will protect them from any unauthorized influences.
Preparing car headlights for polishing
Rough grinding of glass surface
At this stage, we need to remove the damaged layer from the glass surface by grinding. The depth of chips and scratches determines the thickness of the layer that we need to get rid of. We grind using an abrasive tool, gradually reducing the degree of grain size. At the same time, we wet the surface to be treated with water and monitor the degree of its heating.
Remember that overheating may cause a crack to form; it will no longer be possible to get rid of it. If the work is done manually, monitor the progression of movements and uniform processing. Finally, rinse the surface thoroughly with water.
Myth: Polishing makes glass into a thin lens.
The essence of glass polishing is that the polishing tool removes hundredths of a micron in seconds. So, to remove micro-scratches you need to spend 20-30 minutes, while constantly moving the tool and cooling the glass, since heat is generated in the treatment area.
Removing such a small layer of glass is simply not capable of creating visible distortions. After polishing, the glass remains transparent and does not actually lose thickness.
But this myth cannot be called unfounded. It's all about the confusion of two concepts: polishing and grinding glass. So, to remove a scratch with a depth of more than 30-50 microns, polishing is not enough. You will have to use grinding, that is, remove a larger layer of glass in the scratch area many times faster.
Yes, grinding saves you from replacing auto glass, but due to faster rough processing, uneven removal of the glass microlayer occurs. Distortion may occur and the treatment area may become matte.
The areas of glass where polishing, and even more so grinding, were carried out are determined in different ways:
- inspect the outer surface of the glass at an acute angle;
- move a bright lamp over the surface of the glass, observe the double reflection of the lamp and monitor in which zone the compression and expansion of the light reflection appears.
Professional services usually do not grind windshields - distortions in the line of sight are unacceptable. This removal of deep scratches is only possible for side and rear glazing. In addition, it is difficult to determine high-quality grinding.
To restore the original appearance of the windshield, only polishing is used; this is a gentle and lengthy surface treatment process that does not cause distortion of the glass and, especially, does not make the glass a thin lens.
Glass polishing
The next stage is fine polishing. Its task is to obtain a matte surface with as small a depth of grooves as possible. Here we use an abrasive with the smallest possible grit. We monitor the cooling of the surface using liquid.
When doing the work with your own hands, remember that the intensity of movement gives a high-quality surface, but leads to more intense heating. At the end of this step, wipe the glass dry with a clean cloth.
Finish polishing of car headlights
Features of glass polishing
Unlike polymers, when sanding glass you need to start with coarse paper or stone. When using the latter, use only one of its sides, since during the work it is deformed and “adjusts” to the shape of the material being processed. This way the process will be much more efficient.
Try to choose the most optimal number of revolutions of a grinding machine or other tool, since high speed will lead to overheating and ultimately damage to the glass. At low speeds there will not be the expected result; on the contrary, you can even worsen the problem by getting new scratches.
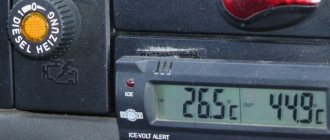
It is very important to monitor the temperature of the glass being processed; at the right time, it is better to pause the work and cool the surface with water.
This way the glass will surely remain intact and unharmed. But it is not recommended to use a lot of liquid during processing, otherwise polishing will take longer. But no new damage will appear on the surface.
After pre-treatment with stone, it is recommended to move on to nozzles (waterproof), the grain size of which is 100-180. Then you need to gradually move to smaller ones (from 220 to 1500). In general, the grit of rough sanding paper is selected based on the condition of the glass being processed.
If there are chips, deep scratches and other damage on the surface of the headlight, take sandpaper or a nozzle with maximum grain size, and then gradually reduce it. Optimally, the transition from one type of sandpaper grit (or wheel) to another should occur only after the surface of the glass being processed has become almost uniform.
An important nuance is the size of the disks. It is better to choose larger diameters of polishing wheels for power tools; in this case, polishing proceeds smoothly and good results are obtained. Discs with Velcro, which are securely attached to the instrument, have proven themselves to be very effective. A polishing compound is applied to these nozzles, which is then distributed over the surface. At the final stage, using diamond paste applied to a polishing wheel, the glass is processed for the lens.
Having finished polishing, carefully install the parts in place and enjoy the result. At a small financial and time investment, we received updated headlights that will serve faithfully for a long time!
The final stage of finishing and applying a protective layer
Further polishing of the headlight glass is carried out using a foam wheel, onto which an abrasive paste is applied. The work must be done as carefully as possible - polishing is carried out in a circular motion. If you don't use a power tool, you can polish yourself by applying the paste to a microfiber cloth.
Next, you should replace the foam rubber circle with a felt one and apply protective paste to it. If polishing is done by hand without power tools, change the napkin and apply protective paste to it.
Result of car headlight polishing
After this, rub the paste into the surface of the headlight glass in a circular motion.
After polishing is completed and the headlights are shiny, there should be no chips or scratches on them - this will mean that you have successfully completed the restoration task.
Myth: glass polishing is a primitive process, you can do it yourself
Glass will not forgive the intervention of an amateur. The “I’ll take the polish” strategy will lead to irreversible damage to the glass: from the same lens effect to the need to replace glass that was still quite suitable (before the intervention).
Glass polishing is a complex technological process that requires strict adherence to all rules, the use of high-quality polishes and professional tools. In addition, during execution, the master must constantly monitor the process, prevent the glass from overheating, constantly move the polishing machine and evenly process the entire working surface, otherwise the glass will overheat and the consequences will be disastrous.
Often, homemade polishing errors cannot be corrected even by a professional service, although according to recommendations on YouTube, everything is simple and can be done with improvised means.
Do not risk the condition of your windshield, because this is a matter of visibility and driving safety. Contact professional polishing services, “treat” microchips and scratches in a timely manner, and do not hesitate to consult with specialists.
So, at DITS-service you have experts who work with auto glass every day: come, ask questions and get the optimal solution to your problem!
Why does the headlight become cloudy?
Our roads are full of surprises. For example, no one can be protected from a pebble accidentally hitting the glass (plastic) of a headlight. Perhaps you yourself have not noticed how the headlights have darkened with time and frequency of use. Or they themselves damaged their headlights by wiping them with dirt with a dry, hard cloth. The fact is that the dirt contains grains of sand with which you so diligently, without knowing it, scratched the headlight glass.
In any case, there is always an opportunity to correct the situation and return the car’s “eyes” to their former shine.
Remember that you can only polish scratches.
. These methods will not help you remove a crack or chip in your headlight. This type of damage can lead to serious problems beyond just replacing the clear plastic part. Also, dim headlights provoke “night blindness” on the road, which affects your and others’ safety.
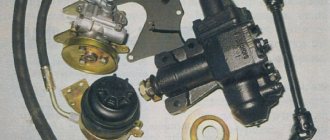
Headlight repair from A to Z
Headlights and lanterns are elements of a car's optical system that help improve visibility of the roadway at night, as well as make the vehicle more visible on the road. Lighting devices located in the front are usually called headlights, and those located in the rear are called lanterns. Both have a similar design. The outer part of the headlights is made of transparent glass or plastic, which, despite its apparent strength, is quite fragile. The headlight can be damaged not only in an accident or an unsuccessful maneuver, but also as a result of a well-aimed hit from a pebble flying off the road surface. It is prohibited to operate a vehicle with damaged lighting fixtures. Self-repair often turns out to be ineffective. This does not mean that you need to immediately go to the spare parts store for a new headlight. Most defects can be eliminated by contacting a professional workshop. A significant portion of headlight defects are caused by mechanical damage. The impact may cause the outer glass to crack or the mount to break. The method of repair depends on how severe the damage is. If there is only one crack on the glass surface or a small piece of plastic is missing, its integrity can be easily restored by soldering. In case of more significant damage, the technicians do not see the point in repairs, since such a headlight will still not be able to function normally. Replacing the glass with new or used one is considered a much more reliable repair option. It is noteworthy that this procedure is possible even on non-separable headlights. To open the system, craftsmen use special chemical reagents, which allow them to do the work much more accurately than when cutting. Often the problem with modern headlights is their fogging. In addition to the unsightly appearance and poor lighting level, fogging threatens oxidation of the headlight contacts and a short circuit. The most common cause of fogging is depressurization of the headlight housing. To fix the problem, the headlight is dismantled and all connecting seams are re-soldered. On vehicles that have been in use for quite a long time, a problem may arise with clouding and decreased performance of the headlights. This problem can be corrected by polishing the inner surface of the glass and reflector.
How to polish headlights
It’s worth noting right away that there is no difference in polishing a glass and polycarbonate (plastic) headlight. Therefore, all methods are universal.
If your headlight is young and not severely damaged, you can use toothpaste without color stripes. A strange way, but effective. As it turned out, toothpaste can whiten not only teeth, but also a lot of other things.
The method of application is as simple as possible. Cover the area around the headlights with polyethylene to protect the paintwork. Then you need to apply the paste evenly onto the headlight. Rub it with even movements for 5 minutes. Then wipe the headlight area with a damp cloth to remove the paste. The result will exceed your expectations.
There is also a method that is suitable for more worn headlights. It is somewhat more complicated and more expensive in terms of money and time, but more professional. To do this you need:
- Polyethylene;
- Sandpaper of different grain sizes;
- Specialized headlight polishing product (can be purchased at a car store);
- Foam nozzles for grinding;
- Drill.
The grinding process involves sequentially sanding the headlight. This procedure occurs in three stages. Sand the headlight with coarse sandpaper, and then medium and fine. This way you will remove large and then minor damage.
Then you can move on to polishing. Apply the required amount of product to the sanding disc and start polishing the headlights at low speed.
If you are not sure that you will perform high-quality polishing, then it is better to contact a salon. Since improper polishing can worsen the condition of the headlights and they will have to be replaced. Why them? Because elements such as headlights can only be replaced in pairs.
Do-it-yourself headlight polishing
Preparation for the process
Before you begin the process of polishing your headlights, you need to make sure that you have everything you need:
A grinding machine with abrasive wheels of various grits: 600, 1000, 2000, 4000. If you do not have a grinding machine, you can use sandpaper with the same grit size;
- Masking tape;
- Glass cleaner. If not available, you can replace it with regular soap;
- Pure water;
- Felt circle or regular sponge (rags can be used);
- Car varnish;
- A polish that can be replaced with toothpaste.
Before you start polishing the lens, you need to do a couple of preparatory works:
Cleaning the headlight from dust and dirt.
To do this, apply window cleaner to the headlight and wipe it with a rag. At this stage, it is not important to use specialized cleaning products. If they are not available, use dishwashing gel, soap, shampoo or other detergents.- Protection of body elements. Headlight polishing can be done directly on the car or at home, after first removing it entirely. If you decide not to remove the headlight, then before you start polishing, be sure to cover the body parts around the lens with masking tape. It is necessary to seal both plastic and metal parts located around the headlight.
Having completed the preparatory steps, you can proceed directly to the work of grinding and polishing the headlight.
Grinding work
The sanding process is the longest when polishing headlights yourself. It will take at least 15 minutes. To grind the lenses of car headlights, do the following:
- Place the abrasive wheel with the coarsest grit on the grinder. It is recommended to start sanding with a 600-grit wheel, but 1000-grit is also possible. If you don’t have a grinding machine, use sandpaper;
- Next, apply water directly to the wheel and glass - this will reduce the temperature of the elements during grinding;
- Begin the grinding process, working evenly over the entire surface of the lens for 2-3 minutes. After sanding with a 600 grit wheel, the headlight will become matte.
- After finishing sanding, wipe the headlight with a cloth soaked in water and go again to the first point of sanding work, replacing the wheel on the machine with a more grainy one.
Each sanding step should take 2-3 minutes. Thus, the process of polishing one headlight takes 8-12 minutes. Attention: When grinding, do not forget to wet the wheel and headlight with water.
Polishing work
After sanding with a 4000 grit wheel, the glass should be almost perfectly clear. At this point you need to start polishing the headlight. To do this, just apply polish to a rag, sponge or polishing felt wheel and rub it in for 4-5 minutes. If you can't get polish, toothpaste will do.
The final stage of polishing headlights with your own hands
The last step is to apply automotive varnish to the surface of the headlight. This stage is optional, but without neglecting it, it is possible to maintain the transparency of the headlight for a longer period. When the car is released from the factory, a special product is also applied to the headlights, the purpose of which is to counteract the causes of dimming of the headlights.
As you can see, the process of polishing headlights with your own hands is simple. It will be possible to clean both headlights from microscratches without outside help in an hour, saving not only time, but also money on the services of specialists. Everything you need to polish your headlights can be easily purchased at any local auto store.
( 417 votes, average: 4.54 out of 5)
Why cover your car radiator in winter?
Method of computer selection of paint for a car
Related Posts
How often to polish headlights
The time for such a procedure depends on how often you use the car, under what conditions, and also how quickly the headlights lose their presentability. Even taking into account all these points, we can say that polishing can and should be carried out once every two years.
If you use the first method, like polishing with toothpaste, then the frequency of the procedure can be unlimited in time. Once a week or once a year - it's up to you.
Do you often polish your car's headlights?
How about the paste method? Write your opinion in the comments, press your thumbs up , subscribe !
Not quite ordinary glass polishing: preparing headlights for installing lenses
During the operation of the car, due to the constant contact of sand, salt, stones, oil residues and dirt on the glass, the headlights gradually lose their transparency. In this state, they shine worse and disperse light incorrectly, which can cause an emergency. It is not possible to constantly change the headlights, so the best way out of the situation is to do it yourself. Polishing the glass of optics under the lens is considered more thorough and complex. To perform such work, it’s easier to turn to professionals at a car repair shop, or you can do the work yourself.
Preparing for work
If you decide to polish glass yourself, arm yourself with the necessary materials and tools. They can be purchased separately or, for simplicity, take a ready-made set, which can traditionally include:
- types of sandpaper of different grain sizes;
- electrical tape or masking tape;
- napkins and rags;
- polishing paste (you can also use varnish);
- activator;
- vinyl gloves.
If manual polishing is not intended, you need to “arm yourself” with a grinder, drill or grinder with adjustable speed (although the last two tools must be used carefully to avoid overheating the glass). You also need to take attachments for the circles, and you will also need cold water (clean or soapy water) for the work.
For grinding and polishing, a special device is useful - a frame that will help hold the glass while working. It's easy to make it yourself. To do this, three planks in the shape of the letter “P” are nailed onto the board. It is advisable to place a wet rag or napkin at the bottom of the improvised frame so that the material does not overheat during operation. The size of such a structure will directly depend on the size of the glass.
Machine polishing
To perform polishing work with your own hands, use a special machine, grinder or drill. Electric clippers require special attachments. Using polishing wheels made of different materials (foam rubber, felt, leather), grinding and further finishing polishing are carried out.
First, a coarse abrasive attachment is put on the power tool, then a thinner one. To get a good result, it is advisable to constantly wet the surface. Finishing is carried out using a special foam rubber or felt circle.
During work you need to be extremely careful, because glass is a fragile material. Set the machine to minimum speed, and each phase can last no more than three minutes.
Do not allow the headlight to overheat, and do not press too hard on the surface.
Preparatory stage of polishing headlights
Before you start polishing your headlights at home, you first need to thoroughly rinse them and wipe them with a dry cloth. In order not to damage the nearby paintwork areas on the car body, we will stick construction tape on them. We will polish the headlights with our own hands without dismantling them. We will remove the headlight only when they need internal polishing.
It is also necessary to protect the rubber seals, as they may be damaged by abrasives or other polishing agents.
We remove dust and dirt using special detergents, you can even use a vinegar solution. It is also possible to dissolve vinegar in water.
We use a grinding machine as a polishing tool, or, if one is not available, an electric drill will do.
Manual processing of headlights
In essence, the process of work is exactly the same as when using a grinding machine, with the difference that circular movements will be performed manually. So to speak, on hand you need to have a container with soapy water into which you need to periodically dip the sandpaper.
The movements during sanding should go from the center to the edges. Polishing is carried out in a similar way. At first you will get a cloudy surface, but with each change of paper grain to a smaller one, the glass will become clearer. To obtain ideal transparency, finish polishing is carried out.