1) Items that will be needed for car window tinting.
- Rubber spatula (for smoothing the surface of the film on the glass) - industrial hair dryer (for heating the tint and eliminating bubbles and folds under it) - tape (for separating the film) - a clean dry rag - a container with a water spray (for wetting the tint).
2) Preparation for work
Fill the spray bottle with clean water and add 5-10 drops of detergent (liquid soap or shampoo). Shake the container until the detergent is completely dissolved. This solution will be needed to clean dirty stains from glass. It is also needed for the film to stick to the glass. Prepare a clean workplace, including the salon. After all, dust located nearby causes the formation of small bubbles, which may later appear under the film. Select a flat, wide place where the tint will be cut to fit the glass. Cut the film along the contour of the glass
3) Method of separating the tint film from the protective layer
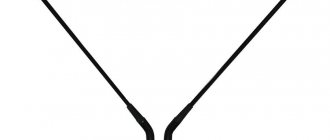
At this stage we will need some tape. To avoid creasing the edges of the tint, the tape must be attached to its two opposite sides and at the same time spread apart, as shown in the figure.
4) Tinting of side windows
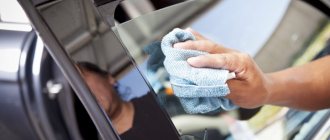
Spray the cleaner onto the glass, wait 2 minutes, remove the cleaner using a rubber spatula using the movements shown in the figure. Lower the glass 2-3 cm and clean the edge of the glass.
Spray filtered water generously onto the glass. If there is not enough water, the tint will be difficult to move across the glass surface.
Car window tinting is, without a doubt, an important element of external tuning. To tint your car or not is a matter of choice for every car enthusiast. In this article we will talk in detail about how to properly tint car windows with film yourself. And at the end you can watch a training video.
Tinting is a process that requires care and preliminary preparation. But with some skill, you can do car window tinting yourself.
You may also be interested in the following materials on our website:
Below we have prepared for you step-by-step instructions for tinting car windows: from choosing a tinting film to gluing a reflective strip on the windshield.
Choosing a film for car window tinting
The tinting film market is so large that to review it, we wrote a separate article about films for tinting car windows.
We do not recommend buying cheap Chinese DIY kits; instead, we recommend purchasing only high-quality roll film for window tinting.
Also listen to the recommendations of sellers who sell tint films. From them you can purchase all the tools necessary for tinting windows.
Still, it is better to see once than to hear a hundred times. Therefore, we suggest watching a video tutorial on tinting car windows with your own hands, which is located at the bottom of this article.
And for better assimilation of the material, all stages of self-tinting windows are described below and can be used as a cheat sheet.
Features of removable tinting
Some of the reasons why a car owner seeks to tint windows include the following:
- interior darkening;
- eye protection from blinding sun rays;
- an attempt to prevent premature fading of the upholstery;
- improving temperature regulation inside the car;
- protection from prying eyes from outside.
Tinting darkens the interior
Removable tinting provides motorists with all these options, and also allows you to quickly return your car windows to their original appearance.
This quality is important because traffic regulations prohibit the darkening of the front side windows, and there are strict requirements for the light transmittance of the darkening of the remaining windows of the car. For this reason, disagreements regularly arise between drivers and traffic inspectors. To avoid them, car owners decide to stick on removable tint. If necessary, you can get rid of it in a matter of seconds.
DIY removable tinting
See also:
Removable tinting Sparks
Materials and tools for tinting car windows
In the process of tinting your car windows yourself, you will need the following tools:
- Spray,
- Soft and hard forcing,
- Paper napkins,
- Sponge,
- Scraper,
- Ruler,
- Knife,
- Hair dryer.
To work with the tint film, use a water-soap solution prepared in the following proportion: 5 drops of washing shampoo per 1.5 liters of water. Mix the solution thoroughly (you can use the container of your spray bottle for this).
Before you start tinting, you should thoroughly clean the exterior of the glass using a prepared water-soap solution.
Traffic regulations and tinting
Checking the permeability of glass by a traffic police officer
Light transmittance standards for windshields are 70%. The rest can have any light transmission.
The use of tinted (including with film) windows on cars is regulated by GOST 32565-2013. Light transmittance standards for windshields are 70%. The rest of the glass can have any light transmission. Whether mirror tinting on car windows is allowed or not is not covered by this GOST, but the ban on mirror tinting is in effect since the Decree of the Government of the Russian Federation of October 31, 1993 prohibiting it has not been repealed. The fine for tinting front windows that does not meet light transmission standards is currently 500 rubles. Those who want to defend their rights before the inspector can take this GOST into service, having a printout of it in the glove compartment of the car. The fact is that often the light transmittance test is almost always carried out with violations. For example, measurements must be made at least in three points. The document also regulates the conditions under which the test should be carried out (air temperature, relative humidity, atmospheric pressure). In addition, the device (taumeter) must have a certificate and be sealed. A copy of the certificate presented by the inspector is already a violation, which will be a weighty argument in court (if it takes place).
Pattern of film for tinting car side windows
Before you start tinting your car windows, you need to cut out the tint film.
To do this, you need to determine where the adhesive layer is located - it is protected by a transparent liner. Always cut the film along the roll and make sure that the cut piece is a few centimeters larger than the glass.
- Moisten the outside of the glass and place a pre-cut piece of tint material on it with the liner facing toward you. The bottom of the film should be parallel to the outer horizontal window seal and overlap it by approximately one centimeter.
- Using a punch and a knife, make side vertical slits in the film so that you can then place the pattern over the vertical seal by about one centimeter.
- Next, having folded the bottom part of the pattern, lower the glass a little and, having secured the film along the upper edge of the glass, make a horizontal cut in it, and then give it its final shape.
The blank for tinting fixed glass is cut out so that it is several millimeters larger than the transparent area of the glass.
- Pre-fix the film on the outside of the wet glass surface.
- Cut out the workpiece carefully and slowly.
- If the transparent area is limited by the seal, then cut along the seal using a forcing.
Pattern of film for tinting the rear window
The pattern of the tint film for the rear window of a car has some features due to its spherical surface.
- Before cutting, the outer surface of the glass and the film for tinting must be completely dry.
- The letter “H” is drawn on the surface of the glass with a wet sponge, and the tint film is rolled out along the roll with the adhesive layer facing out. Our blank must be larger than the transparent area of the glass.
- The remaining tint material along with the roll must be carefully removed. To do this, it is better to resort to the services of an assistant.
- After this, place the workpiece on the outside of the rear window so that there are no horizontal folds, but only vertical ones.
- Smooth out the film in an “H” pattern, since glass has a spherical surface.
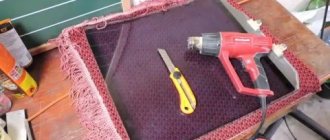
Wrinkles on the tint film must be smoothed out using a hair dryer. Be careful - do not overheat it; only the vertical folds can be heated!
- After removing all the folds, moisten the surface of the glass and film, and carefully smooth the pattern. As a result, it should take the shape of glass without wrinkles.
- Smooth the workpiece from the center of the glass to its edges, both vertically and horizontally.
Carry out this operation carefully using forcing. Make sure that the film does not break during the tinting process, but is evenly smoothed over the surface of the glass.
The next stage of tinting is precise cutting of the film. In this case, it is recommended to use a spotlight to illuminate the car interior, and the cutting line should extend several millimeters onto the opaque area of the glass (see the video below).
Required Tools
In order to independently protect your car from sunlight, you will need the following tools and consumables:
- Tinting film. Naturally, without it it will be simply impossible to carry out this process. When purchasing, in addition to quality properties, you should pay attention to the width of the roll. It is advisable to take extra material in order to avoid various awkward situations when the width of the film after gluing does not correspond to the glass by several millimeters.
- Putty knife. An object used to directly smooth the film. The kit usually comes with plastic spatulas, but rubber ones will be more acceptable. Often, in addition to a spatula, tinters use ordinary windshield wiper blades, but this approach is more relevant for large and unbent glass.
- Stationery knife. It must be very sharp in order to avoid jams and tearing of the material. A blade can also be an excellent replacement, but it is not so convenient to operate.
- Construction hairdryer. If the car windows are curved in two planes, or, more simply put, they are convex, then heating the tinting material will be required to smooth out wrinkles and bubbles. This is where an industrial hair dryer with temperature control comes in handy.
- A number of supplies will be needed. Dry cotton rags, liquid soap or shampoo, water spray. It is worth noting that it is highly not recommended to use glass washing liquid as a detergent. For convenience, you can use graph paper, from which you can make preliminary templates for cutting out the film.
We recommend:
Making eyelashes for headlights with your own hands: instructions
Applying film for tinting on car side windows
Wet the surface of the side glass and use a scraper to clean its lower part. Then lower the glass a few centimeters, wet it and also clean the rest of the surface using a scraper.
Clean the surface with the blade consistently and make sure that there are no uncleaned areas.
Next, wash the glass with a hard sponge and wipe dry using a rubber pad. Wipe the edges of the glass with a napkin. Moisten and wipe the glass again with a rubber pad.
- Before applying the tinting film, wet the glass generously.
- Then it is necessary to remove two-thirds of the liner protecting the adhesive layer from the workpiece and moisten the adhesive surface. It is convenient to carry out this operation on the rear window of the car by placing the pattern with the adhesive layer facing outwards.
- It is better to cut off the excess liner removed from the workpiece before applying the tint film.
Wet your fingers. Your fingertips must be clean, since in the process of tinting the glass you will need to touch the adhesive layer of the film.
Carefully take the workpiece and place it on the prepared glass surface.
Try to ensure that the adhesive layer only touches the surface of the glass and does not touch the seals or other surfaces.
Align the tint film along the top edge. Make sure that there are no gaps or gaps anywhere, and begin to carefully squeeze the solution out from under it.
Follow a few simple rules:
- Hold the pattern with your hand, since when you initially squeeze out the liquid, the workpiece will slide along the glass.
- Squeeze water from the center to the edges.
- Use rubber and then hard forcing. Using hard distillation, expel the liquid in the same directions - from the middle to the edges.
- Then, using a forcing tool and a hair dryer, fix the film at the top edge of the glass.
- After this, use a knife to remove the excess tinting film protruding onto the upper edge of the glass - this technology allows you to avoid leaving gaps along the upper edge.
Raise the glass. Bend down the bottom part of the pattern protected by the liner and generously moisten the glass with the solution. Remove the liner completely.
Do this extremely carefully and make sure that the film without a liner does not touch anything other than the glass with its adhesive layer!
Carefully tuck the tint film under the glass seal. Squeeze out the horizontal inner seal using a force and, when inserting the film for tinting, make sure that it does not break - this operation also requires certain skills, so be especially careful (pay attention to how the master will carry out this operation in the video tutorial below) .
- Squeeze the solution out from under the film using hard forcing: squeeze out the water in successive movements from top to bottom and from the middle to the edges.
- Finally remove any remaining moisture using a distiller wrapped in a napkin and a hairdryer.
- Make sure that no water bubbles remain under the film during the tinting process.
The technology for cleaning and sticking small fixed glasses will be identical.
How to apply tint yourself
The tint coating should only be applied to clean glass. If work is carried out indoors, there should be no dust in it. Polluted air is one of the reasons for the appearance of bubbles. If you perform the steps without removing the glass, then the interior should also be clean.
To ensure dust is not guaranteed, it is best to carry out procedures on a cloudy day after rain. In the same way, you can protect yourself from the appearance of insects that can interfere with work outside.
If, due to complexity, you want to refuse a job, you always have the opportunity to contact the service. In addition to the fact that the window should be smooth, you should remove everything unnecessary from it, for example, the antenna.
What you will need
Before work, you need to prepare tools and material. Among everything you may need, consumables should not be neglected.
- Tinting film. The quantity should be enough for the side windows, as well as the front and rear glass.
- Rubber spatula and plastic scraper.
- Shampoo.
- Spray.
- Stationery knife with a retractable blade.
- Lint-free cloth, dry.
- Clean and warm water.
- Home or technical hair dryer.
Also, before work, the material must be prepared. Cutting out the film is not a difficult task, and involves cutting out pieces that will be 2-4 centimeters larger than the size of the surface to be tinted.
Car preparation
The next stage is preparing the machine itself. For quality work, be sure to wash the car and workplace. Even grains of sand can cause defects during operation, so attention to detail is worth paying attention to. The film should only be applied to a clean surface and in clean conditions. Therefore, car windows must first be washed on both sides using a special cleaning solution.
Even after washing, when wiping the car with a soft cloth, you must make sure that no lint remains on it - you cannot glue the tint material without bringing the coating to perfect cleanliness. Work should begin with the side windows.
Only after pasting them over can you gain experience and begin working on the rear and front glass. Then the process can go in two directions - removing the glass or not removing it. The most convenient way is to remove the glass; the effect of this is much higher, although it forces you to tinker, doing extra work.
We make the film ourselves
The advantages of tint film have already been described in detail, but the question remains: how and what is it made from? The production of car tinting is based on polyester material. The base for production must be of high quality, and very few companies produce such polyester. The classic film consists of several balls. The thickness of each is 20 microns. The manufacturing technique is quite complex; the layers are rolled at a certain temperature. It is very important that when used, the film does not distort the appearance of things and the interior. To achieve this, much attention is paid to the uniformity of the physical indicators of the base in its different sections. This property allows the film to be glued to any type of glass.
You can also tint your car at home. However, it is not possible to create a high-quality product that will meet modern norms, standards and operational requirements. Tinting film is made using temperature and chemical composition in a factory; recreating the process at home can be an impossible task.
Pasting technique
The methods for gluing the coating to the side, front and rear glass are not much different. Experts advise starting with the sides. Only then, having gained experience, can you begin to apply coating to the rear and windshield.
Before starting the procedures, the side windows are washed with water and a scraper, and then wiped with a rubber pad. The edges are wiped with a napkin, and hands are washed with soap before the second part of the work. The glass is moistened with soapy water, and the protective coating is removed from the pattern. The adhesive part is wetted with the solution, as are the fingers. The film is carefully applied to the glass, the absence of gaps is checked and how smoothly the applied material fits. Excess water is removed. Drying too hard can scratch the coating. Water is removed with progressive movements from the center to the edges.
The upper part of the film coating is fixed a little later. The remaining part is also moistened with soap solution. The film is tucked under the lower seal; kinks should not be allowed. The remaining liquid is removed from under the film with a hairdryer and distillation. There should be no water bubbles after finishing work. They can be removed almost immediately after applying the tint by walking over the glass with a rag or soft cloth.
Applying film for tinting on the rear window of a car
The process of cleaning the rear window of a car is slightly different as it has heating filaments and extreme care must be taken not to damage them. It is also recommended to use a plastic spatula instead of a scraper.
- After cleaning, the glass should be washed with a hard sponge, wiped dry using a hard scrub and wiped with a napkin around the perimeter.
- Before applying the film for tinting, moisten the glass generously with the solution, while covering the rear shelf with a rag or some other available material so as not to flood the car’s electrical equipment with water.
To apply the tint film to the rear window, it is better to use an assistant.
- When removing the liner, immediately wet the exposed adhesive layer with a soap and water solution.
- Carefully, without touching the adhesive layer to foreign objects, place the workpiece on the glass - this is a very important operation and requires a certain skill.
- Make sure that the film does not curl, wrinkle or bend.
The adhesive layer of the pattern should only touch the treated surface of the glass and, in no case, any parts of the car’s interior or the installer’s clothing.
Align the pattern with the glass so that there are no gaps, and begin to smooth it using a rubber pressing tool.
When tinting the rear window, smooth the film from the center to the edges so that no air or water bubbles remain under it. Use a plastic spatula in hard-to-reach places.
- Next, moisten the tint film and squeeze out the remaining solution from under it using hard forcing.
- Squeeze along the heating threads - from the center to the edges.
- Then perform this operation by hard forcing, but already wrapped in a napkin.
The final stage is pressing the tint film around the perimeter by forcing, while simultaneously heating the glass from the outside using a hairdryer.
Be careful not to overheat the glass with a hairdryer - it may burst!
Glass tinting technology
Before tinting your car windows, you need to prepare the area. An ideal option would be a garage, which needs to be well cleaned and ventilated. In addition, it would be useful to spray water so that the dust in the air settles a little. If you decide to glue the film in the yard in the fresh air, then do it in calm, sunny weather.
First you need to remove the glass, wash it from dirt and dry it. If you do not want to do this, then you can use patterns made from plain paper. Place the paper on the glass, draw an outline and cut it out. Then cut the tint film according to the paper pattern. Please note that you need to leave an allowance of a couple of millimeters on each edge.
Having prepared all the patterns and cleaned the glass, you can begin gluing the film. Mix any shampoo in a bucket of water to obtain a soap solution. Spray the prepared solution evenly onto the glass using a spray bottle. Remove the protective layer from the tint film and apply soapy water to its adhesive side.
How to properly apply tint? Place the car film on the glass so that no creases appear and begin to “drive out” the bubbles and water with a rubber spatula. The film should be smoothed from the center of the glass to its edges. If you need to stretch the film somewhere, use a regular hairdryer, but do not set the temperature too high, otherwise the film will melt. Was there an air bubble under the film? No problem, pierce it with a needle and smooth it out by “forcing”. The edges of the film are trimmed with a hard saw or a stationery knife. After applying the film, give the glass time to dry completely.
But, as they say, it is better to see once than to read a hundred times. Watch the following video, which shows the process of applying car tint film to windows:
Pasting a reflective strip on the windshield
The tint strip must be cut along the roll with a small margin. Then wet the surface of the glass and place your workpiece on it with the adhesive layer facing out.
Make slits along the seals and remove excess tinting film.
Do not forget that you must use only special blades that do not leave scratches on the glass!
- Smooth out the pattern so that there are no horizontal folds - only vertical ones.
- Then, using a hairdryer and forcing, heat and smooth out the vertical folds.
The windshield is sensitive to temperature changes, so do not heat it up or cool it down suddenly!
- Moisten the workpiece, fold it in half and smooth it carefully so that there are no folds or wrinkles.
- Then, using a ruler and a knife, make notches at a distance of 10-12 centimeters from the top edge of the pattern.
Make notches as often as possible. Using this method you can make a reflective strip of any width. The width will depend on how far from the edge you make the notches.
- After this, remove the excess tint film.
- Then lay out the pattern along its entire length and use a ruler to cut the notches between each other (this process is clearly shown in the training video below).
When working with film when tinting windows, always place the adhesive layer and liner on yourself.
- After this, place the resulting workpiece again on the damp windshield from the outside.
- Wet and smooth the pattern and use the light from inside to make precise cuts.
To avoid gaps after applying the tint film, make a cut so that the film extends a few millimeters onto the opaque area of the glass.
Clean the glass and apply the film for tinting from the inside in the same way as in previous cases.
Do-it-yourself tinting: work order
Do-it-yourself car tinting
In order to properly adhere the tint film, you need to stock up on the necessary tools for car tinting:
To prevent the film from bunching up later, it is better to heat both it and the glass with a hairdryer.
- stationery knife;
- soft plastic or rubber spatula;
- a container with clean water or soap solution (preferably with a spray bottle);
- lint-free wipes.
The side windows must be removed and thoroughly cleaned and degreased. You need to work in a warm room. A hairdryer (preferably a professional one with a wide range of adjustments) will also come in handy. If you have not prepared cardboard patterns in advance, then cut the film with an allowance. Do not peel off the entire film at once - 10 centimeters is enough for a start. Having properly tried on the film, begin gluing, driving out air bubbles with a spatula and a napkin. Oh, and don't forget to wet the glass! Gradually peeling the film off the base, move along the length of the glass. Cut off the excess film with a knife, guiding it with a ruler. At the same time, step back from the edge of the glass by 3 - 5 millimeters - then you should smooth the edges with a spatula. To prevent the film from bunching up later, it is better to heat both it and the glass with a hairdryer. Try to keep your hands moistened with water so as not to accidentally leave fingerprints.
DIY removable tinting
How to apply a removable tint with your own hands - from those that are already on sale - is not particularly difficult, especially for gel tint, which is sold already made for a specific model. The main thing is to remember that the film is soft and to avoid excessive tension. But to make a removable tint with your own hands, you need to work hard. Firstly, choose a film for the base - thin, transparent and durable. Secondly, carefully make templates from thick paper. Well, and finally, think about a way to attach it to the glass. The lack of ready-made recipes may allow you to develop, as they say, know-how in this area.
Video tutorial on how to tint car windows yourself
The main purpose of tinting is to create a certain image of the car and hide its internal contents from prying eyes. Many inexperienced car enthusiasts think so. In contrast, experienced drivers know that tinted windows provide good thermoregulation of the interior, and the tinted windows themselves protect from mechanical damage. The cost of applying a tint coating at a car service center is quite high, but if you understand the essence of the process, you can tint the car yourself. Let's figure out how to apply tint at home.
Selecting material for tinting
There are several ways to darken car windows, but for tinting yourself it is better to use the film method. It is important to know how to properly stick the film and what material is best to choose. The film can be:
- simple, with a black adhesive base;
- multi-colored;
- transparent, having various patterns;
- metallized, with different levels of darkening;
- with a changing color scheme;
- “chameleon” with a mirror surface;
- silicone;
- perforated.
The quality of the tint and its service life will depend on the tinting material.
The simplest and most affordable are ready-made kits. Manufacturers cut them according to the shapes and sizes of glass for a specific car model. Such kits are very convenient, but are of low quality. Their darkening is achieved not by painting, but by gluing a second film layer. It peels off quite quickly, so you will have to re-glue it frequently.
Preparation for gluing the film
To perform high-quality glass tinting work, you will need:
- knife (it is better to use a stationery knife);
- hair dryer (preferably a construction hair dryer);
- marker;
- needle;
- rubber or plastic spatula;
- spray;
- sponge or clean cloth;
- transparent shampoo.
Find out more information from the video:
Attention! Without using shampoo, it is impossible to stick the tint film onto the glass evenly, without wrinkles and bubbles. In addition, the tint will come off much faster without shampoo.
For those without experience in gluing, it is recommended to remove the glass. In order to properly cover windows without a recess, certain dexterity and skills are required.
Before gluing removable tinting, the glass must be sprayed with a soap solution from a spray bottle, rinsed thoroughly on both sides and wiped dry with a clean cloth. A soap solution for washing is prepared from three drops of dishwashing liquid and a liter of water.
Important! Make sure that no foreign objects, even small fluff, remain on the glass.
Any dirt that gets under the film during gluing can greatly spoil the appearance of the tinted glass.
To ensure that the size of the tinting material matches the size of the glass perfectly, it is better to first make patterns from cardboard. This will help avoid damage to the material, and will also save time, nerves and effort.
When making patterns, you should additionally add one centimeter on each side, since the edges of the film should go under the seal.
Types of removable tints
Vehicle owners use several types of removable tinting. Among them the following stand out:
- on a rigid transparent base;
- gel;
- silicone.
All options are effective, but when purchasing, you should pay attention to quality. It is important to ensure that the films are not cloudy and have sufficient light transmittance.
See also:
How to remove tinting from glass?