Advantages and disadvantages of such a solution
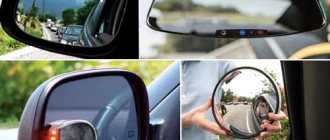
Devices of this type are not a simple rear-view mirror, but a special monitor onto which an image from a camera installed in the rear of the car is transmitted.
It is worth noting that this device has few disadvantages:
- the quality of the transmitted image may not be the best, but it directly depends on the technical characteristics of the device;
- the monitor in the mirror can distract the driver from driving, so if you do not have proper concentration, then you should refuse to buy a gadget;
- Installing a rear view camera outside the car can provoke vandals to take active action; mounting it on the bumper can lead to the loss of the device’s capabilities in the event of an unfortunate collision.
In general, all shortcomings are purely subjective. However, professionals advise choosing high-quality models, carefully planning where to mount the camera and installing the device only in cars driven by an experienced driver.
To be fair, it should be said that there are much more advantages here:
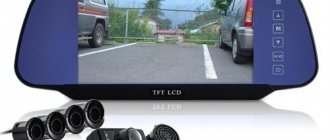
- built-in parking sensors (it is present in any decent model);
- access to control and activation of vehicle functions responsible for road safety;
- automatic brightness adjustment for use even in very poor lighting conditions;
- Easy to install, the device can be mounted instead of a standard mirror or simply put on an overlay with a built-in monitor.
A rear-view mirror with a rear-view camera allows you to more objectively assess the situation on the road, park successfully thanks to additional functions, and some models are supplemented with the ability to record and save video, which allows you to replace the DVR and get a more functional device.
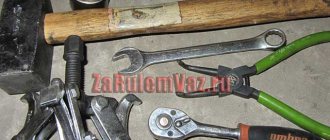
Troubleshooting methods and dismantling the device
Every car owner has two ways to repair a rear view camera. The first and simplest one is to send it for repair. You can contact your manufacturer's service center. If the car is still under warranty, this must be done. Repairing it yourself will void your warranty.
Main board and contacts
But it is often cheaper and easier to carry out simple repairs yourself. If the rear view camera stops working or there are malfunctions, you can try to repair it.
The instructions will be given using KIA cars as an example.
- If the rear view camera does not turn on automatically or at all, to remove it, you need to remove the entire trim.
- To do this, first remove a small panel at the top, under which the bolts are hidden. Remove them to remove the bulk of the trim.
- Underneath you will find four nuts that secure the trunk handle. The camera itself is secured with two self-tapping screws, and two more secure its connector.
- You may encounter traces of corrosion. Remove it first, and then you can disassemble the device.
- The body is secured with four self-tapping screws. When you disassemble the device, be careful - they may oxidize.
- If there is moisture inside the chamber, it will need to be dried. Clean with a brush and then coat the boards with varnish to protect them from moisture.
- There are usually two gaskets in the chamber. One is located on the camera eyepiece, and the other is located at the junction between the plastic parts of the camera and the metal body. Both could become unusable after a certain period of use. Replace them if necessary.
- Reassemble the camera, proceed in the reverse order, having previously treated all joints with sealant. It is better to use butyl rubber.
Read also: Toyota Corolla 150 trunk lock
Rear view mirror with rear view camera: how to choose
Many drivers, having decided to purchase such a gadget, do not always know what to pay attention to when choosing. Let's talk about this in more detail.
The choice largely depends on the preferences of the car owner himself.
- Those who want to equip their vehicle with modern capabilities, but without cluttering up the space, can choose an option with a small display and a rear camera. It will replace the DVR and allow you to monitor the road, and will also retain the direct and familiar purpose of the rear view mirror. In this case, a diagonal of 2.7-3 inches would be ideal. But such devices do not allow you to organize video viewing or control a multimedia system.
- A mirror with a monitor with a diagonal of 4 inches or more opens up wider possibilities for the user. Such models have touch control buttons or a remote control. These models provide two video outputs. You can connect a device that does not have its own video output to them.
- For those who like to watch videos on the road (this applies to car owners with very extensive driving experience and skill), then it is worth considering a device with a screen larger than 6 inches.
Whatever your choice, know that a rearview mirror with a rearview camera equipped with a built-in rear lens will be a better solution than a simple DVR.
Car mirror monitor and rear view camera with wireless unit
A story about a car monitor, made in the form factor of a standard rear-view mirror, a camera, and also connecting them to each other wirelessly. I have been driving for several years now and I am quite good at maneuvering and parking in reverse, but, as many of you probably know, , quite often there are situations when it is quite difficult to cope with just one skill, especially when you have to spin around in a cramped parking lot of a high-rise building, and at the same time, as luck would have it, fogged windows/rain/snow are trying in every possible way to complicate an already difficult situation... After several such cases, I finally I decided to get a rear view camera based on the principle “it’s better with it than without it.”
Since my car does not have a radio with a built-in display, in addition to the camera, the question of choosing a car monitor to connect it also arose. Quite tempting, from the point of view of not cluttering the front panel, is the option of using a monitor that clings to the standard rear view mirror. Previously, I already had experience using this kind of device that acted as a DVR. After a short period of use, the device was safely sent to rest, because... I was never able to get used to its size and the inconvenience it caused, in my opinion, practically nullified all the advantages.
The main reason for all the disadvantages for me was precisely the method of attaching the device to a standard mirror, which forced developers to automatically make its dimensions larger than standard ones, because The DVR lens should look out from behind the standard mirror. In addition, no matter how well I fixed the device on the mirror, the reflection in it shook quite noticeably while moving and this irritated me terribly. It was so annoying that I even “shopped up” a separate mount for it from the old mirror and thus hung it not “on” but “instead” of the standard one, but this did not bring me the desired result, so the device never took root with me.
After this, I wasn’t so much disappointed in the very idea of using the rear view mirror as a monitor - I just really didn’t like its implementation in the manner described above.
By the time they were looking for a monitor for the camera, the Chinese had already begun to fill the car gadget market with a new implementation of the old idea and decided to supplement the “handy” version with a new one - in the form of a full-fledged standard mirror mounted directly on the windshield. It became clear why they didn’t do this before, everything turned out to be quite banal - it’s just that each car brand most often has its own individual mirror mount (including not always on the windshield), which brings with it some difficulties in equipping Chinese mirrors with these the most fastenings. In order to solve this problem, Chinese manufacturers began to produce a number of the currently most common types of mounts for different car brands and offer them to choose from when selling their mirror gadgets.
It was this version of the monitor that I decided to stop at and try it out.
In addition, in order not to bother with running a video cable through the car interior, the above “camera + monitor” combination was supplemented with another useful invention for the lazy - a unit for wirelessly transmitting video images from the camera to the monitor
Let's start with the mirror-monitor.
Technical characteristics:
Screen: 4.3” TFT Resolution: 800x480 Support for video formats: PAL/NTSC Number of video inputs: 2 Function of automatically turning on the screen when an image appears Dimensions: 27x7.6x4 cm
In addition to the device itself, the kit includes a mount for the windshield, theoretically designed for the “nickel” of a standard mirror (why, theoretically, further...), a cable that combines the functions of connecting both power and a video signal source, as well as a decorative cap that allows you to mount cable in the area from the mirror to the ceiling trim
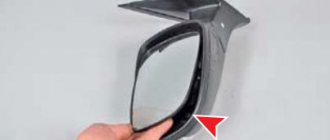
Externally, the device is very similar to a standard mirror, but it is still a little longer
The mirror-monitor has a slight tint, so beloved by Chinese manufacturers. For comparison, here is a photo next to the standard mirror.
There is a single button on the front, the function of which is to adjust the brightness of the video image in steps; it does not allow you to turn the device on/off.
To the left of the button there is a light sensor eye, to the right is an LED indicating the operation of the device
At the back, in addition to the seat for attaching the mirror, there is another peephole, most likely intended for another sensor, but I don’t understand whether it is there or not, at least I didn’t notice any reaction to changes in illumination on this side of the device. It is possible that this sensor, as well as the speaker, the mesh for which is also present here, are installed in some other modification of a similar mirror.
The mount is made entirely of metal
The instructions supplied with the mirror contain a catalog of possible types of fastenings. However, only three of them are currently available for ordering on the website: No. 1, No. 3 and No. 7
According to the manufacturer, these types of mounts must correspond to the following car brands
Mount Compatibility List
Mount No. 1
• BUICK: Regal / GL8 / Firstland / Park Avenue / Lacrosse / ExcelleXT / Enclave / Encore • CHEVROLET: Cruze / Epica / Aveo / Malibu • GREAT WALL: M4 / Harvard H3 / H5 / Florida / C30 / C50 / V80 • FORD: Focus / Mondeo / Max / Fiesta / Explorer • HONDA: CVR / Odyssey / CIVIC / Crosstour / Spirior • HYUNDAI: IX35 / MISTRA • JEEP: Compass / Patriot / Wrangler • KIA: Sportage / K2 • LEXUS: 350 • MAZDA: M3 / M6 / M2 2008 • SUZUKI: SX4 / Crossover • MITSUBISHI: Lancer / Outlander 2008 / Pajero / Lancer-ex • NISSAN: Sylphy / Tiida / Qashqai / Teana / Livina / X-Trail / Qichen D50 / R50 • TOYOTA: Highlander / RAV4 / Yaris / Verso / Crown / Prado / Gamay / Reiz / Camry / Previa / Corolla / Vios
Mount No. 3
• VW: New Baolai / Lavida / Sigtar / Magotan / Tiguan / Touran / Passat / Golf / POLO / Jetta / Santana / Phaeton / Gran Lavida • AUDI: A4 / A6L • SKODA: Fabia / Octavia / Superb / Rapid
Mount No. 7
• HYUNDAI: Elantra / Sonata / Verna / Tucson / I30 / Santafe / Accent • KIA: Cerato / Sportage / Soul / Forte / RIO / K2 / K3 • HAWTAI: Santa Fe / Terracan • MG: MG6 / MG3 • ROEWE: 550 / 350 • JAC: Heyue / Reifine • SSANGYONG
According to the above list, my Toyota Corolla should correspond to the type of fastening under No. 1, which was actually ordered. In practice, it turned out that this is far from true, but most likely this is due to the year of manufacture of my car (2003). It is still possible that in the restyled versions the type that I received is used. I subsequently managed to solve the incompatibility problem with the help of a “homemade” adapter made from scrap materials with a file 
The mount is screwed to the mirror using four screws included in the delivery kit.
The decorative cable trim can be adjusted in length, depending on the distance from the mirror to the ceiling
One end of the trim is inserted into special grooves on the mirror mount, and the other - under the ceiling trim
For ease of installation, the cable for connecting the mirror to power and video signal sources consists of two parts, i.e. You can first mount the mirror separately from above and separately (for example, from below, from the side of the ignition switch) run the power cable, stretching it through all hard-to-reach places and after all this connect both parts of the wire to each other
Power is supplied to the mirror through a special unit designed to filter possible interference from the car's generator; a fuse is also provided here
Two “tulips” have corresponding tags - for connecting a camera and any other video signal source, for example a recorder
The camera is made of metal and this is immediately felt by its weight.
Characteristics
Moisture protection class: IP67 Video format: NTSC Resolution: 640x480 Minimum illumination: 0.2 lux Lens: 13.5mm
Seeing that the top of the camera cover was secured with four screws, I had a desire to unscrew them and see what was inside... But apparently the manufacturer did not lie about moisture protection, and having unscrewed these same screws, I realized that it would not be possible to remove the cover anyway, because .To. it seems to be additionally sealed with some kind of sealing glue
The wireless image transmission kit operates at a frequency of 2.4 GHz and consists of two devices: a transmitter (connects to the camera) and a receiver (connects to the monitor)
The receiver is marked “Receiver”
But you have to guess the purpose of the second transmitter unit by a method of elimination - for some reason they decided not to write anything explanatory here.
I would like to note that if you plan to use a wireless unit, then when choosing a camera you need to pay special attention to the design of the connectors for connecting it, because There are various options and not all of them may be compatible with the transmitter connectors
Let's move on to assembling this entire system. The camera is installed in the right place (in my case, it’s a decorative overlay above the license plate), connected to a transmitter unit from which it receives power and transmits a video image through it
The transmitter is fixed in a convenient place, in my case - under the trim of the trunk lid
Carefully stretch the power wire from the transmitter and connect it by color to the corresponding wires of the reversing light. When reverse gear is engaged, the blue LED on the transmitter lights up
The connection diagram for the mirror-monitor is approximately the same
The only difference is that power is supplied to the mirror separately, bypassing the receiver unit, so I twisted the power wires from the mirror and receiver, according to color, together and only then connected them to the ignition switch.
I ran the wire from the mirror under the trim of the left pillar, the wireless unit was located at the bottom left under the panel, behind the small driver's glove compartment
The installed mirror, due to the long mount, is located a little closer to the driver’s eyes compared to the standard one, and at the same time there is quite an impressive space for the DVR (in the photo - MINI 0806 X44)
In this case, the decorative cable mount was not useful to me, because... its minimum length turned out to be greater than the distance from the mirror mount to the ceiling
When you turn on the ignition, the mirror automatically turns on, as indicated by the green LED. This LED is of course beautiful and all that... but its flickering before your eyes, especially at night, is quite distracting.
Therefore, I had to use the old proven method and cover it with a piece of black electrical tape with a small hole
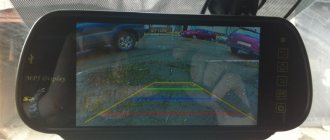
We check the operation of the system as a whole. We turn on reverse gear. After that, after about 1-2 seconds, the monitor screen lights up in the mirror, we drive up to the obstacle (brick wall) and measure the distance in order to further navigate using the grid displayed on the screen
We carefully roll closer and measure the approximate distance corresponding to the STOP mark on the monitor grid
It turns out that the STOP mark approximately corresponds to a distance of 60 cm from the bumper. At such a distance, when parking without a camera, it would already seem to me that I not only had to run into an obstacle, but also drive over it
And this is what the picture looks like at night, the light sources in this case are only the reversing lights
In conclusion - about my impressions of operation. If the car does not have a standard monitor and there is no need to watch movies, then using a monitor built into the rearview mirror seems quite convenient to me - it does not take up extra space on the panel, turns on and off independently, and its location under the ceiling provides protection from sun glare. The only drawback in my case was that the mirror turned out to be a little longer than the standard one, so the driver’s sun visor clings to it. There is no such problem on the passenger side.
The quality of the picture from the camera is certainly not HD, but it is quite enough to see nearby obstacles; at night the picture is also quite readable, although the viewing angle would be nicer.
The wireless unit copes with its task, the transmitter and receiver work, but sometimes short-term interference may appear that affects the quality of the picture. I think this is due to the placement of the transmitter in the metal trunk lid, so over time I will try to move it somewhere in the trunk itself.
Thank you for your attention.
The product was provided for writing a review by the store. The review was published in accordance with clause 18 of the Site Rules.
The best offers from manufacturers
Now let's see what manufacturers offer in this market segment. It is worth noting that the assortment is truly diverse. Everyone will be able to choose a suitable gadget, taking into account preferences and financial capabilities.
- Broadway BW-849. A mirror with a panoramic view will cost the car owner an average of 1600-1800 rubles. The Japanese manufacturer has been pleasing drivers with high-quality and durable equipment for a long time, so they can be trusted. This model is one of the widest in the series, its width is 360 mm, which is quite large. The model is intended for owners of cars with tinted rear windows. A reliable mount with inserts easily adapts the gadget to a standard mirror. The mirror minimally distorts the image.
- Artway MD-165 Combo 5 in 1. This gadget is a DVR with a radar detector and can replace a lot of additional gadgets. Such a solution will cost 10,490 rubles. According to user reviews, the shooting quality of the rear camera is simply impressive; it provides an excellent overview and the ability to assess the situation as objectively as possible without distortion. You will be pleased with the simple settings, quick installation and compactness.
- Dunobil Spiegel Mercurio. Another rear view mirror with a rear view camera, which is popular and has earned the trust of customers. The camera pleases with a wide viewing angle of 9150 degrees). The monitor screen is 5 inches, runs on a standard battery. In addition, the model will delight car owners with a pleasant design. It will complement the interior of any car. According to users, the device provides excellent visibility at any time of the day.
The list of excellent options available to the driver is endless. This market segment is filled enough for everyone to be able to choose a model to suit their needs. A good gadget can replace a video recorder, parking sensors, and a rear-view mirror, simplify control of the multimedia system and make driving more comfortable.
Write in the discussions which model you chose and why, and are also ready to answer all questions regarding the choice of mirror. Share the article on social networks and stay with us.