04/20/2020 1,947 Auxiliary systems
Author: Victor
Many modern cars today are equipped with rear view cameras (RVC). This device allows for a clear view of the space behind the car, allowing the driver to park without any problems. How to choose the right device and how to install a rear view camera? You can find answers to these questions below.
[Hide]
Connecting a rear view camera yourself
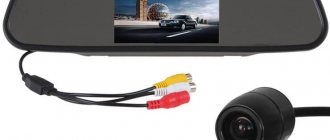
There are several basic ways to connect a rear view camera in a car. The outgoing signal can be output to the display of a car radio or navigator, a head unit monitor, or to a separate screen included in the delivery package.
The last option is the simplest, since there is no problem of equipment inconsistency. At the same time, the remote screen requires a separate place in the car. The easiest way is to place the display on top of the dashboard. The second disadvantage of this option is the additional costs of equipment.
If you connect the output of the device to a monitor or radio, you save both space and money. Plus, in this case the display will be located in the most convenient place for viewing.
Installing a rear view camera yourself usually does not pose any particular difficulties. First of all, you need to decide on the type of product and its parameters. If you are going to connect the device to a car radio or navigator, you must first make sure that the equipment is compatible. The video camera’s power supply voltage, the transmitted image standard, resolution, device activation option, type of connectors, etc. may be important here.
How to install
The rear view camera for Yandex Auto is installed in the central part of the frame for attaching a license plate with a connection to the reverse gear light. In this case, when this speed is turned on, the video camera is automatically connected and the information is subsequently transmitted to the monitor of the head unit.
Installing a rear view camera on Yandex Auto, regardless of the type, follows the same procedure. Moreover, any model includes power cables and a video output. Let's consider the general algorithm of actions.
Prepare your equipment
First, prepare the tools you will need to do the job. The set may vary depending on the situation, but most often you will need:
- Drill with 5 mm drill bit.
- Platypuses.
- Phillips screwdriver.
- Key for 10.
- Roulette.
- Pliers.
- Multimeter.
- Hammer.
- Surface degreaser.
- Wires for connection.
- Screeds and more.
Secure the video camera
In the next step, select a location to mount the rear view camera and secure it. Alternatively, you can install the product under the license plate or at the bottom of the bumper. Please note that in the latter case, the “eye” of the device will be constantly bombarded with dirt.
If you are making a new hole, degrease it and apply anti-corrosion enamel, then wait until it dries. Only after this secure the device. These steps will help prevent rust from forming in the new hole.
Detailed installation instructions should come with the rear view camera, because a lot depends on the type of mount and configuration.
Discard power from battery
To avoid a short circuit during operation, remove the negative from the battery. This step will protect against accidental damage to the wiring during installation.
Disassemble the front panel
Now remove the elements of the front panel to get to the back of the Yandex Auto GU. Here the instructions differ depending on the make of the car. As a rule, it is enough to disassemble only the central part of the dashboard.
Connect a rear view camera
Pay special attention to connecting the Yandex Auto rear view camera. Connect the red power wire to the “plus” of the rear view light. In this case, use a 0.5 A fuse that can protect against short circuits (available at any spare parts store). Sometimes the fuse is already built into the positive conductor. The second wire (black) is ground. Attach it to the car body, for example, with a bolt. Clean the contact area thoroughly. You cannot set the protection (fuse) to minus.
Remember that the cost of a fuse is only 50 rubles, and replacing the car’s wiring can cost more than 10,000 rubles.
Route the wires through the cabin
Try to route the wires along the existing harness that comes from the rear lights. In this case, you can avoid confusion during further wiring maintenance. Here the principles may differ depending on the type (model and brand) of the machine. If the length of the wires that come with the rear view camera for Yandex Auto is not enough, buy an extension cord. As a rule, the connection is made using “tulips” (mother-father).
Connect to Yandex Auto
The greatest difficulty is connecting the rear view camera of the GU with Yandex Auto. The radio is powered via a 32-pin connector. In this case, we are interested in the fifth (Back), third (Cam -) and second (Cam+) contacts. They are blue, black and yellow in color respectively.
Final Steps
This completes the main work. Now take the final steps:
- Supply power from the battery to the vehicle's on-board network.
- Update Yandex Auto software.
- Set the correct date and time.
- Check that the work has been completed correctly.
- Reassemble all previously removed front panel elements.
Let us note once again that to install a rear view camera to a control unit with Yandex Auto, it is better to contact a certified center. This is important, because installation work requires certain skills, and in case of an error, you can damage the car and the radio.
How to connect camera wires and power
How to connect power is a rather important question and not always straightforward. There is an opinion that it is best to power the device from the reversing lights. This is often the most convenient. The camera itself is located on the car in the rear of the body. So here it is not difficult to take the 12V voltage from the rear light and connect the red wire to it. Here you can also take a minus.
Note that in order to avoid the appearance of additional potential differences, it is better to take the plus and minus from one place. This will reduce the likelihood of failures and interference with electronics.
An alternative option is to connect the camera's power directly from the on-board network, directly from the battery or through the ignition (for example, from a cigarette lighter). This method may be preferable if the video signal is sent to the monitor of the head unit.
In this case, the video camera will be constantly energized while driving, warmed up and ready for use. This improves picture quality, but may lead to overheating. Many models are designed for power supply less than 12 V. It is better to connect them via an adapter (voltage converter).
The last question is which wire or connector to connect the video output to. It all depends on the type of display device used and the connection diagram. The easiest way is if a standard RCA connector can be connected directly to the radio or navigator. Otherwise you will have to use adapters.
Below we will describe how to properly connect the video camera yourself when using different connection options.
Connection to radio
Once you have connected the camera to the car's electrical outlet, run the video cable (yellow tulip plug) through the interior and secure it with electrical tape. It is important that the yellow wire is not pinched and does not get caught in the fastening element. Typically, the length of the video cable is from 3 to 5 meters, this is enough to lay it in the most inconspicuous way even in a large SUV.
Healthy! If you do not have enough cable length, you can extend it with another cable of the same type.
Next, connect the cable to the tape recorder. To do this, first read the instructions for the radio, although the principle is the same for most systems, some may still differ in their configuration. Also in the document you will find the specification of the ports, their markings and the location of the input connectors. Usually it is enough to connect the second end of the “tulip” to the corresponding “Video in” connector.
This is interesting: How to cover a motorcycle with film or stickers with your own hands
A typical camera connection diagram is presented above. On most car radios that have the function of connecting a video camera, in addition to the video input, there is an additional wire for activating the inclusion of the radio in the mode of displaying the video image coming from the video camera. This wire is designated “Reverse” or “BACK”. Activation is carried out by applying a “positive” (+12 V) voltage to this wire. For this purpose, video camera manufacturers complete their products with a special wire that, in addition to the cores transmitting the video signal, has another core (red, designated “P3” in the diagram). One end of this wire is connected, together with the + 12 V end of the “P2” connector, to the power wire of the reversing lights, and the other end to the additional wire of the radio.
If we are talking about a wireless camera, then the connection principle is the same as described above, with one difference - instead of a yellow video cable, you will need to connect the included transmitter to the “Video in” port. This completes the installation of the rear view camera, the video of which you can watch at the end of the article. But don’t rush to assemble the interior trim; first you need to check that you did everything correctly.
Schemes for connecting a rear view camera to a car radio and monitor
There are two main options for connecting the camera to the radio. The first is using a separate excitation wire. This pin may be designated on the diagram and body of the car radio itself as “reverse” or “parking”.
The wiring diagram for this connection option is shown above. Here, pin P3 is supplied with +12 V from the rear light of the car. In this case, the main power can be supplied either from the same point or separately, from the on-board network.
If the design of the radio does not provide for the use of a separate excitation (or parking) signal, then activation occurs simply upon the appearance of a video signal at the input. In this case, power is taken from the rear light.
The camera is connected to the monitor in a similar way. There is one main difference here. In some cars you need to go to the engineering menu of the head unit and select the appropriate type of activation.
Practice
We purchased two video systems and tried to install them on a Lada Largus station wagon. Its rear end gets dirty quickly, so one camera was placed at the top of the tailgate and the other behind the heated glass to look out through the wiper's area. The “glazed” camera was secured to the door flange with screw clamps, but you can simply glue it to the glass. The camera should be placed in the same manner on SUVs, crossovers and commercial vans with a nearly vertical tailgate.
The signal transmission from the video camera to the front of the car was organized through a radio module. The video camera and radio module can be powered from the reversing light. But in order not to pull the “positive” wire through the corrugation from the lamp to the door, we took power from the rear wiper motor. On its block there is a “minus” and a “plus”, which appears immediately when the ignition is turned on. The camera and transmitter will operate continuously as long as the ignition is turned on. There is no need to worry about the resource - street video cameras generally work around the clock for many years.
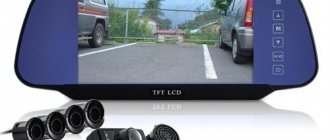
They decided to display the image on a rearview mirror with a five-inch screen. The radio module was placed under the roof trim, getting there through a hole under the interior lamp, which is installed on almost all cars.
It is better to power the mirror and the front radio module from the wiring harness going to the rear of the car. It is necessary, armed with an electrical circuit or a tester, to find the “positive” wire to the reversing light - now the picture in the mirror will come to life only when “reverse” is turned on. And you will never make an emergency stern mooring.
How to connect a rear view camera to a navigator
To connect to a navigator, the device must have a video input or wireless connection.
In the first case, the circuit is practically no different from that described above, with excitation via the video input (see diagram above). The only difference is that most navigators have a different type of connector. This problem can be solved using an adapter or by purchasing a video camera with the appropriate output in advance.
See below for wireless connection option.
Connecting a wireless rear view camera
Many car enthusiasts are interested in how to connect a video camera without laying wiring in the cabin with the accompanying removal of the trim. This can be done using a wireless module. The video signal transmitter is installed next to the camera itself and is powered by the rear lights.
The receiver is placed close to the display device (car radio, navigator or monitor). This option is not suitable when using a radio with activation via a separate input.
Connecting a rear view camera via a relay
Often it becomes necessary to connect a video camera via a relay. It is not uncommon for the display to experience severe noise due to unstable voltage or the use of PWM modulation. On some cars, in the latter case, the video cameras do not start at all.
The solution is to use a relay. The plus from the rear lights is supplied to the control input of the switch. The video camera is powered from a 12 V network through the power relay contacts.
Where to install a rear view camera on a car
The question of where to mount the camera is also very important. It is necessary to ensure full visibility and absence of interference. It is also advisable to reduce the likelihood of vandalism and dirt and liquid getting on the device. Based on this, there are several main options for placing a video camera:
- In the license plate light. This is a very convenient option, specially provided for by the design of a number of cars.
- In the bumper. An oval or round video camera can be installed in a pre-drilled hole.
- In the trunk handle. This is especially convenient if the handle is structurally made in a common body together with a molding above the number.
- Attach the numbers to the frame.
How to avoid strabismus
The parking assistance system consists of two main components - a video camera (this is a kind of eye of the system) and a device with a display on which the image is displayed.
All car video cameras have a similar design: a set of lenses plus a light-sensitive matrix. They produce color images of not very high quality - due to the peculiarities of video signal processing, the resolution usually does not exceed 0.3 megapixels. But this is quite enough to recognize a parking post or a pedestrian. It is better to install the camera higher: the view is wider and less dirty.
One of the options for its placement on station wagons, hatchbacks, crossovers, and vans is an additional brake light cover or cover. For this purpose, a mortise camera with latches or an external camera with a bracket is suitable. You need to adjust the “eye” so that the bottom part of the image on the screen includes the outermost element of your car - the bumper, tailgate or towbar ball.
If you don’t want to bother with installing the camera, buy a license frame with a built-in “eye”. However, this option is only suitable for cars on which the number plate is located high. If the registration plate is installed on the bumper, it is better to abandon the idea - from a half-meter height it is difficult to perceive what is happening, and besides, the peephole will constantly go blind. In order not to encounter “squint,” you should not install such a camera on cars where the number plate is offset from the center. These are, for example, vans with hinged doors and SUVs with side-opening doors. For many cars they offer video cameras combined with a license plate light. They are the easiest to install, they look aesthetically pleasing, but with similar characteristics they are more expensive than others.
Video system components
When selecting a camera, you should pay attention to the video signal standard - PAL or NTSC. The standards of the camera and display should not differ, otherwise, as they say, “there will be no cinema.”
How to set up a rear view camera on a car
Another pressing question is how to properly set up a video camera. Sometimes after installation it turns out that there is no image at all or it is “unreadable”. A possible problem is a mismatch between the video standards of the equipment. In this case, you need to use adapters (video signal adapters). Although it may be cheaper to simply buy a product of a different model.
Another possible situation is incorrectly set monitor modes. In this case, you need to switch the parameters in the engineering menu.
Even if everything works correctly, it wouldn't hurt to adjust the camera further to get parking lines on the screen. How to adjust the product depends on the characteristics of the specific model.