Given the tightening requirements for the light transmittance of tinting films, especially for windshields, front windows and lighting fixtures, some users need to remove them. In addition, the old film must be removed in case of replacement. This article discusses how to remove tinting from car glass and headlights yourself at home in two ways.
Relevance
The service in question is offered in car repair shops, however, after the introduction of more stringent requirements for the light transmittance of car tint films, the cost for removing this material has increased slightly. These same requirements have forced many users to get rid of tinted windows, especially the windshield, front side windows and headlights. Therefore, in order to save money, they began to carry out this work themselves.
Many people removed the tint film in the simplest way, that is, they picked up the edge of the material with a sharp object and pulled it off. However, after this, fragments of film and glue remain on the glass. To completely clean your car glass, you can use any of the technologies described below: material removal with or without heating. Visual lessons on removing tint film can be found on the Internet in video format.
How to remove glue residue
Often this does not require special effort. After rubbing with a sponge dipped in soapy water, it forms pellets and falls off easily. But if the film was glued with especially strong glue, its removal will cause a lot of trouble.
The relatively “gentle” adhesive can be wiped off with rubbing alcohol, G154, or another glass cleaner from your local automotive store.
In extreme cases, you will need to use a solvent. Before this, you need to carefully cover the rubber seals, trim and seats. Glass should be cleaned with solvent in a well-ventilated area. After using it, there will be an unpleasant odor in the cabin for a long time.
Heat removal
To remove film from glass and car headlights this way yourself, you need to get some tools. First of all, you will need an industrial hair dryer, although similar devices are also suitable, for example, you can use a household hair dryer or steamer. In addition, you will need a small amount of water and a few rags. In addition, it is advisable to find an assistant to carry out the work in question, as this will speed up and simplify their implementation.
Removing tinting using heat should only be done at positive ambient temperatures, as otherwise heating can lead to cracking of the glass.
Tuning begins with one of the performers using an industrial hairdryer or other similar tool to heat the car glass. Some people recommend starting heating from the rear side windows. When processing car glass from the interior side, you must not allow hot air to act on rubber and plastic parts for a long time.
The heating temperature should not exceed 40°C, since this value is enough for the glue to melt, and higher heating can lead to melting of the tint.
When processing glass, the hairdryer should be held at a distance of up to 5 cm from the working surface for about a minute over one area of the glass. After heating the film fragment, the second performer pulls off the resulting softened material, rolling it into a tube so that it does not stick back. To do this, use a knife or some similar sharp object to pry up its edge and slowly pull the material.
At the same time, it is important not to exert much force and not to try to peel off the film quickly, as this may lead to its rupture, and the material will have to be pryed off again, or the glue will remain on the surface of the glass or headlights. If, after removing the film, there is glue left on the work surface, you need to wipe it immediately, since heated glue can be easily removed even with a rag.
Quickly remove adhesive residues from the surface of car glass
We have previously described how relatively easy it is to remove the adhesive after removing the film. However, there are times when the glue leaves streaks that are not so easy to deal with. In this case, in addition to directly using solvents or acetone, you can use a cloth soaked in them, which is applied to the area and held for 5-10 minutes. As a rule, this is enough to dissolve the glue and subsequently its remains can be easily removed with ordinary detergents.
As you can see, removing the tint film is a relatively simple procedure, but quite specific and requires certain knowledge. In reality, theory does not always help, and to ensure reliable work, it makes sense to try the indicated recipes on one of the side door glasses. Only after you have mastered the skills, does it make sense to start removing the film on the rear window and other critical areas of the glazing. Then you can be confident in the final quality of the work done.
- Author: Vladimir
Rate this article:
- 5
- 4
- 3
- 2
- 1
(3 votes, average: 4.7 out of 5)
Share with your friends!
Removing film without heating
The first stage of this technology for removing tinting from car glass and headlights is identical to the second stage of the method discussed above, that is, the work begins by immediately lifting the film with a sharp object and pulling it off the car window. Immediately after this, the glass, cleared of material, is poured with detergent and treated with a rubber scraper.
During these works, glue and tinting residues are removed from its surface. The scraper is processed from top to bottom across the entire width of the glass. If after such cleaning there is still glue on the glass, then you should apply glass cleaner GT 154 to it. The glue is also quickly dissolved with acetone and solvent 646. After cleaning, wipe the glass dry with a soft rag.
Before applying detergents, it is advisable to place rags over the door seals to prevent liquid from getting under the casing, which can lead to a short circuit in the wiring and damage to the metal by corrosion. In addition, this will preserve the elasticity and resilience of the seals.
How to remove tinting from glass yourself
High-quality American-made films are quite easy to remove. How to quickly remove such tint? The side glass needs to be lowered a little - the tint film is usually glued not flush with the edge of the glass, but with a slight deviation from it - a few millimeters. It is enough to pry the edge of the film with the blade of a stationery knife. Next, you should tear off the film along the entire width of the glass so that its edge can be comfortably grasped with the fingers of both hands. You pull it down and tear it off, lifting the glass at the right moment. If the glass is pressed tightly enough against the sealing rubber, it can be removed by first lowering the glass all the way - this way the film will not subsequently tear off at the edges. But Chinese-made tinting films are of low quality. To their main disadvantage - they fade quickly - there are also difficulties associated with peeling off the film. As a rule, the film is not separated from the glass in a wide layer, but is torn from it in narrow strips.
Removing tinting from rear window
Separately, you should consider how to remove tinting from the rear window of a car yourself. The fact is that its tinting requires taking into account some nuances. As when removing film from other glasses, it is important not to damage it and adjacent elements of the interior and body. But besides this, you need to take into account that in many cars the rear window is equipped with heating in the form of threads, and there is also an antenna strip running through it, so in the process of dismantling the tinting material, damage to these elements is possible.
In view of this, it is necessary to remove the film from the rear window of the car with extreme caution, without sudden jerks. In this case, it is recommended to carry out work using heating technology.
This will soften the glue, allowing you to carefully remove the material without damaging the heating filament and antenna strip. In case of damage, you can purchase such strips in liquid form.
How to remove tint from a car yourself
Car tinting is the simplest and cheapest means of external tuning. Therefore, it is widespread among car enthusiasts. And currently, this method is used by both owners of expensive executive and business class cars, as well as owners of budget and economy class cars. However, sometimes it becomes necessary to remove tinting from car windows. And not everyone knows how to do this correctly without causing damage to the glass in the car, which is quite expensive.
Now compliance of tinting with legal norms is checked at traffic police posts
Reasons why tint needs to be removed
Let's look at the most common reasons why you may need such a service as car detonation. You need to know this not only in order to answer the question of how to remove tint, but also in order to know what difficulties you may encounter after tinting your car.
Let us remind you that window tinting is allowed according to traffic rules, but within permissible limits. According to these traffic rules, it is not permitted to tint the front windshield if its light transmittance is reduced by less than 75%. Side front windows must have a light transmittance of at least 70%. If your tint exceeds the permitted values, you may be subject to a fine. Moreover, if before July 1, 2012 the fine was insignificant - 500 rubles, then after that the responsibility for violating the rules of tinting was tightened. Now, for violations, license plates will be removed until the film is removed from the windows.
In addition, the need to remove tinting from car windows may arise for other reasons. If your film begins to peel off the glass or begins to bubble. In addition to being unsightly, it also makes it difficult to see through such glass. Also, if the glass is cracked or chipped and needs to be restored, then in some cases the tinting must be removed.
How to remove tint yourself
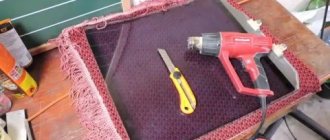
To remove tint you will need these tools and supplies
You can also perform the procedure for dismantling the tint at a service station. However, if you need to remove tint, the price for this service has also increased significantly after the fines were tightened. Therefore, nowadays more and more people are asking themselves the question of how to remove tint themselves.
Despite the apparent simplicity of this procedure, it has a number of nuances. Often, many car enthusiasts try to pry the edge of the film with a sharp object to remove it. This can lead to pieces of film remaining on the glass, torn from the rest, as well as glue residues. And then removing a thick layer of glue from the glass is very problematic.
Removing tint with heat
Thus, remove the tint film using a hair dryer to heat the glass
Firstly, this procedure requires an assistant; it will be inconvenient for one person to perform all the procedures. Secondly, in order for the film to be completely removed and no glue residue left on the glass, you should use heating the glass. A hair dryer is perfect for these purposes. With its help, your assistant heats the glass a little, and you remove the film. If you don’t have a construction one, then you can use a regular hair dryer or an electric “breeze” type heater, only the heating procedure will take a little longer. Be sure to ensure that the flow of hot air does not fall on the plastic and rubber parts of the interior.
When we remove the tint ourselves, remember that the air temperature should not be negative or low (about 0 degrees). If it is cold outside, then this procedure must be performed in the garage. Otherwise, the glass on the car may crack.
It is recommended to heat the glass to a temperature of no more than 40 degrees. At this temperature, the glue begins to soften, but the film does not melt.
When the glass has been heated to the desired temperature, then you can pry the edge of the film with a knife and gently slowly pull the peeled edge. The main thing in this procedure is not to rush, otherwise the film may tear, or the remaining glue will not come off along with the film.
Removing tint without heating
You can remove the tint film without heating, it looks something like this
In addition to the above method, another option can be used to remove tinting - without heating the glass. In this case, pick up the edge of the film and carefully tear it off the glass. Immediately pour the glass cleaned from the film generously with a detergent such as a surfactant or Fairy, and use a rubber scraper (a metal one can leave scratches) to remove any remaining glue, and so on over the entire area of the glass. It is advisable to perform this procedure from top to bottom and peel off the film across the entire width of the glass at once.
After you remove the film from the glass, you still need to wipe it. No matter how hard we tried, some of the glue still remained on it. And if this is not visible now, then in a few days dust and dirt will actively adhere to the remaining glue. For this purpose, a special product GT 154 is sold in car stores. Although you can use a more budget option - glass detergent. Or, at worst, just wash the glass with water and wipe dry.
To ensure that when tinting the side windows, the detergent does not get inside the door and cause a short circuit in the wiring or corrosion, do not be lazy and place a rag on top of the seal. This advice is especially relevant for old cars where the seals have lost their elasticity and resilience.
Video about removing tinting on a car
How to remove tinting from car front windows
How to remove tint
Removing tint with steam, without blades, scrapers or chemicals
Conclusion!
There is one more nuance when removing tinting from the rear window. Most modern models have heating threads installed on it. So, when removing the film from the glass, there is a high probability that these threads may break and come off the glass along with the film. Therefore, in this case you need to be extremely careful. And under no circumstances should you tear off the film from the glass with a sharp movement, as some experts recommend. If your rear window has heating filaments installed, it is best to use a method for removing tinting using heating elements (hair dryer, wind heater, etc.). It’s even better not to waste 500-1000 rubles and perform this procedure at a service station, so that you don’t have to pay more for glass heating repairs later.

