Driving a car with inoperative “dimensions” is prohibited by the rules - any traffic police officer who records such a violation has the right to issue a fine to the driver. To replace a side light bulb that has burned out and gone out, you do not need to visit a car service center - every car enthusiast can perform this operation. The following instructions describe how to make the replacement correctly.
When is the replacement made?
Vehicle manufacturers do not provide clear regulations for carrying out this work. There are only 3 reasons why car enthusiasts change their side light bulbs to new ones as needed:
- The light elements have failed - they have burned out or gone out due to external mechanical influence.
- The owner of the car decided to install more modern LED bulbs.
- The lights began to shine too dimly.
The first reason is clear and does not require explanation. Installing LEDs is a useful operation, since these elements shine well, last a long time and consume much less electricity. The main thing is to maintain the polarity of the contacts during the replacement process, otherwise the new light bulb may fail or the fuses will begin to blow.
As a rule, a car enthusiast does not pay attention to the decrease in the luminous flux of running lights until he replaces one burnt-out headlight bulb. Then it becomes noticeable how much dimmer the old element burns than the new one. The reason is the internal darkening of the base glass from settling metal particles emanating from the heated spiral. Therefore, it is recommended to update old “dimensions” in pairs.
Let's sum it up
On some modern premium cars, it is not possible to even change a light bulb yourself. Whether this is good or bad, we cannot say for sure. But on budget models this option is available. Moreover, it is advisable to carry out the replacement yourself, because there is nothing complicated or impossible here.
Visiting a service station to replace a marker lamp is not the best solution. This way you will waste much more money and precious time. And when you replace it yourself, you will gain valuable experience that will be useful in the future. It is recommended to take a burnt-out lamp to a car dealership and buy a similar one. You shouldn’t chase more powerful lighting devices, they usually only bring problems. On some brands of cars, like Renault Logan, replacing a lamp is more difficult than on others. But nothing is impossible, so it’s definitely worth addressing this issue.
Preparation Tips
To replace two side light bulbs, you do not need to create special conditions and drive the car into the garage - the work is carried out in any convenient place. What to do:
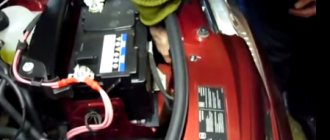
- Disconnect the negative terminal of the battery.
- Remove components and parts that block access to the headlight units from the engine compartment.
- Remove the plastic protective caps covering the rear parts of the blocks where the light fixtures are located.
To change the side light bulb, you need to get to the headlights from the rear, having first removed the interfering elements. Depending on the make and model of the car, there may be an air filter housing, a battery, cooling system pipes, and so on near the headlight units. Decorative plastic panels and trims should also be removed.
When to replace and what will be needed?
Replacing parking light bulbs is not difficult, but some care must be taken. Most of the parts of a modern headlamp are made of plastic, and as you know, it does not tolerate extreme loads. Therefore, it is extremely undesirable to carry out work to replace these structural elements in the cold.
To do the job you will need a minimum set of tools:
- Slotted screwdriver;
- Alligator pliers.
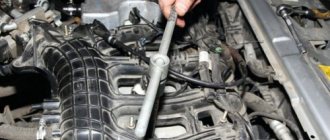
As a rule, this is quite enough. But, a lot depends on the model of your car, as well as on which lights you will change. When replacing rear dimensions, you often have to remove the protective cover; for this, a Phillips screwdriver or an 8-mm tube wrench is useful. Here, again, it all depends on the specific model. If you are planning to change halogen light bulbs to LEDs, then you will also need a soldering iron with a thin tip.
Instructions for replacing lamps
Inside the headlight units of different cars there are 2 types of lamps and connectors - old and new (restyling). Replacing a pre-restyling type side light bulb is performed as follows:
- Once you reach the back of the headlight, disconnect the power supply connector to the light element. There is no need to disconnect the sockets of powerful headlight lamps.
- Grasp the connector and rotate 45–60° counterclockwise. Remove the element from the slot.
- Carefully pull the light bulb out by the base without rotating it around its own axis.
- Insert the new one in its place, making sure that the contacts line up correctly.
- Connect the wires and check the functionality of the new part, then reassemble the unit in the reverse order.
Read more: Peugeot 308 trunk photo
Note. On different vehicle models, old-type elements can be rotated in different directions - clockwise and counterclockwise.
When installing a purchased lamp, you should not touch the base with your bare hands, as warned by the instructions included with each product. Before installation, wrap the glass flask with a soft rag or put on cloth gloves.
Updated versions of elements differ in overall dimensions and installation method. Replacing the lamp is done in the same way, only you do not need to disconnect the connectors and turn the socket - the part is removed from the socket along with the wires.
Another thing is that access to the light bulb is often limited - you cannot grasp the socket with your hand. In such cases, 2 options are practiced:
- use a special tool;
- First pull out the large headlight bulb, then take out the side light bulb.
The owners of some cars use the free space behind the headlights to install a gearbox that operates in liquefied gas engine power systems. Removing the unit to replace the lamp can be quite difficult.
Changing the light elements of the rear “dimensions” is much easier. The main work is removing the plastic and fabric trim from the luggage compartment side. The light bulbs are removed from the sockets in the manner described above.
Car parking lights, as their name suggests, are designed to indicate the size of the car at night. Moreover, sometimes only these lights make you aware of the presence of your car on the road in the dark.
Even if we ignore the possibility of being fined for a non-lit light bulb, you should not neglect the timely replacement of the light bulbs - otherwise you have a real risk of being “caught up” in the dark, especially on a country road.
The procedure for replacing side light bulbs is very simple (in most cases) and does not require any special skills.
Let's try to give a kind of general “recipe” on how to replace the side light bulb yourself. Most motorists perform this “maintenance” casually, and many have a supply of the required light bulbs in the glove compartment of their car.
step-by-step instructions, features and recommendations :: SYL.ru
Your vehicle's side lights must be in good working order for it to drive safely on the road. But not every driver changes burnt-out lamps immediately. This is usually done when visiting a service station, and before that you can drive hundreds of kilometers without working lamps. Let's figure out how to replace the side light bulb on some domestic and foreign cars. Often the work is carried out according to a similar principle, but there are also minor differences.
General information
To indicate the vehicle at night when parked, the design provides side lights. They are present both in front and behind the car. Usually these are low-power lamps, which, unlike the head light, are not in the focus of the reflector. For this simple reason, it makes no sense to install more powerful halogen or LED lamps. Moreover, this can lead to melting of the wiring, which is not designed to withstand such a large load.
As for the reasons for the failure of side lights, there are several of them. Firstly, the light bulb has a limited lifespan. The original shines longer and better, but it is more expensive. Chinese analogues are cheap, but very often burn out. Another reason is a malfunction in the electrical circuit, as well as a leak in the headlight, which causes moisture to get inside the housing. Well, now let's figure out how to replace the side light bulb on a Kalina.
From simple to complex
The first step is to decide on the type of lamps to be installed. Everything is quite simple here. Kalina is equipped with baseless lamps of the 5W5 type, which are widespread, so they can be found in any car store. During replacement, it is advisable to disconnect the negative terminal of the battery. This is necessary for safety, although many do not do it.
The next step is to remove the headlight protective cover opposite the section responsible for the high beam. Next we see a yellow cartridge that needs to be dismantled. The main difficulty is that it is in an inconvenient place. By the way, if the lamp has not been changed for a long time, it will take an impressive effort to remove it. To make the task easier, you can remove the high beam chip. This will create additional space. Next we try to remove the cartridge from the seat. Please note that its body is plastic, so using pliers is not recommended. After this, remove the lamp from the socket and install a new one. Assembly is carried out in reverse order.
Now let's look at the replacement process using the rear headlight unit as an example. There is nothing complicated here, but there are several important details that are worth paying attention to.
The first step is to remove the protective cover. To do this, you need to turn it counterclockwise. At the next stage, the wiring block and the spring holding the side lamp are disconnected. Removing the lamp holder is quite simple. To do this, you need to turn it counterclockwise until it clicks, after which you can remove it from the headlight.
I would like to draw your attention to the fact that you cannot touch the glass part of the light bulb with your bare hands. This is due to the fact that grease stains will remain, and since the lamp heats up to a very high temperature, this can lead to its failure. But if you touched them with your hands, then it makes sense to clean the glass with a regular alcohol solution.
How to replace the side light bulb on a Renault Logan
On this French sedan, the replacement process comes down to just a few simple steps, so even a novice driver can handle it. In order to change the lamp, you need to do the following:
- use a 10mm socket and an extension to disassemble the headlight unit;
- the wire going to the negative terminal of the battery is disconnected;
- If there is no headlight corrector, the latch is released and the headlight unit is removed.
Some models are equipped with headlight range control. It is located behind the front bumper under the cover. Therefore, replacing a light bulb in this case will be much more difficult. The bumper and cover will need to be removed. Only then will you be able to get to the headlight adjuster and remove it. The cartridge is removed by unscrewing it counterclockwise in the case of the right headlight, and clockwise for the left one. Everything is relatively simple, but at the same time quite labor-intensive to replace a regular marker light bulb.
Replacing a lamp on a Hyundai Solaris
This Japanese car has long become a people's favorite in Russia. This is one of the most popular cars used in taxis. This is because the vehicle is reliable and easy to maintain. This also applies to side light bulbs. Even someone who has no idea about the design and structure of a car can change them.
You should start by disconnecting the negative terminal of the battery, which will avoid a short circuit during the work. It is easier to replace on the right side, since there is more space there. It's worth starting with. The headlight unit has a special plastic cover. You can remove it by turning it counterclockwise. After this we get access to the direction indicator lamps, headlights and dimensions. We replace and tighten the lid. Since replacing the side light bulb on a Hyundai Solaris is quite simple, you can do it in 10-15 minutes.
Let's sum it up
On some modern premium cars, it is not possible to even change a light bulb yourself. Whether this is good or bad, we cannot say for sure. But on budget models this option is available. Moreover, it is advisable to carry out the replacement yourself, because there is nothing complicated or impossible here.
Visiting a service station to replace a marker lamp is not the best solution. This way you will waste much more money and precious time. And when you replace it yourself, you will gain valuable experience that will be useful in the future. It is recommended to take a burnt-out lamp to a car dealership and buy a similar one. You shouldn’t chase more powerful lighting devices, they usually only bring problems. On some brands of cars, like Renault Logan, replacing a lamp is more difficult than on others. But nothing is impossible, so it’s definitely worth addressing this issue.
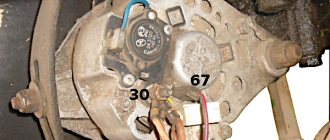
Side light circuit
It's very easy to replace the side light bulb yourself.
In order to save fuel and reduce the load on the generator, daytime running lights are now often included in this circuit, which makes it quite complicated.
You might be interested to know whether it is possible to use LED lamps in a car? Read more in this article
The standard wiring option is quite simple and consists of the following elements:
- circuit breakers;
- front and rear position lamps;
- central or key switch;
- Let's take a closer look at the first two elements.
Read more: Additional grant door seal
Circuit breakers
Sometimes blown fuses are the reason why the side lights do not light up on one side or another.
There are usually two fuses in the circuit, for the left and right sides separately. Since the light bulbs consume little power (4-5 W each), the fuse rating is small, only 5-7.5 A.
Where are the side light fuses located?
In the same place as the others, in a single block. On most modern cars, this block is located under the instrument panel next to the steering column, or, more often, on the lower left, under a plastic trim.
In the latter case, it is enough to remove the cover protecting the unit, mounted on latches. On the back of the cover, as a rule, there is a sticker with information about which circuit this or that fuse protects, indicating its rating.
The biggest inconvenience in this case may be insufficient knowledge of the English language - it is in this language that inscriptions are usually made, even on Korean and Japanese cars.
Lamps
Externally, the headlight bulb is marked W5W, but today LED sidelight bulbs are increasingly used.
Their advantage over incandescent lamps is their greater durability, and the price of both largely depends on the manufacturer. The most famous products are Philips, Osram, Tesla.
What are the new generation 4Drive LED lamps? Find out now!
Watch the video about LED bulbs for side lights:
Moreover, as the “Behind the Wheel” test showed, expensive products do not always justify their price.
Also, quite often, the front dimensions are equipped with light bulbs with a metal base, but this, one might say, is a thing of the past.
For rear position lights, the most common lamp is with two spirals - 21 and 5 (or 4) W.
The 21 W coil lights up when you press the brake, i.e. In this case, the light bulb serves as a brake light, while the lower power spiral works as a side light.
Just as with any other lamps, purchasing a more expensive product does not guarantee any exceptional durability.
Replacing lamps
Usually, before replacing light bulbs, it is recommended to remove the terminal from the battery. Why is not clear. It is enough to simply de-energize the circuit using a switch - in case you accidentally short-circuit during replacement.
Replacing the front marker
The most common option for connecting a headlight unit is to have a single power connector - for ease of dismantling the headlight itself. In this case, the power wires for all consumers (lamps, electrical corrector) are located inside the housing.
However, consumers are often connected separately. Before replacing, the main thing is to determine the location of the side light bulb, so as not to mistakenly remove, say, the headlight range control unit.
If you are changing light bulbs for the first time, it is better to start on the right side. The battery is usually located on the left, which interferes with both visibility and operation.
Read more: Cost of gasoline at TNK gas stations
The replacement process itself is simple - remove the lamp together with the socket from the headlight, for which you turn the latter counterclockwise. The wires do not need to be disconnected if they are long enough to work comfortably.
It is important to pay attention to the condition of the cartridge - whether there are any traces of melting, which indicates overheating. A defective cartridge may subsequently cause a short circuit, so do not delay replacing it if necessary.
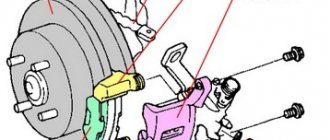
Replacement of rear marker
To provide access to the taillight lamps, you need to remove the hatches installed in the trunk trim.
To replace the tail light bulbs, it is usually necessary to remove the circuit board with the bulbs from the light. It is installed on latches, which are carefully bent with a flat screwdriver. There is no need to disconnect the wires.
There are also lanterns in which each lamp is connected separately. In this case, remove the desired cartridge from the socket by turning it slightly.
After replacing the lamps of both front and rear lights, you should check their functionality, for which you do not need to install the socket or board directly into the lamp. It is enough just to check that there is no short circuit to ground.
An important point - when replacing dimensions, always pay attention to the condition of the cartridges and contacts - the fuse only protects the circuit from short-circuiting, and fires in the wiring often occur due to poor contact.
To replace the rear light bulbs of the Nissan Almera sedan, you need to perform several simple operations, the description of which is given below in the illustrated step-by-step instructions.
Nissan > Almera
The operations are shown on the left lamps; they are similar for the right lamps.
To replace the lamps in the fender light, open the trunk lid.
Replacing side light bulbs in pre-restyling models
To replace the lamp, turn its base in the socket 90 degrees, it is removed from it. We perform assembly in reverse order.
Circuit breakers
2. Take the base with your fingers and turn it 90 degrees clockwise.
3. Remove the base from the headlight, it will be together with the lamp.
4. Change the lamp.
The lamp is simply pulled out of the socket towards itself and installed in the same way.
5. Take the socket with the already replaced lamp and insert it into the headlight housing.
6. Next, turn the base 90 degrees counterclockwise and the work is completed.
If you have any questions, write in the comments.
Choose diagnostic equipment for car air conditioners
Front headlight
Block headlight (auto edition)
In Logan, block headlights are installed, and therefore in one design there are low beam and high beam lamps and direction indicators. When replacing any of the lamps, it is not necessary to disconnect the battery. The fog lights are located separately from the headlight unit at the bottom of the bumper; more information about replacing the lamp in them is here.
Some owners remove the block lamp completely, but this is a lot of unnecessary steps. My hand can easily fit into the gap, even where the battery is!
- Use the head to remove the headlight unit.
- Then you need to disconnect the negative wire from the headlight.
- Remove the entire front bumper.
- Disconnect the headlight range control cable.
- To move the headlight to the side you need to unscrew three screws.
To replace a side lighting element, no additional equipment is required; the process will not take more than 5 minutes.
- In order to replace the lamp, you need to open the hood and feel on the headlight unit for the side lamp socket, which is located just below the headlight lamp.
This video shows how to change the front marker light bulb on a Renault Sandero Stepway 2012. The light bulb is w5w 12V.
Replacing front headlight bulbs on Renault Logan. Installation of inexpensive LED lamps.
Finding the lamp body by touch is not difficult.
We took out the socket and tried to remove the burnt out lamp.
The lamp has been removed and we are preparing to install a new parking light lamp.
It is only necessary to remove the light bulb from the housing while wearing cotton gloves.
LED lamps
Some Loganovods recommend using diode lamps when replacing. They reduce current consumption and improve visibility on the road
We recommend that you pay attention to lamps with at least 13 diodes
Conventional and LED lamps for side lights
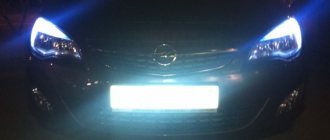
Installing LED lights is no different from conventional ones. And the light from diodes is better, the current consumption is also less. The most important thing is to make the right choice.
13-LED marker lamp
It became much brighter
If you want to change the low beam lamp on a Renault Logan, then this article will tell you everything about it in detail.