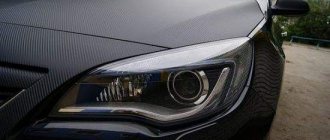
One of the universal and affordable means of decorating a car is vinyl film. In addition to styling, it also performs protective and concealing functions.
The car market offers a wide variety of films of varying quality and purpose. This is the simplest and most cost-effective way to transform a car, with which you can achieve amazing results, including 3D and even 4D volumetric effects that are fashionable today.
How to choose a film
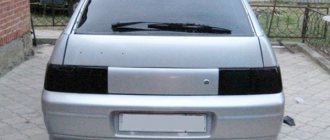
Complete headlight protection is provided using anti-gravel film. Depending on the case material - glass or plastic - a polyurethane or vinyl model is selected.
Anti-gravel film 3m can serve to protect the paintwork of the body. The coating will provide maximum protection from:
- scratches, small cracks from road debris, distributing the impact over the entire surface and not locally;
- dirt, dust thanks to the slippery top layer;
- traces of insects, rain, etc.
There are two types of films on the market: polyurethane and vinyl. The choice depends on the shape, design and material of the case. For plastic parts, choose a vinyl version with a thickness of up to 0.1 mm. If the optics body is glass, use polyurethane material up to 2 mm thick.
If the optics have a ribbed outer surface and are made of plastic, only polyurethane armor of minimal thickness is used.
How we do wrapping
All work is carried out in a clean, specially equipped box. We pre-prepare the work surface: remove dirt, degrease.
Wrapping a car requires care and perseverance. The master carefully adjusts the drawing so that the gluing points are completely invisible. All edges must be carefully tucked, treated with primer and heated. This will protect the film from twisting and peeling.
The car is waiting for delivery after being covered with matte film.
Tip: after covering the car with color film, cover the film with ceramics. This will extend the life of the film, enhance its protective properties and add even more beauty.
To the question: “Is it difficult to cover a car with film yourself?” We answer: “No, it’s not difficult. If quality and durability are not important.” Any failure to comply with technological standards will lead to the appearance of wrinkles and bubbles, as well as peeling of the edges after the first car wash.
Our craftsmen guarantee high quality work. We provide a written guarantee for all types of services. The cost is determined at the first consultation and depends on the chosen film and the scope of work.
Call us or write in chat or mail. We are waiting for you in our office.
Vinyl models
Initially, only outdoor advertising banners were covered with a vinyl protective layer. The material protected the design well from fading and mechanical damage. Using vinyl as an armor film for headlights, drivers do not reduce the luminous flux of the lighting device: the material transmittance is 99%. The advantages of this option:
- Price. You can use vinyl coating for optics and bodywork after preliminary polishing.
- The assortment includes color film models. It is important to take into account the reduction in track lighting parameters by 10% after using any colored coating.
- The material is much thinner than its polyurethane counterpart and can be used for gluing ribbed surfaces.
Among the disadvantages, owners of vinyl armor note:
- The appearance of a yellow coating (on average after 12-16 months of operation).
- At air temperatures below -25 °C it may crack. This was discovered by those drivers whose cars were outside in the cold.
- When gluing a ribbed surface, the material must be constantly heated.
Polyurethane films
Polyurethane protective film for headlights is not as widespread as vinyl, due to the price - the material is 4-5 times more expensive. According to technical characteristics, it provides protection for the body 170% better than vinyl due to its thickness. The material was first used to protect helicopter blades from scratches, stones and sand at high speeds during desert operations.
The glass headlight, armored with a 2 mm thick polyurethane film, can withstand impacts from gravel weighing up to 50 g at a speed of 80 km/h.
The advantages of the coating include:
- resistance to temperature changes;
- sufficient strength;
- high elasticity of polyurethane. It is easy for beginners to work with when applying headlights or paintwork on their own;
- quick removal without leaving marks.
Among the disadvantages of the material is the insufficient transmission of the light beam. It is also not recommended to cover optics with halogen lamps.
How to glue film
To make reservation of headlights with your own hands quick, you should first clean the surface, cut out the workpiece and prepare the tool.
Some drivers recommend heating the film after applying it to the headlight, so that the blank, after stretching and pressing, accurately takes the shape of the optics housing. The second method is to heat the film before applying it to the surface. Both options are acceptable and are chosen individually. The quality of covering headlights with armored film remains at a high level.
After removing the protective layer of film, do not touch the sticky surface with your hands, or heat the material with a hairdryer, directing the air flow to the adhesive surface.
European and Russian manufacturers of car armor offer up to 7 years of guaranteed operation of their material without loss of functional characteristics. Asian manufacturers (China, Japan, Korea) guarantee no more than 3 years, provided that the gluing regime is followed.
Preparing headlights for booking
Preliminary preparation includes washing the part and degreasing the surface of the headlight with any synthetic alcohol-based product. Ethyl alcohol (methyl alcohol is allowed) has proven itself well. You can use car shampoo for washing.
After the part has dried, it is wiped with alcohol or another degreasing compound. Armoring of car headlights begins immediately after the alcohol has evaporated, this will prevent dust from settling on the cleaned part.
For plastic headlights, do not use acetone as a degreaser. The reagent corrodes the surface.
Since fog lights have a complex shape, it is recommended to remove the part from the car body.
What will you need for pasting?
Before wrapping a car, we study what is necessary and what may be needed in the process. To apply film you will need the following materials and tools:
- The film itself. It is advisable to take it with a reserve or choose one with a larger width. The specialist will tell you the number of meters and which company to buy.
- Sharpened scissors, a sharp knife, preferably a stationery knife.
- Spray bottle with soap solution (prepared from water, liquid soap, detergent, car shampoo in a ratio of 10 to 1).
- Paper tape.
- Two types of squeegee (spatula): plastic, felt.
- To degrease the surface, alcohol or solvent is required.
- Technical (professional) hair dryer.
- Lint-free cloth or napkins.
- A special composition for enhancing the properties of the adhesive side of the material - 3M primer (A transparent liquid with a pungent odor enhances the adhesive effect of the self-adhesive material, has no analogues).
Read more: Let's look at the car radio connection diagram in Audi in detail
You need to prepare all this in advance so that you can quickly take it if necessary.
Pasting process
After preparing the surface, do-it-yourself headlight armoring with film occurs in stages. You can glue the armor film using the wet and dry method. Regardless of the method, the process of applying a protective coating to the headlight housing is the same:
- Blanks are cut out. You should leave allowances at the edges of at least 2 cm. You don’t have to paste over the side of the optics surface by rounding the corners of the cut out part.
- If you use warming up the workpiece before gluing, preheat it with a hairdryer.
- Pasting begins from the top of the headlight body: bend the upper edge of the film base, apply it to the surface of the headlight, gradually freeing the coating from the backing.
- Press tightly and stick the film.
- After the initial gluing of the protection, it should be smoothed, dried and the protruding edges should be trimmed with a knife.
The peculiarity of the wet method is that the headlight should be covered with a protective film on a damp surface. The body is moistened with water or diluted car shampoo, a film is applied on top, the surface is pressed and smoothed from the center of the body to the edges, expelling the liquid. The part is dried.
Wet-on-wet gluing is technically simple and well suited for applying armor to large surfaces. With the dry gluing method, the film is preheated or heated during the smoothing process. The protection hides small scratches that are already on the case.
Tips before you start wrapping your car
The level of adhesion, and therefore its durability, directly depends on the quality of preparation.
- The car must be washed thoroughly. It is best to use a high-pressure washer, since our first priority is to knock out dirt from under the seals and grooves where the film will be tucked.
- For high-quality pasting with glossy, matte or carbon-style film, it is necessary to remove moldings, door handles, antenna, etc.
- If necessary, use a bitumen stain remover. Wipe the surface with clay and water.
- Using a squeegee and a rag, clean all the grooves, the space under the sealing rubber bands, as well as the edges of the body parts where the film will be folded.
- Pay special attention to removing silicone and fat deposits. Spray the degreaser onto the surface and then wipe off any dissolved deposits with a dry cloth. It is also possible to use two napkins: one soaked in degreaser and one dry.
The recipe for preparing a soap solution is quite simple: a few drops of dishwashing detergent, for example Fairy, per 1 liter of clean water.
Primer should only be used when necessary:
- in places of complex recesses and depressions, where film tension is required to remove folds;
- along the edges of body parts where the material will be wrapped;
- the inner edges of the wheel arches of the car, where there is sandblasting from the wheels, vibration from lockers, etc.;
- if for some reason you have tampered with the adhesive layer on the film, thereby reducing its adhesive properties.
It is quite understandable to want to play it safe and also apply primer around the perimeter of the car body elements. But this is unnecessary if you followed the previous recommendations. Using a primer may even have negative consequences. If you glue, for example, a carbon-effect film, onto a poorly painted body element, then there is a possibility that after 3-4 years the film will be removed along with pieces of varnish.
We suggest watching the video tutorial for tips on the pattern.
To properly cover a car with vinyl film yourself, you need to follow these tips during work:
- When you heat the vinyl film with a hairdryer, be sure to ensure that it does not overheat. Otherwise, this is fraught with loss of its adhesive properties or, in general, damage to the material.
- When heating, you need to keep the industrial hair dryer at a distance of 20 centimeters from the heated surface, constantly moving the air flow. The entire coating should be heated evenly.
- Don't let the vinyl flooring backing get wet or you may have serious problems removing it.
- Do not cut vinyl into plastic bumper parts or car moldings. It is best to dismantle them before starting work.
- An extra pair of hands will never hurt you, so it’s better to enlist the help of a friend than to wrap the car yourself.
There are two ways to glue vinyl film to a car: wet and dry. These methods are similar in the application process, the difference is the application technology.
Wet method
The wet method is more convenient if you are applying it for the first time or with your own hands. Either the adhesive layer or the surface itself is moistened with the solution. This will allow, if necessary, to correctly direct the material when it is displaced on the body. All soap solution and bubbles are removed using a squeegee and hair dryer.
Read more: VAZ 2102 - photo video technical specifications reviews tuning a Lada with your own hands
Dry method
This application method is chosen by specialists who are confident in their work. It is much faster than the previous one. The material is glued directly to the surface of the body with great precision. With this method of gluing, the vinyl does not need to be dried, which increases the service life of the coating.
Each option has its own subtleties and requires a professional approach.
Dry method
With this application method, the film is transferred directly to the car, starting from the edge of the pattern. In places where bending is expected, the vinyl is heated with a hair dryer to increase ductility and stretched. When air bubbles form, they are expelled using a spatula. This option is recommended to be used only if you already have experience in such work.
Wet method
For beginners, the wet application method is better. Its essence is to moisten the inner layer with a 10% solution of liquid soap solution by spraying. This way, the vinyl will not stick to the surface of the car right away, and in case of uneven application, it can be easily corrected. When the material is applied, excess moisture must be removed using a spatula and a professional construction hairdryer.
Options for tuning the interior with film can be seen in the photo (the work was done using Photoshop specifically for Lada.Online). For comparison, we post three images of modern cars: Lada Priora, Granta, Kalina, Vesta, XRAY, Largus and Niva 4x4:
- Staff salon;
- Wood effect film;
- Carbon film.
Let's start with the fact that the car owner can apply the film in two ways: on dry and wet surfaces. The choice is up to the driver, but it is better to rely on your own accuracy and speed.
To achieve a good result, you should work with an assistant. The pasting process involves following the following rules and recommendations:
- Smooth the material from flat surfaces, working towards the edge.
- In order for the film to fit perfectly on bends and indentations, it is made elastic by heating it to a certain temperature.
- Do not stretch the material too much.
- If air is detected under the film, you should try to smooth the material using a squeegee.
Pasting a car dry or wet cannot be done without special materials and tools. To work successfully, the master will need:
- car film;
- dry, soft, lint-free cloth;
- stationery knife and scissors;
- a professional hairdryer, but you can also use a regular hairdryer;
- plastic or felt squeegee;
- sprayer with soap solution (surface treatment using clean water is difficult);
- masking tape;
- degreaser (white spirit works great).
If the film is very large, it is better to work with an assistant.
Felt squeegee
For professionals, the dry gluing method is definitely suitable. The work is done on the first try and is done very quickly. The quality of the coating is high, and the material will last a long time.
Dry method of car wrapping
How to remove
After the armor film has used up its resource, the question arises of how to remove it. It is impossible to peel off the armor like ordinary material; scraping it with a knife is not recommended.
It is forbidden to use gasoline or acetone: in 99% of cases cloudiness remains on glass and plastic headlights.
You can quickly remove the armor using a hairdryer. If the part is glass, you can choose a higher temperature for heating the film and, after softening the material, remove the protection. If it is plastic, strong heating is not recommended: the plastic will darken.
Before heating the part, the body is degreased so that there are no solid particles left on the film, which could burn it when heated and leave a noticeable mark on the body.
Residues of glue after removing the vinyl film are removed with White Spirit. Car service technicians recommend cleaning car headlights and hoods from glue using the following means:
- Allegrini Puliscitutto;
- Koch Orange Power/ Eulex;
- 3M Orange;
- Mr. Muscle with ammonia.
Materials and tools
— Squeegee made of plastic and felt. Both serve to smooth the film and remove water and air bubbles.
— Scissors, large and small.
— A stationery knife with replaceable break-off blades.
- Masking tape.
— Solvent for degreasing the surface or removing excess glue (white spirit works best).
— Hair dryer for heating the film. It would be better to use a hair dryer, which will provide higher heating temperatures and faster work.
— Soft rags for smoothing the film.
— A spray bottle with a soap solution for applying it to the prepared surface.
The solution is prepared by mixing 10 parts water with 1 part detergent (liquid soap). There is no point in moistening the surface with plain water. The film will not be able to be moved.
- Vinyl film,
- Detergent at the rate of 1 liter per 10 liters of water,
- Masking tape,
- Alcohol or solvent
- Cotton napkin.
Also, to cover a car with film, you need to prepare the following tools and electrical appliances:
- plastic squeegee (spatula),
- felt squeegee,
- stationery knife,
- scissors,
- professional hair dryer,
- sprinkler
High-quality vinyl car wrapping involves the use of professional tools and high-quality materials. Tools you will need:
- plastic spatula;
- felt squeegee;
- special scissors and a sharp stationery knife;
- spray;
- construction hairdryer
The following materials will also be useful:
- vinyl;
- masking tape;
- a solvent that will not corrode the car’s paintwork or alcohol;
- a piece of cotton fabric;
- liquid detergent (1 liter per 10 liters of water).
Prepare everything you need before you begin gluing the chosen vinyl film.
Protection with varnish
You can protect your headlights from stones and ice fragments using varnish. Manufacturers use protective varnish for headlights, which supports the optics housing for up to 18 months. Then intense wear begins, the body begins to turn yellow and darken.
The varnishing process can be carried out in a workshop or independently. Varnish is always applied after polishing:
- dismantling optics from a car;
- rough grinding, highly abrasive sandpaper is used;
- primary polishing;
- priming the headlight surface;
- primary (main) varnishing;
- re-varnishing;
- drying;
- fine polishing.
The use of varnish as an alternative protection improves the quality of road lighting and extends the service life of the part by an average of 3-4 years.
Each motorist chooses how to protect the optics individually. Varnish and film have their advantages and disadvantages; a large range of products allows you to choose the best option for any car.
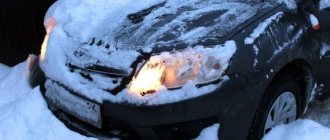
While driving on the road, stones fly out from under the wheels of the vehicle in front, which can cause mechanical damage to the headlights. To protect the optics, a special film for car headlights is glued to it. What is she? How to stick it on, care for it and remove it? The article provides answers to these questions.
Characteristics of protective film for headlights
Protecting optics from small stones, midges and other materials that can cause damage has always been a hot topic. Previously, metal grilles were installed on optics. But they looked natural on SUVs and sports models, while they spoiled the appearance of luxury cars. The situation changed with the advent of protective films that are glued to car headlights (video author – AvesAuto).
Armored protection does not have high strength qualities, but has the following advantages:
- reduces impact force;
- easily removed from the surface;
- protects against dust and dirt;
- protects the glass surface from minor damage.
If a large stone hits, the force of the impact spreads over the entire surface, which makes the impact not so strong. Even if the headlight does break, the glass will not crumble inside the housing, but will remain on the film. It makes cleaning the optics easier, since it is easier and faster to wash off dirt from a smooth surface than from a ribbed surface.
How much film do you need?
Vinyl wrapping a car is a simple process. However, it is important to correctly calculate the amount of material. In this case, some nuances should be taken into account, for example, the type of film and body type. The experience of the master is also of particular importance. If you are a beginner, then it is better to take more material, since shortcomings and errors are possible.
Do not forget that vinyl film may have individual characteristics, among which elasticity and strong stretch should be highlighted. It is for this reason that experts provide the following material calculations:
- To wrap an SUV, 23-30 meters of film is required.
- For a crossover – 18-23 meters.
- For a sedan - 17-19 meters.
Of course, these data are relative. However, thanks to them, the car owner has a rough idea of how much material needs to be purchased. If wrapping a car with vinyl is beyond your capabilities, then you should seek help from specialized salons. Here they will help you choose a material and apply it to the vehicle body.
Instructions for covering headlights
Reserving headlights with film is a simple procedure and consists of a sequence of steps:
- Before gluing, you need to wash and dry the headlights.
- Then the surface of the glass should be degreased using industrial alcohol.
- Next, you need to cut out the blanks with an overlap of about 2 cm at the edges.
- Before gluing, the prepared blanks must be heated with a hairdryer until they become elastic.
- When removing the backing, you should immediately glue the protection before it loses its elastic properties. In this case, use a spatula to remove bubbles from under the material. It is recommended to heat 4 cm sections and glue each one sequentially.
- The remains are trimmed with scissors.
- At the end of the work, you need to warm up the entire surface with a hairdryer again and work with a spatula, finally leveling the surface.
Leveling the material with a spatula
Correct advice
The easiest way to update the surface of the body is to wrap your car with vinyl. The photos of the vehicle presented in the review confirm this. However, many people make mistakes during the film application process.
Basic Rules:
- The vehicle must be washed and degreased before wrapping. Many car owners believe that this is completely unnecessary.
- The body must be wiped down.
- If the canvas is large, then you should ask for help. Gluing film alone is not so easy.
- The film cannot be glued without preliminary adjustment. Before tearing off the mounting and removing the backing, the material should be tried on the part.
- The backing should be removed immediately before gluing the part. Do not wet it with water.
- The material should be rolled with a squeegee from the middle of the canvas to its edges.
- When working with vinyl, you need to heat it with a special hairdryer. The air flow temperature should be no more than 70°C.
- After finishing the pasting, dry all treated surfaces with warm air. The vinyl will stick completely only 10 days after application. During this period you should not drive a car.
If you are not confident in your own abilities, then the work should be entrusted to experienced craftsmen from the salon. Otherwise, illusory savings may result in additional costs. After all, wrapping a vehicle with vinyl is an art.
Features of care and operation
After booking, it is not recommended to drive the car or wash it for 2 days so that the material adheres properly. When washing armored headlights, you should not use abrasive detergents, they damage the material and it loses its transparency.
Although the booking material is quite strong, its uniformity is negatively affected by such factors as:
- alcoholic drinks;
- chemicals;
- artificial oils.
High temperature also has an adverse effect on the material.
Preparation and getting started
Particular attention should be paid to the room in which the machine will be covered with film. Working outdoors is strictly not recommended. Street air contains dust particles that can fall on the prepared surface of the car and the adhesive composition of the film.
Once glued, they will form bubbles that cannot be removed. Therefore, covering a car with film should only be done indoors, in a clean room with moderate humidity. Particular attention should be paid to lighting. The car must be illuminated evenly, from all sides, in order to notice all possible defects in the adhesive.
Body panels and body kit elements must be prepared for pasting: thoroughly washed and dried. This can be done either in a car wash or with your own hands. In any case, before gluing, the surface should be wiped again with a clean cloth to remove all grains of sand and dirt.
Irregularities and dents need to be puttied and sanded to level the surface. So, the smoother the surface, the better the film will stick. You should also pay attention to the places on the back of the panels where the curved edges of the film will be glued. They must also be clean and even.
- First you need to wash the car using car shampoo, and then carefully examine the surface.
- If there are bitumen stains, adhered grains of sand, or traces of insects, you must use alcohol or a solvent.
- It's even better to polish the car after washing. Any film will look great on a perfectly clean and smooth body.
- The next preparatory stage will be marking the material. To do this, you need to attach a film to the body element and mark the cutting line. Using scissors and a stationery knife, cut out a piece of the required shape.
car wrap film
Methods of wrapping a car with vinyl film
There are two ways to stick vinyl film to a car body.
- For beginners, the wet method of applying vinyl coating is best. The principle of operation is to moisten the adhesive layer with a 10% detergent solution. This treatment allows you to straighten the film or move it if the application is uneven. However, after laying the film material, it will be necessary to completely remove moisture. For this you will need squeegees and a hair dryer.
- For those professionals who can apply the film accurately and evenly on the first try, the dry gluing method is suitable. The work will be completed much faster, and the coating will serve the motorist for a longer period.
Tips for removing film
Although some manufacturers provide a 7-year warranty on their products. Due to poor-quality road surfaces, the film has to be changed after 3-4 years. High-quality branded film can be removed from the glass surface without any problems.
Removing headlight protection
If the material is of poor quality, then after removal, an adhesive base remains on the surface. The adhesive is removed mechanically using chemicals.
Price issue
Video “Simple instructions for applying protection stickers to headlights”
This video demonstrates how to stick a protective film on the headlights of your car with your own hands (the author of the video is VAPILA).
Headlights are the source of light for a car at night. Most modern cars allow you to change only the lamps, instead of replacing the entire headlight - which is more economical.
Therefore, armored film for headlights is a good solution that extends the service life of this part of the car. The product is made of polyurethane or vinyl film, which is practically invisible, applied directly to the surface of the lamp. Built-in UV inhibitors prevent discoloration and hardening of the material. Excellent protection for headlights against scratches and pitting.
Types of vinyl film
The essence of the work is that all body parts and tail parts (bumpers, moldings, spoilers) are treated with a special vinyl film. Regardless of the size of the part, it is applied entirely, without joints or folds. The edges are folded and glued on the reverse side or cut off at the joints (this is the principle used to cover a car with matte film).
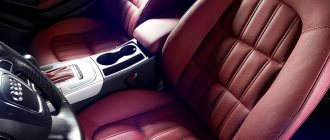
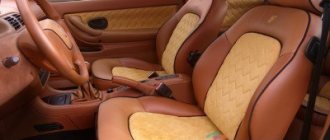
By combining different colors you can achieve even greater uniqueness and a memorable look. It is also possible to cover the interior of the car with film, or rather its elements. These are decorative panels, plastic linings, claddings. Covering a car with film, in addition to the purely aesthetic aspect, allows you to hide some body defects.
Based on its purpose and appearance, car vinyl is divided into the following types:
- Carbon. There are two modifications. A budget, non-textured option with superior protective properties, but more expensive, three-dimensional.
- Matte. Easier to care for thanks to its porous surface. Has a service life of 5 to 10 years.
- Textured. It has an appropriate volumetric surface layer that imitates various materials (for example, leather). Quite a thick coating that can reliably protect the car body.
- Transparent protective. This coating does not have an aesthetic component. It performs a protective function while remaining invisible on the car.
- Glossy. This vinyl film can reliably protect the surface of the car from scratches and rust. Shelf life varies between 3-10 years. The ideally equal, almost mirror-like structure of the film cannot be repeated either by painting or polishing.
- Fluorescent or neon film that can glow in the dark.
- Vinylography.
In other words, this is a sticker with a print applied to it. Used in the past only for advertising purposes, this film is now increasingly used in car design. Solid or partial decor of this type emphasizes the uniqueness and individuality of both the car and its owner. It is as easy to stick on as it is to remove. At the same time, the layer of paint underneath remains intact. In addition, it is much cheaper than airbrushing. 3D Vinyl Carbon Film
Covering a car with vinyl is an important step that should not be rushed. Particular attention must be paid to the choice of film coating. What criteria are taken into account?
- The plasticity of the film, on which the quality of car wrapping directly depends.
- Tear resistance.
- Thickness, which affects the protective qualities of the film. The optimal value is considered to be from 50 to 300 microns.
- Warranty period of use.
- Surface type (matte or glossy)
The service life of vinyl coating is quite short, so sooner or later the question arises of how to remove the vinyl film from the car. It turns out everything is quite easy. If you want to change the design of the car again or simply remove the vinyl, there are a few simple steps to follow.
- The car warms up for several hours in a warm room (20 degrees and above) or in the sun.
- Using an industrial hair dryer, the surface heats up to 70-80 degrees. Immediately you need to remove the film at an acute angle, moving from the edges to the center.
- Be careful when removing vinyl from plastic surfaces. It is better to set a lower heating temperature than to spoil the original appearance and shape of the parts.
- If traces of the adhesive layer remain on the surface, you can use alcohol or solvent to remove them.
There is nothing difficult when working with vinyl film. All that is required from a car enthusiast is calmness, accuracy and leisurely behavior. In order for the work to proceed without annoying glitches, it is better to carry out the pasting with an assistant.
Many people cover a car or its separate part (hood, roof, bumper, mirrors) with vinyl film, pursuing different goals:
- protection against chipping with protective film;
- hiding defects (paint fading, differences in shades of parts, scratches);
- changing the appearance by wrapping the car body.
This procedure is becoming more and more popular every year, and the variety of shades and textures makes it possible to realize any creative ideas.
Reasons for popularity
Vinyl, despite its recent appearance on the market, has won the love and recognition of many car owners for a number of reasons: with its help you can quickly change the color of the car, hide minor scratches, and the service life of good material is 5-7 years. Its cost is also quite affordable.
Advantages of a car wrapped
Drivers who have covered their cars with vinyl film note many advantages of this procedure:
- the car is protected from the negative effects of the environment in the form of dust, small stones, sand;
- the vehicle began to look more presentable;
- no additional care required.
If you decide to cover your car, it is better to consider purchasing a high-quality vinyl film that will completely follow the contours of the body, including every curve.
Over time, it becomes necessary to remove the vinyl. To do this you will need to perform 4 simple steps:
- the car is left for several hours in a room with a temperature of more than 20C or in the fresh air during the warm season;
- warm up a hair dryer to 80C (if you have no experience, then to 60-70C, so as not to damage the parts);
- the coating is removed at an acute angle in the direction from the edges to the central part;
- Using a special solvent or medical alcohol, remove traces of glue, if any remain.
In practice, a specialist is required to be calm and not rushed. In some cases, an assistant may be required for work to avoid negative consequences.
What is a reservation
This method of protecting a car was invented by companies from the West who used a thick film, also called “armored”, and began to work on protecting the front of the car.
The principle is to protect the body from small stones that can fly out from under the wheels, damaging the paint and headlights. For this purpose, an armored film is glued. When an object hits the plastic of the headlight or body, the film takes the entire impact. And after the time has passed, the armored film is replaced with a new one.
Watch a comparative test of various armored films in the video below:
How to stick armor film yourself
Here is one way to stick armor film on a car:
Step 1: Clean the headlight glass and hands. Make sure there are no cleaning agents left on surfaces. Without removing the headlight cover from the backing, lift it up and make sure you have the correct shape (i.e. slightly oval lenses). If it is below 65 degrees, you can gently heat the lens with a hairdryer, this will help.
Step 2: Carefully remove the cover from the backing - touching the adhesive as little as possible. Take the adhesive side and carefully place it on the headlight. Move towards the center and align the edges. This is the most important step as it will have a big impact on the final alignment. Make sure that the maximum permissible edge deviation is allowed. Be careful, the glue is pressure sensitive. If necessary, lift and rinse with water until the piece of armor film is evenly leveled. Then press down on the center.
The remainder of the installation will require using a hair dryer on low. Apply water to the surface of the lens and move the scraper in small increments with steady pressure from the center outwards around the headlight. Hold the outer part while squeezing. Use both hands if necessary for best results. If you leave bubbles, stop, lift the material a little, rinse again and squeeze with firmer pressure.
Step 4: Once there are a few centimeters of margin left from the edge, you should press them firmly. The material at the edge will have a waviness. Everything needs to be distributed evenly.
Step 5: Go over the edges of the armor film with a hair dryer on low setting and make sure the edges are firmly set. Use a sharp razor knife to carefully trim away areas that are misaligned or overhanging.
What is the best way to apply vinyl, on a wet or dry surface?
If you are a beginner, the best way is to apply it to a wet surface. Applying film on a dry surface is a rather complicated process, and requires certain skills and the presence of tools, since vinyl sticks to a dry surface much faster, and if you get wrinkles, it will be quite difficult to smooth them out, and in some cases impossible.
Pasting film onto a damp surface is much easier. If applied incorrectly, the vinyl can be carefully removed and repositioned. With this method, it is necessary to carefully expel the water from under the film so that small bubbles do not form during drying.
What parts of the car is armored film applied to?
Most cars have four bulbs up front - two for normal beams and two for high beams - as well as separate fuses for each side.
Armored headlight film is designed to protect vehicle headlights, turn signals, parking lights and fog lights to protect against stones. It also protects the front and rear bumpers, body and doors.