After the last car (Subaru Forester SF5), in which the headlights turned on and off when the engine was started, I had to get used to pressing the button every time before starting to drive. In just over a month of owning the 7, there have already been times when I forgot to turn on the headlights, fortunately I didn’t get a fine. It was decided to make minor modifications to the car to automate the inclusion of low beam headlights. There are quite a lot of different options on the Internet for obtaining this effect, both homemade and factory-made buns. Since it’s more interesting to do everything yourself, I decided to assemble a simple circuit using relays. For myself, I decided that my light should turn on only after the engine starts, not to disrupt the operation of the standard circuit, and so that when I turn on the light through the standard button, my “circuit” should be disassembled. To implement this task, the following were purchased: 1) 4-pin relay - 1 piece 2) 5-pin relay - 2 pieces 3) 4-pin relay block. — 1 piece 4) relay block 5 contacts. - 2 pcs. 5) holder for a fork fuse 6) wires, corrugation, electrical tape Most likely there will be those who will say that it could have been done simpler, that three relays are a lot and could have been connected differently, but for me the circuit I came up with is simpler and more convenient. Naturally, I do not claim that this is exactly how this modification should be carried out)
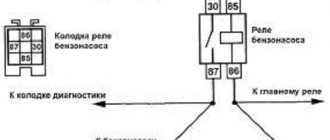
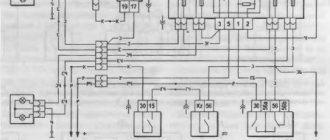
The operating principle and role of each relay. 1) The first relay is connected with contact 30 through a fuse to the battery. One contact of the coil is to ground, the other is to the 15th contact of the ignition switch, the 87th contact is connected to the 30th contact of the second relay. 2) The second relay has a 30th contact, as already written above for the first relay, one coil contact to the 15th contact of the ignition switch, the second end of the coil to the oil pressure sensor. Contact 87A is connected to the 30th contact of the third relay. 87 The second relay contact is not connected to anything. 3) The third relay with the 30th contact to contact 87A of the second relay, one coil contact to ground, the second to 12V from the size. Contact 87A is connected to the standard relay for turning on the low beam headlights, namely to contact 85 (if I'm not mistaken).
As a result, after turning the key to the “ignition” position, the first relay transmits voltage from the battery to the second relay. The second relay, while the engine is not started and there is ground on the oil pressure sensor, opens contacts 30 and 87A, thereby not passing 12V to the 30th contact of the third relay. After starting the engine and increasing the oil pressure, the ground on the oil pressure sensor disappears and contacts 30 and 87A of the second relay close again. The third relay transmits voltage to the standard low beam headlight relay until the low beam headlights are switched on using a standard button, which in the first position supplies 12V to the dimensions, as a result of which the third relay opens contacts 30 and 87A.
When connecting to a standard relay, I decided to put a diode in the gap of the standard wire, which I took from an old PC power supply. Maybe it was unnecessary, but it makes me feel better =D
Connection points. 1) 15th contact of the ignition switch, on which 12V appears when the key is turned to the “ignition” position. Blue wire (double thicker and thinner). 2) Oil pressure sensor. The connection to it was made in the engine compartment. 3) Connection to 12V dimensions. For the left headlight, this is a yellow wire going to the headlight unit in the engine compartment, directly next to the headlight unit itself. 4) Connection to the standard low beam headlight relay. Gray wire with a red stripe Block Ш1 (black) going to the fuse and relay block under the hood. You can only gain access to this wire from the interior by disassembling the control panel.
Lighting equipment, that is, headlights, plays a vital role in the operation of a vehicle. With the help of optics, you can not only illuminate the road surface at night. Headlights also serve as an identification sign for other road users when visibility is poor.
If a driver drives with his headlights on, oncoming cars at a sufficiently large distance will be able to notice this. This allows you to prevent accidents, accidents, erroneous maneuvers and other unpleasant situations on the roads.
Automatic switching on of low beam headlights when starting the car
As you know, demand for any product is an ideal incentive for its development and production. Enterprises producing electrical equipment for cars have eagerly started producing units for automatically switching on low beams.
The competitors are very successfully craftsmen who have created many interesting versions of homemade devices, distinguished by their varied functionality and complexity of designs.
With the help of very simple homemade circuits, you can achieve the desired result - the headlights will be connected synchronously with the ignition or engine start, during daylight hours only the light will turn on, and in the dark the side lights will also be on.
Automatically switching on low beam headlights: how to do it yourself
Taking into account recent changes in traffic rules in the Russian Federation, the driver is required to turn on low beam headlights both when driving in the dark and during daylight hours. Otherwise, traffic police officers have the right to fine the driver.
Although the amount of the fine is not the largest, the very fact that a car can be detained for violating traffic rules, after which the driver will be fined a certain amount for such an offense, is, for a number of reasons, unacceptable for most responsible motorists.
To avoid such errors, the best option is to turn on the low beam when starting the engine, that is, automatically. However, not all vehicles have a similar function, which is implemented as standard. In this article we will look at how to modify a car so that the headlights turn on simultaneously with the start of the internal combustion engine.
Read in this article
Scheme for automatically turning on the headlights when starting the car
It is possible to ensure timely switching on of the light when connected to the ignition power source. But it should be remembered that some devices can be connected to the ignition switch located in any position, the functions of others will be activated only if the ignition is already turned on.
The most rational scheme is considered to be one through which power will be supplied to the relay (button) when the ignition switch contacts are closed. Turning off the engine when stopping will open the circuit, therefore turning off the headlights.
According to some drivers, such a design can cause an increase in load on the electrical circuit, but in fact, provided that each of the components of the structure is correctly connected, increased loads will not be observed.
Is it possible to start the engine with the headlights on?
I think that many of you have noticed that the low beam bulbs in the headlights burn out much more often than the high beam ones, and there is a completely logical explanation for this: during the day, by law, it is necessary to turn on the low beam, DRL or PTF. And if you have lights on during the daytime, and not fogs or running lights, then most likely this is the reason for the too short service life of the light bulbs.
But there are rumors among car enthusiasts that the “life expectancy” of the filament is influenced by such a factor as a voltage drop when starting the engine, that is, in simple words, it is not recommended to start the engine with the headlights on. Since the starter takes on several volts when cranking, the voltage in the on-board network drops seriously for 1-2 seconds, which can lead to a decrease in the service life of the lamps.
But is this really so, and is there any truth to these speculations? Let’s try to figure it out.
Will a voltage drop in the on-board network harm the headlights?
Having studied dozens of materials from official sources, both domestic and foreign automakers, I have never found at least one recommendation to turn off the lights when starting the engine. Moreover, most modern cars have an AUTO function, which involves switching on this mode once, and the headlights turn on or off themselves as needed.
It turns out that in the evening or early morning in automatic mode, the engine starts with the headlights on. And this applies to both halogen and xenon headlights. It turns out that manufacturers are completely confident in the harmlessness of such a procedure, so these rumors about harmful starting with light should be considered rumors, and nothing more.
If you believe some real experiments from specialists, then you can notice the following pattern: the lower the voltage at the lamp contacts, the longer it will last, and this definitely lends itself to logic.
What actually harms lamps and shortens their lifespan?
If everything is clear about the drop in voltage, then with jumps in a larger direction it’s just not, and this is exactly what car owners need to be afraid of. If you notice frequent lamp burnouts, then the first thing you need to do is measure the voltage in the on-board network with the engine running.
If the voltage exceeds 14.2 Volts, then it is necessary to urgently find and eliminate the cause of such a defect. Most often this happens due to a banal failure of the generator voltage regulator, which cannot cope with its immediate task and the voltage will be too high.
However, the opposite situation also happens when, due to a faulty regulator, the voltage does not increase, but drops below the required values. But as we have already found out below, in this case there will definitely be no harm to the light bulbs, but there will definitely be a decrease in the efficiency of electrical appliances. And the battery will be constantly discharged in this mode.
I hope that the review will be useful and interesting for many. If you liked the article, subscribe to the channel and like it so you don’t miss new ones
Description of the work when assembling the circuit for automatically switching on low beam headlights
Experts consider the optimal solution to be the use of the stove switch off button, located on the right side of the switch block.
The work will be as follows. First you will need to dismantle the size switch, its location is the leftmost switch block.
Next, you will need to disconnect the positive wire and the key block, through which the switching off and switching on of the low beam is organized. Usually the connection is made using a double green wire; after disconnecting, this wire is connected to the relay.
You will need to cut an additional wire into the positive wire going to the heater switch and also connect it to the relay.
Then connect the wire to the relay that supplies power to the low beam headlights. Do not forget about the need to throw wires onto the body.
All formed connections will need to be carefully soldered, but if this is not possible, then you can limit yourself to using insulated twist.
If the work is done well, we will get a Euro light system when the ignition is turned on.
But according to experts, this very simple option cannot be considered the most economical. In particular, this applies to winter time, when it will take some time to warm up the car. It would also be inappropriate to turn on the low beam if it is necessary to carry out repair work.
Scheme two
The above problems can be prevented by somewhat complicating the circuits. The additions made will make it possible to turn off the light at the moment of stopping, regardless of whether the ignition is turned on.
To get an improved circuit, you can use two options, connect to:
- handbrake
- oil pressure sensor
To connect via an oil pressure sensor, it is necessary to purchase 2 transistors, a relay and a microcircuit marked K561TP1. The parts can be placed in the housing from the relay, then the device is connected to the oil pressure sensor.
Turning on the engine will normalize the pressure in the lubrication system, the sensor contacts will open, and power will be supplied to the capacitor. The transistors included in the circuit will supply voltage to the relay, which will turn on the lighting fixtures.
Turning off the engine will cause power from the sensor to be transferred to the light bulb located on the dashboard. In this case, the capacitor included in the headlight control unit will begin to discharge, and power will not be supplied to the relay.
It should be noted that this scheme has some disadvantages, in particular - a decrease in oil pressure in the system will trigger the sensor (when coasting or idling), as a result of which the emitted light will blink.
A parallel connection will allow you to create a circuit that allows for both automatic and manual control.
You can regulate the on-off process by selecting the appropriate resistance on the board. A higher resistance value means it will take longer for the lighting fixture to change status.
Not everyone approves of this method, because... The circuit is quite complex; additional wiring will be required and high-quality connections will be made.
We connect the circuit for switching on the low beam headlights to the handbrake
Connecting to the handbrake is not at all difficult; modifying the circuit will require adding another relay and a wire about a quarter of a meter long directly to the contact of the handbrake button.
This option will allow you to turn off the headlights when you start moving the handbrake, but when you release the handbrake, the headlights will light up.
How to Turn on Low Beam on a Kia Rio
Replacing the low beam beam of Kia Rio
The Korean car Kia Rio 3 with a reliable and simple design is quite popular among domestic car enthusiasts. Unfortunately, the model also has shortcomings, including the headlights, where the halogen bulbs quickly fail, resulting in no lights at all or only low beams.
Characteristics of head optics lamps
In the Kia Rio model, one bulb with a service life of approximately 600 hours at a normal battery voltage of 13.2 is responsible for the low beam and high beam and looks like this:
- type h5;
- landing cartridge. P43T or P43T-38;
- filament light about 55 W, distant. 60 W.
The P43T-38 cartridge lamp differs from the regular P43T in that incandescent lamps are much more accurate, but this does not make a big difference.
When choosing, you must take into account the fact that the color of the luminous flux from lamps from different manufacturers will differ. This is why you should change two bulbs at the same time if the manufacturer is unknown, or put one of the same brands, which will allow them to burn the same color.
Replacement procedure and necessary precautions
In the Kia Rio, the low beam lamps are located in the headlight under a round protective cover. To change it on Kia Rio, you must follow the following procedure:
- Disconnect the power supply with the ignition key and open the cover.
- There is a round protective cover on the back of the headlight housing; it must be unscrewed and removed. The right headlight of the car is easier to obtain; to replace the lamp, you do not need to remove various attachments. It is more difficult to get to the left; you need to unscrew the bolts securing the fuse box and move it to the side or show due skill when unscrewing the protective casing.
- After this, access will be provided to the bulbs responsible for low and high beam, as well as to the operation of parking lights. The replacement lamp is located directly in the center of the open window and has an electric shoe on it, which must be removed by pulling it with great force.
SIMULTANEOUS LIGHTING OF LOW BEAM AND DAYTIME RUNNING LIGHTS OF KIA RIO 3 (RESTYLE)
SIMULTANEOUS LIGHTING OF LOW BEAM AND DAYTIME RUNNING LIGHTS OF KIA RIO 3(RESTYLE) Kia Rio.
Dimensions and low beam headlights.
Accelerated self-training course for novice drivers: Sign up for lessons.
- After removing the block, you need to open the spring clip that secures the lamp, which opens by pressing it with two fingers and then sliding the lock to the side.
- Then the headlight bulb itself is removed from the headlight and a new one is installed, then the entire assembly must be reassembled in reverse order.
Advantages and disadvantages of the assembled circuit
Homemade options undoubtedly have advantages. They allow you to get the required result and eliminate complaints from traffic police officers about headlights not being turned on while the car is moving.
Wherein :
- the cost of a homemade system is quite low
- it won’t take much time to make it
How to create an inexpensive circuit for automatic low beam headlights:
Of course, drivers who have at least basic training in electrical engineering and experience in doing this kind of work with their own hands can do the job efficiently with their own hands.
Professionals also advise that before starting work, you should really assess your capabilities. In some cases, in order to avoid problems, it is better to fork out some money and entrust the work to a professional auto electrician.
If the work will be done independently, then it is recommended to arrange all tie-in points inside the cabin. At the very least, they will be protected from the negative effects of precipitation.
It is more rational to make the connection points themselves by twisting the wires - this method is in no way inferior to soldering, and in conditions of increased vibration it turns out to be more resistant.
We should not forget that the mounting of the installed relay must be rigid.
The installation should not be carried out in such a way that, with the maximum permissible trajectory of movement of the wiring branches, their tension does not arise; all bending points of the wiring located near the metal fragments of the body must be protected using a polyvinyl chloride tube.
It is not advisable to follow the recommendations of amateurs who claim that to obtain the desired result, you can install a jumper in a certain place on the car's mounting block, without installing an additional relay. Failure to comply with basic electrical engineering rules is a real cause of serious problems, for example, headlights can be turned on bypassing the fuse.
Carrying out installation work with your own hands will require maximum care and accuracy from the car owner. During operation, the possibility of moisture and mechanical deforming loads on system fragments should be excluded. It is not recommended to use gas-discharge lamps in automobile electrical systems.
As you know, low beams must be turned on when driving a vehicle, not only in the evening and at night, but also during the day. In a situation where the running lights do not work, the traffic police officer has the right to issue a fine to the driver. Of course, this is a small amount, but it creates a headache. In this regard, most motorists have encountered a number of inconveniences due to the fact that many simply forget to turn on the low beams when getting into the car, or do not turn off the lights when leaving the car, which is why they find the battery completely discharged in the morning.
In order to get rid of such problems, many decide to modify the process of turning on and off the headlights. Thanks to the simplest circuits, the headlights can turn on simultaneously with the ignition or when the engine starts. In this case, during the daytime the low beam headlights will light up, but not the headlights, and at night everything will work as usual. Let's consider both options.
Do-it-yourself automatic low-beam headlight switching
Publication date: July 27, 2020. Category: Automotive equipment.
As you know, low beams must be turned on when driving a vehicle, not only in the evening and at night, but also during the day. In a situation where the running lights do not work, the traffic police officer has the right to issue a fine to the driver. Of course, this is a small amount, but it creates a headache. In this regard, most motorists have encountered a number of inconveniences due to the fact that many simply forget to turn on the low beams when getting into the car, or do not turn off the lights when leaving the car, which is why they find the battery completely discharged in the morning.
In order to get rid of such problems, many decide to modify the process of turning on and off the headlights. Thanks to the simplest circuits, the headlights can turn on simultaneously with the ignition or when the engine starts. In this case, during the daytime the low beam headlights will light up, but not the headlights, and at night everything will work as usual. Let's consider both options.
Automatic switching on of headlights upon ignition
In order to organize such operation of the lighting elements, it is necessary to connect them to the ignition power source, and as many know, some devices can be connected at any position of the ignition switch, while others begin to function only when the ignition is already on. Based on this, the most convenient place to connect the headlights is the heater switch button (the rightmost switch block).
For this scheme you will need:
- any standard five-pin relay;
- diode;
- wires.
- Remove the size switch (switch block on the leftmost side).
- Disconnect the positive wire from the key block responsible for the low beam operation (usually this is a green double wire) and connect it to the relay.
- You need to insert an additional wire into the positive wire that goes to the heater switch and also connect it to the relay.
- Connect the wire that powers the headlights to the relay.
- Throw the wiring to minus (to the body).
The connections can be soldered, but for full-fledged work, an ordinary insulated twist will suffice. As a result, automatic low beam headlights will work as soon as you turn on the ignition.
However, this method is considered not the most economical, since the headlights start working immediately, which is not very important in winter, when the engine needs to be warmed up or when repairing a car.
To avoid such inconveniences, you can complicate the circuit a little so that the low beam turns off while parked, regardless of whether the ignition is working or not.
What spare parts are needed to assemble an automatic switching circuit?
To set up a system for automatically turning on lighting fixtures, you will need to find:
- standard five-pin relays
- wires
- diodes
To implement a more rational scheme with the option of connecting to a handbrake or oil pressure sensor, you will need to purchase:
- transistors, 2 pcs.
- wires
- microcircuit marked K561TP1
For this scheme you will need:
- diode;
- wires.
Automatic switching on of headlights after engine start
To organize such a work scheme, you can go in two directions: connect to the oil pressure sensor or to the handbrake.
Method 1: Connecting to the oil pressure sensor
To make this connection you will need:
- relay;
- transistor (2 pieces);
- wires;
- microcircuit K561TP1.
All parts are placed in a small relay housing, after which the device must be connected to an oil pressure sensor. When the pressure in the engine lubrication system normalizes, that is, when the engine is turned on, the sensor will open, and the power from it will go to the capacitor. Ultimately, the voltage to the relay will be supplied through the transistors included in the headlight power supply. When the engine is turned off, power from the sensor is supplied to the desired lamp located on the dashboard. At this time, the capacitor that is included in the headlight control unit begins to discharge and the power supply to the relay stops.
In this case, you can also control the headlights manually if you use a parallel connection. In order to set the time to turn off and turn on the headlights, just select the resistance on the board. The higher this parameter is, the longer it will take the headlights to turn on and off.
True, not everyone likes this method, since this scheme is much more complicated (you need to pull wires and make 3-4 connections).
Method 2: Connecting to the handbrake
This method is much simpler, since in this case it is enough to just slightly modify the headlight connection diagram for ignition, which we talked about at the very beginning. To do this, just add another relay and a short wire (about 25 cm) to the standard contact of the handbrake button.
Thanks to this method, the headlights will turn off as soon as you pull the handbrake, and light up when you release it.