Good afternoon, colleagues!
From time to time I see phrases like “adjusted the handbrake by tightening the cable” on car forums.
Perhaps for some parking brake designs this is done, but often this indicates that a person does not have a very good understanding of the design of the parking brake mechanism.
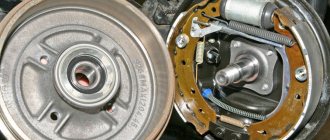
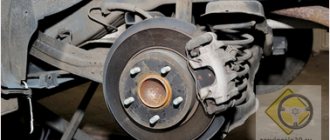
Consider a classic drum-type parking brake mechanism.
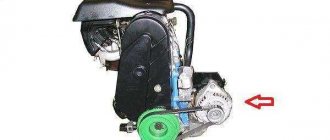
As an illustration, I use a photo of the brake mechanism of the Chery Tiggo 5 car. It combines a disk working (main) brake mechanism and a drum parking mechanism. A similar design is found on many other cars. For example, I have seen the same design on the 1st generation KIA Sorento, as well as on the Nissan Qashqai. Sometimes the service and parking brakes are combined into a single design, as, for example, on VAZ cars or on the Suzuki Grand Vitara. A disc-type parking brake (example: Ford Focus) is not discussed in this article.
Before moving on to the illustrations, I would like to note that the parking brake design discussed here uses two types of adjustments.
The first adjustment is the cable tension and the number of clicks of the handbrake lever in the cabin.
The main purpose of this adjustment is to ensure that the cable is not overtightened, and when the lever is released, the wheel brake mechanisms are returned to their original (free) state, and with a certain number of clicks, the cable ensures the operation of the brake mechanism (usually 5-6 clicks until the wheels are completely locked) .
When the lever is released, the cable should not pull on the brake pad drive, and when the lever begins to rise, the cable should be tensioned to drive the brake pads. If the cable is adjusted correctly, then when the lever in the cabin is released, it will have slight slack, and therefore will not stretch for a long time, and this adjustment will be required very rarely. An example of adjusting the cable tension can be seen at the link Adjusting the handbrake cable on Chery Tiggo 5
.
The second adjustment is the position of the pads, i.e. adjusting the gap between the pads and the drum.
It is necessary to ensure effective operation of the brake. If the gap is too large, then the lever travel in the interior will not be enough to lock the wheels, because the pads will not have enough travel to press against the brake drum with sufficient force. If the gap is too small or absent, the pads will touch the drum or will “grab” too early, hence the risk of the mechanism not fully releasing the brake when the lever is fully released, the pads will rub against the drum while moving. As the pads wear, the gap will increase and the adjustment must be repeated. At the end of the post, after the photos, I will give my recommendations on the procedure for adjusting the position of the pads. Sometimes there are designs with automatic clearance adjustment, then this adjustment is not required (for example, VAZ rear drum brakes).
It is the second adjustment that is often neglected by inexperienced car owners.
, trying to adjust the position of the pads using cable tension. As a result, we have a brake mechanism that is constantly engaged while driving, overheating of the drums, pulling of the cable, the need for repeated adjustments, etc.
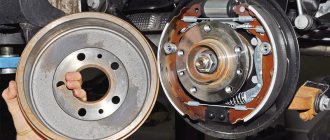
The photo below shows the design of the drum-type parking brake mechanism of the Chery Tiggo 5 car.
The mechanism works very simply.
When we lift the lever in the cabin, the cables that drive the wheel brakes are pulled, they pull the brake levers, and they spread the brake pads, pressing them against the drum. The smaller the initial gap between the pads and the drum, the more the wheel brakes with fewer lever clicks in the cabin. When the lever is released, the pads return to their original position under the action of return tension springs. From this it becomes clear why the gap should not be adjusted with a cable, since the brake mechanism while driving will always be in an intermediate, semi-working state.
Below are illustrations with my comments. At the end of the post there are recommendations for adjusting the brake pads.
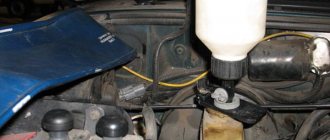
The car has two braking systems - hydraulic and mechanical. Hydraulics are the main means of stopping, interacting with all pairs of pads on the wheels. Mechanics, in turn, are used to fix the position of the machine in place. Hydraulics and mechanics do not interact directly with each other. Over time, the handbrake cable stretches, preventing the lever from pressing the brake pads with enough force to completely lock the wheels. In this case, you will need to adjust the mechanical handbrake. This procedure can be done in a garage environment. The main thing is to understand the principle of adjustment, as well as to have the necessary set of tools with you.
Why you need a working handbrake
The hand brake locks the wheels relative to their axis of rotation, thereby ensuring stability on the surface, including sloping roads. Thanks to a working handbrake, the following functions can be performed.
- Stability of the car on the road when parked, or on a slope.
- Assisting with emergency braking.
- Moving a car using controlled skidding techniques (if you have the appropriate skills).
- Acts as the main brake in case the hydraulics fail.
Note! It is prohibited to use the handbrake as a permanent braking element. The reason is the high risk of skidding, because when stopping in this way, only the rear pair of wheels are engaged.
How many braking systems are there in a car?
ri. And all of them provide the functions of changing the speed of the vehicle, stopping and holding in place, using the frictional force and reaction of the support between the wheel and the road surface material. So, the types of braking systems:
Working - provides a controlled reduction in vehicle speed, if necessary, even to a stop. Consists of a drive for transmitting force and a braking mechanism. It is usually of the friction type, installed in the wheel and divided into two types, drum and disc. The drive and force transmission system is also divided into several types:
- Mechanical drive
- Hydraulic
- Electric
- Pneumatic
The first three types of drives will be discussed in detail in further material of the article.
Spare - performs the functions of a working one in case of its complete or partial failure. Structurally, it can be a standalone unit or be part of the main system. Uses working system mechanisms.
Parking brake - better known as a handbrake, it serves to hold the car in place for a long time and prevents it from rolling down an inclined surface. When driving a vehicle, it is used to start moving up an inclined surface. Uses working elements.
When adjustment is necessary
It is necessary to diagnose the parking brake at least once a month, or after 30 thousand kilometers. If there is a suspicion of a malfunction, you will have to check the condition of the unit more often, especially since the procedure is easy to perform.
It is worth tightening the cable in such situations.
- The owner installed new brake pads.
- Due to the poor performance of the rear drums, it was decided to completely replace them.
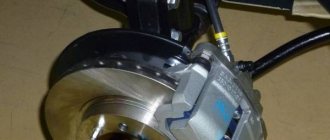
- Brake discs have been replaced.
- The position of the pads is adjusted according to the parameters specified by the manufacturer.
- The brake cable in the mechanical line has been replaced.
- The adjustment device is installed back in place.
- The lever began to move very strongly, as evidenced by a large number of clicks.
EPB device
- The electronic handbrake operates on the rear wheels and is represented by the following list of components:
- Electric handbrake control system;
- Brake mechanism;
- Electric drive.
The electronic handbrake control system is represented by a separate unit (ECU) that works with sensors and actuators. Sensors monitor a lot of different factors (slope, pedal position, etc.) after which the signal is sent to the system’s ECU and processed according to established algorithms. The control unit takes into account the position of the electronic handbrake activation button, the slope sensor and the clutch pedal sensor, which is located on the clutch drive. The latter monitors the position and speed of pedal release. Afterwards, the received information is processed and the ECU sends a command to the actuators (wires, electric motors, engine auxiliary systems, etc.).
The braking mechanism includes standard disc brakes, which are no different from conventional ones, except that the working cylinders are different. Also, the electromechanical parking brake drives are now located on the brake calipers.
How to tighten the handbrake
As a rule, repairing a handbrake involves installing a new cable. But if the adjusting element is in working order, and there are no traces of broken cord on the surface of the cable, the problem can be eliminated by adjustment.
To properly tighten the cable, you must perform the following steps.
- Raise the machine and place it on stands. This will give you access to the bottom.
- Raise the handbrake lever one to three clicks.
- Locate the adjuster locknut in the brake drum hole and loosen it.
- Tighten the adjusting nut and check that the brake cable is tight.
- If the cable tension level has not increased, the system will have to be repaired. It is better to entrust this work to the service center technicians.
- If the tension is successfully increased, you need to make sure that the handbrake is working correctly by pulling the lever towards you. Try to manually turn the wheel forward or backward. Make sure that it does not rotate without applying additional force.
- Retighten the locknut.
- Release the handbrake lever.
- Recheck the behavior of the wheel. Here it should spin freely.
After removing the supports, release the car to the ground and retest the operation of the handbrake. If you suspect a malfunction, try going through the steps described earlier again.
Adjusting the handbrake: how to tighten or loosen
The parking brake is an integral part of the automobile braking system. Its purpose is to prevent spontaneous movement of the vehicle when parking. The handbrake is used in extreme cases - for example, when the brake fails. Without a handbrake it is difficult to move on a sloped road. As you can see, the parking brake is a useful mechanism. Therefore, keep the handbrake in working condition and regularly carry out diagnostics, tighten and adjust it.
Checking the serviceability of the handbrake
Every car enthusiast can carry out the simplest diagnosis of proper operation of the parking brake. Select a section of road with a slope of 23–25%. Stop, put the gear in neutral and tighten the handbrake. If the car does not move after releasing the main brake pedal, then the handbrake operates.
How to use the handbrake
On a note. Car maintenance service workers recommend checking the operation of the parking brake at least once a month.
When tightening the parking brake lever, pay attention to the number of clicks of the ratchet mechanism. If the handbrake is in good condition, there should be from two to four clicks. If there are fewer of them, then you need to release the parking brake drive. Otherwise we tighten it up. Let's look at step-by-step adjustment of the handbrake using the example of a Lada Kalina car.
Step-by-step instructions for adjusting the parking brake drive
It is convenient to carry out adjustments on an inspection hole or overpass. It's better to do it with an assistant. You will need the following tools: two open-end wrenches for 13, a wrench, an extension, sockets for 10 and 13, WD-40.
In motorsports, the handbrake helps put the car into a controlled drift. This requires certain skills and abilities.
Remove the muffler from the rubber pads and move it to the side
To get to the handbrake adjustment mechanism, you must first remove the muffler from the rubber cushions and move it to the side. There is protection above the middle part of the resonator. It needs to be removed. The protection is secured with 4 bolts, unscrew them using a wrench and a 10mm socket.
Unscrew the protective screen over the central part of the resonator. It is secured with 4 bolts with a 10mm head.
Pull up the parking brake
- Lower the handbrake lever down.
- Loosen the drive locknut with a 13mm wrench.
Using a 13mm wrench, unscrew the locknut on the handbrake rod - Tighten the nut on the lever rod. The length of the drive will decrease, the tension will increase.
- Check the operation of the handbrake. Tighten it up to 4 clicks.
- Spin the rear wheels. If they are fixed, then tighten the locknut.
Loosen the handbrake drive
If the wheels rotate with difficulty when the handbrake is lowered, then the parking brake must be loosened.
- Lower the parking brake handle down.
- Loosen the locknut.
- Unscrew the nut on the lever rod, the cable tension will decrease.
- Check how the wheels rotate. If they rotate freely, tighten the locknut.
Checking operation after adjustment
After replacing the brake cables, drum shoes and adjusting the parking brake drive, the handbrake operation is checked and adjusted.
Place the car on an overpass or inspection hole. We will divide the adjustment procedure into 2 stages. At the first stage, we check the operation of the parking brake when it is not tightened .
- Hang up the rear wheels.
- Lower the handbrake lever down.
- Rotate the rear wheels by hand; if the pads rub against the brake drum, then you need to release the parking brake drive.
- Loosen the locknut on the lever rod. Unscrew the nut on the lever rod a few turns.
- Repeat steps 3, 4 and ensure that the wheels begin to rotate freely without any extraneous noise.
Second stage: checking the operation of the handbrake
- Tighten the lever 4 clicks and try to spin the wheels. If they spin freely, then you need to tighten the handbrake drive.
- Release the locknut.
- Tighten the nut on the rod a few turns.
- Release the parking brake lever and tighten again 3-4 clicks.
- Spin the wheels one by one. Full locking in a correctly adjusted parking brake occurs at 4 clicks.
- Repeat steps 3–5 if the handbrake operates at the 5th click or higher.
After adjustment, tighten the locknut. Install the protective screen and hang the muffler on rubber pads.
When operating your vehicle, do not neglect the parking brake. Its serviceability will improve driving safety and help avoid troubles on the road or parking lot. Check the handbrake every month. If any malfunctions occur, fix them as quickly as possible.
Let's get acquainted, my name is Dmitry Kuznetsov. Rate this article: Share with friends!
Adjusting the handbrake cable
Complex cable adjustment comes down to changing the tension level between a short cable coming from the handbrake and two cables leading to the left and right rear wheels. The nut for increasing or decreasing the degree of tension is located under the bottom of the car. In some cases, it is located immediately behind the lever - it all depends on the design of the particular machine.
By twisting, the tension of the handbrake cable increases. The procedure is carried out until the wheels are blocked when the lever is raised two or three clicks. If the adjusting nut is soured, it is enough to use a special rust cleaning agent. WD-40, or its substitute, is suitable for this. If there is a large layer of rust, you will have to replace the handbrake cable along with the adjusting nut.
Teaching how to use the parking brake is an integral part of the educational process in driving schools. But when it comes to practice, most drivers do not even remember the existence of this additional safety feature, preferring to fix their car by engaging first gear.
In principle, this is a completely effective method on small slopes, not to mention flat horizontal areas. But you are unlikely to find at least one driver who did not forget at least once when turning on the ignition that his car was not in neutral gear. And it’s good if such cases end with just an unexpected jerk. But what if there was another car or, for example, a light pole just a few tens of centimeters ahead?
Adjusting the parking brake drive: why you need to do it and what you need
09.07.2019
Issues discussed in the material:
- How does the parking brake work?
- When is it necessary to adjust the parking brake drive?
- How to understand when it's time to adjust the parking brake drive
- How to adjust the parking brake actuator
Incorrect tension of the handbrake cable entails several problems with the technical condition of the car. As a result, the parking brake will not hold the car motionless, the brake mechanism may overheat, and increased wear of the pads, drums or discs will be observed. You will learn how to adjust the parking brake drive in our article.
Why do you need a handbrake on a car?
Before moving on to considering the issue of adjusting the handbrake, you need to understand what its task is. Many drivers do not use the car’s handbrake at all, and in some modern cars it is even “hidden”, for example, under the armrest, which is most often lowered for the driver.
The main task of the handbrake is to prevent the spontaneous movement of the car when it is on a hill. For example, this can be useful in a parking lot or in a traffic jam on an uphill slope. In addition, with the handbrake significantly
Parking brake functions
The very name of this mechanism speaks about its purpose - blocking the wheels in order to ensure their fixation regarding the direction of forward movement of the vehicle, including when the vehicle is parked on surfaces with a gradient slope.
We list the main functions of the handbrake:
- ensuring vehicle immobility while parked on horizontal and inclined surfaces;
- assistance to the main braking system of the vehicle during emergency braking;
- performing maneuvers while the vehicle is moving (if you have the appropriate skills);
- replacement of the main brake when it breaks.
Of course, abuse of the handbrake is unacceptable (meaning its use as a replacement or addition to the main braking mechanism). Still, its main task is to secure the car while it is parked. Note that a tightly stretched cable is not always a good thing. If you try to brake while the car is moving with the handbrake, it will most likely go into a skid.
Let's look at the design of the parking brake and the principle of its operation. ST consists of three relatively independent blocks:
- mechanical drive;
- control unit;
- executive device.
The drive is a metal cable that stretches from the handbrake handle to the actuators. It is the cable that transmits the force from tightening the lever to the brake pads. In this case, the adjustment of the hand brake, or rather, the degree of its tension, is carried out using a rocker arm, which is also responsible for dividing the forces on each of the wheels.
The actuating device is the same brake pads, which are also activated when the brake pedal is pressed. This was done to simplify the braking system, for which reliability is one of the primary factors. And it is much easier to maintain a car with a partially combined brake mechanism.
The parking brake is activated using a lever installed in the cabin in the area of the central tunnel. It is equipped with a ratchet, which tensions the cable to the required amount. When you tighten the working handbrake, a separate light on the instrument panel will light up, indicating that the car is braking. On some car models, when trying to start driving with the parking brake on, the driver will be warned by an audible signal, which virtually eliminates the possibility of stretching the cable due to the car owner's forgetfulness.
Introduction
If a motorist can note the fact that the handbrake of his vehicle has lost its inherent tenacity and every time there is a need to put the car on the handbrake, he has to pull the parking lever sharper and higher, most likely he will have to go to a service center in the near future. However, as practice shows, such problems can be resolved by the car owner independently. The material below discusses in detail the adjustment of the handbrake of Kia Sportage 3 and 2.
The need to pull the parking lever faster and higher is a sign of imminent repairs.
Handbrake diagnostics
Checking the functionality of the parking brake should be carried out once a month (some automakers focus on the mileage indicator - every 20-30 thousand kilometers). If you feel that the effectiveness of securing the car with the handbrake has decreased, there is no need to wait for the recommended period for servicing the handbrake.
In this case, there are two common methods for diagnosing the condition of the handbrake:
- The first method requires placing the vehicle on a fairly steep slope (with a gradient of 15 degrees or more) and tightening the lever to the last ratchet notch. If the car is kept from spontaneous movement under the influence of gravity, everything is in order. If not, it is obvious that it has lost the braking efficiency that is required of it, and you need to immediately eliminate the cause of the incomplete operation of the handbrake with subsequent adjustment or repair of the mechanism;
- the second method does not require a slide. The check can and should be carried out on a horizontal surface. To do this, we tighten the lever towards ourselves until it stops, start the engine, engage a lower gear (strictly speaking, first) and begin to slowly and evenly release the clutch pedal. With a fully functional handbrake, the car will twitch a little, but stall. Otherwise, it will start moving, perhaps at a lower speed than usual. And then you will also have to tighten the handbrake cable.
A noticeable decrease in the effectiveness of securing the wheels with the handbrake can be caused by the following reasons:
- weakening of the tension of the brake cable (typical of long-term operation of the vehicle without servicing the vehicle, as well as abuse of the parking brake when driving the vehicle);
- brake linings are worn beyond normal limits;
- The gap between the pads and the drum has been increased.
How to tighten the handbrake: subtleties of the process and recommendations
In order to make driving a car safe, the coordinated and uninterrupted operation of all its mechanisms is extremely important. And the handbrake plays an important role in this matter. The parking brake must keep the car on the rise, otherwise, if there is a problem with it, there will be a real threat of various problems during parking. In addition, malfunctions of the handbrake can lead to serious problems in emergency situations on the road, when the mechanism simply cannot help the driver of the vehicle avoid a collision. If malfunctions in the operation of the handbrake occur, it is necessary to take care of its repair as soon as possible. Such a problem cannot always be resolved only by professionals. Most often, the motorist is able to correct the problem on his own. Within the framework of this useful material, the issue of tightening the handbrake on your own will be considered in more detail.
Purpose and design of the parking brake
Many drivers even understand the functional purpose of the handbrake. Especially if they don't use it. In some vehicle models, this mechanism may be hidden in the armrest or some other part. The main purpose of the handbrake is to prevent spontaneous movement of the car when it is on an incline. This mechanism is especially useful when parking in a traffic jam or when driving and then stopping the car on a hill. Using the handbrake is much easier to drive uphill or downhill, especially for cars operating on a manual transmission. The functions of the handbrake are identical to those performed by conventional brakes. The only distinguishing feature of the parking brake is the presence of a mechanical drive. The simplest design of a hand brake is a regular cable, one end of which is attached to a lever in the cabin, and the other end to the brake actuators. Braking occurs directly when the lever is pulled, which compresses the brake pads.
Common problems: how to check?
Having a similar design, a car handbrake may stop functioning for two reasons:
- Strong stretching of the cable;
- Reaction to sudden temperature changes.
When the cable is stretched, the driver will be forced to raise the handbrake higher and higher in order for the effectiveness of its retention to remain at the same level. In the second case, due to the constant expansion and contraction of the metal parts that make up the parking brake, the handbrake also begins to function less effectively. However, even if the vehicle owner approximately understands the cause of the problem, one cannot do without a more thorough check of the parking brake. It is best to do this in a specialized center where there is a special stand. The car owner is also able to independently check the handbrake for serviceability. To do this, you need to hang one rear wheel, put the car on the handbrake and try to manually spin the wheel. A spinning wheel will indicate that the parking brake is not working properly. In this case, you will need to adjust or completely replace the cable.
This video will show you how to tighten your car's handbrake yourself:
Published: June 13, 2018
Preparatory part
Before you begin adjusting the degree of tension of the handbrake cable, you will need to stock up on the following tools and materials:
- a ratchet and an open-end wrench (usually 13, but this depends on the specific design);
- WD-40 type lubricant;
- an extension cord with a lamp if the illumination of the underbody of the car is insufficient.
The work should be carried out on a lift/overpass; an inspection pit, which many garages are equipped with, is also suitable. As a last resort, you can jack up the rear of the car and put it on blocks.
Note that for some car models, the handbrake adjustment is made directly from the passenger compartment, so this point should be clarified.
If access to the bottom of the car is provided, you should make sure that the inoperability of the CT is not caused by jamming of the cable due to dirt and other objects getting on its surface. In this case, it is enough to simply clean the cable and then lubricate it.
And one more nuance: you can start adjusting only if the technical condition of the cable, pads and drive mechanism is in satisfactory (working) condition.
Service check[ | ]
In accordance with the “List of faults and conditions under which the operation of vehicles is prohibited” (appendix to the Traffic Rules),
it is prohibited to operate a vehicle
:
1.5. The parking brake system does not ensure a stationary state:
- vehicles with a full load - on a slope of up to 16 degrees inclusive;
- passenger cars and buses in running order - on a slope of up to 23 percent inclusive;
- trucks and road trains in equipped condition - on a slope of up to 31 percent inclusive.
— List of faults and conditions under which the operation of vehicles is prohibited
To check the parking brake at home, you can tighten it all the way, engage first gear and smoothly release the clutch. When the parking brake is working properly, the engine should stall until it comes to a complete stop. If the car is moving slowly, something is wrong.
How to tighten the handbrake yourself
If during inspection of the cable you notice damage to it (cracks, breaks, other noticeable defects), such a drive mechanism must be completely replaced. But most often, the insufficient effectiveness of braking with the parking brake is caused by a loose cable. Any experienced driver is well acquainted with the technology of how to tighten the handbrake cable, but for those who are faced with this task for the first time, objective difficulties should not arise.
Note that it is not difficult to check the adjustment results, but it is better that you have an assistant. If the CT lever is tightened by 5-6 clicks, this is normal. If there are more teeth, it is obvious that it is weakened. If you can only tighten the handle 2-4 clicks, this is over-tensioning of the cable, which is also fraught with big troubles. So, when carrying out this procedure, focus on the optimal number of ratchet teeth.
The essence of adjusting the cable tension, regardless of the design features of the ST, is to change the size of the gap between the brake discs and the pads. The adjustment itself is carried out by changing the length of the working part of the cable (shortening or lengthening it relative to the clamping point).
Here is a typical sequence of actions when performing this procedure independently:
- We provide free access to the bottom of the vehicle;
- tighten the handbrake 2-3 clicks;
- we find the locknut of the adjusting mechanism, loosen it using the hole in the brake system drum;
- We begin to tighten the adjusting screw, periodically checking the tension of the cable from the passenger compartment;
- if the screw travel is not enough to tension the cable as expected, it must be completely replaced (this operation is much more complicated, so the help of a specialist may be needed);
- if the handbrake lever is tightened with the required force, we have achieved our goal, but we still need to carry out an additional check, trying to turn the suspended wheel by hand. If this is possible only at the limit of effort, then everything is fine and you can tighten the locknut;
- after this, we completely release the parking brake lever and again check the rotation of the suspended wheel with the muscular strength of our hands - it should not slow down (if this is the case, we have “tightened” the handbrake, and we need to adjust the handbrake again - loosen it a little);
- we lower the car to the ground (if a lift or jack was used) and check the performance of the ST in real conditions - for example, on a steep hill or while braking while driving.
How to tighten the handbrake with your own hands? Instructions, signs of malfunction
As you know, a car uses several braking systems. In addition to a working and spare one, there is also a parking one. In common parlance it is called a “handbrake”. On trucks, this element is driven by air. But on ordinary passenger cars and minibuses this is an archaic cable element. The design is quite simple (since it does not require a compressor, receiver and other parts, as in a pneumatic system), but it requires periodic adjustment. In today's article we will look at how to tighten the handbrake on a VAZ and other cars with your own hands.
Main symptoms of a malfunction
How to tighten the handbrake on a Chevrolet or any other car? Determining the malfunction of this element is quite simple. You should drive your front part onto a slope. According to the rules, the parking brake should hold the car at an angle of 17 degrees.
So, we drive up the hill, put the handbrake on and turn off the engine. We do not set the car for transmission. If the car begins to roll down, this is the first sign of a weakened handbrake. You can check this element without practical exercises. So, it is enough to count the total number of clicks in the lever. There should be 5-6 of them. If there are fewer or more clicks, then the car needs parking brake adjustment. It is also possible to test the handbrake on a completely flat surface. So, you should tighten the lever all the way and engage the gear. Smoothly releasing the clutch, try to move away. If it is a working handbrake, you will feel that the car is chained to the ground. It is almost impossible to move it from its place. But if you calmly make a movement with the handbrake tightened, it means the cable has weakened. The way out of the situation is to tighten the parking brake.
Such diagnostics should be performed once a year or every 30 thousand kilometers. Timely checking of the brake system elements will help avoid many emergency situations.
Causes
The most common cause of these malfunctions is natural wear and tear of the parking brake element. The cable tends to stretch. Therefore, it is not surprising that from time to time motorists wonder how to tighten the handbrake on the Hyundai Accent and other cars. On foreign cars this unit lasts quite a long time. But on VAZs it can become unusable after 2-3 years. But it all depends on the intensity of use. Experienced motorists put the car “in gear” - this procedure does not harm the car and extends the service life of the parking cable.
Also, the reason may not be the cable itself. For example, a weakened handbrake may indicate worn out pads in the drum or disc mechanism. In this case, the linings are changed in pairs. For drum brakes, four pads are purchased (upper and lower on each side), and for disc brakes, two. If you tighten the handbrake without changing the pads, this can contribute to poor braking while driving.
The block has its critical wear. If the friction material wears away, the metal part of the lining begins to rub against the surface of the disc or drum. If the problem is ignored, significant scuffs and scratches occur. Only a groove can help save such a situation (and even then not always). Therefore, always check the condition of the pads and replace them according to the regulations.
Where is
Before you learn how to tighten the handbrake with your own hands, you need to find where it is located. And it is located under the bottom. It is worth noting that the car has several such cables - each goes to its own wheel (right and left).
Closer to the middle of the body they are combined into one single element. This is where the adjusting nut is located that we need to use. We will also need wheel stops and a set of open-end wrenches.
Let's get started
So, first, we set the car in gear (if it is a rear-wheel drive car, then in “neutral”). Before tightening the handbrake on the Kia, you need to jack up the rear of the car. It is best to carry out work in a pit or overpass. If this is not available, we carry out work on a flat asphalt surface. We install anti-roll bars under the front wheels. We climb under the bottom and find the branching point of the cable. The adjusting and locking nut will also be located here. The latter must first be unscrewed.
Using pliers, grab the front part of the parking cable. With the other hand, take a wrench of the appropriate size and rotate the adjusting nut. If during testing the lever makes more clicks than expected, then the element needs to be tightened. If less, then unscrew it. How many turns the nut will be tightened or unscrewed depends on the severity of the situation. Sometimes to get the desired effect you need to repeat this procedure twice or three times.
Completion of work
After adjustment, tighten the lock nut tightly (so that it does not unscrew and disappear while driving) and check the effectiveness of the parking brake. If necessary, repeat the procedure again. At this point, the question “how to tighten the handbrake with your own hands” can be considered closed.
It is worth noting that setting up a cable drive has a similar principle, regardless of the make of the car and even what type of brakes are installed (drums or discs).
Conclusion
So, we figured out how to tighten the handbrake with your own hands. Before testing, it is important to hang up each of the rear wheels of the car and try to spin it. The disk should rotate freely, without jamming. If everything is exactly like this, it means that the procedure for tightening the parking brake was successful.