Replacing jets for gas stoves for bottled gas
Jets for gas stoves
Modern gas stoves usually operate on mains (natural) gas and liquefied gas, i.e. balloon. Whatever gas your stove runs on, high-quality jets are required for its normal, full functioning.
The jet is a very important component of your gas appliance, without which it is impossible for gas to enter the burner, i.e. The operation of a gas stove, a Neva or imported gas water heater, as well as a gas boiler is also impossible.
Jets (nozzles) are made in the form of a small bolt, in the upper part of which there is a hole in the middle. It is through this hole that the gas enters the burner, mixes with air, and when this air-gas mixture is ignited, a flame is formed on which food will be cooked.
Jets for gas stoves differ in their purpose:
- for natural gas
- for bottled gas (liquefied)
How to tell if your stove's jet is working well
Jet for gas stove
In what cases does the device for supplying gas to the burner require replacement?
Imagine that in the summer you are leaving for the country, taking with you everything you need for a normal life away from the city, including a gas stove. But here’s the problem: the gas main does not go into your house and you have to use bottled gas.
Jets for different types of gas differ significantly from each other, so replacing them in this case is simply necessary. By the way, as for the hole located on the bolt, the diameters of these holes differ and their size depends on the type of gas (on bottled gas, the nozzles have a narrower hole, because the pressure of the gas coming from the cylinder is higher than that of natural fuel), and on the power of the burners themselves.
Each burner has its own jet attached, and even by the size of the burner you can already determine its power. The larger and more powerful the burner, the greater the amount of air-gas suspension it needs to operate, so the larger the burner, the wider the diameter of the nozzle hole.
Let me give you one example: if your gas stove runs on natural fuel, and this is, as a rule, NG G 20 gas (i.e. 20 mBar), then the smallest burner will require a jet with a hole of 0.75 mm, a medium burner - 0 .92 mm. and the largest is 1.15 mm. A powerful oven burner will operate smoothly and without problems if a jet with a hole diameter of 1.20 mm is attached to it.
When using liquefied gas, as I already said, nozzles with a narrower opening diameter are required. Most often, conscientious manufacturers of gas stoves sell their products with a set of jets for different types of fuel, but if this does not happen in your case, you will have to purchase this set yourself, especially since they are sold in many building materials stores.
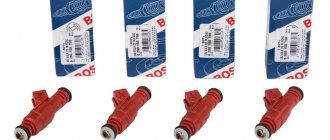
Jets for bottled and natural gas
How much do they cost and where to buy jets?
For those who would like to save on their own safety, I would like to give an approximate cost of jets for gas stoves of various brands. If your home has an Ariston or Indesit stove or heater running on liquefied gas, then the nozzle for such a stove will cost you 200 rubles (for one set or set).
For a Zanussi stove running on natural gas, such a set will cost 230 rubles. A set of jets for Belarusian Hephaestus costs 150 rubles, but for a set for a Gorenje , you will have to pay about 700 rubles.
You can often find jets (nozzles) on sale in specialized stores that sell gas equipment, gas hoses and spare parts for gas stoves. If they are not in stock, you can order them directly from the manufacturer. Do not forget that the same devices are not suitable for domestic Russian-made stoves and imported products, and be sure to take this into account when purchasing them.
Replacing jets yourself
So, you have made your choice, all that remains is the process of replacing the jets (injectors). Here, of course, I would advise you to seek help from a specialist, but knowing that our people prefer their own hands to any master, I will say that this matter is not at all difficult. You just need to strictly follow the safety requirements necessary when working with gas appliances.
Read also: Kos operator of CNC machines
Therefore, we begin replacing the jets by shutting off the gas pipe. Then we remove the burners, the stove table cover, and begin to unscrew the old ones using a hex key, and immediately screw in the new ones in their place. As you can see, nothing complicated. If you decide to change devices in the oven, then first remove the burners - upper and lower and continue working according to the same scenario as when replacing jets in a gas stove. Let's watch the video.
Today, not all villages and holiday villages are gasified, which forces residents to use bottled gas for domestic needs. We have already written how to heat a house with liquefied gas in cylinders, and in this article we will tell you how to convert a gas stove to use bottled gas.
Replacing carburetor jets
The jets do not always become clogged due to foreign particles entering the cavity. More often this happens due to the accumulation of resins and various impurities. In view of this, many experts recommend periodic cleaning (no more than after 30 thousand kilometers), and if this does not help, then replacing the jets.
The second reason for installing other elements is tuning the power unit. In this case, the change in parameters occurs by adjusting the composition and quality of the air-fuel mixture. If you install a fuel jet of a larger cross-section, the mixture will be richer, and installing a larger air analogue will lead to its leanness.
Changing the parameters of the gas turbine engine affects all modes of engine operation: from minimum load (idling) to full opening of the throttle valve. This will increase the car's consumption regardless of driving style. The air jet changes the VTS composition curve. In this case, the power of the unit, and with it the gasoline consumption, will increase/decrease depending on the opening angle of the throttle valve.
However, for proper tuning it is necessary to accurately select the performance of the jets. This is the only way to achieve smooth and stable engine operation even under light loads.
You can replace the jets yourself. To do this, perform the following steps:
- The air filter housing is removed;
- All hoses are dismantled, as well as the choke cable and air damper drive;
- Remove the carburetor cover;
- The air jets are unscrewed (they are put on the emulsion tubes);
- At the bottom of the emulsion wells there are fuel jets; they are unscrewed with a screwdriver. You can remove them using an ampoule from the handle - it is soft and will not damage the mirror of the inner surface of the nozzle;
- If you decide to completely remove the carburetor to wash it, the intake manifold hole must be closed to prevent debris from getting into it.
When replacing jets, it is worthwhile to simultaneously carry out a visual inspection of the seals, since their deformation and tears also affect the operation of the device. After replacing the jets and servicing the carburetor, all elements are installed in the reverse order.
How to convert a gas stove to bottled gas
In general, setting up a gas stove for bottled gas is not difficult; to properly adapt the stove you just need to change the gas supply nozzles to the burners. This can be easily done with your own hands without hiring specialists.
Gas is supplied to the burner using a special hole in the nozzle, which is an integral part of any gas stove. The hole can be of different diameters, depending on the pressure in the gas supply system. Of course, the pressure in the central gas lines is noticeably higher than in a conventional gas cylinder, and accordingly the diameter of the hole in the nozzle should be smaller.
Often, complete with a gas stove, the manufacturer also includes a set of jets designed for different types of gas mixtures - natural gas, propane-butane, etc. But if they weren’t there or the stove was bought a long time ago, it’s okay, you can buy the necessary jets in the store.
Choosing a jet for bottled gas
Jets (other names: nozzles, injectors, nozzles, etc.) for gas stoves are not in short supply; they can be bought at specialized retail outlets - markets, shops. In appearance, the nozzle is similar to a regular bolt with a thread applied, but unlike the latter, it has a hole in the center through which the gas actually passes. As we said earlier, the hole can be of different diameters, and usually its value is stamped on the end of the product.
Before buying a jet, you should determine what diameter is needed. This is an important point, since incorrectly selected jets will not allow the stove to work normally, or even make it impossible.
It is not difficult to understand that the stove is working correctly after replacing the jets:
the flame should burn without hissing, without yellow impurities and red tongues;
When lighting the burner, no popping noises are allowed, and the flame should not suddenly go out.
The required diameter of the nozzle hole is indicated in the instructions for the gas stove; if the instructions are lost, then information about your stove and its manual can be easily found on the Internet.
We categorically do not recommend changing the diameter of the nozzle hole yourself by caulking or drilling - new nozzles are not expensive, and “reworking” at home can have a detrimental effect on the operation of the stove.
What tools are needed?
To configure a gas stove for bottled gas and then connect it to a gas container, you will need the following tools:
first of all, new jets;
7 mm wrenches, wrenches or open-end wrenches;
a new flexible hose, 1.5 meters or more in length. Serves to connect the stove to a gas cylinder;
seal and gas reducer with outlet pressure 30 mBar.
How to properly clean carburetor jets from plaque and dirt
The most common problem with all jets is loss of throughput. Since their holes and cross-section must ideally match the factory settings, even minor clogging can lead to unstable carburetor operation.
Here are common problems with unstable motor operation associated with jets:
- A slight dip for one to two seconds (the gas pedal is pressed smoothly, for example, while the car is starting to move). During acceleration and also at idle, the problem disappears. Often this effect occurs when the outlet holes in the transition system of the 1st chamber are clogged. This may also indicate a malfunction of the accelerator pump.
- When you smoothly press the gas pedal, a noticeable dip or twitching is observed (sometimes the engine may stall). If this happens at low and medium speeds, and the effect is eliminated by pressing the accelerator harder, then you should pay attention to the fuel nozzle of the MDS (main metering system). It may be clogged or not fully sealed. The problem may also be a clogged emulsion well or HDS tube in the first chamber. If this effect appeared after a recent “upgrade” of the carburetor, a fuel jet with a smaller cross-section than required by the engine may have been installed.
- At idle there are dips (as if the speed is “swaying”) and unstable engine operation. This problem may be a clogged fuel jet IAC (idle air system) or the channels of this system.
- When the engine experiences high loads (vehicle speed above 120 km/h), its power and throttle response are lost or a series of failures (“swaying”) is observed. A possible reason is clogging of the channels, jets and emulsion well with the HDS tube in the second chamber.
It is worth considering that the problems listed are not always associated with clogged jets. Often one of these effects is caused by the intake of foreign air due to poor sealing of the carburetor and additional elements (for example, the gasket ring of the EM valve of the XX system is torn or deformed), a malfunction of the throttle valve, a malfunction of the fuel system, etc.
Also, before you “sin” with the carburetor, you need to be sure that the ignition and fuel supply systems are working properly. Sometimes similar behavior can be observed when there is a problem with the motor itself.
If diagnostics have shown that the cause of unstable operation of the internal combustion engine is clogged jets, then they should be cleaned. It is important to remember that the procedure cannot be performed using rough and sharp objects (brush or wire). This is explained by the fact that jets are mostly made of non-ferrous metals, so inaccurate mechanical action can scratch the “mirror” of the part or slightly increase the diameter of the holes.
Jets can become clogged or deteriorate for the following reasons:
- low quality gasoline;
- untimely maintenance of the fuel system and carburetor;
- specialists carrying out maintenance, repair or adjustment of the carburetor do not have sufficient knowledge of the intricacies of the operation of this device.
There are two methods for cleaning carburetor jets: superficial and thorough cleaning.
Surface cleaning of jets
This method is used for periodic maintenance of carburetors. In this case, a special aerosol is used to clean carburetors. The procedure is quite simple:
- the “pan” or housing with the air filter is removed (you should be careful with the studs that are screwed into the carburetor - the threads in it are very delicate and can easily break off);
- the air and fuel jets are unscrewed;
- the idle speed solenoid valve is removed;
- the aerosol is sprayed into all carburetor openings through which air or gasoline passes;
- the jets are blown;
- you should wait about 5 minutes, then install the jets back and start the engine;
- since the EM valve is disconnected, it is necessary to pull out the choke lever;
- cleaning occurs not only at idle, you need to work the gas pedal a little so that the engine operates in different modes and all carburetor jets are used;
- Some, when performing the procedure with the engine running and the gas pedal pressed (so that the engine runs at higher than average speeds), additionally spray the product into the chambers.
After the carburetor has been superficially cleaned, all disconnected elements are reinstalled. As for the solenoid valve, it is installed while the engine is running. First, it is tightened by hand, and then using a key until the engine is about to stall. You need to catch that line while the motor remains stable, but the valve is tightened to the maximum level. At the end, the choke handle is removed.
Thorough cleaning of jets
While superficial cleaning should be done periodically, a thorough cleaning procedure is carried out in cases where the above mentioned steps have not yielded the desired result.
In some cases, a solid particle entering the float chamber moves under the fuel nozzle and partially or completely blocks the hole. In practice it looks like this. At speed (often after driving over potholes), the engine sharply loses speed and stalls altogether.
This problem can be solved on site by partially cleaning the carburetor - unscrewing the fuel nozzle and blowing it out. But there is a high probability that there was more than one grain of sand, so the carburetor should be thoroughly cleaned.
In this case, the cover of the device is removed and all cables and hoses are disconnected. To clear clogged carburetor jets and channels, use compressed air and special cleaning agents.
We change the jets and connect the stove to the cylinder
Before starting work, the stove should be disconnected from the gas (if it is connected). Next, remove the burners; some stove models require removal of the top cover. After that, use a hex wrench to unscrew the old jet, and taking into account the size of the burner, immediately screw in a new one, and so on with all the burners.
The jets in the oven are changed in the same way as the burners - we remove the surfaces covering the burners, remove the burners and change the jets. For a more competent change, it is better to use the instructions for your stove.
Connecting the plate to the cylinder
For this operation, you need to screw a fitting onto the gas stove pipe, and put a previously stored flexible gas hose on it and secure it with a worm-type clamp.
We attach the second end of the hose to the reducer and also tighten it with a clamp, and connect the reducer directly to the liquefied gas cylinder using paronite gaskets. Fastening is carried out using an open-end wrench; we place the gearbox in a horizontal position - this is important!
Read also: Determine steel grade by chemical composition
If everything is done correctly, there should be no gas leaks, but it is better to check this personally. To do this, use the simplest method - applying a soap solution to the joints. If there is a leak, it can be easily seen by the inflating soap bubbles. In this case, it is necessary to change the gaskets, tighten the clamps, and if there is damage to the hose, replace it.
Safety precautions when using a stove with bottled gas
Gas equipment is always a source of potential danger. In this regard, a number of simple but important rules should be followed:
the gas stove must be installed in a well-ventilated area;
a liquefied gas cylinder is installed outdoors, in a special metal box;
If you smell a smell in the room, you should immediately ventilate it and turn off all electrical appliances;
All connections, hose and gearbox must be accessible for inspection.
A small part of any gas stove, without which it cannot work properly, is the nozzle. They have to be changed very rarely and only when the incoming blue fuel is changed to a liquefied version from cylinders instead of stationary gas. You can replace the nozzles in a gas stove with your own hands, only to do this you need to know all the nuances of dismantling and visually distinguish the nozzle from other parts.
Types of nozzles
All modern gas stoves can operate on natural or main gas, as well as from a replaceable cylinder containing liquefied gas. When propane is used, it is necessary to change not only the jets on the stove, but also the gearbox.
The jets are made in the form of a small bolt with a thread and a hole in the head - through it gas is supplied to the stove burner. Next, in the burner it is mixed with air, this mixture is ignited, an open flame is formed, on which food is cooked. You can find out more about how a gas stove works and works here.
Nozzles are available in two types: for natural gas, the hole is slightly larger in diameter, and the part itself is shorter and visually different; For liquefied gas, bolts with longer threads are made.
If you need to replace one such part on a gas stove when it is not working quite correctly, then experts advise replacing the entire set at once - you don’t know when the next one will fail you.
This is what the jets look like - a complete set for the Hephaestus gas stove:
What are jets?
Preparing the mixture
In the burner, a mixture of gas and air is prepared so that the gas burns with maximum heat output, does not produce soot and does not emit carcinogenic waste during combustion. Each burner is designed for a specific operating mode; the large one consumes more gas than the small one. In order for the mixture
It turned out to be correct, each burner has a jet of the size calculated by the designers. The larger the diameter of the hole, the more gas will pass through it. The incoming pressure of natural gas is lower than that of bottled gas. Therefore, manufacturers have designed two sets of nozzles for each stove. One for the main gas pipeline, the other for bottled gas.
Marking
A nozzle, also known as a nozzle, looks like a bronze bolt with a thread and a through hole in the center, which controls the amount of gas released. Trying to make a hole of the required diameter yourself is a bad idea. Holes made with precision
up to a hundredth of a millimeter. This guarantees the required throughput. The end of the bolt is marked with a number that indicates its size. Each burner (small, medium, large, oven) has its own number, determined by the manufacturer. In most cases, the threads and sizes of nozzles are similar for products from different companies.
Some manufacturers supply a second set of nozzles with the stove. If you have lost it or were not included in the kit, do not despair. On the Internet, when you request a brand, you can find a technical
passport of your stove. It contains all the necessary data for injectors for the main gas pipeline and bottled liquefied gas. For example, for Hephaestus brand slabs, nozzles with the following markings are required:
- 45 - small.
- 75 - average.
- 85, 95 - large or oven.
Jets are sold in gas supply stores. It’s very easy to select and buy the right size or set.
Where to buy the kit
Of course, every user is interested in the question: where can one purchase such a set, and how much does this pleasure cost? It all depends on the brand of your meal prep aid. Jets for popular brands of gas stoves can be purchased at any specialty store that sells spare parts for gas equipment. For rare ones, you can order them on the manufacturer’s official website or at a service center.
Approximate prices for injectors:
- Belarusian plate Hephaestus - 150 rubles;
- Ariston or Indesit (liquefied gas) - 200 rubles;
- Zanussi - 230 rubles;
- for a stove from Gorenje from Slovenia - 700 rubles.
All prices are for a set of injectors or jets. Very often, users are confused about the names of the parts of a gas stove: burners with flame dividers are installed in the upper part of the stove, they look as shown in the photo - they should not be confused with burners.
Changing injectors
Working with gas appliances always involves extreme caution - all steps should be carried out strictly according to the instructions. This is especially true when it comes to the use of physical force: one excessive force, and replacing a nozzle turns into a major overhaul for your gas stove.
Replacing jets is a fairly simple operation, but if you have absolutely no skills in working with such equipment, it is better to invite a service specialist.
The basis for successful DIY gas stove repair is strict compliance with all safety requirements. First, let's prepare a simple set of tools. You will need a Phillips screwdriver and a set of open-end and ring (star-type) wrenches:
- for jets - 8 mm (for liquefied gas - 7 mm);
- burner nuts - 14 mm;
- The tip of the oven pipeline is 17 mm.
We shut off the gas supply to the stove and prepare a table for storing various parts that have been removed for the time being. All photographs were taken during the dismantling of the Brest 300 slab; for other products, the replacement of such parts will not differ much.
Stove burners
- The cooking panel has standard devices, as shown in the photo. To get to them, you need to remove the grille.
- Now carefully remove the dividers and remove the burners from their sockets.
- To get to the jets, we need to remove the burner table cover, which is secured with screws.
- Different models have specific fastenings; we only had to unscrew two screws, and after that the cover can be lifted easily.
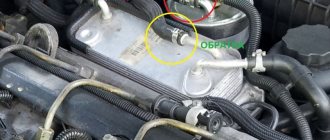
- Our gaze revealed two strips of metal - traverses, on each of which the burner bodies are reinforced, which have the same design, and the difference is only in the length of the aluminum pipeline. At the end of this tube there is a nozzle into which blue fuel is supplied, and then through a hole at the end of the nozzle it exits into the burner leg, mixes with air and is supplied to the divider. If the divider holes are clogged, then the flame does not escape from all points - cleaning or blowing of the holes is required.
- The burner body is rigidly fixed to the traverse and holds the entire structure vertically. Here we should make a small digression and talk separately about special devices - there is a myth among users about a unique set of tubular wrenches, with the help of which it is easy to replace jets on any model of gas stove. Anyone, even someone who does not have a technical education, immediately sees that such a key will not fit into the nozzle due to the special structure of the entire structure.
The first photo clearly shows how the nozzle is secured to the pipeline in our case, and next to it are other designs of gas burners from more modern types of stoves, where the nozzles are screwed into the body from above; there is no need to disassemble the table. Such options are much more expensive, but are easy to replace jets.
- To release the tip, you need to find a special lock - this is a plate with a slot and a hole in the middle, it looks like a clothespin. We squeeze one side of the clamp carefully, without using force, pull it out of the socket - the tip with the nozzle is free, press the tube and it comes out down from the fastening ring.
- Now you can start replacing. There are two options: pull off the tips from all pipelines and unscrew the jets on the table, or try to remove the jet on the spot. The first is preferable, because the nozzles stick to the tip body so much that it can be very difficult to unscrew them - to do this, it is sometimes carefully clamped in a bench vice. If you are afraid of confusion, then all tips have markings.
- When you pull off the tip, an O-ring remains inside, so when assembling it you need to take it out and put it on the tube. The nozzle thread is not sealed - there is no technical need for this. The rings are also not lubricated by anything, because the internal pressure of the main gas pipeline is much lower than in water pipes.
Read also: Report on the carpenter profession
At this point, the replacement of nozzles on the table is completed, assembly is carried out in the reverse order, but first you need to change the jets in the oven.
Oven nozzle
- We open the lower technical drawer of the stove, and completely open the oven door to the lowest position.
- The nozzle is located behind the left wall of the oven in a special housing into which an arc-shaped burner is inserted. To get to it, you need to pull out the floor, there is a slot for this, pull it towards you, it should come out without resistance. We put it aside.
- We unscrew the two screws securing the burner and remove it from the oven. A hole opens on the left through which gas enters the burner. There is an injector hidden there that needs to be replaced.
- Considering that during long-term operation the nozzle could become strongly stuck to the nozzle body, you should not try to rip it off - if the thread breaks, you will have to buy a new body.
- We unscrew the three screws securing the left side wall of the stove, and move it to the side.
- There is a nut at the end of the pipeline - it must be unscrewed using a 17 mm wrench to remove the nozzle body. It unscrews without any problems.
- To unscrew the two screws securing the housing to the wall of the oven, you need to move the pipeline a little, after that we take out the nozzle.
- We carry out the replacement in a calm atmosphere at the table - the jet got very stuck, so we had to lubricate it with a special product and wait a few minutes.
Assembly is done exactly the opposite, with all precautions.
That's all the nuances of replacing nozzles in a gas stove. You just need to remember that you only need to install your own jet, and strictly according to the markings - for each stove model there are special sets of these small but very important devices on sale.
Connection and setup
Connection to the cylinder
To connect and configure the stove we will need the following materials and tools
:
Install the metal box outdoors
. It would be better if there was a lock on it. Screw the reducer to the cylinder, positioning it horizontally (this is important). Screw the fitting to the plate. In both cases, you can use a special sealing tape. It is sold in stores. Run the hose through a pre-made hole in the wall from the box into the house. Place one end on the gearbox, the other on the fitting and secure with worm-drive clamps.
Replacing jets
Remove the burners and install new nozzles for each of them. In order not to make a mistake when replacing nozzles, make a sketch of the plate. Write down the nozzle markings for each burner and refer to it during operation. On some stoves, you need to remove the top panel to get to the jets. They are usually attached
on screws for a Phillips or straight screwdriver. Using a socket or open-end wrench, carefully unscrew the injector and install the prepared replacement. Proceed in the same way with the remaining nozzles. In the oven, you need to remove the bottom panel to gain access to the jets.
Please note: bronze is a soft material. Too much force on the wrench can strip the threads. Having finished the work, screw the removed panels into place, install the burners, each in its place.
We changed the nozzles for the gas stove. Do the test. Open the valve on the cylinder. To comply with safety regulations, use a soap solution to check the quality of connections on the gearbox and fitting. Apply with a brush
soap solution at the junction of the rubber hose and the gearbox. If bubbles appear, tighten the clamps and check again. Do the same procedure with the joint of the fitting. Do not neglect safety when working with gas appliances. The consequences can be severe. Light the gas on the burners one by one. If the flame is blue, without yellow or red tints, then the job is done well.
There are 2 types of gas - natural
(main) and
liquefied
(balloon or propane), gas equipment can operate on both, be it a boiler or a stove. In this article we will talk about converting a gas stove to liquefied gas, namely replacing the nozzles (they are also called nozzles or jets).
Initially, all stoves are equipped with nozzles for working on natural gas, as a result, when the stove is connected to a cylinder, the burners begin to smoke and the flame turns red.
This happens due to the fact that the gas pressure in the cylinder is higher than in the gas pipeline, and the hole in the nozzle for natural gas is larger than in the nozzle for liquefied gas, so the gas does not come out of the nozzle evenly and the burner begins to “smoke”. In order to avoid incorrect operation of the stove, you need to replace the nozzles in the burners (1 piece in each burner) and in the oven (1 piece), for this you will need to buy a set of nozzles suitable specifically for your stove.
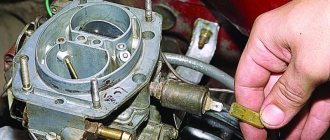
It is very important to pay attention to the diameter and pitch of the thread on the nozzle so that it fits exactly and performs its function to the fullest. As a rule, a set of nozzles includes 5 pieces if the stove has 4 burners and 3 pieces if the stove has 2 burners. It is better to entrust the replacement of injectors to a gas service specialist, but if you still dare to change the injectors yourself, then you will need a socket wrench, a screwdriver and possibly pliers. As a rule, to find where this nozzle is, you need to remove the cover from the stove burner (round, black cover), under the cover you will see a burner divider, inside of which the nozzle should be visible (see photo).
We unscrew the nozzle counterclockwise and screw a new one in its place. Everything is clear here, with the nozzle in the oven it’s a little more difficult, to get to it, as a rule, you need to remove the side cover of the stove and assess the location of the nozzle, otherwise the replacement process is the same, unscrew the old one, screw in the new one. When replacing injectors, fume tape and other seals are not needed, moreover, they are not advisable, because The thread is extremely small, it is possible that the nozzle will not follow the thread and the connection will not be tight. After the nozzles are changed, the stove will stop “smoking” and dirtying your dishes!
Gas stoves, which can be found in home appliance stores, can be divided into 2 types, differing in the type of gas used to operate them. Thus, a distinction is made between stoves running on natural gas and stoves running on liquefied gas.
Gas stoves using natural gas.
Natural gas consists of 98% methane, and the remaining 2% consists of impurities of nitrogen, carbon dioxide, sulfur, etc. Natural gas is almost twice lighter than air, odorless, and has a flash point of 640 degrees Celsius.
Thanks to its vast reserves, natural gas has found wide application in our country. Due to the lack of odor, the gas is not used in its pure form; for safety reasons, a special strong-smelling substance, emillercaptan, is added to it, the smell of which we smell when we turn on the gas burner of the stove.
Gas stoves using liquefied gas.
Liquefied gas in our country is used in areas where natural gas supply lines are not installed. It is a mixture of 15-35% propane and 65-85% butane. Each of the components of this mixture is significantly heavier than air and, with increasing pressure, takes on a liquid form.
Thanks to liquefaction, gas occupies 250 times less volume than at normal atmospheric pressure. Thanks to this, it becomes possible to pack it in special cylinders or fill it with special containers for use in household gas stoves.
Gas stoves from Russian manufacturers supplied to areas where there are no natural gas supply lines are configured for liquefied gas. Since the pressure of liquefied gas is much higher than natural gas, nozzles of smaller diameter are installed in the stoves. If such stoves are used on natural gas, then the nozzles need to be changed.
But gas stoves of all foreign brands (even those produced in our country) are initially equipped with nozzles for natural gas, with which the use of liquefied gas is strictly prohibited. The kit supplied with such stoves must include additional nozzles for liquefied gas, which will need to be installed.
Be sure to check the complete set of the stove when purchasing! For example, Gorenie stoves often go on sale without additional nozzles for liquefied gas, and finding them yourself can be very difficult and expensive.