Before you start working on the car and selecting parts, you need to clearly understand what is used in the car and why. What happens in an internal combustion system when we turn the key, how electrical energy is converted into mechanical energy. The ignition coil is the part of the car from which the operation of the engine as a whole begins.
The function of the ignition coil is to turn low voltage into high voltage. The whole process occurs as follows: a spark is formed in the spark plug. Then, its temperature ignites the fuel-air mixture in the combustion chamber. The energy generated during combustion is what drives the engine pistons.
Verification procedure
If you detect one or more signs of “dying” of the coil or if it is impossible to start the engine, you should definitely check its performance. This is necessary in order to find out what nature of the breakdown occurred, and, therefore, begin to eliminate it.
Can this be done without instruments? Unfortunately no. Unless you immediately replace the coil with a known good one. At the very least, a regular multimeter will suffice. Such a tester must be kept in the car - its cost is almost symbolic.
In general, verification is relatively easy. It is enough to follow the steps described below, and even a completely inexperienced car enthusiast can handle it.
First of all, you need to inspect the ignition unit itself. If the engine does not start at all, then you need to find out if there is a spark. You need to do this:
- disconnect the main wire from the distributor (located in the center);
- connect a candle to it;
- holding it with pliers, apply it to the motor housing or to the breaker;
- turn on the ignition.
If there is no spark, there is only one conclusion - failure in the coil. Next, you need to find out whether electricity is supplied to it.
The check is carried out with a multimeter. One of its probes is applied to terminal “B” on the coil, the second to ground. If there is no voltage after turning on the ignition, the fault is looked for directly in the lock.
In addition, it is also possible to power the coil using an emergency circuit. Here the wire from the positive terminal of the battery is connected to contact “B”. In this situation, you can be absolutely sure that voltage is supplied. However, when these actions did not lead to a spark, you will have to test the primary winding for integrity.
For this:
- the wiring located on its sides is disconnected (they are low-voltage);
- the multimeter is set to Ohms and the resistance is measured;
- The secondary winding is also ringed in the same way.
The simplest way to check for proper ignition of carburetor VAZ-2109
If there is no spark in the car, you can find the reasons in another way. This technique does not require the use of a special device or tool. In this method, the entire ignition chain is tested, without taking into account the Hall sensor. To carry out this work, we need a small wire with insulated ends and a nail or paper clip.
First of all, we disconnect the high-voltage cable from the distributor. During checking, it must be positioned approximately 10 millimeters from the minus of the car. Next, turn on the ignition. Disconnect the connector from the Hall sensor and connect its end to the middle contact, to which the green wire is connected. We short the other end of our wire several times to ground. At the moment of short circuit, sparks should run between the ground and the end of the wire. If there is a spark in a carburetor VAZ-2109, we can conclude that the Hall sensor is faulty or there is no contact. Often, inside the distributor itself, the plate frays the wires or the connector simply becomes loose. In addition, there are cases when, when checking, we see the presence of a spark, but when connecting the wire to the spark plug caps, there is no spark. This indicates the need to replace the slider inside the distributor. Some carburetor-type VAZ-2109 are equipped with an ignition interlock circuit, which may also become unusable (or there is a malfunction in the switch).
Before performing the test, you need to prepare the following set of tools:
- figured and flat screwdrivers;
- insulated pliers;
- control with a wire or tester;
- spare spark plug.
To protect yourself from electric shock, you should wear dielectric gloves.
Verification process:
- We turn off the ignition, after which we check the high-voltage wires for breaks, and at the same time check for good contact in the connections with the distributor and the ignition coil.
- We carefully inspect the condition of the wires between the distributor and the switch, and also check the wires from the ignition coil to the switch.
- With the ignition switch on on a carburetor VAZ-2109, you need to check the presence of power in the system. To do this, take a test lamp, connect one end to ground, and the other to the “B+” contact of the coil. The glow of the control lamp indicates the presence of power.
- Using a rubber glove, disconnect the middle high-voltage wire from the distributor. We put a spark plug into its tip and touch the engine ground with the metal part. When cranking the starter, sparks should flow from the spark plug.
- Unscrew the screws of the distributor and remove its cover. We check for cracks and damage, and also check the condition of the coal. If the cover is damaged or cracked, it must be replaced.
- We inspect the condition of the slider in the distributor. Quite often it happens when there is no spark due to a breakdown of the interference suppression relay or breakdowns in the housing of the ground slider.
- We check the crankshaft by rotating the starter. If the slider is stationary, the reason for this is a broken timing belt or the drive itself is faulty.
- We check again for the presence of a spark.
- If once again there is no spark in a VAZ-2109 carburetor type car, you should check the high-voltage ignition wiring, as well as the spark plugs themselves. To do this, you must use a known good spark plug. If there is still no spark, change the high-voltage wire.
Coil resistance measurement
It is important to note that this procedure cannot be performed without an ohmmeter or tester. The procedure is as follows:
- the car is de-energized (by disconnecting the negative cable from the battery);
- completely remove all wires from the coil;
- measurements are taken on the primary winding (the probes are applied to two low-voltage terminals, installed as we remember - along the edges);
- to avoid distortion of readings, it is necessary to thoroughly clean the outputs from dirt and oxides;
- It is better to write down the results.
And finally, all that remains is to find out what the ground resistance is. To do this, one wire of the multimeter is applied to it, and with the second you need to touch three contacts in turn:
- two low-voltage;
- one high-voltage one (it is in the center of the coil).
If nothing happened to it, then in all three cases the tested resistance level will be within 50 Ohms.
Depending on the type of coil, the normal readings in Ohms will be as follows:
- at primary – 0.43 +/- 0.04;
- on the secondary – 4.08 +/- 0.40.
8352.12 respectively:
- 0,42 +/- 0,05;
- 5,00 +/- 1,00.
If nothing happened to the distributor, you will need to inspect the switch module - this can be done using a light bulb.
A working VAZ 2109 ignition coil ensures uninterrupted operation of the vehicle. In case of minor disturbances in its functioning, the driver notices jerks when starting to move. As the technical malfunction develops, the car starts up worse, and over time it cannot move at all without outside help. You can avoid unpleasant breakdowns by monitoring the technical condition of the VAZ 2109.
labavto.com
One of the reasons for problems with a spark in the internal combustion engine on a VAZ 2109 is a malfunction of the ignition coil (IC). To accurately diagnose a malfunction, you need to know the design of the unit, be able to check it and, if necessary, install a new product.
Coil design features
This unit is designed to convert low on-board voltage (12 V) into high voltage (15-30 thousand V), which is supplied to the spark plugs to ignite the fuel assemblies in the engine cylinders. The impulse is transmitted through high voltage wires.
Both engines with injector and carburetor engines have an ignition system with a distributor (distributor). The scheme of work is not complicated. The distributor receives low-voltage current, which is then transmitted to the short circuit. The received pulse is converted into high-voltage current. Then the distributor distributes it in a certain order to the candles.
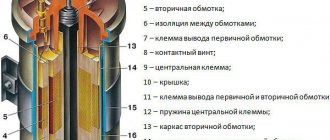
The main elements of the coil are the primary and secondary windings, wound on an external magnetic circuit. The first one has a small number of turns of copper wire - from 100 to 150, but it has a large cross-section. The second has a much larger number of turns - from 15,000 to 30,000, the wires are also made of copper, but with a smaller cross-section. There is a primary winding on top, and a secondary winding inside it.
In the secondary winding, a high-voltage current arises due to the action of electromagnetic induction and the accumulation of charge in the primary winding, which arise after cutting off the current in the primary. The high-voltage current is supplied to the central terminal of the short circuit, and then the distributor distributes it to the spark plugs.
Signs and causes of malfunctions
Most often, the spark disappears unexpectedly, but attentive drivers with experience can predict the disappearance of the spark by the following signs:
- 500 km before the end of the short circuit service life, the car can sometimes be difficult to start, only after a few minutes of warming up. Some drivers associate this with idling.
- When starting a cold engine and pressing the accelerator pedal, the engine begins to actively rev. This lasts a few seconds and after further pressing the accelerator, the engine runs normally.
- Dips or jerks at start.
- Unstable idling, unstable engine operation at low speeds.
- When you press the accelerator hard, instead of increasing speed, dips appear.
- Weak spark or its complete disappearance.
It will be useful: Which crankcase protection for the skoda octavia a7 is better: tips, pros and cons
Typical short circuit faults:
- there are oil stains on the cover;
- short circuit between the turns of any of the windings;
- breakdown of insulation of the secondary winding to the housing (ground) short circuit;
- break in the electrical circuit of the windings;
- mechanical damage or defects on the body or cover of the short circuit;
- The readings on the measuring tester do not meet the requirements.
Short circuit malfunction can be caused by the following reasons:
- Inexpensive low quality spark plugs. Saving on candles results in expensive repairs.
- Overheating is a common cause of short circuit failure. If the engine constantly overheats, the short circuit will not last long. The product has an acceptable number of heating and cooling cycles.
- Over time, the short circuit wears out, like any product. The service life of the coil is 50-70 thousand km.
How to check a short circuit in a garage
If signs of a problem with the VAZ 2109 short circuit are detected, it should be checked for functionality. During the test, you can determine what caused the problem and how to fix it. First we do a visual inspection of the unit. If there is damage to the cover or body, replace it with a new one.
If the engine does not start, you need to make sure that the short circuit does not produce a spark. To do this, remove the central wire from the distributor and connect the spare spark plug. Then we clamp it with pliers and place the body on the power unit or distributor. If there is no spark after the starter turns, this means there is a problem with the ignition system.
First of all, you need to check the presence of power at the short circuit. We connect one crocodile of the multimeter to terminal B on the short circuit, and throw the second one to ground.
If there is voltage and no spark, check the integrity of the wiring of the primary winding. We disconnect the low voltage wires from the short circuit and use a multimeter or tester to measure the resistance of the windings.
To carry out the test, you need to prepare an open-end wrench set to “8” and a measuring device: a tester or a multimeter. In addition, you should turn off the power to the car by removing the negative terminal from the battery.
Checking the short circuit consists of the following stages:
- On a de-energized machine, use a 8-mm wrench to unscrew the nuts securing the high-voltage wires to the short-circuit contacts and disconnect them. Before doing this, remember how they were connected so as not to make mistakes during installation. We clean the contacts on the coil from any remaining oxidation and dirt.
- At the next stage, we check the primary winding of the short circuit. Switch the multimeter to resistance measurement mode. We connect one of its crocodile to output K on the primary, the second to B. Two types of coils are installed on the VAZ 2109: 3122.3705 - dry, which has a closed magnetic circuit and 8352.12 and analogs filled with oil with a magnetic circuit that is open. Their control resistances are slightly different. With a working primary for 3122.3705 it is within 0.43 Ohm +/- 0.04 Ohm, for 8352.12. – 0.42 Ohm +/- 0.05 Ohm.
- Next, we check the secondary element of the node. We connect one crocodile to the connector for the high-voltage cable, the second to output B. If the secondary winding is in working condition, the resistance for 3122.3705 will be within 4.08 Ohm +/- 0.40 Ohm, for 8352.12 - 5.00 Ohm +/- 1.00 Ohm.
- At the final stage, we check the insulation, that is, we look for a short circuit. We throw one terminal of the multimeter to ground, which can be used as a short-circuit housing, and connect the second terminal alternately first to contact B and then to contact K. When working properly, the tester should show a value of at least 50 mOhm. If the parameter is very different, then there is a short circuit.
If a malfunction is detected at any stage, the unit needs to be replaced with a new product. Short circuits can be installed on the VAZ 2109. If the coil is working properly, you need to check the distributor, spark plugs and high voltage cables.
Faulty short circuits cannot be repaired; they can only be replaced with new ones. On the VAZ 2109, MZATE-2 is installed from the factory. There is a Bosch analogue on the market that is more expensive than the original, they work more efficiently, are more reliable and durable. There are mid-range analogues in the price segment - products from Valeo with good performance characteristics.
Do-it-yourself replacement of a unit: step-by-step instructions
The procedure for replacing a short circuit on a VAZ 2109 is simple; you can do it yourself in your own garage. It takes no more than half an hour. To carry out the work, you need to buy a new short circuit, prepare a standard set of tools and WD-40 for stuck fasteners.
The replacement process consists of a sequence of steps:
- We remove the negative terminal from the battery to turn off the power supply to the car.
- We disconnect the cable connected to the central part of the distributor from the short circuit.
- On top of the coil, unscrew the 2 nuts that secure the wires. If they are covered with traces of oxidation, treat them with WD-40 and let them sit for a while.
- The removed wires must be marked in order to be correctly connected during further installation and the layout diagram must be drawn on a piece of paper.
- The short circuit is secured to the car body with two nuts. They may not be completely unscrewed, especially since it is difficult to get to them from the battery side.
- Having loosened the fastenings, loosen the assembly and remove it from its seat.
- We clean the socket from dirt and rust and install a new coil.
- Tighten the fastening nuts. We connect the wires according to the marks and diagram.
Self-replacement allows you to save on maintenance and gain additional experience in auto repair work.
The ignition coil is one of the most important elements of the ignition system, so you need to monitor its serviceability so as not to get into an unpleasant situation on the road when the car does not start due to the disappearance of the spark due to a faulty short circuit. It is easy to diagnose the node yourself at home, following the instructions above.
VAZ ignition coil and its possible malfunctions.
Equipment control
Even a serviceable car, operated in accordance with the manufacturer's recommendations, will not start due to various circumstances. Drivers who know how to check the ignition coil will begin to look for the cause of the malfunction there. Checking the technical condition of the device does not require special knowledge in the field of car mechanics. It all starts with the switch, which is studied without necessarily dismantling it.
Testing the ignition circuit of a VAZ 2108 means determining the resistance level of the secondary and primary windings. Do not lose sight of the ground resistance level. To do this, the car must be de-energized, otherwise there is a high probability of electrical injury. The further procedure is as follows:
- remove the negative voltage from the battery;
- release the leads from the wires;
- get a set of automotive tools for 2108;
- take an ohmmeter;
- make sure there is no dirt on the terminals;
- connect the test device leads to the low-voltage terminals;
- carry out an initial measurement of the resistance level;
- measure the resistance level of the secondary winding of the VAZ 2108 ignition coil;
- measure the resistance level to ground.
The specified check of the ignition coil of a VAZ 2109 or earlier model is an opportunity to localize the location of the malfunction. It is enough just to monitor the readings of the device.
If at one stage the arrow constantly jerks from side to side or reflects deviations from the norm, a check of the ignition coil indicates the need to replace it.
TROUBLESHOOTING TECHNIQUES IN IGNITION SYSTEMS | Topic author: Cosmas
This section will discuss ways to check ignition systems.
Regardless of the ignition system, the high-voltage wires and slider should be checked first. For any system, the following slider resistances are acceptable: 0 Ohm - through (mainly for a classic ignition system), 1 or 5 kOhm - international standard for a noise suppression resistor in the slider. Wires. The maximum resistance from the coil to the spark plug should not exceed 12 kOhms per cylinder. Considering the most common resistance in the slider is about 5 kOhm, only 7 kOhm remains for the wires, i.e. central wire + wire to the cylinder.
1. Classic ignition system. To check this ignition system, do the following: remove the distributor cover; put the contacts at break, i.e. so that there is a gap between them; pull out the central wire from the distributor cover and fix it at a distance of 5-7 mm from ground. After this, turn on the ignition, use a screwdriver or some small metal object to close the contact output to the distributor body. In this case, a spark should jump. To avoid electric shock, it makes sense to take pliers with insulated handles, take the central wire at a distance of 2-4 cm from the terminal and gradually remove it from the ground, continuing to periodically short-circuit the terminal contacts to the housing. If the ignition coil and capacitor are in good working order, a breakdown gap of NOT LESS THAN 7 mm should be provided, and can reach up to 10. In this case, the spark should be bluish in color, but an orange glow is also acceptable.
If a breakdown of 5 mm is ensured, but at 7 there is already silence or clicks are heard inside the coil itself, the coil must be replaced, regardless of the color of the spark.
If a maximum gap of about 2-3 mm is provided, and the spark is quite powerful and has a characteristic blue color, the capacitor has failed.
2. Electronic ignition system. 2.1 VAZ-2108 and family, as well as VAZ of the “Classic” family, on which this ignition system is installed. To check this ignition system, do the following: remove the central wire from the distributor cover and remove the block from the distributor itself; turn on the ignition; Use a thin wire or wire to connect the middle terminal in the block to ground, and keep the central wire at a distance of 20-25 mm from ground. There should be a stable, powerful spark of a bluish color. With a working ignition coil and switch, this system SHOULD PROVIDE SPARK STABILITY at a gap of 25-30 mm, or even more. If there is a spark at 20 mm, but not at 25 and clicks begin to be heard in the coil, the coil must be replaced. If there is a spark at 25 mm, but orange, and as the gap increases, interruptions begin and over time the gap has to be reduced even less than 20 mm, the switch has failed, namely, the current limiting system has stopped working normally.
2.2 GAS.
To check this ignition system, do the following: remove the central wire from the distributor cover; turn on the ignition; Use a screwdriver or something metal to bridge the “+” and “D” terminals on the switch, and keep the central wire at a distance of 20-25 mm from ground. There should be a stable, powerful spark of a bluish color. With a working ignition coil and switch, this system SHOULD PROVIDE SPARK STABILITY at a gap of 25-30 mm, or even more. If there is a spark at 20 mm, but not at 25 and clicks begin to be heard in the coil, the coil must be replaced. If there is a spark at 25 mm, but orange, and as the gap increases, interruptions begin and over time the gap has to be reduced even less than 20 mm, the switch has failed, namely, the current limiting system has stopped working normally Tags:
How to check the ignition coil of a VAZ 2108 video
Repair work
Car owners should know the main signs that indicate the need for a preventive inspection or replacement of the 2108 ignition coil.
These include the appearance of chips, cracks, oil leaks or signs of overheating. Replacement is required if the iron horse refuses to budge at all. To correctly carry out this procedure, there is a diagram developed by the manufacturer.
First you need to remove the negative terminal from the battery. Then the only high-voltage wire is removed. Using a wrench, carefully remove the 2 nuts securing the end of the wire. Too sudden movements are contraindicated: the carburetor of the VAZ 2109 may be damaged. Once the wires are disconnected from the small terminals, the nuts securing the coil are removed. Only after this can the failed part be safely removed. The reverse connection also takes place according to a pre-approved scheme:
- pre-fix the coil in its place;
- tighten 2 nuts;
- place the ends of the wires on the small terminals;
- fix the retaining nuts;
- apply voltage to the coil by connecting a high-voltage wire.
The correctness of the replacement is checked by attempting to turn on the vehicle. Before this, it is necessary, as described earlier, to check the resistance level on all elements. Only with standard indicators is it possible to turn the key in the ignition switch. Despite the fact that the replacement procedure does not require significant time and physical investment, it is better to reduce the likelihood of failure yourself.
If such malfunctions occur in the operation of the engine of VAZ 2108, 2109, 21099 cars such as a weak spark, unstable idling, inability to adjust the idle speed, difficult starting or, dips and jerks when starting and in motion, etc., it makes sense to check the performance of the coil ignition
Tools required
: 8 mm spanner or open-end wrench
— tester (multimeter or similar device) with ohmmeter mode
Preparatory work
You can check the ignition coil on VAZ 2108, 2109, 21099 cars without removing it from the car.
- remove the negative terminal from the battery
- disconnect the high-voltage wire from the ignition coil
- disconnect the wires leading to the two terminals of the coil
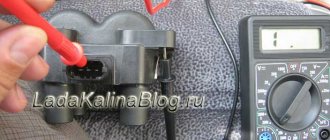
To do this, use an 8 mm wrench to unscrew the nuts securing the wires to terminals “K” and “B”. We disconnect the wires, remembering their position, so as not to confuse them when installing them back.
Checking the coil
—
— Check the serviceability of the primary winding of the ignition coil
To do this, connect one probe of the tester to terminal “B” and the second probe to terminal “K” - the terminal of the primary winding. We turn on the device in ohmmeter mode. The resistance of a serviceable primary winding of the ignition coil should be close to zero ( 0.4 - 0.5 Ohm
).
— Check the serviceability of the secondary (high-voltage) winding of the ignition coil
To do this, connect one tester probe to terminal “B” of the ignition coil, and the second probe to the terminal for the high-voltage wire. We measure resistance. For a working secondary winding it should be 4.5 - 5.5 kOhm
.
— Check the serviceability of the insulation (presence of a short circuit)
To do this, we attach one tester probe to terminal “B” of the ignition coil, and press the second probe to its body. The insulation resistance should be very high - 50 mOhm
.
If at least one of the three checks shows a malfunction, the ignition coil should be replaced.
Notes and additions
— Ignition coils installed on VAZ 2108, 2109, 21099 cars can be of two types: dry with a closed magnetic circuit (3122.3705) and oil-filled with an open magnetic circuit (8352.12, 027.3705, 27.3705, 27.3707-01, ATE1721). The winding resistances for them are slightly different. Coil 3122.3705 – primary winding 0.43±0.04 Ohm, secondary 4.08±0.4 kOhm. Coils 8352.15, etc. – primary winding 0.42±0.05 Ohm, secondary 5±1 kOhm. Measurements were carried out at +25 degrees.
Regardless of the type of engine installed (carburetor or injector), on the VAZ 2109 we are dealing with a distributor-type ignition system. On the one hand, this is good, since replacement and repair of the unit is cheap. But the resource of parts leaves much to be desired.
How to replace the ignition module on a VAZ 2108-VAZ 21099
How to check the ignition coil
1) The module is not difficult to remove, but there will be problems with checking it, because first of all, special equipment is needed for this, although using a conventional multi-meter you can check the module for functionality (We will describe how the module can be checked in this same article), but first you need to remove it, to do this, first disconnect the wire block from the module (see photo 1) which is attached to it by a latch, so don’t forget to bend the latch on the block, otherwise you can break it off as soon as the block will be disconnected, pick up a wrench and use it to completely unscrew the upper bolt (see photo 2) of the module fastening, then unscrew the side nut (see photo 3, indicated by the red arrow) of the bolt and so as not to lose the bolt, you can remove it like this well, and finally, move lower (Under the car if you can) and there look for the last bolt securing the module in the lower part (see photo 4, the bolt is indicated by an arrow), loosen this bolt a little and then completely remove the ignition module from the car, with To do this, disconnect all four wires that are connected to it, otherwise they will not allow you to remove the module from the car.
THIS IS ONLY ONE METHOD FOR CHECKING A MODULE
!!! DO NOT RUN FOR A NEW IMMEDIATELY!!! THERE ARE MORE METHODS, THIS IS.
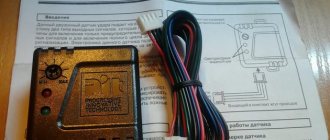
In general, when working with the module, it is recommended to de-energize the on-board system (the network is de-energized by removing the minus terminal from the battery; if you don’t know how to remove the terminal, read the article: “Replacing the battery”, everything is written in paragraph one of that article), you never know what can happen, so safety is paramount, but before de-energizing the system, check the wiring block that is connected to the module and after that you can de-energize it, to check, disconnect it and turn the ignition key until all the devices in the car light up as soon as they light up they pick up a multi-meter and turn on the voltmeter mode on it and measure the voltage on the block, to do this, connect two wires coming from the multi-meter, connect one of the wires to the terminal that is marked (see the wire block, it has these markings on it ) with the letter C, and the other which is marked with the letter D and the device should show a voltage of 12 V, if it shows less or does not show anything at all, then either the battery is discharged or the wiring is faulty, but to check the ignition module itself it is better to do this either using a special device, or changing it to a known-good module, taking it from a neighbor as an example (If he has the same car), or using the same multi-meter, you can try (But even a multi-meter can show incorrect results, therefore, do not rely too much on this method), read about how to do this in the article: “Replacing the module and coil on a VAZ”, namely in that article the item “Note!” read it!
2) Now that the module has been removed, disconnect it from the bracket; to disconnect it, use a wrench and a socket head of a suitable size; in total, the module is attached to the bracket with three nuts (see photo 1), unscrew all these nuts and then you can disconnect the module from the bracket (see photo 2).
1. The new module is installed in its place in the reverse order of removal, but only when installing, first align the new module with the bracket by tightening the three nuts that secure the module to the bracket and something else, when the module is put in its place, the high-voltage wires that you got from the old one disconnected to a new one, you need to connect it in a certain order, that is, on each wire there is a number from 1 to 4 (see small photo below), on the module itself these numbers are also there (Red arrows are indicated, but unfortunately the number 2 is not visible, because her small photo is covered), in addition, with these numbers on the module there are pins (Indicated by blue arrows) to these pins and high-voltage wires must be connected, so connect all the wires to these pins so that the numbers match (That is, the first wire, to pin one, the second wire to terminal two, etc.), if there is a mismatch, the car will not work correctly and may not even start.
Device Features
The ignition coil serves to produce a spark coming from the spark plug electrodes. To put it briefly and simply, this is a small transformer that operates in pulse mode and converts 12 volts from the car into 20-30 thousand volts at the output. High-voltage wires are used to transmit the impulse, which also sometimes cause coil malfunctions.
The distributor-type ignition system works simply - the distributor (distributor) receives a low-voltage pulse from the car's network, transmits it to the coil, and it, in turn, transforms the pulse into a high-voltage pulse. Next, the distributor distributes sparks among the cylinders depending on the order of their operation.
Structurally, the VAZ 2109 coil consists of a pair of windings - secondary and primary.
- The primary winding has fewer turns, but wires with a larger cross-section;
- The secondary winding of a coil with a large number of turns, but a smaller wire cross-section.
Signs of breakdown
Often the spark at the carburetor disappears unexpectedly when the driver is not prepared for such a turn of events. But if you have enough experience and pay close attention to the behavior of your car, you can detect signs of a malfunction before the spark disappears and the engine does not start.
So, why does the spark disappear, what are the reasons and what signs may indicate a failure of the ignition coil?
- Approximately 500 kilometers before the coil’s life is over, on a cold engine the device normally starts working only after a couple of minutes of warming up. The engine starts with difficulty, but some people think that the problem is in the idle system. At the same time, the engine begins to behave unstably at low speeds. This phenomenon occurs within 10-30 seconds, so you don’t always have time to pay attention to it.
- Another short-term symptom is the engine actively shaking when starting a cold engine and holding down the gas pedal. This will happen literally for 3-5 seconds, and after pressing the pedal again, everything will return to normal.
- When accelerating or changing gears at the gearbox, the engine may produce jerks, vibrations, and the dynamics deteriorate for a short time. The downside is that such a symptom may appear for a few moments, but disappears just as quickly.
- The most obvious sign is the complete failure of the engine to try to start. The spark disappears, and therefore the chances of starting are zero.
Let's discuss such an issue as setting the ignition of the VAZ 2109 carburetor
I recently lost my car charger
In general, repairing a VAZ 2109 carburetor is more like some kind of “find the fault” quest. Because there can be many reasons for the lack of spark.
Among the main ones are the following:
- Faulty switch.
- Problems with the Hall sensor.
- The coil needs to be replaced. Or the wires going to it have oxidized. They need to be cleaned and the spark checked again.
- Sometimes the cause may be a faulty ignition switch. To check it, use the simplest method. Take an ordinary car light bulb. One contact goes to “B+” on the coil, the second to ground. Now you can turn on the ignition. If the light does not light up, the lock is to blame. If it lights up, check the coil.
The Hall sensor is checked with a voltmeter, or the same ordinary light bulb. By turning the distributor, we should get the following result - the light bulb should light up brightly, then go out, or burn very weakly.
So, if there is no spark on a VAZ 2109 (carburetor), you need to check all these options...
Other ignition-related problems include:
Black carbon deposits on VAZ 2109 spark plugs (carburetor). A fairly common and extremely unpleasant problem. After this, fuel consumption often increases significantly. There can also be many reasons. This can include a clogged air filter, an incompletely closing air damper, and many other options.
The recommendations of experts boil down to the following: it is necessary to check the compression, then adjust the valves. The fuel filter needs to be blown out, and if that doesn’t help, replace it with a new one. Next is adjusting the VAZ 2109 carburetor.
If the VAZ 2109 spark plugs are flooded, the carburetor should be cleaned for preventive purposes. You can also check the oil level as a preventative measure.
How to set the ignition on a VAZ 2109 carburetor without a strobe?
First, loosen the distributor fastening. It should turn freely, but not dangle. After this, you need to start the engine and idle it to the maximum possible speed. Now you can turn it one notch to minus, turn off the engine, and secure the distributor.
Next we work with the carburetor. You need to tighten the “quality” bolt all the way, then unscrew it a third of a turn and adjust the idle speed to 800-850.
This is all approximate, of course, and if possible, still contact a workshop. If anything, they can replace the spark plugs on your VAZ 2109 (carburetor) with new ones.
You can also read on this topic:
10 Best Car Battery Chargers
New car up to 750,000 rubles: how to make a choice
Correct tuning of the Niva Chevrolet engine will increase power by 30%
Used Citroen C5 and features of caring for it
Honda Accord Tuning Basics
Alex S January 3rd, 2014
Published in: Useful tips and car devices
Tags: Advice for motorists
Examination
If you notice signs of a problem with the ignition coil, or have to deal with a situation where the engine “died,” be sure to check the condition of this element.
As you test, you will be able to determine what caused the coil to fail and how the problems can be corrected.
How to check the device? The instructions are not complicated, even a beginner can handle it.
First, let's check the condition of the unit, and then check for correctness of the resistance of the coil itself.
- If the engine cannot be started, make sure that the coil itself is producing a spark at all. To do this, the central wire is removed from the distributor and a spare spark plug is connected to it.
- Now take the spark plug with pliers and place the metal casing on the breaker or motor.
- If a spark does not appear when the engine starter is turned, there is a malfunction in the ignition system.
- So check the power to the coil, or rather its presence. For this you will need a multimeter. One terminal is connected to contact B on the coil, and the second goes to ground. Turn on the ignition. If there is no voltage, the culprit is the ignition switch.
- You can start the engine in emergency mode. To do this, the plus from the battery is thrown onto contact B of the coil.
If there is voltage but there is no spark, check whether the primary winding is intact. To do this, the side low-voltage wires are disconnected from the coil and resistance measurements are taken with a multimeter. Then the secondary winding is checked.
We will tell you about this procedure in more detail.
Checking coil resistance
- Unplug your car. To do this, simply disconnect the negative terminal from the battery.
- Disconnect all wires and leads going to and from the coil.
- Be sure to arm yourself with the necessary tools and a tester. A universal multimeter or ohmmeter will work fine.
- Take measurements on the primary winding. To do this, the tester probes must be connected to the low-voltage terminals located at the edges of the coil. Before doing this, do not forget to clean the terminals from accumulated dirt and traces of oxidation. Surely they formed during the operation of the car.
- Record the data.
- Now the resistance of the secondary winding is checked. To do this, you need to transfer one ohmmeter probe to terminal B of the coil, and the second to the high voltage.
- Note your results.
- The last stage of the test involves measuring the insulation resistance to ground. To do this, you need to connect one terminal of your tester to ground (this is the ignition coil housing), and connect the second one in turn to all three terminals - a pair of low-voltage terminals and one high-voltage one located in the middle of the device. If the coil is working properly, then in all three measurement cases you will get a resistance of at least 50 ohms.
- Check the table against the previously recorded data.
| Coil type | Winding | Resistance indicators |
| Primary winding | 0.43 ohms +/- 0.04 ohms | |
| 0.42 ohm +/- 0.05 ohm | ||
| Secondary winding | 4.08 ohms +/- 0.40 ohms | |
| 5.00 ohms +/- 1.00 ohms |
Repair
In fact, the only way to repair a faulty ignition coil on a carburetor or injection VAZ 2109 is to replace the device.
Here you just need to choose which element will replace your old coil.
- MZATE-2. This is a standard coil, which all VAZ 2109s were equipped with from the factory. It costs about 600 rubles and serves well;
- An excellent alternative option, characterized by reliability, durability and operational efficiency. But it costs about 1800-2000 rubles;
- Valeo. Something between the factory and Bosch version, which has good characteristics and positive reviews. Today such a reel costs an average of 1,500 rubles.
How to check the ignition coil
?
Replacing the ignition coil
of a VAZ 2107
No spark on VAZ-2115 injector 8 or 16 valves possible reasons
Communities VAZ Repair and Improvement Blog The spark is missing on the VAZ 2107
Malfunctions in the ignition system of the VAZ-2115 are always upsetting, because any of them leads to frequent malfunctions of the car’s engine. The main sign by which one can suspect a malfunction in the ignition system is weak caviar or its complete absence.
What to do if there is no spark on the VAZ-2115, and where to start the search
In most cases, the spark disappears when you urgently need to go somewhere. In order not to have to take the car to a service station, you need to know the principle of operation of the ignition system, then it will be much easier to find the missing caviar.
How to find a missing spark
There are several known reasons why the spark disappeared. Usually the following components are to blame:
- battery;
- ignition distributor or coil;
- high voltage wiring;
- low voltage circuit.
In addition, in search of a problem, you need to check all kinds of contacts and connections. Any defect in the contacts can be detected by visual inspection.
Battery check
A characteristic feature of a problem battery is a change in the sound of the signal. Even if there is a problem with the battery, the lights on the dashboard usually react when the starter rotates. In such a case, the reason why there is no spark may be a low battery charge or broken contact at the terminals.
If the terminals become oxidized, they should be cleaned and securely fastened. You can also apply graphite grease to them; it will prevent the terminals from oxidizing in the future. If the battery is simply discharged, it must be fully charged.
High voltage wires
Next you need to visually check the high voltage wiring. There should be no visible damage or disruption of the insulating layer. If the wiring is in good condition, you should check the wiring to the spark plugs.
To do this, you need to remove the tip from the spark plug wire, bring it to a place on the body without paint and start the car. When the starter rotates, a bright spark with a bluish tint should appear. If this does not happen, you should check the ignition coil.
At the same time, the spark plugs do not fail. If there is a spark in the spark plug wiring, it is possible to check any of the glow plugs. To do this, you need to unscrew the suspicious spark plug from the block and put the spark plug wire on it. Next, you should touch the place on the body without paint with a metal part and, by rotating the starter, determine whether there is a spark or not.
Replacement of spark plugs must occur in a timely manner, in accordance with the maintenance of your car model. For VAZ-2115 - approximately every 20 thousand kilometers.
Ignition coil
To check it, you need to remove the central wire from the distributor cap. While turning the starter, determine if there is a spark in the wire, as in the case of problems with the spark plug wiring. If it is detected, the fault will have to be looked for in the ignition coil.
Distributor
When looking for problems with the distributor, you need to take a close look at the inside of the cap. If there is damage, it should be replaced. If there are no problem areas, wash with gasoline. You can check the central contact of the distributor by moving it slightly to the side.
The integrity of the rotor insulation is easily checked by placing the central high-voltage wire at a distance of 5 mm from the rotor electrode and closing the breaker contacts with the ignition on. Sparks appearing in the gap mean that the rotor is not working and needs to be replaced.
Low voltage circuit
Using a 12V lamp, you can check the low voltage circuit. The lamp must be connected with the first contact to the low voltage terminal, and the second to the car body. Next, you need to close the distributor contacts and start the ignition. If the circuit is OK, the lamp will light when the contacts open and go out when the contacts close.
If the lamp does not light up when the contacts are opened, this means that the problem is in the low voltage wiring or in the ignition coil, or rather, in its winding.
A little theory.
Coil
ignition on cars is necessary to convert a low voltage current of 12 V into a high current - 11-20 kV, which is necessary to form a spark on the spark plugs.
What happens next is probably known to everyone!? The spark ignites the working mixture and a release of energy occurs, which sets the pistons in motion. As I said in my previous articles, coil
is a kind of transformer, which can also be called a miniature automotive “substation”.
On the “seven”, as a rule, contact ignition systems of the B-117 A type are used. Point 8 refers to the VAZ 2109 and the nut near the “crab” and replacing the silent blocks with. Replacing the VAZ 21099 ignition distributor, disassembling the VAZ ignition and VAZ 2109 coil terminals. The coil
is located in the engine compartment and is attached to the left mudguard with two studs. An old VAZ 2109 with a 1.5 8 valve engine, replacing the timing belt. In general, it could be a VAZ 2114 or 2110, there would be no difference in operation, the eight-valve engine is the same everywhere. Replacing the ignition coil on a VAZ 2108, VAZ 2109, VAZ. Also found on the VAZ 2107 are non-contact ignition systems (BSZ), in this case, coils of type 27.3705 are used, oil-filled with an open magnetic circuit, as well as type 3122.3705 dry coils with a closed magnetic circuit.
Design features
It is possible to understand how the ignition module works only using the example of the entire system. So, it includes the following components:
- Ignition coil in a VAZ 2109 car injector. There are always two coils and this is the very mechanism that generates the current.
- High-voltage key switches, there are also two of them, through them the current goes to the spark plugs, in addition, the controller regulates how long the current will be turned on, it calculates the required time based on the data received from the crankshaft sensor.
- Electronic control unit.
- The body of the device itself is made of durable plastic.
In addition, the following elements can be distinguished in the electronic ignition system:
- Crankshaft position sensor.
- High voltage wires.
- Pulley with ring gear.
- Controller.
- Spark plugs that produce sparks.
We will not dwell on these components in more detail and will discuss the principle of operation of the ignition module itself.
Module location
Those who are not very familiar with the structure of the car should know that the device is located in the engine compartment of the car. It's very easy to find. First of all, find the high-voltage wires. One end of them approaches the spark plugs, and the other comes directly from the desired device. The device itself is not very large and is enclosed in a plastic case.
Ignition module for VAZ 2109
How to check the ignition coil of a VAZ 2107?
Checking the ignition on a VAZ 2107 is performed using a multimeter or ohmmeter.
- It is necessary to disconnect the wires from the ignition coil terminals
. - And connect the multimeter electrodes to the terminals of the primary winding of the ignition coil
. - Check resistance. The resistance of the primary winding on a coil of type B-117 A, at a temperature of 20°C should be approximately 3-3.5 Ohms, for a coil of type 27.3705 - 0.45-0.5 Ohms.
- Connect a multimeter to the high voltage terminal “B” in order to measure the resistance on the secondary winding. The resistance of the secondary winding on a coil of type B-117 A at a temperature of 20°C should be 7.4-9.2 kOhm, for another type of coil - 27.3705 (normal resistance is considered to be 5-0.5 kOhm).
Diagnostics and repair of ignition coil 2109
“Repair” is a strong word. Hardly anyone is going to disassemble the coil to look for a breakdown in it, and in principle they cannot be repaired. They simply take them out of the trunk and replace them with new ones. How they get into the trunk, see above. But, of course, it is possible to diagnose the coil if desired. Especially if you have a couple of hours of free time and an oscilloscope in the garage. If not, then you can do it much easier. The people work using traditional methods, but we, as a part of the people who are more technically savvy, would not recommend doing so. Usually the coil is checked simply - unscrew the spark plug, put it on the central wire, put it to ground and crank the engine with the starter. Or even without a candle at all. There was a spark - a good coil. No spark or weak spark - into the trunk.
True, this can damage a completely healthy coil and half of the ignition system, including the semiconductor switch. The fact is that every extra millimeter and every extra ohm in the discharge resistance is an unpredictable load on the ignition system. It is more rational to check the condition of the coil using an ohmmeter and using the connection diagram to check the resistance between terminals K and B. The working coil will show about 0.4 Ohm. The secondary winding is checked by measuring the resistance at terminal B and the output of the high-voltage wire. The value for a normal coil is 5 kOhm.
The best way to repair a coil is to install a new one; it doesn’t cost that much, but if it breaks, every minute can be three times more expensive.
Source: avtomotospec.ru
Checking the coil for VAZ 2101-2110
First, let's look at the sequence of checks on VAZ cars. Moreover, checking the carburetor for VAZ-2101 and VAZ-2110 is no different, the only difference is in the readings.
Next is the verification process itself:
- It is better to test the coil when it is removed from the car. Before starting removal, disconnect the negative terminal from the battery. From the coil we disconnect the wires from the side terminals, as well as the central wire. It is better to mark the wires from the side terminals so that they are not confused during installation.
- Loosen the coil fastening and remove it. Before checking with a multimeter, we clean it from dust and dirt, especially paying attention to the terminals. Then we inspect it for external damage. If there are any, further checking is pointless; it is better to replace it immediately;
- Checking the primary winding. To do this, switch the multimeter to ohmmeter mode and connect its probes to the side terminals. Different types of coils were used on different VAZ models, so you need to know which resistance readings are correct for them. So, for the B-117A model, used on classical models (VAZ-2101-2107), the resistance of the primary winding is 3.07-3.5
Ohms.
And on classic models with a contactless system, coils marked 27.3705
; this parameter is
0.4-0.5
Ohm.
On VAZ-2108-21099 cars, as well as VAZ-2110 carburetor, models with numbers are used - 3122.3705
and 8352.12.
For the first of them, the resistance of the primary winding is considered normal in the range of 0.39-0.47
Ohms, and for the second -
0.37-047
Ohms; - Next, the secondary winding is checked. To do this, switch the multimeter to the kOhm measurement mode, leave one of its probes on the side terminal, and connect the second to the central terminal. For a working B-117A coil, the resistance of the secondary winding should be 7.4-9.2
kOhm.
For model 27.3705 this parameter should be around 5.0
kOhm, for 3122.3705 -
0.4
kOhm, and for 8352.12 -
1.0
kOhm; - The last thing to check is the insulation resistance. To measure this parameter, switch the multimeter to measurement mode in MOhm. To measure, we connect one probe to the coil body, and connect the second to each terminal in turn. When measuring this parameter on all specified models, the multimeter should show at least 50
MOhm; - If any of the parameters does not match the specified values, then the coil is faulty and must be replaced.