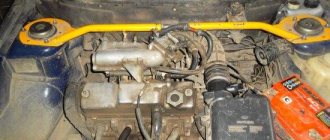
Removing the fuel rail
You will need : relieve pressure in the fuel system, remove the engine air filter, prepare a Phillips and flat-head screwdriver, a 22mm open-end wrench, a 17mm wrench, pliers, a 10mm socket, a 13mm socket and a 5mm hex socket. .
Procedure :
- Disconnect the connector from the injector wires and remove it from the bracket.
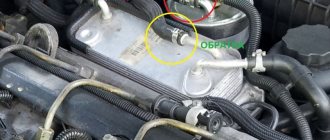
- Unscrew the screw securing the pressure plate of the fuel supply tube to the ramp using a Phillips screwdriver.
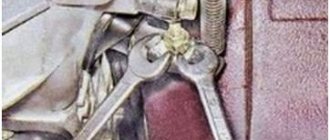
- Unscrew the fitting of the fuel supply tube to the ramp using a 17 wrench, holding the tip of the ramp tube with a 22 wrench. Otherwise, the ramp may be broken.
- Remove the fuel supply tube from the tip of the ramp tube, and remove the rubber sealing ring.
- Loosen the crankcase ventilation hose clamp using a Phillips screwdriver. Remove the hose from the cylinder head cover.
- Unscrew the self-tapping screw securing the guide tube using a Phillips screwdriver.
- Remove the tube with the oil level indicator facing up.
- Remove the brake booster hose from the intake manifold by using pliers to loosen the clamp.
Disconnect the end of the throttle valve drive cable from the drive sector. Move the throttle body away from the intake manifold (see replacing the throttle body). Disconnect the blocks with wires from the ignition coils (from cylinders 1, 2 and 3), and move the wire harness to the side (see replacing spark plugs).
- Unscrew the two nuts from the upper fastening of the intake manifold using a 10 mm socket.
- Then two bolts and three nuts for the lower fastening using a 13mm socket.
- Disconnect the block with wires from the phase sensor. Remove the ignition coils from cylinders 1, 2 and 3. Cover the holes for the ignition coils with a rag.
- Push the intake manifold towards you and lift it up, bringing it out from under the wiring harness.
- Unscrew the two screws securing the fuel rail to the cylinder head using a 5mm hexagon.
- Remove all four injectors from the cylinder head holes by pulling the ramp along the axes of the injectors. Remove the ramp with injectors and wiring harness.
- Fuel rail assembly with injectors and wiring harness.
Removing Priora fuel injectors
- Disconnect the block with wires from the injector by pressing the spring clip.
- Remove the bracket by prying it off with a screwdriver.
- Remove the injector from the fuel rail, overcoming the resistance of the sealing ring.
- Remove the injector O-rings using a flat-head screwdriver.
Before installing the injectors, it is necessary to replace the O-rings.
Then apply a thin layer of engine oil to the O-rings. Assembling and installing the fuel rail with injectors is performed in the reverse order. Owners of domestic Lada Priora cars note the build quality and reliability of the car’s components. However, most of the comments and questions from car enthusiasts concern the maintenance of the engine and fuel systems. The most important role in the dynamics of a fuel-injected car is played by injectors, which provide fuel injection into the engine cylinders. They often require cleaning or replacement.
Purification process
Cleaning the nozzles itself should be done on a clean surface - for this you can cover the working surface with a piece of cloth.
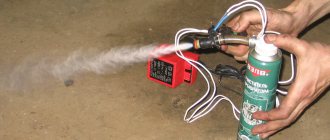
Prepare a hose and a can for cleaning the carburetor. To flush, secure a plastic hose clamp at the inlet of the nozzle (make sure the length is at least 20 cm). The nozzle will need to be turned on, and the end of the hose itself will need to be lowered into the liquid that is used to flush the carburetor. Cleaning can be carried out by any of the proposed ones - RunWay, Liqui Moly or Hi-Gear.
You need to watch how the torch changes: it will expand or contract - it all depends on how dirty everything is. Once the jet stops changing, cleaning should also be completed.
But there is no need to add cleaning additives advertised on the market to the fuel: it very often happens that they harm the engine. The acidified dirt itself after such cleaning can create a blockage that will prevent normal access to the fuel-air mixture. Otherwise, fuel access may be blocked.
Cleaning is complete. Now do the installation in reverse order.
Owners of domestic Lada Priora cars note the build quality and reliability of the car’s components. However, most of the comments and questions from car enthusiasts concern the maintenance of the engine and fuel systems. The most important role in the dynamics of a fuel-injected car is played by injectors, which provide fuel injection into the engine cylinders. They often require cleaning or replacement.
What injectors are installed on Priora cars?
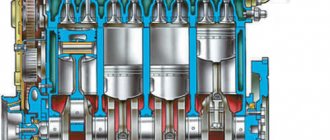
Injectors are an indispensable element in the operation of any power unit with continuous injection. Structurally, they are electromagnetic valves, which, when opening, ensure the supply (injection) of fuel in the required volume into the engine cylinders. At the same time, the main purpose of the part is to save fuel, so the valve opens at regular intervals, depending on the driving mode.
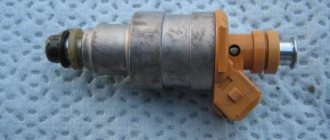
Have a red body
On "Priors" equipped with an injection type engine, imported injectors are installed. Products manufactured by Bosch and Siemens are characterized by a high degree of reliability and wear resistance. Their service life is determined by a mileage of 100–150 thousand kilometers, after which it is recommended to change them.
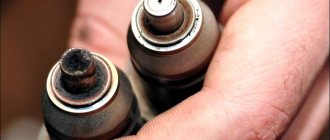
Usually available in black
Differences between injectors for 8 and 16 valve engines
Various modifications of Priora are equipped with parts of the same model. There are no differences for 8 and 16 valve power units. The only thing is that you should be careful when selecting injectors for engines of different sizes: for example, for a 1.5 engine, spare parts will differ in markings, color and thickness from those for a 1.6.
It is recommended to choose materials from the same manufacturer that were equipped with the car at the factory.
How to check for faults
The car owner can independently check the performance of the injectors on his car. The procedure is quite simple and does not require special training or expensive equipment. In garage conditions, diagnostics can be performed with a set of open-end wrenches, screwdrivers and a tester with a resistance measurement mode.
Reasons indicating problems
Diagnostics must be performed not after any period of operation or mileage has expired, but in the presence of external manifestations of injector failures. In cases where other vehicle systems are operating normally, the following indicators indicate problems with the injection solenoid valves:
at idle there is instability in engine speed;
starting the engine is difficult - the engine may stall;
when overclocking it is impossible to achieve the same dynamics;
The amount of fuel consumed has noticeably increased.
Unclip the plastic clips that secure the valve's power cable. Remove the connector.
Switch the tester to resistance measurement mode and take measurements of the windings of each of the injectors in turn. That is, you need to apply one contact of the tester to each of the five terminals, and the second one to the fifth wire for power.
Optimal resistance values in all cases should be in the range of 11–15 ohms. If at least one pin shows deviations, it will be necessary to change the nozzle.
Replacing injectors on a 16-valve Lada Priora engine
As mentioned above, symptoms of injector malfunction include unstable engine operation, starting problems and increased gas mileage. To change the nozzle to a new element, you will have to spend a lot of time, since the replacement procedure is quite complicated.
As a working tool, it is recommended to immediately prepare:
set of open-end wrenches;
Phillips-blade screwdriver.
After the car has stood for some time and cooled down, you can start working:
The plastic retainer of the harness must be pressed to the side with your finger to pull the bundle of wires out of the injector.
After which you will need to relieve the pressure in the car’s fuel system. The average pressure is approximately 380 kPa, that is, if work is carried out without bleeding, you can get injured due to sudden fuel emissions. To do this, you will need to open the rear door of the car and remove the seat from the back row.
Cleaning methods
There are several options for cleaning the injector:
- removal of contaminants in an ultrasonic bath, which will require disassembling the injector and removing the nozzles;
- periodic flushing using special gasoline additives;
- using flushing fluid instead of fuel.
The last two methods are well suited for washing injectors with your own hands, since to implement them you do not need to disassemble and remove from the engine the elements that supply fuel to the cylinders. Another thing is that these methods are not as effective as ultrasonic treatment, and therefore are considered preventive.
Hence the conclusion: such procedures need to be done more often . The optimal interval for using a cleaning additive in fuel is 5-10 thousand km. More effective washing of injectors without removing them from the engine, which uses liquid as a fuel substitute, can be done once every 15-20 thousand kilometers.
Do not use traditional methods to service the injector, including adding kerosene, pouring solvent, or using other exotic compounds.
Instead of saving, you may end up with large costs for fuel system repairs.
Cleaning procedure
Cleaning injectors can provide the car owner with the following benefits:
restoring the original functionality of the device;
reduction of fuel consumption;
optimization of motor operation.
That is, in case of contamination (use of low-quality fuel), it is possible to flush and clean the valves in order to restore them to functionality.
Open the hood and make sure all vehicle systems are working properly
Several cleaning methods
Experienced drivers know that there are several ways to clean injectors on a Lada Priora. Moreover, each of them has both its pros and cons.
The first option is to use a detergent additive - the liquid is added to gasoline and, after entering the gas tank, it enters the injectors. Usually one bottle of the additive (0.5 l) is enough for a whole tank of fuel. In this case, absolutely all parts of the fuel system are washed. However, the disadvantage of this method is the lack of drainage of dirt - it will remain in the system.
The second option involves using a solvent. It is considered the most effective, since flushing is carried out while the engine is running. However, it is necessary to replace the spark plugs immediately after using the solvent, as they may stop functioning.
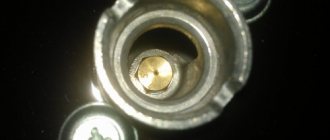
Injector works perfectly
Perfect combustion of fuel can only be achieved if the injector is fully operational. Translated from English, it is called a motor pump.
To understand how to properly clean, you need to know the operating principles of the mechanism itself. This part is based on one or two channels. The sprayed liquid will fall into the first, and the second will contain steam or gas, which will spray the first liquid. The torch will burn continuously and evenly if the nozzle is of high quality and clean. In gasoline engines like the Lada Priora, an electromagnetic injector is usually used. It is a simple device that operates using an electronic control unit - at the right time it is required to supply voltage to the valve excitation winding. Thus, an electromagnetic field will be created: it will retract the valve with the needle and release the nozzle. The fuel will inject, the voltage will disappear and the needle will return to the seat.