About trim levels with power steering
Consider the situation:
- The car is in a pit;
- Engine off;
- The rack makes a knocking noise when you turn the steering wheel.
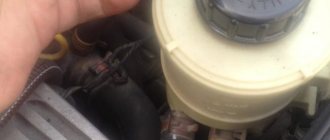
Don't rush into adjustments! There is indeed a nut in configurations with power steering, but it would be undesirable to turn it.
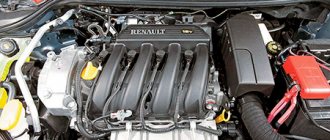
Two power steering hoses are clearly visible. Try starting the engine and wait about 10 seconds. The intensity of all knocks made when turning the steering wheel should decrease. This is how power steering works, and this is normal! You can safely continue to operate the car.
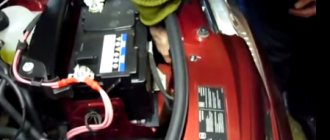
Before tightening the Renault Logan steering rack with power steering, always bend the tin washer. The warranty is then void. The washer is riveted along the edge of the nut and rests against the sides of the crankcase. Sometimes replacing the power steering fluid helps, but only if it has not been changed for a long time and has lost its properties.
Necessary tool
Keys and accessories:
- Rozhkovy on “16”.
- Hammer.
- Wooden beam.
- Balloon wrench.
If you have a little experience in carrying out such work, then you can replace the tips on Renault Logan yourself. To do this, you should only adhere to the rules listed below.
Let's start replacing (preparatory work)
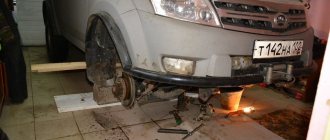
To replace the tips, you need to put the car on supports. Then you should remove the front wheels. In this case, it is recommended to turn on the handbrake and place wheel chocks under the rear wheels to ensure the stability of the car.
Stages of work
- Before repairing, all elements of the steering mounts must be sprayed with WD-40.
You can also use water if liquid is not available. You should pour it over the bolts and wait a while until they are saturated with moisture. This will make it easier to unscrew the bolts. We removed the wheel and treated the tie rod end to the hub with WD-40 - The rod on the car has a lock nut.
It must be loosened and left in this position. Loosen the tension, indicated by an arrow - The nut on the steering knuckle is loosened.
The finger is kept from turning by the hexagon. Loosen the pin bolt - You can also use and.
We use a ball joint remover (it is universal for all cars) - After unscrewing the nut, the finger is removed from the socket.
After this, the car is reassembled in the reverse order with the new part installed. The steering knuckle was removed - A finger is inserted into the socket and the nut is screwed in until it stops.
You can use a hydraulic jack. We use a jack to help - When installing the steering rod, it is necessary to turn it to the number of revolutions by which it was unscrewed (to get to the wheel alignment).
- All elements must be carefully tightened.
In this case, you should also work carefully so as not to strip the thread. AHTUNG! Do not overtighten, otherwise you will have to take a new tip - After completing this work, you should contact a specialized service station to set the wheel angle (wheel alignment).
- It is recommended to lift the car on the side on which the part will be replaced.
- When carrying out work, the car must be on the parking brake.
- To clean dirt from the steering column, you can use a metal brush.
- In the event that you do not have a puller at hand to press out the finger, you can use a wooden block and a hammer. Using a hammer through the beam, you need to hit the mounting hole of the finger, freeing it.
- It is important to remember that the steering wheel tip on the right has a left-hand thread, and on the left – a right-hand thread ( that’s why the article numbers are different, they are lower
).
Adjustment (tightening the rack)
The recess in the nut will be closed with a plug, rubber or plastic. The plug must be removed. The location of the nut is circled. The nut itself is not visible from under the bottom.
Find it at the point circled (see photo).
None When the nut is found and the plug is removed, the following options are possible:
- We use an L-shaped socket wrench with a handle less than 10 cm;
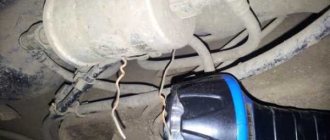
- A “flexible key”, which is held over the metal of the body, is also suitable (see photo);
This is where the key cable is routed - You can buy a special Renault/Largus key.
To reach the nut, it will be easier to jack up the left wheel and remove it. Next, a socket wrench is used.
And even before tightening the Renault Logan steering rack, many do this: using a grinder, they make a “10 by 10 cm” recess in the bottom. It is better not to use this method.
Should I buy a new Logan steering rack or repair it?
The control rack of a car, including the Logan control rack, is a reliable, strong unit that is occasionally subject to deformation and breakage. But constant loads (steering wheel torsion) can damage the part, which leads to the need to repair the Renault Logan control rack, or the Logan control rack needs to be replaced. The process of restoring the control component in most cases turns out to be meaningless, which is why many are interested in the Renault Logan control rack, the cost of purchase and replacement.
And although the Renault Logan control rack with steering wheel is one of Logan’s weakest points (if the Logan control rack is without steering wheel, then it will last longer and be more reliable, since the design is less complicated), but do not rush to immediately purchase a Logan rack. The technicians working in our car service center have extensive experience in dealing with the problems presented, and perhaps repairing the Logan control column will help you, or you will only need to change the Renault Logan control rack boot or oil seal.
In any case, we advise you to first diagnose the Renault at a car service center in order to save time and money.
This is interesting: Renault Logan front suspension repair (video)
Do tie rod ends affect handling?
Renault cars (in our case we are talking about the Logan model) are equipped with a steering system assembled using a rack-and-pinion system. The steering system drive includes a pair of rods with a ball-type CV joint, as well as steering knuckles. Some cars are equipped with power steering, which is also worth taking into account when performing work. If at least one of the nodes fails, this negatively affects the performance of the entire system as a whole.
Replacement of tie rod ends is required in the following cases:
- During the movement, unusual sounds appeared.
- There is a strong vibration of the steering wheel when turning.
- Strong play appeared when the wheel rocked.
- Steering has become more difficult (Renault's steering wheel becomes stiffer).
- If you let go of the steering wheel, the car starts to pull to the left or right.
Any of these signs or several problems together may indicate a failed steering linkage.
Brief description of the steering device
Before starting any actions to service the machine, it’s a good idea to get to know its main components and how they work. The bulk of French brand cars are equipped with a hydraulic booster control system
.
It includes
:
- steering column;
- rod ends;
- steering knuckles with hub;
- hydraulic booster and injection lines;
- fluid pressure sensor.
For ease of assembly, each tip has a right one - I, a left one - II. The design is made according to the “gear-rack” scheme. The mechanism connection is located in a special housing and is regulated by a special plug when the product is assembled at the factory. In the future, the gap between the parts cannot be changed.
DIY Ford steering rack repair video
Article numbers of “tested” steering tips
All spare parts for Logan have numbers, steering rods are no exception. To make repairs efficiently and quickly, you should buy new spare parts before starting.
60 01 550 442 - original code for the left steering tip for Renault Logan. 60 01 550 443 - original code for the right steering tip for Renault Logan.
Steering end 60 01 550 442
Sasic - 4006158 4006159
- a popular replacement option (analog).
Sasic 4006158 — steering tip (analog)
How do tie rod ends affect car control?
The Renault Logan car has a rack and pinion steering system. The design contains two rods connected to ball joints and steering knuckles. Most Renault cars also have hydraulic power steering. If any element of this design fails, this will affect the quality of driving.
Logan steering rack - components
The part can be either mechanical or hydraulic. The latter type of design is especially common on modern cars, as its architecture is more advanced in terms of assembly and also provides a more comfortable driving experience. The third type of steering rack is called electric (EUR). The EUR mechanism has a complex design and high cost in relation to its hydraulic counterpart.
Let's look at the components:
- Steering rods and ends responsible for turning the wheels are attached to the retractable mechanisms of the part.
- A toothed bar with gears is responsible for transmitting force from the steering wheel to the rods and controls the wheelset.
- The housing (crankcase) is a component made of aluminum; it contains all the main rack mechanisms.
- The spring system ensures a tight fit of the rack to the gears, and also eliminates the steering wheel from free movement and play.
- Limiters regulate the maximum value of steering wheel turns to the left and right.
- Bearings - used for ease of manipulation when turning the rack.
All about replacing tie rod ends on Renault Logan
I'm interested in the question of how to change the tie rod end on a Logan 2009 1.5 liter. Thank you in advance! (Kostya)
Hello. In practice, the need to replace the tie rod end occurs when knocking noises appear when turning the steering wheel. To perform the repair, you will need a set of socket wrenches, a ball joint removal tool, a jack, and supports. A more convenient option would be to perform the work on a lift.
We make the replacement ourselves
1. Remove the hinge pin. 2. Slightly unscrew the element locknut. 3. Mark the position of the tip with a marker.
- First, you should put the front part of the vehicle on a jack and place supports under it.
- Then unscrew the bolts and remove both wheels. The vehicle must be secured in place by applying the handbrake and placing wheel chocks under the wheels. If the elements are too dirty and you cannot unscrew them, use a brush to clean them, then treat them with WD-40.
- You need to unscrew the nut that secures the so-called hinge pin to the steering knuckle lever, while this pin should be held from turning.
- Then you need to install a device for removing the hinges and remove the so-called finger. If such a device is not available, you can try to press out the element using a hammer, hitting the end part with it. The blows themselves are applied along the axis.
- Then the hinge pin is removed.
- Now you need to slightly unscrew the locknut of the steering end. The position of this element should be marked in advance; use paint or a regular marker for this. This must be done so that when installing a new part, the position of the wheel toe angles is not disturbed.
- Next, you need to dismantle the tie rod end. In this case, it is important to count the number of revolutions, since during subsequent installation this will allow you to approximately restore the angles.
- Now the final stage - you need to install new elements in the reverse order of removal. These components need to be screwed on, observing the pre-calculated number of turns, and you need to screw them to the mark that you left earlier. The locknut is tightened with a torque of 50 Nm. As for the so-called hinge pin, in this case the tightening torque should be 37 Nm. After the new parts are installed, you will need to check the wheel alignment angles and, if necessary, adjust them.
Video “Changing the tips yourself”
The detailed process for replacing these parts is presented in the video below (the author of the video is Everything related to the car).
AvtoZam.com
Steering rack repair Logan, Logan
Created for drive2.ru.
- wheel alignment angles;
- level of working fluid in the power steering reservoir;
- presence of leaks;
- condition of anthers;
- the presence of play in the hinges;
- extraneous noise;
- reliability of fastening of nodes.
If on the road the car has a tendency to “yaw” or an extraneous knocking sound in the area of the front suspension, then you should think about restoring the power steering parts. This is interesting: Renault Logan trunk lock repair
Signs of a broken tie rod
Structurally, there are 2 tie rod ends, which are located on the right and left sides of the front of the machine. Timely vehicle maintenance allows you to detect a faulty tip at an early stage.
Special attention is paid to the integrity of the anther. Damage to its surface leads to a lack of lubrication in the hinge joints of the tip and the entry of dirt, which increases the rate of wear.
Typical signs of tip failure:
- Vibration of the gas pedal when accelerating.
- Steering wheel play.
- Extraneous sounds in the front of the car when driving on uneven roads.
- Creaks when turning the steering wheel.
- Typical tire wear (if the problem is ignored for a long time).
- Pull the car to the right or left side of the road when driving.
- Knock when braking.
When the first signs of wear on the steering tip appear, a detailed examination of the element is carried out and, if necessary, replacement is performed. Delaying repair work can result in loss of vehicle control while in motion.
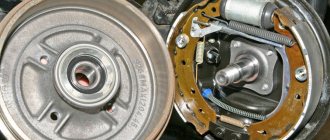
Typical Renault Logan steering rack faults and their symptoms
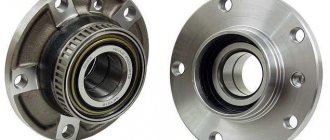
According to statistics, Logan's weak point
on the chassis - these are the front hub bearings.
But at the same time, frequent failures of thrust bushings due to unsatisfactory road surfaces have been noted. This is determined by the following criteria
:
- vibration;
- strong knocking sound when driving on an uneven surface;
- increased play when turning the steering wheel (especially on the right).
Steering rack repair with power steering Renault Logan
Some “masters” solve this issue by simply tightening the adjusting plug. It has already been written about above: the plant, anticipating such a situation, categorically prohibits doing this. If the worm gear is excessively clamped, intensive wear of the teeth begins, which can lead to undesirable consequences.
Video from Loganovoda about replacing steering tips
The Renault Logan steering linkage is an invariable element of the steering control of the vehicle. The main task of this unit is to transmit the torque (force) when the steering wheel rotates to the knuckles of the steered wheels. There are tips on the two edges of the tie rod, which are connected using a special connecting sleeve. What are the features of this node? When is it necessary to replace a Renault Logan steering rod? What design features of the unit should you remember when performing work? Let's consider these points in more detail.
Repair of steering rack with power steering. Lada Largus
Finding and eliminating knocking in the steering rack
Lada Largus.
The steering rack is an integral part of any modern car, including Renault Logan. It is included in the design of the steering mechanism and ensures the transmission of force from the steering wheel to the steering rod of each wheel. If a malfunction is suspected and adjustment is impossible, the steering rack should be replaced as soon as possible. The procedure is not difficult and can be done with your own hands if you have a repair kit and know the repair rules.
On Renault Logan, depending on the version, steering racks of various types were installed - mechanical and hydraulic.
Cars of the first generation - phase 1 (2004, 2005, 2006, 2007, 2008, 2009) with a 1.4 engine in two offered trim levels were equipped with a mechanical steering rack, and cars with a 1.6 l engine were equipped with a hydraulic one.
Restyled models (2009, 2010, 2011, 2012, 2013, 2014, 2015) and second-generation versions (2014, 2020, 2016, 2020) in the simplest configurations are offered without power steering (hydraulic booster), which is ordered separately .
How to replace Renault Logan steering ends?
“Before doing any work, place the machine on the front stands. To remove wheels more efficiently, put the car on the handbrake (raise the handle to the upper limit). Also place the wheels on special chocks to secure the vehicle. If there are none, use ordinary brick.”
Please note that if the ends fail, the Renault tie rod loses functionality. To avoid problems while driving, it is important to replace the faulty part in a timely manner (taking into account the article number). The algorithm of actions looks like this:
- Work on a pit, overpass or lift (the latter option is most preferable). As mentioned above, repairs can be made after the machine has been supported.
“Replacing the steering rod ends (left and right) is identical. The only difference is in the carving. The tip mounted on the left side has a right-hand thread, and the tip on the right side, on the contrary, has a left-hand thread.”
- Prepare tools and spare parts for replacement. Use only new parts. If the rod is faulty, replace it immediately.
- Raise the car and put the front end on supports. Work from the side from which the faulty unit was found.
- Tighten the bolts using a bolt tool and remove the wheel.
- Raise the handbrake and place special “shoes” under the rear wheels to secure the vehicle.
- Inspect the fastening elements. If they are dirty, treat the desired area with a special brush (must have metal bristles), and then apply a penetrating lubricant (WD-40 is suitable).
- Unscrew the mounting nut that holds the joint to the knuckle arm. When doing this work, keep your finger from turning.
Twisting the fastening nut of the Renault Logan tip
- Install the removable device for the ball joints, and then use the removable device to press the pin out of the rotary type lever mechanism.
“If you don’t have a special device at hand, use a hammer to remove the pin. To avoid damage to the assembly, strike the axial part of the lever.”
- Take out your finger, and then loosen the tension of the locking nut of the tip (the rod should be fixed in this case).
- Mark the position of the tip. This is a prerequisite to avoid difficulties in finding the correct position for the part during the reassembly process. If installed correctly (taking into account the notes made), you can avoid the costs of adjusting the wheel alignment.
- Twist the steering rod end. When performing work, count the number of revolutions made. This will also be useful during the assembly process and will allow you to avoid adjusting toe. If there is such a need, hold the traction by the flats.
- Install a new tip according to the algorithm that is the reverse of dismantling. At the same time, wind the product at the number of revolutions that was recorded earlier. Tighten the knot until the set mark is reached.
- Tighten the nuts with the required force. For the locking nut it is 50 N*m, and for the hinge pin nut it is 37 N*m.
- Check and, if necessary, adjust the wheel alignment at a service station.
If after reading you still have any questions, look at the training video, which shows the sequence of actions.
Features of steering rack faults
According to the manufacturer's instructions, the service life of the steering rack without quality complaints is 180–200 thousand km, subject to regular preventive inspection. The main reasons for node failure and malfunctions include:
- Poor quality of the road surface, which significantly increases the load on the steering elements.
- Dust and dirt particles settle on the rubber seals, which leads to corrosion on the rack components.
- Driving style is too active.
- Natural wear and tear over time.
Diagnosis of the malfunction is revealed by a simple inspection and careful attention to the behavior of the car on the road. The following signs will indicate that a repair is imminent:
- Extraneous noise.
- A knocking sound occurs when turning the steering wheel.
- The suspension rattles unusually when driving on poor surfaces.
- Driving is accompanied by vibration.
- There was play when turning the steering wheel.
Sometimes the situation can be corrected if the part is adjusted, but this is not always possible. Often, adjusting the steering rack does not eliminate the problem, and then it is necessary to make a replacement: remove the old element and install a new device. Among the main malfunctions of the steering rack, the most common are:
- Damage to the bushings of the worm pair. It manifests itself as knocking noises when turning the steering wheel. It can be eliminated by removing the faulty part or replacing the bushing will help.
- Corrosion and damage to seals. This is indicated by the absence or leakage of fluid in the tank. New parts should be installed or the existing ones should be cleaned of corrosion, and the power steering fluid should be replaced.
- The teeth of the worm pair of the distributor rod have worn out. This is indicated by play in the steering wheel. Faulty parts are replaced.
- Corrosion processes in the steering rack mechanism contribute to tight steering. It will be necessary to disassemble the part, clean it, and repair the rod.
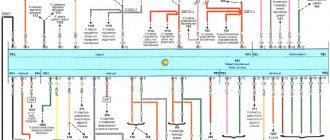
The weak link of the steering rack is the bearings and thrust bushings, which most often cause ineffective operation. The block diagram of the steering control is shown in the figure.
The numbers indicated in the drawing are:
- 1 and 7 — right and left tie rod ends;
- 2 — the steering rod itself;
- 3 — boot;
- 4 - crankcase;
- 5 — power steering tubes;
- 6 - drive gear.
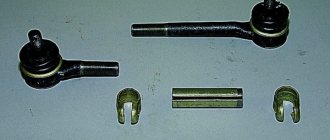
Important ! If you need to change the tie rod ends, then you should definitely look at their markings: the right tip has one stripe, the left one has two.
Replacing the tie rod end for Renault Logan 2005
We replace the tie rod end when its ball joint fails or the joint cover is damaged. We remove the front wheel from the side of the tie rod end being replaced and securely fix the car on a factory-made stand. Turn the steering wheel all the way in the direction opposite to the tip being removed. The work is shown using the example of the right tie rod end; we replace the left tie rod end in the same way.
Use a 21 wrench to loosen the locknut, holding the tip by the flats with a 19 wrench. Before unscrewing the nut securing the tip hinge pin to the steering knuckle lever, use a wire brush to clean the “Torx” key hole in the end of the pin from dirt.
Using a “16” wrench, unscrew the nut securing the tip hinge pin to the steering knuckle lever, holding the pin with a “Torx T-30” wrench. Using a puller, press the ball joint pin out of the lever hole. If there is no puller, do not unscrew the pin nut completely. We insert the mounting blade between the tie rod end and the steering knuckle arm.
By pressing the tie rod end down with a mounting blade and striking the end of the steering knuckle lever with a hammer, we press the pin out of the hole in the lever. Having completely unscrewed the pin mounting nut...
...we remove the ball joint pin from the hole in the lever. Before unscrewing the tip, use a marker to mark its position relative to the tie rod or, when unscrewing, count the number of revolutions by which the tip was screwed. This will approximately maintain the previous wheel toe adjustment.
Use a 19mm wrench to unscrew the tip, holding the steering rod from turning by the hexagon with a 13mm wrench.
Remove the tie rod end. Install the tie rod end in the reverse order. We screw it onto the threaded end of the steering rod the same number of turns (or up to the mark) that it was screwed to before removal. Tighten the locknut of the tip and the nut securing the ball joint pin to the prescribed torques. After completing the installation of the tie rod end, it is necessary to check and, if necessary, adjust the toe-in of the wheels at a special stand - at a service station. To adjust the wheel toe, it is necessary to loosen the locknut of the tip and rotate the steering rod by the hexagon with a 13 key, holding the tip with a 19 key (see above). After adjusting the toe, it is necessary to tighten the tip locknut to the required torque.
..
121
122
128 ..
Basic troubleshooting methods
It is not difficult to carry out work on troubleshooting the steering rack yourself; the main thing is to determine the cause of the breakdown. On the Internet you can find many photos and videos that tell in detail how to replace this or that element of the device. Basic troubleshooting methods:
- When the steering wheel is rotated, characteristic knocking noises are heard in the part where the steering rack is located. This indicates damage to the worm gear bushing. The unit cannot be repaired but requires replacement. You can make a new part yourself if you have a drawing of the device and the correct choice of material. The bushing can be bronze, plastic, etc. The cost of a homemade element will be much cheaper than a purchased one. A BMW bushing with catalog number 7820 023 188 is suitable for Logans.
Important ! The manufacturer suggests replacing the entire steering rack assembly. But such repairs will cost a lot of money, especially when installing the original. The cost of the analogue is half that - 10-11 thousand rubles. Not every car owner is willing to pay such a price.
Replacement is carried out as follows:
- The vehicle is placed on a jack from the right wheel side.
- The steering tip nut is unscrewed and dismantled.
- The steering wheel position is set all the way to the left, and the boot clamps are cut off.
- The boot is removed from the rack.
- It takes two people to remove the tie rod: one pulls it down, the other adjusts the key after each turn.
- The steering wheel is set to the extreme right position. Now you can see the bushing normally.
Before installing a new homemade bushing, you need to sharpen it, correcting the size. Before installing the part, you should lubricate the seat. Assembly is performed in reverse order.
- Increased play in the steering wheel is most often caused by wear of the teeth of the worm pair. The problem is solved by restoring or replacing faulty components.
- The appearance of traces of leakage and low fluid level in the tank. The reason is wear, breakage or rust on the seals. You should correctly select and buy new parts and install them to replace the damaged ones.
- The cause of heavy rotation of the steering wheel can be complete corrosion of the steering rack. It is necessary to disassemble the device, clean it from rust and carry out additional work to restore the rod.
Replacing tie rod ends
How I changed the steering ends with my own hands in the garage on a Renault Logan car with an 8-valve engine and a manual transmission...
Hello dear readers of the blog AAuhadullin.ru. Today we will talk about how to replace Renault Logan steering tips.
When replacing Renault Logan external steering ends in a car, you will need an open-end wrench for 16, alternatively 17, 21 or 22, hexagons, as well as a wheel wrench, a ball puller from a VAZ 2108, and a hammer. We place the car in front on supports, preferably on both sides.
Remove the front wheels, first setting the handbrake to the top position all the way. Let's put wheel chocks under the wheels, alternatively a brick or a block, and start working.
Brief description and video
- First, use a can of WD 40 to spray the fasteners. If you don’t have a wedge on hand, use water, wet a cloth, put it on the fastener and wait for it to get wet
- Let's start by loosening the rod end locknut.
Loosen it and leave it in the same place. - We unscrew the steering tip nut on the steering knuckle, holding the hexagon to prevent the finger from turning.
- If desired, use a ball joint puller and press the pin out of the steering knuckle arm.
An alternative is a heavy hammer, tap it on the end of the fist boss from the side along the axis of the lever, alternating blows on the fasteners from above - Pull the finger out of the swing arm socket
- We screw the new one in the reverse order of removal, until the locknut is installed in the place where it was before.
- We place the hinge pin in the socket of the steering knuckle lever, and tighten the new pin well, holding it from turning
- Tighten with good force, do not break the thread of the lock nut of the rod end
- Having completed the work on both sides to replace the steering tips, we go to a technical service, where we set the angles of the car’s wheels
Replacing Renault Logan steering wheels incorrectly
Right
Video on youtube:
How to change steering tips on a Renault Logan with a 16 valve engine and automatic transmission...
Continuation of the topic of today's videos - replacing Logan steering ends.
Before carrying out the work, steering tips were purchased in advance, which have been lying in the garage for almost six months now, waiting to be put to work.
These are products from Febi Bilstein (Germany). The company's mark is stamped on the back of the tip under the finger.
Included with the steering end are nuts for fastening the pins with a self-locking insert and for connecting to the rods. I installed the original pin nuts that were included in the kit on the car when I lubricated the steering pins under the protective covers. Then the rubber boots were removed, and lubricant was replenished into the assembly. Therefore, I purchased new nuts, also with a locking insert.
The nuts are made from the Belibeysky plant, Republic of Bashkiria.
Reminder:
The plastic cover on the steering pin must be removed before installing it as it is for transport purposes only. Retains boot and threaded part of tip.
Every time you replace a Renault Logan steering wheel, you need to install new nuts.
And one more useful tip. If the rubber boot of the steering link breaks, you can install a boot from the steering tip of a VAZ 2108 car.
The tips on the right and left are mirrored. Since they are different, you need to pay attention when buying, choosing the right or left. In order not to confuse the tips, there is 1 notch on one of them near the anthers, and 2 on the second.
With 1 notch there will be a right tip in the direction of travel of the car, and with 2 notches it will be on the left.
Tip replacement work
For ease of work, we will need to jack up the front wheels and remove them, not forgetting about the sliding shoes for the rear wheels and the safety net for the body.
Plus, before work, raise the brake handle all the way.
Along the way, I demonstrate in the video the entire necessary set of tools that I always take with me on the road. These are various wrenches, sockets, various screwdrivers, a set of probes, clamps, etc., everything that can be useful on the road when repairing a car with your own hands...
Let's get back to work...
We unscrew the central part of the cap to get to the bolts and use a wheel wrench to loosen the wheel bolts.
Then lift the wheel using a jack. We install an additional support under the body and remove the wheel.
Now you can proceed directly to replacing the tip. To do this, we give back the pin fastening nut, having previously treated it with a liquid wrench.
But we also treat the lock nut of the rod with liquid so that it “comes off” before work.
Then we remove dirt from the threads using a metal brush, spray the nuts with liquid again and you can unscrew the connections. First we give the nut at the junction of the tip with the steering rod.
We carry out the work using an open-end wrench set to “21”. To increase the force, add a small auxiliary tube to the wrench. You can release the nut either from under the wheel niche from above or from the inspection hole.
Then, using an open-end or socket wrench set to “17”, unscrew the steering pin nut.
To prevent the finger itself from rotating in the tip, we insert an asterisk key into its upper part to fix it (see photo above). In my case, the nut unscrewed without fixing the pin.
Removing the pin from the steering knuckle
Then, without a special puller, you can remove the pin from the steering knuckle joint by hitting the metal “bump” on the side with a hammer. In order not to break the thread, it is better not to unscrew the nut completely.
If after lateral blows to the “bumps” the finger does not come out of the connection, you can hit the nut from above. This is only if the tip will not be installed again. A strong impact may damage the threaded part.
Then, after the finger has come out of the connection, we tighten the nut connecting the tip with the rod inward along the thread, as much as the thread allows. Then, without unscrewing the tip from the rod, we wrap a layer of electrical tape onto the freed part of the thread.
This is done so that when installing a new tip, screw it exactly to the beginning of this electrical tape.
This must be done in order not to disrupt the wheel toe angle parameters. After replacing the tips, you will still need to immediately go to a car service center where they perform Renault Logan wheel alignment. They need to be checked and most likely adjusted. On a Reno Logan car, only the relative position of the wheels is regulated, and there is no camber.
After applying a layer of electrical tape, unscrew the old tip and install a new one, screwing it to the edge of the applied electrical tape on the steering rod threads.
Installing the pin in the steering knuckle
Then we put the tip pin in place in the steering knuckle and tighten the nut securing it and tighten it completely.
We remove the electrical tape on the rod and tighten the lock nut well with a certain force. I should have replaced the old nut, but I forgot to do it and also wrapped a layer of electrical tape for control.
Therefore, I decided to leave the old tie rod nut, and it would be advisable for you to change it.
If the nut on the connection is very tight, you need to use a gas wrench to hold the steering rod from turning. Then we put the wheel in place, without first tightening the wheel bolts until they stop. We remove the stop and jack and tighten it completely.
At this point the left tie rod end was changed. As we can see, this work was completed without the use of an inspection hole or overpass, I just needed a flat area.
The right steering tip changes in the same way as the left...
The factory nut is a little lower than the Belebeyskaya one, but the length of the thread on the pin is enough to install without any problems.
After replacement, don’t forget to visit a wheel alignment service center.
Source: https://www.aauhadullin.ru/2011/07/zamena-rulevyx-nakonechnikov-reno-logan/
Adjustment work
To troubleshoot problems, another method is used - you need to tighten the adjusting plug.
Attention ! When making repairs yourself, you need to correctly calculate the force: if you tighten the steering rack incorrectly, the work will need to be redone, and other elements may fail.
The problem of steering wheel knocking is solved by adjusting the distance between the rack and gear. In this case, it is enough to tighten the steering rack as much as possible, and the problem may disappear. The adjustment features vary depending on the presence or absence of power steering.
With power steering
Situations where, with the engine turned off, turning the steering wheel causes a knock in the steering rack, according to the manufacturer’s instructions, do not require adjustment, although the mechanism contains a special nut. After starting the engine, you should wait 10–20 seconds, and the noise most often goes away. Auto service specialists claim that this is an indicator of the normal operation of the power steering, and no intervention is required.
If the problem is not resolved, then before adjusting you should bend the tin washer (heat shield). This will protect the car from expiration of warranty service. The washer fits tightly to the crankcase bolts.
In the absence of power steering
In this case, you will need a 10mm hexagon. Working algorithm:
- Scrolling to the right reduces the gap.
- The car is placed on the pit, the wheels are tightly fixed.
- Use a 10 key to remove the crankcase protection.
- The nut is located remotely and you need to remove the rubber plug, after which you can find out its location by touch.
- Removal is carried out using one of the keys - flexible or L-shaped, with a handle length of at least 10 cm.
- The nut is removed.
The adjustment is carried out as follows:
- The nut rotates 15–20 degrees to the right.
- The partner actively turns the steering wheel in both directions.
- If the knock remains, then you should do another broach.
- When the knocking is eliminated, a control pull is performed another 10 degrees.