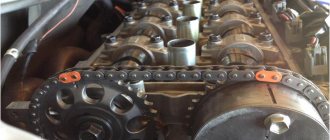
Cause of smoke in the exhaust pipe
In order to understand the question of why the engine smokes, you need to have an idea of what happens in it during operation.
A fuel mixture is formed in the combustion chamber, which is compressed by the piston and ignited by a spark from the spark plug. The mixture is supplied through the inlet valves, and the spent mixture is discharged through the outlet valves. The pistons have special oil intake rings; they are needed to collect excess oil on the cylinder walls so that it does not enter the combustion chamber.
The engine valves also have special seals (caps), which serve to ensure that the oil located in the cylinder head does not enter the combustion chamber. In addition, spark plugs also play an important role, and if they have a weak spark, or the gaps between the electrodes are incorrectly set, then the fuel mixture in the engine will not burn completely.
Based on this, we can identify the following causes of engine smoke.
- Spark plug. If the spark plugs are faulty, that is, they produce a weak spark, or the gaps between their electrodes are set incorrectly, then the fuel mixture does not burn completely and is discharged from the combustion chamber with blue smoke. In the most severe cases it may be black.
- Piston oil intake rings. As stated above, oil intake rings perform a function related to cleaning the cylinder walls of excess oil so that it does not enter the combustion chamber. They are subject to a powerful frictional force. If they wear out, the oil enters the combustion chamber and ignites along with the fuel mixture. In this case, black smoke appears. Similar functions are also performed by engine rings, which also remove excess oil from the surface of the cylinders and can wear out over time.
- Valve caps. These are seals that serve to prevent the oil in the cylinder head from entering the combustion chamber, and are made of dense rubber. When it wears out, the lubricant enters the combustion chamber and ignites. This produces white (or bluish) smoke.
The last two reasons for smokiness will be discussed below. If a car owner notices the appearance of blue or blue smoke, he needs to pay close attention to the operation of the power unit’s spark plugs and have them diagnosed or replaced.
You need to remember that sometimes the cause of smoke in the exhaust pipe can be bad gasoline. It may contain various additives or additives that will create black or other colored smoke. This problem usually disappears when refueling with other fuel.
Diagnosis of faulty engine oil rings
Ignoring this problem can lead to the fact that the rings will not remove the lubricant, and therefore it will need to be constantly refilled. In addition, the rings may become stuck and will need to be decoked. You can learn how to decarbonize stuck rings from other publications. But it is better to do this at a specialized service station.
Now let's move on to consider the question of how to diagnose this problem.
There are two ways, the first is a compression test, which will be discussed in detail below.
The second is diagnostics with the power unit running.
In order to determine the problem with the rings, it is imperative to warm up the engine to operating temperature, since this problem only appears when the power unit is running hot.
Then press the gas pedal, giving standard or increased speed. If black smoke comes from the exhaust pipe, then the problem is in the rings and they need to be replaced.
How to replace the piston rings in this case. Here you will have to disassemble the cylinder head, remove the pistons, buy a new set of rings and replace them. If the car is foreign-made, then it is better to entrust such work to specialists, since doing this without removing the engine will be problematic.
It is important to remember that if the problem is in the rings, then the engine will generally have difficulty starting after a long period of inactivity.
Diagnosis of faulty valve caps
This problem can be detected when the engine is running cold, or while driving.
Let's consider the first case. The car enthusiast should park the car in a garage or other place and wait until the engine cools down. After this, put it in neutral gear and start the engine, giving speed.
When starting in this way, white or bluish smoke will pour out of the exhaust pipe. This means that oil enters the combustion chamber through the valve caps.
The second method requires the driver to be observant. When the car is moving, you need to accelerate it, then brake the engine, and press the gas pedal again, giving significant speed. In this case, you need to constantly look in the rearview mirror. If white or bluish smoke starts pouring out, then you can safely diagnose a faulty cap.
What to do in this case. This problem can be solved in your garage. You just need to remove the old seals and replace them with new ones. This type of work does not require great skills and even a beginner can handle it.
It is important to remember that if the car still smokes with replaced oil seals, then the problem may be in other engine components, so in this case it is better to contact specialists and carry out professional diagnostics.
Diagnostics using compression
To do this, you will need the help of a friend and the presence of the device itself.
To carry it out correctly, you need to adhere to the following algorithm. First you need to put the car in the garage and warm up its engine to operating temperature.
After this, disconnect the spark plug of the first cylinder and insert a compression gauge there. Using the starter, start the engine for a few seconds (crank the crankshaft), and remember the pressure that the device shows.
Next, you need to pour no more than 20 grams of oil into the cylinder chamber and turn the crankshaft again.
If the pressure in the first case is low, and in the second case it increases, then the problem is in the piston rings and they definitely need to be changed.
Next, the second and subsequent candles are removed, and similar manipulations are carried out.
As you can see, there is nothing complicated in such a diagnosis, but it helps to identify one of the problems with the appearance of smoke.
It is important to remember that loss of engine power at high speeds or loads also indicates that the piston rings are worn out.
Purpose of oil scraper piston rings
Oil control piston rings consist of 3 main rings: upper, compression-oil control and lower. Some varieties consist of only one ring and a spring. The following tasks are performed using the presented spare parts:
- Protects pistons from overheating by removing half the heat to the cylindrical walls. Thanks to this, the piston is protected from the formation of defects and retains the integrity of its structure longer.
- Maintains the tightness of the cylinders and thus prevents the penetration of gas into the crankcase of the car engine.
- Removal of excess oil from the mirrors in the cylinder, and protection of the combustion chamber from the penetration of excess amounts of technical fluids.
What is a correction check called?
A fiscal document with this name must be punched if it turns out that when closing a shift, the amount of cash in the cash register does not coincide with the numbers that should have been, in the direction of increasing. Although in this case a correction check alone is not enough. The cashier will have to write a statement and attach an explanatory note to it. This documentation will be needed to explain to tax specialists why the adjustment was required. They must confirm the accidental occurrence of cash surpluses. This situation does not involve punching the refund check.
In what cases can you break through?
Only two are considered valid reasons for punching a correction document. It could be:
- if there is a cash register failure;
- if the cashier made a mistake.
The human factor seriously influences the number of errors. The most common cases that lead to the need for correction include the following actions of the cashier:
- He accidentally charges more than the buyer paid. For example, a purchase was made in the amount of 90 rubles, but an extra zero appeared on the receipt, and the fact that it was no longer 90, but 900 rubles, became clear only at the end of the shift.
- The buyer paid for the goods, but the seller forgot to punch and give him a receipt.
- The cashier mixed up the action algorithms and replaced the correction check with a receipt return check.
However, these are far from the only reasons for possible accounting problems. Disruptions in the normal functioning of online cash registers make their negative contribution. Cash problems can occur due to equipment malfunction, power surges, power outages, or other technical problems. There are breakdowns of cash register machines - they overheat and turn off.
Sometimes there are massive failures in the operation of online cash register equipment. An illustrative example from December 2020: problematic firmware caused the failure of equipment of the ShTRIKH-M form. Entrepreneurs had to take payment without punching. All these amounts were then indicated in the correction checks.
What is indicated in the correction check
In terms of their details, adjustment checks are practically no different from ordinary checks punched directly upon purchase. They must indicate:
- TIN of an entrepreneur or legal entity.
- Personal number of cash register equipment.
- The tax system used.
- The address where the payment took place.
- Fiscal sign.
However, this is not complete identity; there is still a certain difference. The correction receipt does not contain any indication of the product range, its volume, or price. This does not need to be done because they are not provided to buyers. They are required only so that the OFD and the Federal Tax Service can conduct their inspections. There is also no QR code, because in this case clients do not need to check whether the document is genuine.
It is necessary to issue a correction check at the online cash register not only for internal use, but also for the activities of inspection and control structures. Therefore, it is enough to indicate one total adjustment amount. There is no need to break down into different product categories.
Reasons causing a decrease in pressure in the cylinders
If, as a result of the check, it turns out that the compression in a diesel engine is underestimated, then in order to increase it, it is necessary to carry out a comprehensive check and find out the reasons that caused this defect. The reasons for low pressure in the cylinders of a diesel engine are the following factors:
- piston malfunction;
- occurrence of compression rings;
- scuffs and chips on the cylinder walls;
- cracks in the cylinder block;
- failure of the cylinder block gasket, the appearance of irregularities on the adjacent surface;
- violation of the tightness of the engine housing, formation of cracks;
- the appearance of soot layers inside the power unit due to the use of poor quality fuel;
- valve failure due to burnout or incorrect settings.
The compression indicator is directly dependent on the degree of wear of the parts included in the piston group, on the valves and clearances responsible for the temperature of the compressed air, established during their adjustment.
If defects are detected in the piston or compression rings, the entire piston group must be repaired. To increase the pressure when scoring is detected on the cylinders, it is necessary to grind the walls or replace the entire cylinder block.
Worn and burnt valves need to be replaced and subsequently adjusted. Incorrect valve adjustment causes uneven compression in the cylinders.
Carrying out a comprehensive inspection of diesel engines is a mandatory measure to prevent final engine failure.
The condition of all engine elements affects the compression level. A decrease in this indicator indicates severe wear of the power unit mechanisms. When carrying out complex diagnostics, the level of compressed air pressure in the cylinders of diesel engines is always measured.
When is buying the worst option?
Factory dimmers can provide the expected economic result or increase living comfort in all typical situations. In addition, their prices vary, which will allow you to make a purchase that suits your pocket.
But still, in a number of situations, you may not be able to find an option that is suitable in size or power, so homemade products may be the solution.
There are non-standard situations when industrial products do not satisfy human needs. For example, this happens if a small dimmer is needed, and there is a desire to improve the aesthetic properties of its control panel.
Or a person considers it necessary to increase efficiency, make operation more convenient, achieve some color effects, or improve any other characteristic.
You can also perform the assembly yourself if you have the necessary components, which will significantly reduce the cost of the procedure.
Vibration at idle reasons
In idle mode, the engine runs, but does not transmit torque to the vehicle's wheels. The crankshaft rotates at a speed of approximately 750 to 950 rpm, depending on the type of engine. The control unit settings maintain the idle speed at the level specified by the manufacturer, since their “drawdown” will lead to the engine stalling, and an increase will cause unreasonably high consumption of expensive fuel. In addition, the central piston group will experience high loads, which will reduce engine life.
A serviceable and well-tuned engine usually operates quietly; the driver in the cabin hears only a slight noise and can feel minimal vibration from the engine compartment. Some "shuddering" may be normal after a cold start, especially in winter.
But as the power unit warms up, when the parts expand from the heat and take their normal sizes, it should return to normal: therefore, it is important to warm up the engine in winter. In this case, there should be no failures in engine operation, jerking, misfires, knocking or other extraneous sounds.
If engine vibration appears while driving or at idle speed, becomes noticeable and causes problems, even stopping the internal combustion engine, it means that there are some problems with the unit itself or attachments, which, in contact with the body, transmit vibration to it.
The main causes of engine vibration during idle operation:
- engine tripping;
- poor engine mounting;
- failure of the pillows on which the power unit rests;
- the crankshaft is unbalanced.
Let's take a closer look at them.
Problems with stool
If a child has bowel movements more than three times a day, it means diarrhea has begun. Rare bowel movements (once a day or less) indicate the onset of constipation. The presence of mucous secretions and white lumps in the stool indicates that the food has not been completely digested. These signs allow you to determine that your baby has digestive problems.
Do not rush to abandon the chosen mixture and immediately change it to another. Remember: changing the formula is stressful for the baby’s body. Watch your child, perhaps all the troubles will go away on their own, because the baby needs to get used to new food. Wait a few days, and if the symptoms do not go away, you should stop feeding your baby this product. Contact your pediatrician, he will make the correct diagnosis and help you choose the appropriate baby food.
Diesel cycle internal combustion engine
Vibration transmitted to the body is one of the features of the operation of a diesel engine, which is determined by the nature of ignition and combustion of diesel fuel.
But it is important to distinguish the normal vibration level from obvious symptoms of a malfunction
We recommend that you start checking the fuel system with computer diagnostics, or more precisely, with real-time reading of injection correction. A positive correction will indicate an overflow of fuel, respectively, a negative correction will indicate a decrease in the injection time by the computer. This indicator does not mean that the injector is faulty. But it perfectly shows how, by adjusting the amount of fuel injected, the ECU tries to maintain stable engine operation at idle.
The cause of increased vibrations may well be the high-pressure fuel pump itself. If vibration is transmitted to the body only in the first minutes after a cold start, most likely the cause is a faulty glow plug. Also, do not rule out problems with loss of compression.
Imbalance after repair
If vibration at idle appears after a major engine overhaul, the reason may be due to negligence in the selection of parts. Negative factors include:
- installation of pistons, connecting rods, which differ significantly in weight;
- discrepancy between the gaps in the cylinder-piston group, as a result of which the relocation of the pistons occurs with an impact;
- unbalanced crankshaft;
- critical wear of seats, poor lapping of valve chamfers, incorrect adjustment of thermal clearance. These factors can cause loss of compression and vibration.
On cars with a manual transmission, vibrations at idle and medium speeds appear after installing a low-quality clutch kit. The imbalance transmitted to the body will increase if, after repeated overheating, the flywheel has not been machined and balanced. If the flywheel is excessively lightened and the inertial mass is reduced, smoothing out the uneven rotation of the crankshaft, the engine will operate unstably at idle speed.
Many engines begin to vibrate at idle after removing the balancer shafts. Owners get rid of the balance shaft mechanism so as not to spend money on their repair. Removing balancers not only provokes vibrations, but also increases the load on the crankshaft, which reduces its service life.
The operation of an internal combustion engine is always accompanied by vibrations. Normally, they are little noticeable to the driver, but sometimes the engine begins to vibrate and “jerk” very strongly, both while driving and at idle. Why does this happen, why is vibration from the engine at idle transferred to the body, and what to do about it?
The engine started smoking: caps or rings
Quite often you notice that increased smoke appears from the exhaust pipe of a car. Sometimes situations get to the point where the car is literally shrouded in clouds of thick smoke. It is quite obvious that for every car enthusiast, the appearance of excessive smoke indicates the emergence of certain problems with the internal combustion engine.
Let us immediately note that not always, but often, increased smoke indicates serious problems with the engine. At the same time, it will not be difficult for experienced drivers to determine the cause by the color and composition of the exhaust. However, for beginners it is not always easy to understand why the engine smokes, as well as to determine the cause and identify the rings or caps. Let's figure it out.
Compression and throttle
Adjusting valves on a VAZ 2107 with your own hands
You can measure compression with the throttle open or closed. A different approach reveals individual nuances of wear of engine parts. The decision to measure compression with the throttle valve closed will mean that not much air will get into the cylinders.
The compression rate in this case is low (about 0.6-0.8 MPa). This method makes it possible to achieve high sensitivity of readings to the slightest leaks, since little air enters the cylinder. Even small leaks can reduce the value significantly. Based on the evidence obtained, a number of certain conclusions can be drawn:
- the valve is not completely adjacent to the seat;
- the valve may be stuck;
- camshaft cam wear;
- crack in the wall of the combustion chamber;
- the head gasket is worn out;
Problems with valves can arise both as a result of wear and after repairs, especially in mechanisms with hydraulic compensators. The shape of the camshaft cam profile may wear unevenly, especially with runout.
A compression test with the throttle valve open means that much more air will enter the cylinder compared to a compression test with the throttle valve closed. An increase in air volume will cause the pressure in the cylinder to increase noticeably. It turns out that the presence of leaks will lead to a more intense loss of compression in such conditions. But potential leaks will still be able to let in less air compared to large volumes when it is supplied. The result will be that the compression will not drop much (about 0.8-0.9 MPa). Measuring engine compression with the throttle valve open allows you to identify serious damage:
- destruction or burnout of the piston;
- fracture or deformation of piston rings;
- sticking (coking) of rings in the piston grooves;
- burnout of the valve or bending of the valve stem;
- wear (scoring) of the surface of the cylinder mirror;
Additionally, during the measurement process, it is necessary to pay attention to how the pressure in the cylinder increases. This approach allows you to more accurately localize one or another fault.
If at the moment of the first stroke the compression meter shows low compression of up to 0.4 MPa, but already on the next stroke a noticeable rise is evident, then this may indicate wear of the piston rings. When, at the moment of the first stroke, the pressure indicator is around 0.7 or 0.9 MPa, but does not increase any further, then problems with valve tightness are likely.
White or black smoke appears from the exhaust pipe
Let's start with the main types of smoke to better understand the problem. So, white smoke from the exhaust pipe is quite normal for warming up a cold engine. Moreover, it is a mistake to believe that it is smoke. It's actually steam. Water in vapor form is a natural product of the engine.
In an unheated exhaust system, this vapor partially condenses and becomes visible, and water usually appears at the end of the exhaust pipe. As the engine and exhaust system warm up, condensation decreases.
The colder the environment, the denser the vapor produced. At temperatures below 10 ° C, steam is formed even on a well-warmed engine, and in frosty temperatures of minus 20 - 25 degrees it acquires a thick white color with a bluish tint. Air humidity also affects the color and saturation of steam. The larger it is, the thicker the steam.
Note that if steam is visible in the warm season, it is quite possible that this is due to coolant getting into the cylinders. Its shade depends on the composition of the coolant, weather, lighting, and also on the amount of coolant in the combustion chamber. Sometimes it can take on a bluish tint, resembling “oily” smoke. But, unlike oil smoke, which leaves a bluish mist in the air for a long time, steam quickly dissipates.
It is quite difficult for an inexperienced motorist to determine by appearance what is the source of the smoke. In this case, you can use a proven verification method. To do this, on a well-heated engine, it is necessary to briefly cover the cut of the exhaust pipe with a sheet of white paper, while the condensed steam in the form of drops of water, when it hits the paper, will gradually evaporate and will not leave obvious greasy marks.
If this simple test confirms that it is steam rather than oil smoke coming out of the exhaust system, action must be taken to correct the problem that is allowing coolant to enter the cylinders.
Most often, liquid can enter the cylinders through the head gasket due to insufficient traction (in winter, coolant leakage is often observed at the junction of the block and head), burnout, and less often as a result of the formation of microcracks in the head or cylinder block. By opening the radiator cap or expansion tank, it is easy to detect the smell of exhaust gases and a film of oil on the surface of the coolant.
All problems associated with white smoke from the exhaust pipe require elimination of not only the direct causes, but also a mandatory check of systems that can affect their occurrence: thermostat, switch sensor, clutch or fan itself, condition of the radiator, its plugs, hoses or connections. If white smoke and accompanying defects are noticed, then the car cannot be operated, as the defects progress quickly.
- Let's move on. Black smoke from the exhaust pipe indicates an over-enrichment of the fuel-air mixture or a deterioration in fuel combustion conditions. Therefore, we are talking about malfunctions of the fuel supply system. Such smoke is usually clearly visible against a light background and represents soot particles - products of incomplete combustion of fuel.
Black smoke is accompanied by high fuel consumption, often poor starting, unstable engine operation, high toxicity of exhaust gases, and often loss of power due to a non-optimal composition of the air-fuel mixture.
By the way, in carburetor engines, black smoke usually occurs due to overflow in the float chamber due to a defective needle valve or due to coking of the air jets. In gasoline engines with electronic fuel injection, over-enrichment of the mixture usually occurs due to malfunction and failure of sensors (oxygen, air flow, etc.), as well as leakage of injectors. In diesel engines, black smoke appears when there is a malfunction in the high-pressure pump, injectors, or when the injection timing is not optimal.
To carry out accelerated diagnostics, it is also necessary to examine the condition of the spark plugs. Black deposits indicate that there is a need to replace the spark plugs with new ones, and diagnostics and adjustment of the power unit systems may also be required.
Please note that it is the bluish smoke (gray) that is associated with the combustion of motor oil in the engine cylinders. There can be many reasons for this:
- Damage to valve stem seals;
- The occurrence of rings designed to remove residual oil from the cylinder walls;
- Turbocharger malfunction;
- The oil used is of poor quality, etc.;
Now let's take a closer look at the problem of damage to caps and rings. Let us note that smoking and the most common causes of oil consumption are caps and rings.
The purpose of the caps is to retain oil while the valves are operating. Poor quality and malfunction of these elements lead to loss of tightness; lubricant constantly leaks and accumulates in the cylinders.
As soon as the driver starts a cold engine after the vehicle has been idle for a long time, the accumulated oil will burn along with the fuel in the chamber. As a result, blue or blue smoke comes out of the car's exhaust pipe in a cloud.
How to properly use oil scraper piston rings
To ensure that the presented spare parts last as long as possible, experts recommend following the following recommendations:
- Use sufficiently high-quality oils and replace basic technical fluids on time;
- Change the air filter in a timely manner;
- Use only good fuel and replace the car’s fuel filter on time;
- In winter, warm up the engine for a long time;
- Do not overheat the engine;
- Repair worn cylinders in a timely manner;
- After replacement, allow the new rings to break in and do not overload the engine for 5,000 kilometers.
Repair work
You can change the valve stem seals and rings yourself.
This is interesting: Replacing the front bearing hub of a VAZ 2108: step-by-step instructions
Replacing valve stem seals
The oil seals were replaced on one of the most common engines produced by Toyota Corolla - 4A-FE (1.6 l, 4 cyl., 16 cl., 115 hp)
The reason for replacing the caps was several factors:
- the car smokes a lot, especially after a long period of parking or long work at idle
- high oil consumption (up to 700 g/1 thousand km)
- The idle valve is constantly clogged with oil
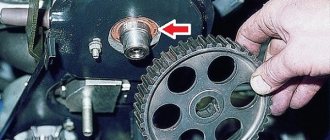
1 First, you will need to purchase a valve cover gasket (1 pc.), sealing rings for spark plug wells (4 pcs.) 2 Camshaft oil seal (1 pc.) 3 Washers for the nuts that hold the valve cover (4 pcs.) 4 MSK (18 pcs.) .) I took the original Hyundai / Kia caps.
5 Desiccant from VAZ-2112, fits like a original one, as well as a remover for old caps. 6 Toyota Corolla Ceres 4E-FE engine 7 Remove the valve cover, which is held on by 4 studs, tightened with nuts. 8 You can unscrew the spark plugs right away, or you can later, it’s not important, but it’s better to cover the spark plug wells so that God forbid something falls in there. I covered them with rags. Next I unscrewed the braid. wiring from the generator and put it aside, but it was necessary to do this right away, before removing the valve cover. 9 Next, turn the wheels to the right and through the hole in the right wheel arch, turn the crankshaft so that the mark on the crankshaft pulley coincides with the number zero (look under the hood from the generator side) (in the photo is the right wheel arch, and the bolt that holds the crankshaft pulley) . Then we make sure that the mark is visible through the hole on the camshaft pulley. 10 Then we make sure that the marks on the camshaft gears match, are opposite each other, in places as in the photo. If all the marks match, then the piston of the first cylinder is at TDC and you can move on. 11 Before removing the intake camshaft, it is necessary to secure the split gear with a bolt (M8) by screwing it through the hole in the gear. If this is not done, you will have to cock the gear later, otherwise the engine will “diesel”. 12 Remove the camshaft covers and lay them out so that nothing gets mixed up during assembly. 13 The outer covers (one near the distributor, and two on the opposite side) can stick, like mine, I had to tinker. Then we remove the distributor, having previously marked its initial position! 14 Remove the camshafts and place them so that they do not interfere. 15 This gives access to the pushers with shims and everything else. 16 We take out the pushers, and here you can pull out and measure the thickness of the reg. washers, because There were no dimensions indicated on them. 17 The washers are picked out by something sharp. 18 Next, desiccate the valve, but during desiccation it is better to cover the valve with a rag, otherwise when you press the desiccant, the crackers will fly all over the engine compartment. 19 Remove the spring and see the cap itself. We get it out with the device discussed above. 20 If the cap is old enough, then after you managed to get it, it looks something like this. After you take out the cap, be sure to make sure that there are no pieces of the old cap left there. 21 Next, we put on a new cap, having previously bathed it in oil, first we press it with our hands, and then we select the head according to the diameter and tap it very lightly, as soon as we heard a characteristic sound, as if it was stuck, then that’s it, the cap is seated, 3-5 very light ones are enough hit with a hammer. 22 The new cap is in place. Next, you need to dry the valve back, put the spring in place, having previously smeared the top of the valve with lithol. We take the desiccant, press on the spring and stick crackers onto the lubricant, carefully release the desiccant and make sure that the crackers sit as they should, and that’s it, the valve is ready. 23 Valve components: This is interesting: How to replace the cylinder head gasket on a VAZ 2110 (8 and 16 valves): fault diagnosis
1 – valve holder;
2 – upper valve spring plate;
3 – valve spring;
4 – oil deflector cap;
5 – valve guide bushing;
6 – valve.
24 Next, you need to replace the camshaft oil seal, it does not leak, but it has already become plastic from old age, to replace it you need to unscrew the pulley, the thread is normal, you can unscrew it as in the photo. 25 The pulley cannot be mixed up when being put in place, so there is no need to mark anything. The camshaft oil seal needs to be put on when you install the outer camshaft cover (we lubricate the oil seal before installation), so we will install the pulley at the end together with the timing belt. 26 When everything is ready, we begin to assemble everything in the reverse order, put back the pushers with washers, install the camshafts, make sure that when installing the marks on them match. 27 Next, we install all the camshaft covers in place, do not forget to lubricate the rubbing surfaces with oil; on the three covers shown in the photo, you need to coat the edges with sealant. The sequence of unscrewing and tightening the camshaft cover bolts can be found in manual 28 Lubricate with sealant. 29 The sequence of unscrewing and tightening the camshaft cover bolts can be found in the manual. And then we put on the belt. 30 We change the gaskets of the spark plug wells in the valve cover and the gasket of the valve cover itself, carefully fill the gaskets of the spark plug wells with something similar in diameter, having previously lubricated them with oil 31 After the gaskets are installed, you can put the valve cover back. 32 Before installing the terminal. covers measured the gaps, everything turned out to be normal (for intake 0.25 - 0.3., for exhaust - 0.2 - 0.25) if you look at the manual. We put everything back together, put the terminal in place. cover, all hoses, electric braid. Don’t forget to screw the wiring back to the generator, as well as the oil pressure sensor connector, and you can start the engine.
This is interesting: How to completely disable the alarm on a car: disabling a car alarm with or without your own hands with or without a key fob
Installing valve stem seals with your own hands is not a difficult procedure, but it requires care and experience. During desiccation of the valves, there is a danger of losing the cracker. After this, it will be impossible to put the motor back together. You should also pay attention to protecting the engine from dirt during replacement. If you are not confident in your abilities, do not undertake it.
Replacing piston rings for Toyota Corolla
As a rule, problems with Toyota Corolla piston rings in most cases occur after 90 - 100 thousand kilometers, and the car owner himself may suspect them due to increased engine oil consumption.
Although the service life of piston rings averages 150–250 thousand km, their failure can occur much earlier, which depends not only on operating conditions, but also on the quality of the consumables used.
ATTENTION! These items cannot be repaired. They can only be replaced with new ones. In this case, repair work requires preliminary disassembly of the engine, as well as following a certain replacement schedule specified in the manufacturer’s manuals. Violation of the technological process in this case threatens complete failure of the unit.
In the process of replacing Corolla valve stem seals, as well as piston rings, our service center technicians will not only perform the correct installation of rings, valve stem seals and other elements, but will also conduct a complete diagnosis of the internal combustion engine.
After the replacement of rings on a Toyota Corolla is completely completed, the engine must be run in, which requires gentle operation for at least 3-5 thousand kilometers.
It is possible to replace piston rings as efficiently as possible only in a car service workshop, where a guarantee will be provided for all types of work performed.
Signs of wear on the valve stem seals.
The design of any engine, both domestic and foreign cars, contains oil seals (valve seals).
They are always used when the machine is running, and therefore wear out very quickly. Increasing their service life is a headache for engineers working at automobile factories, but timely diagnosis of signs of wear on valve stem seals, as well as their replacement, is the task of motorists. You can cope with it successfully only in one case, when these very signs are known to you, and if not, then this article will help you.
How do valve stem seals work and when are they considered worn out?
As you know, the valve in the engine is located in two different cavities. One of them implies the presence of motor oil in it, the other, on the contrary, must be isolated from it. In this case, the valve is in constant motion during its operation. In order to maintain the tightness of the hole through which it moves from one environment to another, valve stem seals are exactly what is needed. They are made from special elastic rubber, but over time this rubber tends to age, harden, dry out and collapse, as a result, the caps no longer cope with the task assigned to them and begin to need replacement. The car owner can determine this moment by special signs.
The main signs of wear on valve stem seals.
- Increased oil consumption - if engine oil is consumed in your car more than it should be, it means that it is being wasted somewhere; alternatively, it enters the combustion chamber due to worn out valve seals.
- Oil deposits on spark plugs are a consequence of oil getting into the cylinders.
- Blue exhausts when the car warms up, the engine heats up - the smoke disappears. This phenomenon is a clear sign of a dried out cap, which, when heated to a certain temperature, becomes wider and again begins to successfully cope with the functions assigned to it.
However, be extremely careful, these signs may indicate not only worn valve stem seals, but also other problems with the engine! Therefore, at the time of diagnosis, do not forget to pay attention to:
- mileage - as a rule, oil seals need to be replaced every 70-80 thousand km. mileage;
- compression - if it is reduced, but you did not find any leaks or problems with the valves and/or rings on the pistons, then the problem is definitely in the caps. They should be replaced.
Consequences of driving with worn valve stem seals.
If you missed the moment of failure of the valve seals, then most likely it will lead to the following consequences:
- increased oil consumption, which, firstly, will not have the best effect on your budget, and secondly, will provoke periodic oil starvation, leading to increased wear of parts and the need for premature engine overhaul;
- oiliness and eventual failure of spark plugs;
- burnout of valves - carbon deposits will form wherever there is oil, including on the cylinder walls, which over time will interfere with the closing of the valves and lead to their burnout.
To prevent all this from happening, carry out timely replacement as soon as you notice the first signs of wear on the valve stem seals.
Replacing valve seals: tips.
We will not consider the procedure for replacing valve stem seals now; this is the topic of a separate article, but we will finally mention the main recommendations that will protect you from mistakes. There are only 3 of them:
- to desiccate the valves, always use a special tool - a desiccant, so you will be less likely to break or lose something;
- When changing the caps, cover all the holes on the engine with a rag or foam rubber, they will protect the open cavities from dirt, and you from losing the crackers;
- Before installing the new cap, be sure to lubricate it with oil.
And remember, if you do not have sufficient experience and knowledge in replacing valve seals, if you notice signs of wear, do not experiment, but give your car into the hands of professionals; they will quickly replace the failed parts with new ones and, in this case, will take little. Depending on the car and service station, costs will range from 7 to 20 thousand rubles.
Video.
I recommend reading:
autoepoch.ru
Causes of burnout
Valves burn out for various reasons, including:
- factory defects or low-quality spare parts;
- incorrect valve adjustment or malfunction of hydraulic compensators;
- valve wear (valve stem or guide bushing);
- early or late ignition;
- lean mixture.
No one is immune from purchasing defective and low-quality spare parts, so buy spare parts from trusted sellers who value their reputation. If the valves are adjusted incorrectly (they are tightly clamped), the engine operation will be noticeable by the characteristic “tractor” sound. In this case, due to non-compliance with the thermal clearance, the valve overheats, which will invariably lead to its burnout.
If the ignition is set incorrectly, combustion of the combustible mixture occurs when the valve is open and leads to its malfunction. A lean mixture is dangerous because the combustion temperature of the combustible mixture increases, which leads to overheating and burnout.
Oil slinger rings
| Designs of bearing units. |
Oil flinger rings and grooves are used for liquid lubrication and peripheral speeds above 6 m/s.
On shaft 4 (Fig. 41, d) rings 6 are placed or protrusions are made integral with the shaft. Centrifugal force throws oil from the ring into the annular groove of the cover, from where it flows through the hole into the body. Oil slingers are used to prevent leakage of liquid lubricant from the housing. Once on the ring (or in the groove), the lubricant is thrown by centrifugal force into the cavity of the cover and then flows into the body. These seals operate most effectively at high peripheral speeds in units using liquid lubricant.
| Main dimensions of oil slinger rings, mm. |
Oil deflector rings are made integral with the shaft (Fig. 19, a), installed in a groove on the shaft (Fig. 19 6) or secured to it. Oil deflectors are characterized by simplicity of design, lack of friction and wear of seal parts.
| Sealing devices. |
Oil deflector rings and grooves on the shafts (Fig. 19, b) are necessary to prevent leakage of liquid lubricant from the housing. These seals operate most effectively at high peripheral speeds and only in units lubricated by liquid oils.
Oil deflector rings are made integral with the shaft (Fig. 19, a), installed in a groove on the shaft (Fig. 19, b) or fixed on it.
In some designs, oil deflector rings are used instead of sealing devices (see Fig.
To prevent leakage of liquid lubricant from the housing, oil slingers are widely used (Fig. The lubricant flowing from the housing falls on the slinger ring or into a groove and is thrown into the cavity of the cover by centrifugal force, from where it flows back into the bearing housing through a channel specially designed for this purpose. Oil slingers the rings can be made integral with the shaft (Fig. Oil deflector grooves can be single (Fig. These seals work most effectively at high peripheral speeds and only in units lubricated with liquid oils.
To avoid oil leakage, oil deflector rings are put on the worm shaft journals, and the bearing caps, in addition to oil-retaining labyrinths, have rubber sealing rings. An oil indicator is used to check the oil level in the gearbox. There are two marks on the chrome-plated oil indicator rod: the lower one indicates the presence of a minimum amount of oil in the gearbox, at which its operation is still allowed; upper - indicates that the oil chamber of the gearbox is full.
One-piece gap seal parts, mechanical seals and oil flinger rings are put on the rotor.
To reduce oil leakage along the shaft of the crankcase or frame, oil deflector rings were previously widely used, which were machined on the shaft or mounted on it.
| Diesel D-54 A crankshaft with centrifugal oil purification. |
Since the front and rear ends of the crankshaft extend outward from the crankcase, to prevent oil from leaking out of the crankcase, oil flinger rings, oil seal threads and oil seals are installed at the ends of the shaft.
Causes and symptoms
There are no engines that are perfectly clean inside. Except at the factory. But it happens that some carbon deposits form after 200 thousand kilometers, while others calmly drive all 400-500 thousand. An interesting question, you will agree. But the answer is elementary.
It all depends on how much the so-called provoking factors influence the engine. These include:
- low quality fuel;
- using oil that is not suitable for the vehicle;
- ignoring basic rules for operating the machine;
- the use of structural elements in the engine that do not correspond to it (all kinds of tuning, etc.).
And the more such factors, the sooner decarbonization will be required. Is it necessary? Certainly. Is it worth doing it yourself? Here you can choose for yourself. I did it myself, nothing complicated.
A correct assessment of the situation allows you to start cleaning the insides of the engine in a timely manner. To do this, listen to the car. No, you don't have to stand and listen to her
Just while driving, pay attention to the characteristic signs of coking:
- dynamics drop and power deteriorates;
- fuel consumption increases;
- the engine rattles like an old diesel when starting;
- compression drops;
- there is a lot of unnecessary noise;
- the motor is troublesome;
- Dark smoke comes out of the exhaust and smokes constantly.
Yes, I would call such signs indirect, since there are a number of other reasons that can provoke such phenomena. Water gets into the oil and that's where you get the smoke.
What to do in this situation? You can disassemble the assembly and check the condition of the elements. If you have never done decarbonization, and the car has a lot of mileage, then even a preventative flush will never hurt.
How to identify valve stem seals
The oil seal (also known as valve seal) is a very small but important element of the engine. Its main purpose is to prevent excess engine oil from leaking. It must fit tightly to the valve and let through the amount of oil that is needed to lubricate it. Oil seals are one of the vulnerable and hard-to-reach parts of the gas distribution mechanism.
1
The oil seal is a cap with a reinforced sleeve and an expander spring, which presses the sealing edge against the rod. The effective operation of the cap is determined by the material of manufacture. Acrylic fluorine rubber products have a high degree of compaction. It is extremely important to know which caps are installed in the car engine, since when replacing them you need to use only original caps.
2
The number of valve stem seals in the engine is easy to determine: how many valves - so many caps. Different car models have different numbers of valves.
3
The oil seals are located directly on the valves themselves. The valves, in turn, are located in the head of the engine block. These products wear out quickly and must be replaced periodically.
4
Car service technicians recommend changing the caps every 50 thousand kilometers to avoid problems with the engine. They can be checked for malfunction by touch - change if the oil seal is hard. Obvious signs of wear: increased oil consumption, a bluish, bluish tint of exhaust gases, oil stains appear on the threads of the spark plugs.
5
You can change the valve stem seals yourself or at a service center. To remove them you need a special tool - a valve depressurizer. This procedure is not complicated, but it requires certain skills and experience.
Sealing additives can be used to temporarily extend the life of worn valves. They fill gaps and soften the valve seal.
sovetclub.ru
Problems with engine mounts and mountings
Defective engine mounts are a common cause of vibration. Normally, the power unit supports take on the loads, so the driver does not feel them. But pillows with fastenings, like other structural components, are subject to wear and tear, and over time may lose their functions.
Mitsubishi Delica pillows:
You can determine the wear of the pillows yourself; it is advisable to do this together. It is necessary to jerk the car back and forth with the hood open, and an assistant must record the engine deflection angles during the rocking process. If everything is in order with the fastenings, the deviations in all directions will be uniform. If there is a difference between the angles, then the corresponding pillows need to be replaced.