Equipment
Author temass
Date
Feb 17, 2016
0
762 Share
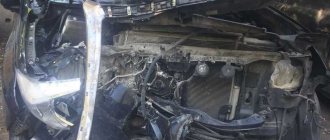
A small scratch on a car body is the beginning of a big problem that entails serious body repairs. Crack after crack, the car's paintwork becomes unusable, is not pleasing to the eye and does not perform well in its protective function. At this moment, the thought of painting the car for the first time comes to mind in order to restore protection and appearance.
Protecting some parts of the car when painting
- Body painting tools
- Paint and varnish materials for work
- Types of paint compositions for car painting
- Primer - what is it for?
- Automotive putty
- Polishing pastes – how to choose the right one?
The painting procedure in professional workshops is expensive, so it is advisable to paint the body yourself - you will need less money, and you can have a good time, which is suitable for avid car enthusiasts. What equipment, tools and materials will be needed to paint the body in a garage, what types of paint to use, why do you need to prime and putty the body, and how to achieve a good result?
How to dilute car putty? Useful tips
During various body works, you still have to ask about how to dilute car putty.
This question makes sense regardless of whether you have minor scratches on board or whether the corrosion has thoroughly affected the wings or sills - it will simply be necessary to align the cleaned and treated fragments before painting. And after cleaning up existing damage, using a rust converter and other necessary procedures, it’s time to putty. For the most part, working with it does not require any special skills, although it does take a lot of time. Therefore, most car owners cope with the task on their own - at least if the amount of work is not too large. After all, if you turn to a certified service with such a problem, you can lose quite a significant amount of money. In addition, the local craftsmen, as a rule, persuade the client to paint the entire body after carrying out anti-corrosion and restoration work, and this costs a pretty penny.
How to dilute car putty, in theory, should be written on the product offered by the manufacturer. However, many car enthusiasts who are planning to straighten their car are faced with the lack of sufficiently clear instructions - both on the packaging and in the form of a separate insert.
A mysterious tube must be included with a jar of car putty. The inscription on it may be different: some manufacturers claim that it is a hardener, others call the substance a catalyst, and others call it an activator. However, it's not the name that matters. Without this additive, the putty will not harden, or it will dry out until the second coming. But how much should be added?
In principle, if you have a wide range of work to do, and all the purchased putty will be used, then you don’t have to think too much and pour the tube into the bucket with the base. However, much more often a relatively small amount of putty is required - to correct the sills or to smooth out a fender dented by a neighbor in the parking lot.
If you dilute the entire jar, then you will have to throw away the unused material - after combining with the hardener, the putty begins to set even in a closed bucket, even if it takes quite some time.
When you need a little putty, but there is no indication on the can, take as a basis the ratio of activator to base as 1:100 - this is what most brands mean. But there are manufacturers whose putties require an even smaller amount of hardener (1 to 200, for example). Therefore, in the absence of precise instructions on the can, it is better to look for what is written about this on the manufacturer’s official websites.
It should be remembered that experienced repairers advise taking into account the temperature around the car being restored. If, to put it mildly, it is not hot (say, + 10 or below), then it is worth adding more hardener.
At what temperature can you putty walls?
In the modern world, no repair work is complete without putty. As a result of their implementation, a flat surface is obtained, on which it is convenient to glue wallpaper and apply other decorative elements. Puttying walls and installing plasterboard panels is easy to do if you follow certain recommendations. Using the right construction tools in the right order and strictly following the procedure will allow you to successfully complete such work, even for those who are doing it for the first time.
Puttying process
Before starting work, it is necessary to select the material of the required quality, which is ideal for the room being repaired. There are the following types of putties presented on the website https://yugcom.com/shpaklevka:
- with the addition of gypsum, used for coatings of low humidity (hallway, corridor)
- Polymer, for medium humidity.
- Made of cement, resistant to high levels of humidity (bathroom, toilet)
Particular attention is paid to having the right tools. The service life of the putty also depends on the correctly selected construction tools. To complete the work, you will need the following tools: two spatulas of different sizes, a drill with a special attachment, a suitable container for mixing the mixture and a building level.
After selecting all the necessary materials, you can begin the main stages of work:
One of the most responsible, it should be taken very seriously. Wallpaper, various types of stains, and old plaster should be completely removed from the wall. After this, a layer of primer is applied to the wall.
First, you should carefully study the preparation recommendations and carry out all the actions completely in accordance with what is written. Before applying the finished mixture, the surface should be watered with plenty of water.
If there are any unevenness or small cracks on the surface of the wall, they must be completely sealed with putty and wait for it to dry completely. A small spatula will work well for this type of work. After a short period of time, using a larger spatula, apply the main layer of the mixture. During the application process, you should slowly level the already applied layer. The thickness of one layer should not exceed 1.5 cm. Craftsmen advise placing it at an angle of 80 degrees. If necessary, make an angle, use an angle spatula.
- Surface grinding work.
After completing all putty work, you should wait about 24 hours so that both the wall itself and the other materials used are completely dry. After this, all unevenness is smoothed out using a piece of sandpaper.
The sanded surface is primed. After this, it is ready for painting in the desired color, or applying decorative elements or wallpapering.
Temperature
At first glance, you may get the wrong impression that the process is very simple and straightforward. But there are features that also need to be taken into account. One of them is the correct temperature regime.
Work inside and outside the premises is not tied to a specific time of year. The room temperature should not fall below 5 degrees Celsius, and the humidity level should not fall below 10%. These are the most appropriate parameters; if not observed, the coating may crumble. Places exposed to low temperatures should be treated before the onset of the cold season. The interior decoration of the room can be carried out in winter, provided the proper level of heating. Good ventilation of the room plays an important role, which makes it possible to remove excess moisture.
General rules
One of the most common mistakes when preparing putty is combining two masses at once, completely, and carelessly kneading them. As a result, the putty turns out to be non-uniform, lays down unevenly and hardens at different speeds. To achieve the desired result, that is, a smooth surface that is easy to grind, without breaking off pieces in the process, the hardener should be introduced gradually, in small doses, carefully mixing the base each time.
It is easy to determine whether mixing is sufficient: the activator is specially made pink. As long as there are streaks in the mass, work with the spatula does not stop.
For ease of mixing and speeding up the process, people recommend using two spatulas - a large one and a smaller one. But whether to take this advice is up to you.
It happens that, even knowing how to dilute putty for cars, or having carefully read the instructions (if, surprisingly, they are included in the kit), the repairman receives a smooth, even, but runny mass that does not want to harden. The situation can be saved by drying the problem area with a hair dryer. And for the next fragment of the body, add a little more hardener to the putty.
Other necessary consumables for weapons
Other necessary consumables
Consumables for painting a car also include quite a lot of small things, such as: sandpaper for rubbing of various grain sizes; ordinary solvent for degreasing the body surface before puttying; a set of spatulas, including rubber ones; developing powder for detecting putty defects; special wipes for removing grease stains from the body; masking tape to isolate parts that do not need paint on; fiber wheels for polishing; sanding fiber – standard and light; matting paste for matting paint and varnish coatings for painting.
https://youtu.be/6oKK6PQpP2c
Proportions for correct dilution of putty for cars: do it yourself
Putty is needed to eliminate unevenness. A base layer of putty is applied to the surface to be repaired, and when it dries, a primer is applied. Sanding is required between these two stages. At first glance, there is nothing complicated here, but any material, even the best, shrinks. If necessary, you can apply two layers of putty, drying and sanding several times. Next we look at how to dilute putty for cars, choosing the desired proportion of hardener and base material.
Air temperature and drywall
Drywall helps create perfectly smooth walls, but they still need putty work. This must be done to preserve the cardboard layer. Each repair is done for a certain time and sooner or later it will have to be replaced. And then, by removing the old coating, you can lose the cardboard layer, and this is a big problem, since the material is damaged.
The putty process is no different from ordinary wall putty, but it has its own characteristics. Before you start puttingtying the drywall, you need to treat the area where it connects to another sheet and where it is attached with self-tapping screws to the profile. Then move on to the entire wall.
Surface finishing
As usual, it all starts with preparing the walls. They should be thoroughly cleaned and then primed. You need to make sure that the primer layer is thoroughly dry. If this moment is not controlled, then a strong adhesion of the plasterboard sheet to the putty layer will not be obtained.
It is important to make sure that the temperature of the wall and room is not lower than +5 °C. If this indicator is lower, then it is not recommended to treat the surface, since the mixture begins to lose its elastic properties and is poorly applied. When dry, it may burst or simply crumble. Experienced experts recommend not skimping on the quality of the material. The service life and time spent on work depend on this.
Related article: How to hang a shelf on the wall with your own hands
What can be concluded? Puttying walls is a fairly simple job, but it requires knowledge of some nuances, patience and a desire to learn. You can do this work yourself or invite an experienced specialist. Everyone decides personally what to do. However, it is important to putty walls at the recommended air and surface temperatures. And then the home renovation will delight the owners for many years.
From theory to practice: surface leveling
Different primer materials, their types and varieties
A primer is needed to improve the adhesion of metal and paint. An even layer of metal can be immediately covered with primer without fear of further peeling. However, in reality, both primer and putty are used. The latter comes in several types:
- Polyester;
- Epoxy;
- One-component nitro and acrylic putty.
As you can understand, two-component polyester putties are now the most popular. This material itself can be filled with fiber, aluminum chips, etc. Such compositions are called filling or basic. And you can use them if you have a “final” putty, which is used before priming.
Polyester putty filled with fiberglass
So, two types of materials were named: filling putty and final putty.
There are no fillers in the universal polyester putty. If the thickness of the resulting layer does not exceed 0.5 mm, such material is always suitable for use.
Primer - what is it for?
Knowing all types of paints is not enough - paints and varnishes are of no value if applied to an unprepared coating. To work, you will need a primer - a material necessary to protect the metal of the body from corrosion and create a smooth surface for applying putty and paint. Primers are divided into five types:
- Inert. They do not actively counteract external factors and prevent moisture from penetrating under the coating.
- Passive. Used for corrosion protection.
- Phosphating. They are characterized by a high level of adhesion and deep penetration into the metal of the body, due to which they provide strong adhesion.
- Protective. Designed to form a protective layer that softens mechanical and chemical influences.
- Modifiers. They transform areas affected by corrosion and turn rust into a protective film that prevents the subsequent development of corrosion.
Based on their internal composition, primers are divided into one-component, two-component and alcohol primers. Each composition has a specific effect on the body coating.
How to divorce?
Automotive putties are sold in two-component form: putty mass (or base) and hardener. The base is a plastic substance that has good adhesion and pliability under external mechanical influence. The hardener is used to convert liquid putty into a solid mass.
The vast majority of modern putties are diluted according to the same scheme: 2-4 grams of hardener per 100 grams of putty. In this case, the choice of the exact proportion depends on weather conditions and requirements for hardening speed. In dry, hot weather, 2 grams is enough. If the weather is humid and cool, or accelerated curing is required, the proportion can be increased to 4-5 grams per 0.1 kg portion of base.
Mix the base with the hardener slowly, with soft plastic movements and always by hand. Do not beat car putty using mechanized means. This can saturate it with air, which will weaken the frozen layer on the workpiece.
If, after adding the hardener and mixing, the putty has acquired a noticeable reddish tint, you should not use it. It's better to prepare a new portion. Excess hardener may cause a red tint to appear through the paint.
Automotive putty
Let's start with putty. Putty will be useful to you if the car body is damaged, ranging from deep dents to scratches. This does not mean that you can completely forget about such things as straightening. It just happens that it is impossible to create an ideal surface with just straightening and in such cases you can resort to puttying. Putty is divided into several types according to its basis, namely:
- acrylic;
- polyester;
- nitrocellulose.
Putties, like paints, can be two-component or one-component. Two-component ones are sold complete with a hardener and must be mixed before use. In terms of viscosity, they are thick and are mainly intended for applying with a spatula to deep dents. One-component putties include those that are ready for use immediately. But such putties are used only as finishing ones, since they can only be applied in a very thin layer due to high shrinkage.
How long does it take for car putty with hardener to dry?
The drying speed of automotive putty is influenced by many factors:
- brand of putty;
- amount of hardener;
- ambient temperature;
- air humidity;
- etc.
On average, one layer of putty dries for about 20 minutes until it gains strength sufficient for abrasive processing. However, when applying several layers, the drying time can be reduced. The final strength is gained in 2-6 hours.
You can also speed up the polymerization process of the putty with a hairdryer or incandescent lamp. But there is one caveat here: it is categorically impossible to dry the first layer artificially, as this can subsequently lead to its cracking and peeling. And subsequent layers should sit for at least 10 minutes after application without external influences. Only after the initial polymerization has taken place is the putty allowed to dry a little.
Features of applying the mass
The first step is to mix the putty with the hardener. The disappearance of pink layers indicates that the mass is prepared correctly. The tools you will need are spatulas of various sizes. Quick and accurate techniques for applying material are the basis for a positive result. Filling a deep dent is not done in one step. It will be necessary to apply several layers of universal or coarse material. Since the putty takes up to 20 minutes to harden, layers can be applied to several areas at the same time. When the mass hardens, the area is sanded using a block or plane. During the procedure, you can conduct a test to identify areas that require additional application of the composition. To do this, just apply black spray paint to the surface. After sanding, all defects that require additional putty will become visible. After leveling the dent, the finishing compound is applied. Then the surface is treated with fine-grained sandpaper P240, it forms a smooth transition from the defect site. Good to know! Each spatula has its own contour. When applying layers, streaks appear on the surface. They cannot be removed immediately, as the material will go deeper into the dent. Once hardened, it is difficult to remove them. The ideal option is to cut off the strips with a sharp object 5-6 minutes after application, since at this moment the mass acquires a rubbery structure. To see clearly how to putty a car, check out the video:
How long does it take for car putty with fiberglass to dry?
Fiberglass fillers are typically used to smooth out deep uneven surfaces. They have high tensile strength and resist cracking well. Therefore, even a thick layer of putty with glass, unlike other types, is less likely to peel off from the treated surface.
Due to thicker layers, putty with glass requires longer drying. Different manufacturers talk about different hardening speeds for their products. But on average, bodybuilders can withstand fiberglass fillers 50% longer.
At what temperature can you putty?
So, let’s answer the first question - what is the minimum temperature for plastering walls?
The first thing you need to look at is the packaging. However, not all manufacturers write the optimal temperature for puttying. Among professionals, it is believed that puttying cannot be done when the room temperature is below +5 degrees Celsius. And the most optimal temperature when you can start puttying is from +15 to +25 degrees Celsius.
How to apply car putty correctly?
There are simply no universal answers to the question of how to putty correctly. Each master works in his own style. However, there are a few general recommendations that most bodybuilders adhere to.
- Work out in advance the question of which putty is best to eliminate the defect in your specific case.
- You need to prepare as much putty at a time as is required to treat one element or one defect. The hardener will turn the putty into a wax-like mass unsuitable for application in 5-7 minutes.
- Choose a spatula that is suitable for a particular case. There is no point in using a large wide spatula to stretch an area 3 times smaller than the spatula itself. The same applies to large areas of treatment: you should not try to pull them out with small spatulas.
- There is no need to try to immediately bring the surface to the ideal using only spatulas. The main thing is to fill the defective area well and carefully. And micro-irregularities and “snot” will be removed with sandpaper.
Experienced body workers work slowly, but without breaks within the framework of one defect.
Wall putty technology
Mixtures used to level the surface
Before you start puttingty, it is important to carefully select a high-quality material that will suit exactly the room in which the renovation is planned. Putty can be:
- gypsum, for rooms with minimal humidity (hallway, corridor, room);
- polymer, for rooms with normal humidity;
- cement, for rooms with high humidity (bathroom, kitchen, toilet).
Particular attention should be paid to the availability of the necessary tools. The quality and durability of the putty depends on the correct selection of equipment. What tool will help you cope with the task? To carry out the work you will need: two spatulas (large and small), a drill with an attachment, a mixer, a container for mixing the solution and a level.
Having selected the necessary material and equipment, you can begin to work.
- Preparing the walls. An important stage in the work, it must be approached with all responsibility and scrupulousness. Initially, it is necessary to thoroughly clean the surface of grease stains, remnants of old plaster, wallpaper, paint and dust. Cover the walls with primer.
Related article: Cost of insulation for external walls
What sandpaper should I use to sand car putty?
After drying, the first layer of automotive putty is traditionally sanded with P80 sandpaper. This is a fairly coarse-grained sandpaper, but it can be used to roughen the bottom layer conveniently and quickly.
Further, the grain increases by an average of 100 units with each subsequent processing. This is the so-called “rule of one hundred”. That is, after the first rough grouting, paper with a grain size of P180 or P200 is taken. Then we increase it to P300-400. We can stop here. But if a perfectly smooth surface is required, then it would not be superfluous to use finer-grained sandpaper.
After sanding, it is recommended to rinse the treated surface with water.
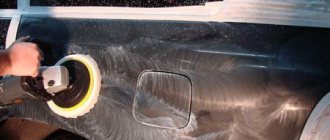
Polishing pastes – how to choose the right one?
Polishing materials for car painting are necessary at the final stages of painting a car - with their help, an even and beautiful shine of the coating is formed. At the first stage, abrasive polishing is performed, which ensures the removal of a thin layer of paintwork on the car body. Several removals are carried out using polishing pastes with different grain sizes.
To restore a body surface damaged by minor defects, it is necessary to use fine-grained compounds, while to eliminate extensive damage, it is advisable to use only coarse-grained polishing pastes. The choice of paste at each specific stage of polishing depends solely on the condition of the body coating. To ensure proper application of the paste, it is recommended to use special polishing equipment.
WATCH VIDEO INSTRUCTIONS
Buy high-quality automotive paint and varnish materials and equipment from trusted manufacturers so that painting your car yourself in a garage environment will be successful. Follow the painting instructions and don't skip the important steps of priming, filling and polishing. In this case, the paintwork of the car will last a long time.
How to use car putty? (lots of photos and videos)
Good afternoon. In today's article I will tell you how to use car putty, namely how to apply it correctly and rub it in correctly. Traditionally for our site, the article is supplied with a large number of photos and video materials.
So, to apply putty to the car body we will need:
- Sandpaper with mark 40-80-120
- Bar depending on the size of the damage
- Silicone remover (degreaser)
- Spatulas
- Container for diluting putty (plexiglass or large spatula)
You may need:
Straightening tool such as spotter, back hammer, mallet, etc. those. the tool that will allow you to bring the body shape as close as possible to that intended by the factory.
To rub the putty you will need:
- Bar (commensurate with the size of the damage)
- Sandpaper (40-80-120-180-240-360, depends on the required surface quality, i.e. we will sand it for the next layer of putty or we will already prime it)
Attention - when rubbing the putty, do not forget about the respirator.... With a price of 30-50 rubles, it reduces the likelihood of dust getting into the lungs by 90 percent! Silicosis is a very terrible disease!
How to properly dilute and apply putty?
If you don't like to read, watch this video:
The putty should be applied to a previously sanded (80-120) and degreased surface. If you ignore these rules, the putty will fall off in a layer!
For large damage, first apply putty with fiberglass, then universal/aluminum, then soft. Small damage can be immediately masked with universal or soft putty. We have a separate article on the types of putties on our website.
Application order:
- Mix the putty in a ratio of 97 parts putty, 3 parts hardener.
- Stir thoroughly until a homogeneous mass is obtained.
- We apply with spatulas, forming the required surface as closely as possible. Avoid applying putty in layers greater than 5mm.
- If the putty begins to clump, stop applying.
- Dry for 1.5-2 hours
- We rub it sequentially with sandpaper 80-120-180-240 (under the primer to dry)
- Attention.
- If it is impossible to achieve the required shape in one application, that’s okay. The more layers of putty you apply, the less likely it is to shrink. The main thing is not to forget to matte the surface and degrease it.
Typical mistakes when applying and processing putty.
Very little hardener.
In this case, the putty will take a long time to dry, and when processed with sandpaper, the dried putty will roll off. Also, with a high degree of probability, the putty will shrink (the putty surface will move in waves).
A lot of hardener.
In this case, the putty will harden “in the moment,” i.e. during normal hardening, if the application of the putty has not yet been completed, the master notices that the putty is rolling off, but if you hurry, you can “finish it” as this process takes 2-5 minutes. If there is a lot of hardener, this process takes 20-30 seconds and it is impossible to finish anything. But this is not the main problem...
A few months after painting, the hardener will come out as a change in paint color! While it's not that noticeable on dark colors, it's a disaster on light colors!
Temperature too high.
The putty can be dried at temperatures up to 60 degrees. This gives both quick drying time and instant shrinkage, but if you overheat, the putty will soften and fall off! Nothing terrible will happen - just translation of the material.
Temperature too low.
The putty can be applied at temperatures above 10 degrees. At low temperatures, the putty will shrink more, and polymerization may not complete; as a result, during subsequent sanding, the putty will clog the sandpaper.
Wet sanding.
The putty is very hygroscopic; if you rub the putty “wet”, it will absorb water and subsequently the water will worsen the adhesion of the primer and paint to the surface.
The main material is car paint!
Ultimately, you will need to purchase the main attribute of their car painting consumables - car paint. The approximate price of auto enamel ranges from 500 to 1000 rubles per 1 kilogram.
Car paint
Depending on the base on which paints are made, they can be divided into water-based and non-water-based. Water-based paints include all acrylics, while non-water-based paints are synthetic paints.
Car paints are also divided according to the painting method into the following types:
- acrylics are the most popular paints today. They give a very high gloss, allow you to remove smudges and debris, allow polishing within an hour after painting, and are very resistant to damage and environmental influences;
- Metallics are paints that require two layers of paint. To do this, first apply the first layer of synthetic nitro paint, which gives the car color and also gives the paint a metallic effect. The second layer is acrylic varnish, which gives the metallic-colored coating a chic shine and also gives it the necessary protective properties;
- Special paints are paints that are often used for non-standard car painting: in airbrushing and tuning.
Preparing and mixing putty
- Too little hardener (catalyst). The putty does not cure in the required time. Sanding is difficult, it gets into lumps, scratches and risks occur.
- Too much hardener (catalyst). This “putty” does not harden faster. The active hardener remains in it, which reacts with the resin and pigments of the filler and paint. The result is defects: uneven coloring, the formation of spots and obvious contours of painted areas.
Features of temperature conditions
For many, especially novice developers, such work will seem like a simple process that can be completed quickly. But there are some nuances, knowledge and compliance with which will affect the final quality of the finish. This is especially true of the question at what temperature you can putty the walls.
Let us remind you that puttying of indoor walls and facades is carried out in any season. You just need to know at what air temperature you can putty a particular surface.
Let's start by figuring out at what temperature you can putty the walls inside the house. Regardless of the material from which the structure is built (concrete, brick stone or gypsum board), the temperature in the room should be at least five degrees Celsius, and the humidity level of the walls should be 10%. These values are considered optimal so that the putty mixture does not freeze, but dries naturally. If this rule is violated, the composition will be applied to the surface in an uneven layer, and when it hardens, it will become covered with cracks or fall off completely.
It is recommended to putty the opening areas of window and door blocks before the start of the cold season, because such places cool quickly.
Puttying of internal walls can also be done in winter, only the room must be constantly heated. Adequate ventilation should be provided to allow excess moisture to escape outside. When puttingtying walls in a cold place, it is necessary to add components to the solution that make it easier to apply the solution to the surface, or use special putty compounds designed for work in such conditions.
Now let's see at what temperature you can putty outdoors. Such work is allowed to be carried out at negative temperatures that do not fall below five degrees below zero. It is best to use special putty compositions that contain antifreeze additives that increase the strength index and are not exposed to negative temperatures.
For puttying internal and external walls, it is recommended to select a day with favorable weather conditions. It is best that the temperature at this time varies between ten and twenty-five degrees Celsius, and the humidity level is 60%.
The raw putty mixture should not be exposed to direct sunlight, high humidity or freezing temperatures.
A wall surface repaired with a putty mixture dries differently. The process depends on the material used, the thickness of the covering layer, ambient temperature and ventilation. Drying works best if the room is heated centrally.
Sanding and finishing putty
- You should always degrease the cleaned surface thoroughly before each layer of putty.
- Before use, mix the putty well; over time, it will settle in the jar.
- Add hardener in a certain ratio to the putty (as indicated by the manufacturer)
- Do not mix a large amount of putty at once, since when adding a hardener you have 7-10 minutes before it begins to harden, you simply will not have time to distribute it on the surface of the part. It is better to calculate the amount of work in advance and dilute the required amount.
- Don't try to display the form all at once. Divide into several approaches.
- For quality control, use “Developer Powder” or development in the form of aerosol black paint.
- If you are going to putty on metal where there were pockets of corrosion, then you need to apply “Acid Primer” to this area, then “Soil Filler”, then you can apply putty or epoxy primer, then putty. You can be sure that after such treatment, the repair will be of much higher quality and the part will last much longer.
- “Control for glare” - Apply degreaser to the part from the dispenser and you will see irregularities in the glare.
Universal putty
- polyester laminates,
- steel,
- aluminum,
- two-component acrylic primers,
- old varnish coatings.
Attention!
Do not apply directly to wash primers, one-component acrylic or nitrocellulose products.
- Degrease the surface of the polyester laminate, sand it dry with P80 - P120 and degrease again with Silicone Remover;
- Degrease the steel surface, sand it dry using the P80 - P120 method and degrease again;
- Degrease the aluminum surface, matt it with a special fiber (e.g. Scotch Brite Fine, Scotch Brite Very Fine) and degrease again;
- Degrease the primer, sand it dry using the P220 - P280 method and degrease again;
- Degrease the old varnish coating, sand it dry using the P220 - P280 method and degrease again.
Mix the components until a uniform color is obtained, observing the mixing proportions of the hardener. It is recommended to use putty dispensers for this purpose. Apply a layer up to 3 mm thick with a spatula. Minimum application temperature +10°C.
Putty with aluminum filler (dust)
ALU - aluminum filling putty
with the addition of aluminum powder, which increases its resistance to elevated temperatures and guarantees excellent adhesion, which allows its properties to be compared with PROFICYNK putty. It has less shrinkage compared to typical putties, as well as high elasticity, thanks to which it is used for leveling large-area unevenness.
Can be used on the following types of surfaces:
- polyester laminates,
- steel,
- Cink Steel,
- aluminum,
- two-component acrylic primers,
- old varnish coatings.
Fiberglass putty
FIBER
— putty with the addition of glass fibers. Thanks to the additive, it has high mechanical strength and has a good ability to fill irregularities and holes. However, the associated low elasticity and very hard processing properties limit its use to small surface areas.
Can be used on the following types of surfaces:
- polyester laminates,
- steel,
- aluminum,
- two-component acrylic primers,
- old varnish coatings.
Finishing putty
FINISH
—
the finishing putty
is applied with a spatula. Serves for repairing small surfaces and final finishing leveling of the surface before applying primers. Thanks to the fine fillers, it is ideally applied in thin layers and fills small depressions and scratches. Allows processing with fine-grained sandpapers, resulting in a very smooth surface. It also has very good adhesion to various types of substrates, including galvanized steel.
Putty for plastic bumper
Putty on plastic
, has high elasticity and excellent adhesion to most plastics (with the exception of polyethylene and Teflon). It also has satisfactory adhesion to polypropylene, which makes it possible to putty unprimed surfaces.
Can be used on the following types of surfaces:
- plastic surfaces with the exception of PE and PTFE,
- steel,
- Cink Steel
- aluminum,
- two-component acrylic primers,
- old varnish coatings.
One-component acrylic putty
Liquid putty
Putty on galvanized steel and aluminum
It is a high quality filling putty. It has very good adhesion to different types of substrates and high thermal stability. It does not lose adhesion on galvanized steel even at a temperature of 90°C. In terms of its other properties: application, hardening time, processing, as well as mechanical properties, it is similar to UNISOFT putty.
Can be used on the following types of surfaces:
- polyester laminates,
- steel,
- Cink Steel,
- aluminum,
- acrylic primers 2-component,
- old varnish coatings.
Automotive soil - its variety
Automotive primer
Consumables for painting a car also include a primer, which is applied over putties. A car primer is used to protect metal from corrosion, treat putty areas after body repairs, and also to enhance the adhesion of enamels to plastic.
1. Acrylic primer
These primers are used for the final leveling of the repaired surface immediately before applying the paint. This type of primer is ideal for the entire range of enamels.
Approximate cost: 200 – 400 rubles.
2. Epoxy primer
It is used for anti-corrosion protection of the body and smoothing out minor surface defects when puttingtying and painting the car body.
Approximate cost 200 – 300 rubles.
3. Adhesive primer for plastic
Used when painting plastic. Provides adhesion (adhesion) of paintwork and plastic.
Approximate cost 120 – 400 rubles.
How to prepare the surface for applying putty?
It is important that all holes and cracks are welded before puttying. Any instability in the metal underneath the putty will cause it to crack. If you do not putty even small holes, the putty will draw moisture from the back side, through this hole, which will cause corrosion of the metal under the putty.
p, blockquote 13,0,0,0,0 —>
p, blockquote 14,0,0,0,0 —>
Manufacturers of automotive putties recommend applying it to clean metal, polished with a coarse abrasive (p36 - p120).
p, blockquote 15,0,0,0,0 —>
There should be no traces of corrosion on the metal. It is not advisable to apply it to cold metal. A barely noticeable condensation may remain on cold metal, which will be covered with putty and will oxidize the metal.
p, blockquote 16,0,0,0,0 —>
After the metal is prepared, it must be blown with compressed air and degreased.
Read also: Insulating the veranda floor on stilts
p, blockquote 17,0,0,0,0 —>
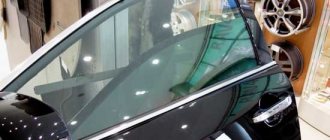
Final car finishing
Before carrying out such a finishing and repair process as car puttying , you should make sure that the damaged surface is completely leveled. Only after this can you proceed to the final layer, using a finishing putty. It is applied without the simultaneous use of duralumin on a surface that is completely dry. As for the tools, you can use the same spatula that was used earlier.
After this, you should begin priming the surface, which has previously been well sanded.
The priming process is able to most effectively bond the putty with the later applied paints. It is car puttying and subsequent painting that is the final process when finishing a vehicle.
How to quickly putty a car?
Sometimes there are force majeure circumstances that require work to be completed twice as fast as usual. If it’s one or two parts, then you just need to “turn on second gear” and move faster. But what if it’s a full car repaint? In this case, you can use the following two methods to speed up the process:
- It is necessary to putty the body parts not sequentially, until an ideal result, but in parallel. For example, find all the bumps on the car, knock off the gloss from them and putty all around. If there are a lot of defects and this task will take approximately several hours, then the putty can literally harden, which will lead to difficult processing (especially by hand). For easy processing, you can simply use a little less hardener. Although under-dried putty quickly absorbs water when processed wet and clogs the sandpaper when processed dry.
- As a complement to the first method, the second and third layers can be applied without processing. The main thing is to do this when the previous layer has already dried a little, but has not yet hardened (about 10-15 minutes, no more, because on completely dried putty, without treatment, the second layer will adhere satisfactorily). Example: the first layer is applied (the bottom of the pit is laid), after 10 minutes the second layer (wider), after 10 minutes the third layer (pulled under the general background of the part). On the fourth layer, it remains to tighten the pores and scratches.
Often, putting a car with your own hands is done in a hurry, which is the main reason for the violation of painting technology. It is important to understand that during puttying, a foundation is created for the primer and paint. And the better this process goes, the less likely there will be various shrinkages and peelings. The second force majeure method is best used in the most extreme situations.
Putty is the best option for repairs
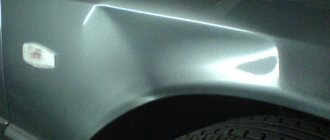
Putty, as a material, is designed to effectively level out dents, some irregularities and cavities that are usually present on metal parts of a car body. The use of putty is able to give the surface of the car the correct, original shape.
The quality of materials of this kind is constantly improving, as a result a large number of their varieties appear. Among the variety offered on the modern market, we can note such types of putty as:
- Fiberglass putty, which is designed to effectively seal fairly deep irregularities or cavities. This is a material that is more solid in consistency and does not allow the material to shrink significantly during the drying process;
- Polyester putty is used for effective smoothing and subsequent leveling before painting. The material lends itself well to processing, thereby providing a very smooth surface.
Materials for putty
The choice of a particular material should be based on the planned result, as well as on the master’s skills and abilities regarding the process of how to properly putty a car.
Where to start bodywork?
The first stage is to thoroughly clean the surface on which the future putty will be applied. This is a very labor-intensive process, especially if you are working with body corrosion. The market today offers a lot of different types of putty mixtures.
When the preliminary work is completed, you can immediately see all the defects that need to be repaired. Experienced repairmen can determine “by eye” how much putty will be needed for the job.
If you are a beginner, it is better to follow the instructions included with the mixture. It specifies the proportions necessary for diluting the mixture.