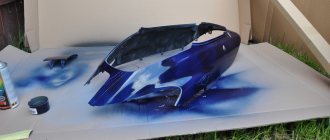
Many car enthusiasts who have been in a minor accident, as a result of which the car body received dents, scratches and other defects, are looking for a way to properly straighten the fender. Let's look at step by step how to do it yourself, what tools and equipment are needed for this. In addition, many are interested in the questions of what a magnetic cape is and how it helps protect the fender and other elements of the car.
How to fix a heavy dent with your own hands
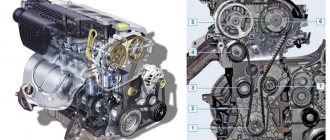
To remove the deepest dents, use impact pads of various shapes and hammers. Spoons are used as counterfeit tools. They have different shapes and sizes and are used depending on the type of damage.
The metal in the center of the damage is thinner than at the edges. Before straightening, you need to pull the iron to the center of the defect. A gas burner is used for this. Next, the dents are aligned.
After roughly leveling the defect, it is covered with putty.
Work order
The general technology of track straightening involves three stages:
- preparatory,
- basic,
- final (final).
Before considering each of them in detail, we note that in a normal situation the problem is solved by a team of 7 people, which, in particularly complex or urgent cases, as well as when using optics, can be expanded to 8-10 fitters of the 4th category.
The initial stage of preparation comes down to the study of deflection arrows - the curvature is measured along a chord 20 m long - and to calculations based on the data obtained, carried out using the Pashkarpov method.
Having received the necessary numbers, in accordance with them you need to drive in temporary reference points - so that after alignment they are located at the same and constant distance from the outer side of the sole. For this, wooden pegs with a cross section of 3-4 cm in the wide part, 25 cm long, with a hewn edge, which should be placed in the direction opposite to the track vector, are best suited. They should be placed strictly opposite the division points, and in such a way that the distance from their tip to the rail support is equal to the template with a tolerance up or down exactly by the amount of shift.
Removing dents without painting using heating and cooling
As with pulling out dents, this method is applicable if it is not possible to reach the convex side of the dent. Before you remove dents on a car without painting, you need to stock up on the necessary equipment. We will need a hair dryer and a can of compressed air. Since the hair dryer heats the air up to 600 degrees, you need to wear protective glasses and gloves. The temperature of the air leaving the can is -78 degrees, so handling it also requires extreme care.
First, the dent is heated with a hair dryer, moving it smoothly along the radius. Then you need to cool the defective area by directing a stream of air from the can onto it. Due to the sharp temperature change, the dent is leveled out. When removing medium-sized dents without painting, the defect must be heated at several points.
We recommend: Do-it-yourself replacement of the pump on a VAZ 2107
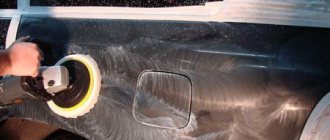
After performing a body repair without painting, the dents need to be polished with an abrasive polish to give it the perfect look.
Good luck with DIY paintless dent removal!
How to eliminate a crease
Straightening a car body involves not only performing the main part of the work, but also working with creases. It can be tightened using a reverse hammer. If you do not have a device for welding on hand, you need to turn the door sideways and use a pry bar to knock out the door until it is completely level.
Advice! To preserve the car's paintwork, it is recommended to seal the adjacent fender edge using fastening tape.
Various paintless dent removal methods
Repair work to restore a crumpled wing should begin with an inspection of the existing defect. If the dent is not very deep, there are no sharp creases and the paint layer is not damaged, there is no point in using traditional straightening, since this will damage the paintwork, the car fender will have to be repainted, and this will entail additional material and time costs. In such cases, it is advisable to use one of the paintless straightening methods. They are presented in the table.
| Way | Description |
| Using a magnet | To do this, you need a powerful magnet, which must be moved from the edge of the dent towards the center, while pulling it towards you. To avoid scratching the paintwork, protection is necessary: place a soft backing (fleece or flannel) under the magnet. |
| Using special levers | PDR dent leveling technology is considered the most modern and allows you to remove dents of any size. Straightening the wing in this way implies the presence of a special set of levers with a curved end of various shapes and lengths. The fender must be removed to gain access to the convex side of the dent. Straightening must be done with a hook of appropriate length, while applying gentle pressure to the defect site. As a result, the metal will gradually recover. |
| Application of applicators | To straighten the wing of a car, you can use applicators using adhesive or vacuum technology from the outside. The damaged surface must be washed and degreased. In the center of the concave zone, applicators are glued with a special thermal compound. Within a few minutes the glue hardens. The central part of the dent is carefully pulled out, being careful not to overtighten. Special tools are used here: a mini-lifter or a bracket with a screw in. After completing the stretching, you need to remove the glue |
| Heating followed by cooling | Straightening without painting can be carried out by heating followed by cooling. This method is completely doable with your own hands. Prepare a construction or installation hairdryer and a can of compressed air. Warm up the defect area with a hairdryer using smooth movements, then direct a stream of air from the can onto it. As a result of a sharp temperature change, the dent will stretch out. If the defect is medium in size, then it must be heated in several places |
In cases where, upon inspection of the dent, scratches, bends and other damage to the paintwork are found, traditional straightening and subsequent painting of the car wing is necessary.
Hood repair
Determining the complexity and cost of repairs
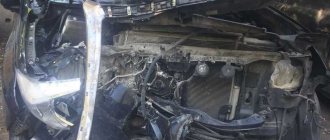
The cost of hood repair depends on the nature and area of damage. Our craftsmen can fully assess the complexity of the work by carefully examining the body part, measuring the area of damage, and outlining repair technologies. During repair work, internal pockets of corrosion may be revealed in the stiffeners, which increase the scope of work. A simple calculation shows that for imported models, ordering and delivering a large body part from a car manufacturer is always more expensive than complex repairs at a car service center.
In some cases, inexpensive hood repairs without painting are possible. Manual straightening of small dents is inexpensive. The use of modern devices (spotters with reverse hammers) makes it easier to extract large, shallow dents. Complex cases include hood repairs after an accident with frontal, sliding impacts to the front of the car. In such situations, repairing the hood, replacing the wing, or bumper is not enough. It may be necessary to restore the geometry of the supporting frame of the body on special traction stocks. For thin body metal, complex repairs include welding, sealing through corrosion or emergency breaks, and working with aluminum hoods of expensive foreign cars. The duration of the repair depends on the complexity of the work. Craftsmen complete simple repairs without painting in 2-3 hours. Complex repairs involving manual straightening, welding, and painting of the hood may take several days.
Technological operations of hood repair
Technological operations for hood repair include:
- troubleshooting (detection of chips, dents, rust spots on internal surfaces, through damage);
- dismantling the body part;
- determination of restoration technologies, assessment of the cost of work;
- cleaning damaged areas, peelings and cracks in paintwork, degreasing metal;
- reinforcement work with stiffeners, frames, amplifiers;
- tin work (vacuum extraction, spotter, manual straightening);
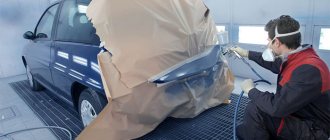
- preparation for painting (priming, sanding uneven surfaces);
- selection of paint and painting in a special chamber;
- hood assembly;
- body polishing.
Simultaneously with the restoration of the body part, you can order hood insulation, which is especially important for diesel cars with recommended slow engine cooling.
When troubleshooting damage to the hood, the need for local repairs of adjacent body parts is also revealed - the upper surfaces of the front wings, false radiator trims, and head optics.
Complex repair work includes welding (sealing with fiberglass) through holes, straightening dents in the area of reinforcements and stiffeners. To preserve the overall appearance of the exterior during local painting, the selection of the correct shade of enamel, taking into account the darkening or fading of the overall color of the body paint, is of particular importance.
When installing a body part in its original place, the technician must carry out repairs (if necessary), adjusting hinges and hood locks. High-quality hood repair can be easily assessed visually by the perfectly smooth surfaces of the planes, relief stampings, uniformity of gaps with the wings, and the front facing of the false radiator.
Advantages of ordering hood repair from the Auto Captain service
The masters of the multidisciplinary service "Auto Captain" will repair the hood of any degree of complexity. Our specialists are highly qualified and have extensive experience in performing complex work. When ordering hood repair in our workshops, you will receive the following benefits:
- repair speed;
- affordable prices compared to foreign car dealerships;
- quality of repair work (performed using modern equipment for bodywork and paint work);
- own guarantees for the quality of repairs;
- related services (anti-corrosion treatment, body polishing, optics).
In their reviews, our clients note additional advantages of ordering body repairs: detailed explanations by specialists on metal working technologies, a simple application procedure, individual work with each client, transparency of the pricing policy.
Removing dents on a car using a reverse hammer
Straightening dents using a reverse hammer is performed when the driver has difficulty accessing the damage site, or the parts being restored cannot be dismantled. Repairing body dents like this usually requires subsequent painting of the repaired part. To straighten a dent, perform the following steps:
- Clean, dry and degrease the surface to be restored. Remove traces of corrosion.
- One end of the reverse hammer is attached to the center of the damage. The operation is performed using a special suction cup or applicator.
- Straightening is carried out by gradually increasing blows of the weight on the hammer handle.
- After completing the restoration of the exterior of the body, the hammer is disconnected.
An applicator or suction cup is only effective in straightening the body if the damage is not serious. In the presence of deep and complex defects, the hammer is welded to the surface, or clings to technological holes using special hooks.
Straightening tools
The first thing you need to stock up on when doing a job like straightening a car body is a spotter. This is a special tool with which spot welding can be carried out on any surface. Modern automotive services offer work through the use of multifunctional devices. The advantage of the device lies in its perfect accuracy.
There are a number of establishments that work mechanically, using special hand tools in a set. A set of straightening hammers in skillful hands will cope with any task and eliminate geometric defects. For smooth types of surfaces, hammers with convex strikers are used. Such car straightening cannot be carried out independently.
Using a Hot Glue Gun and Pull Tools
- The idea is to glue the pulling elements to the dent in several places. By pulling them, you can straighten out the dent. The house-to-house method is used in the PDR technology adhesive system.
- The pulling element can be made by simply screwing two self-tapping screws on one side of a wooden dowel, and applying hot glue to the reverse side (bottom). Such dowels can be placed in several places. After the glue has cooled and hardened, you can pull the pulling elements. You need to prepare a sufficient amount of glue and be patient, as you may need to make several attempts.
- For small dents, the pulling element can be glued to the center. Large dents extend from the edges.
- This way you can pull out the jammed stiffening rib, which “holds” the entire dent.
- At the same time, when pulling out dents, you need to tap the high spots, if any.
- To remove the pulling element, heat the glue with a hairdryer. Use isopropyl alcohol to loosen and remove the adhesive.
We recommend: How to adjust the valves of a VAZ 2109
Pulling out a dent with a reverse hammer
You can make a reverse hammer to straighten out dents. To do this, you need a rod 3–5 mm thick and a piece of pipe. You can use hot glue to glue one piece of the hammer to the center of the dent. The principle is the same as when using pulling elements, only the hammer adds additional force through the inertia of the sliding load.
You can make a reverse hammer yourself.
In the illustration you can see the basic concept of the reverse action hammer. You need to pull out the dent before the glue hardens too much. Because when the glue hardens, it becomes brittle and comes off the surface prematurely when pulled out. You need to apply glue, press the rod onto it and wait for it to cool, after which you begin to slide part of the pipe (weight) along the rod. A reverse hammer is convenient for straightening small and medium-sized dents.
Using a Dent Pulling Kit
This kit also uses hot glue to secure the puller to the dent. The places where the pulling device will be glued must be degreased with isopropyl alcohol. You need to use a little glue.
You need to apply pulling pressure with the device and leave it for 5 minutes, periodically heating the edges of the dent. In general, when pulling with a special device (small bridge), the slow method works better than quickly pulling out the dent. Gradually reducing the size of the dent, you can do several repetitions. If there are raised areas around the dent, they must be carefully tapped with a special punch, which is included in the kit. This set is not expensive (about 1000 rubles), you can buy it here.
General provisions
Straightening of the railway track is assigned based on the results of the inspection - either full-scale or with a measuring car. But it should always be done only after all the work on raising the track has been completed. In addition, before starting to resolve the issue, it is necessary to inspect the joint gaps and adjust them (when necessary), but if more than three of them are merged in a row on a link line, it is permissible to only replace the grating.
Attention, the shift is carried out precisely along the outer rail side - this is relevant both for curves and for straight double-track or right-hand single-track sections.
The following general rules apply:
- It is better to carry out work either early in the morning or on cloudy days - when there are no temperature changes that cause heating of the VSP elements.
- According to the route plan, it is worth starting from the point where you need to perform the most serious movement.
- If the ballast is compacted, it is necessary to loosen it first - at the ends of the sleepers.
- In the winter season, it is not recommended to solve the problem, but if the direction has gone astray in the most serious way, it is permissible to change the track.
- The distance between the axes of adjacent blades should be controlled at each link.
Technologically, straightening curved sections of track can be carried out in two ways:
- By eye - it is possible only in those places where deviations from the norm are small, in “corners”, and short in length (up to 30 m).
- Combined - at reference points (one from the other - at a distance of 10 m) shifts are carried out strictly according to calculation, and between them - by smoothing, if a machine is used, or approximately, with manual labor.
In all situations and for any method, the need to move the grid is determined based on an analysis of the degree of deflection.