Is it possible to restore the ball joint?
This element has 2 types of faults.
Most often you may encounter the depletion of lubricant in the housing. With this development of events, restoring the ball joint to working condition is easy. Using a special syringe, the amount of lubricant in the housing is updated. Experienced craftsmen prefer graphite lubricant, but you can use another type, preferably with similar values. If the performance of the ball was restored using the above method, it is worth considering that it will not be possible to extend it for a long time. In cases where there is a high degree of wear, adding lubricant will not change the situation. A replacement part will be required.
The condition of most domestic roads means that car suspensions cannot last for a long time, as a result of which regular and frequent replacement of its elements is required. As for the ball joint, removing it without a puller is not a big problem. This process requires a minimal set of auxiliary tools. At the same time, the absence of a professional tool will not have a negative impact on the parts of the mechanism.
Replacing a ball joint on a Renault Logan
DIY ball joint repair.
When you are too lazy to buy a new one It is recommended that owners of this brand of car replace not only the ball joint, but also the lower suspension arm at the same time. This procedure is performed as a result of wear or damage to the unit. To carry out the operation you need:
- Hammer.
- Flathead screwdriver.
- Socket wrench - size 30.
- Dimension key 13.
- Open-end wrenches for 16 and 18.
- Two pipes of different diameters.
- Bar.
Basic Process Steps
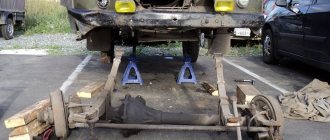
- The car is hung up, or its front part is raised using a jack, and the car is placed on supports.
- The wheel is removed.
- The nuts of the upper and lower bolts, as well as the connecting rod, are removed.
- The nut at the stabilizer bar link is unscrewed, then the bolt is pulled out.
- The ball bolt is removed.
- The finger is pulled out from the rotating mechanism housing.
- The bolts of the silent blocks, both front and rear, are removed.
- The lower suspension arm is removed.
- The old ball joint is removed. To do this, remove the rubber cover and the metal fixing ring from the assembly. At the end, the support is knocked out with a hammer (more details in the video).
- The new ball is installed so that its teeth fit into the grooves of the spline.
Reassemble the mechanism in reverse order.
Repair and restoration of the ball joint
The ball joint can be either collapsible (for example, in domestic cars) or non-dismountable. Of course, it is much easier to repair a unit that can be disassembled for spare parts. The ball is dismantled, disassembled and worn parts are replaced. As a rule, these are polymer inserts and anther. Then install the unit in place. The repair of ball joints (dismountable) is completed.
If the ball cannot be disassembled, then either a grinder is used to make the support collapsible, but after repair the structure is restored by welding, or they use a more humane method and pour liquid polymer into the ball under pressure.
View gallery
Many people recommend disassembling the support in any case to grind the axle ball or replace it.
Ball replacement steps.
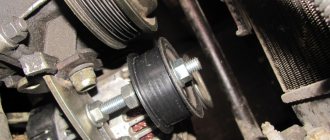
How to remove the crankshaft pulley using a puller and which way to unscrew it
In order to replace a faulty element yourself, you need to equip yourself with the following tools:
- Keys for seventeen and nineteen.
- Support removal device.
- Lift (jack).
- Crowbar or similar device.
- Balloon wrench.
To replace the ball, you must first lubricate the element with a special compound (litol). To do this, remove the protection, process the element and return the protection to its original position.
ball
First of all, loosen the holders
It is important not to unscrew them completely before installing the machine on the lift. We lift the car and dismantle the wheel. We remove the pin holders that secure it to the support itself. Using a ball removal device, it is necessary to loosen the fixation of the element. Next, using a crowbar, we pull the used support out. The new support is mounted on the pin. At this time, the assistant should gradually lower the lever, directing the element to the required position. Lower the lever and fix the finger holders.
The process is complete! Next, check the reliability of the fixation and return the car to its original position.
https://youtube.com/watch?v=yCmbcGAuNJA%3F
Thus, we replaced the ball. When carrying out work, you must adhere to the instructions provided and remember the safety requirements. With a competent and responsible approach, the work will only take a few hours. For the efficiency and quality of the work performed, it is not recommended to do the work yourself, without additional help. When dismantling and changing an element, use a high-quality and proven tool for your own safety. During inspection and repair, be extremely careful and careful, as considerable physical stress occurs. With due attention and strict adherence to the instructions, you will get the desired result. Happy renovation!
How to remove the ball joint
How to remove the gearbox lever of a VAZ 2110
Replacing a ball joint can turn into a rather complicated process if the element has not been removed for a long time and has already become “stuck.” A ball joint remover will be an excellent assistant for DIY repairs.
There are many options for this device. For example, an attachment with a fork-shaped end. The puller is inserted between the lever and the hub, and then driven in with a hammer until the ball pops out of its seat. The disadvantage of this design is the risk of damage to the boot.
Other options use threads to create the breaking force. If the ball is stuck quite strongly, and even a lot of force is not enough to remove it, you can hit the place near the joint attachment to the steering knuckle with a hammer.
When choosing a puller, pay attention to the size of the latter and the space that is free around the support of your car. A well-chosen ball puller can also be used to remove steering ends.
Support with rivets
If your car has never had ball joints replaced, most likely the attachment points to the control arm will be rivets. In order to remove such a ball, you need to drill out the rivets or cut them off with a grinder. When drilling, be careful not to widen the hole in the suspension arm.
Sometimes it is extremely difficult to perform such a procedure without removing the lever. In addition, it will be easier to remove the rivets if you secure the lever in a position convenient for operation.
Tools
Do-it-yourself replacement of a ball joint will be discussed using the Daewoo Sens as an example. The example is quite indicative, since Daewoo Nexia, Opel Vectra A, Astra F, Kadett have almost identical suspension structures.
For repair you will need:
- jack;
- wheel chocks, as well as safety supports for cars;
- ball puller; screwdriver, drills or grinder, if the ball joint is on rivets;
- wheel wrench for removing wheels;
- a 17mm wrench and a 17mm socket or 2 17mm wrenches for unscrewing the support mounting bolts;
- pliers for removing the retaining clip of the upper hinge mount.
Replacing the support
To replace the VAZ-2114 ball joint, you will need to perform just a few simple steps:
- Using a "17" wrench, unscrew the two bolts that secure the ball joint race to the steering knuckle of the hub.
- It is advisable to turn the steering wheel to the side in advance to make it convenient to dismantle and install the element. During the repair process, you can rotate the stand, just turn on the ignition so that the steering wheel does not lock.
- Using a “22” wrench, you need to unscrew the nut located on the ball joint pin.
- Replacing a VAZ-2114 ball joint without a puller is problematic - too much force must be applied to get the pin out of the cone. Therefore, install a ball puller on the lever as well.
- Rotate the puller bolt to remove the pin.
That's all, disassembly of the unit is completed. Clean the seats and install a new ball joint, filling a sufficient amount of lubricant under the boot. Assembly is carried out in reverse order. To get the ball pin into the hub hole, you need to bend the lower arm with a crowbar.
Good day. This article will discuss how to understand that the ball joint on a VAZ 2109 - 2114 is faulty, and how to replace the ball joint on a VAZ 2109 - 2114.
Replacing ball joints with your own hands - Lada Kalina Blog
Replacing ball joints yourself
Today I decided to write an article on replacing ball joints, although mine were still in good condition, I still made a small material for the article. Just in case, I bought a new support, if suddenly upon removal it turns out that there are problems with it. To perform this Kalina repair, I needed the following tools and accessories:
- Keys for 17 and 19
- TORX E12 socket with ratchet and wrench, as well as a small extension
- hammer
- mount
- ball joint remover
The procedure for removing the old and installing a new ball joint on the Lada Kalina
So, first of all, we tighten the handbrake and tear off the bolts of the front wheel on the side where the replacement is planned. Then we lift the front part of the car with a jack and finally unscrew the wheel mounting bolts and remove it:
After this, unscrew the ball pin nut using a regular 19-socket wrench:
Now you can insert the puller, as shown in the photo below, and twist the bolt until the support pin pops out of its place:
Now you can unscrew the two support mounting bolts, which are located at the bottom edges, using a TORX E12 socket for this:
Now you can press the lever down with a pry bar to remove the support from its place. Or you can do it a little differently: place a brick under the brake disc, and carefully lowering the jack, thereby unloading the suspension arm, and the rack rises slightly up:
Now the ball becomes free and can be removed without any problems:
Then we take a new support, remove the protective rubber from it and stuff lubricants into it, you won’t regret it -)
We put the ball pin in its place:
Then tighten the nut to a torque of 66-82 Nm. Then you need to fit the holes in the support to the holes on the steering knuckle and tighten the bolts. I’ll say right away that I suffered a lot with this procedure, since I didn’t have a powerful pry bar at hand to pull the lever down. I had to use a light mounting spatula to manipulate the lever and change the position of the stand while raising or lowering the car with a jack.
As a result, after some effort, we managed to align the holes, but then, even with complete alignment, it can be problematic to tighten the bolts, so you should be patient if problems arise in this matter. Perhaps in your case it will be possible to make everything simpler without putting in extra effort. As they say, it doesn’t happen every time, yesterday I changed it on the nine (on my experimental one), and everything happened there in 5 minutes without pry bars or other manipulations with the jack.
By the way, I forgot to mention the price of new supports; in our city you can buy one for from 250 to 400 rubles, depending on the manufacturer: AvtoVAZ, Lemforder, Fenox, etc.
I apologize for being off-topic, but I don’t know what to do, because of the velvet glass on the viburnum, the glass is completely covered in scratches that are already visible to the naked eye, especially this applies to the front windows, please help me with advice on what to do, I read on the website that they are glued with a cloth, I wanted to ask if this one is good method and won’t moisture falling on the glass and flowing down the glass contribute to the material peeling off?
How did you deal with the problem of velvet on the viburnum, the glass is completely covered in scratches that are already visible to the naked eye, especially for the front windows, the same garbage.
https://ladakalinablog.ru
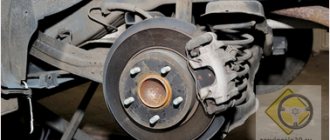
Removing old ball joints from the car
Preparatory operations
We take a metal brush and carefully clean the hinge nuts, the threads of the ball pins, the seats and the bolts that secure the supports to the suspension arms.
Soak with WD 40. Spray carefully so that the liquid does not get under the boot. Otherwise, during dismantling, the ball joint pin may rotate along with the nut. This will be a problem, but it can be solved, I’ll tell you about it later. We wait a few minutes for everything to sour. We begin to remove the old ball joint from the VAZ of the seventh model.
Dismantling
Let's start by replacing the lower ball joint. We are developing a nut. To do this, take a spanner wrench set to “22”. If you use a carob, you can “lick” the edges. If you tore it off, then we use an open-end wrench longer, because the cap wrench will not be able to be removed when you unscrew it all the way.
In most cases, this nut gets stuck and rusts. It takes a lot of effort to break it. Having torn it off, we walk it part way, unscrewing it and screwing it back so that part of the thread of the finger goes through, cleaning it.
You won't be able to unscrew it completely. Due to the design features of the steering knuckle on the VAZ 2101-07, it will rest against the bipod. Therefore, when dismantling the lower ball joint, you need to unscrew the nut as much as possible, as much as the design allows.
We take a puller and insert it between the fingers of the upper and lower support. We twist it until it rests against them with its edges. We continue to “tighten” it, but not to “useru”, so as not to break the thread on it. If it turns with great difficulty, stop. This force will be enough to press out the lower ball joint.
We have a hammer in our hands, it is advisable to take the adapter in the other hand to increase the accuracy of the blows. We rest one edge of it against the steering knuckle, there is a special protrusion there (shown in the photo below), and “hit” the other with a hammer. After several blows, the finger should “pop out” of the cone.
The rest is a matter of technique. We unscrew the nut completely, now there is enough space for full extension; if it still rests on the bipod, then use a pry bar to lower the lever down.
Important! We do not completely remove the hub from the lower ball pin; we will need it to press out the upper support.
And now the unpleasant moment. Once the finger has come out of the steering knuckle seat, there is nothing holding it. The nut has a fluoroplastic ring that secures it from unscrewing spontaneously. It can pull the finger along with it, and the nut will begin to spin with it.
Examination
If you find signs of a bad ball joint in your vehicle, have the unit inspected. At home, diagnosis can be performed using several methods. It’s better to take a comprehensive approach to checking, using all methods in turn.
Methods for diagnosing ball joint malfunctions include:
- hearing test;
- rocking wheels;
- measurements.
Hearing test. The check is carried out in the presence of an assistant who rocks the car with the engine turned off. While the car is rocking, its owner listens to sounds. If a knock is heard from the side of the support, it is necessary to remove the parts, carry out a thorough inspection of them and, if necessary, replace them with new ones.
Rocking wheels. The check is also carried out in the presence of an assistant. The car is jacked up, an assistant is placed behind the wheel, and he is asked to press the brake pedal. At this time, they begin to rock the wheels one by one and look for any play. If there is play, the support is replaced.
Measurements. Armed with a caliper, the car owner climbs under the front of the car and, through the control hole under load, measures the distance between the end of the pin and the outer surface of the support housing. The obtained indicators are compared with the standards specified in the vehicle registration certificate. For example, for VAZ cars this distance should not exceed 1.18 cm. If you don’t have instructions at hand, you can always download them on the Internet.
The work of replacing the ball joint of the VAZ 2107 takes place in several stages
- First of all, you need to remove the wheel.
- Armed with a metal brush, we clean the fasteners of the ball joints.
- Using the intended liquid, you need to treat all connections that will unwind during operation.
- Using a 22mm wrench, unscrew the nuts. Immediately you need to make two turns on the upper and lower supports.
- We install a ball puller.
- Often both the upper and lower supports give in immediately. And the one at the top pops out first. Otherwise, you will have to use a hammer and a special steel drift to knock it out. We hit the protrusion located on the steering knuckle and thus knock out the support.
- When the upper ball joint of the VAZ 2107 can be knocked out, take the key, unscrew the nut, after which you can remove the ball joint from the fist.
- If the finger rotates, you should clamp the lever, for which it is best to use a mounting tool.
- Now you need to unscrew the fastening of the support to the upper yoke.
- 1Remove the ball joint.
- When the ball is removed, you need to carefully clean the place where it fits on the lever. Check the lever for cracks, chips, etc.
- The sealing washer should be removed from the old ball, which we install on the new support.
- Thoroughly lubricate the ball joint using Litol-24 or ShRB-4 grease.
- Install the boot and washer.
- Now you need to screw the ball to the lever. We install it into the fist and tighten the nut.
- Now we unscrew the nut of the lower ball joint of the VAZ 2107. In almost all cases, the pin begins to rotate, but in order to avoid this, it is necessary to install an assembly between the brake shield and the knuckle. Next, we make a lateral tension in the connection between the fist and the finger.
- If the previous step does not help, the problem can be solved by installing an adjustable wrench in the gap between the knuckle and the lower arm, using it to keep the finger from turning.
- Now that the nut is unscrewed, you can lift your fist up. In order to make further work more convenient, it is necessary to insert a 22 key into the slot located between the lower arm and the upper part of the fist.
- Remove the ball joint from the lever.
- We carefully inspect the lever and the seat itself, which must be cleaned of rust and dirt.
- We take a new ball, checking the presence of grease in its lower part, unscrewing the plug using a 7 key.
- If there is no lubricant, it is necessary to fill the ball with new lubricant, for which a syringe without a needle is used.
- We install the ball at the bottom of the lever in its seat, after which it is necessary to screw it to the lever.
Now the new balls are installed, and as you can see, there are no particular difficulties in this procedure. The main thing is to strictly follow the instructions described above.
Also read with this article:
We are preparing for a major overhaul of the VAZ engine
How to modify the VAZ 2107 stove yourself: expert advice
We adjust the VAZ 2107 carburetor without the help of a service station
Installation of fog lights (PTF) on a VAZ 2107
How to replace ball joints without a puller
To press the ball joint pins out of the steering knuckle cones, you need to:
- Jack up the car under the beam, hang the wheel so that it and the lever “hang” in the air.
- Loosen the ball fastening nuts as described above
- We insert a pry bar, when replacing the lower ball joint, between the lever and the knuckle. We press it down, as if squeezing these two parts apart
- With the second hand we hit with a hammer with “bulging” eyes on the ebb of the fist, shown above in the screenshot. After some time, depending on the degree of souring of the ball pin in the cone, the pin will “fly out”
- For the top one we do the same. We insert the pry bar between the upper knuckle and the lever and hit it with a hammer until the ball joint pin pops out
The remaining operations are carried out according to the same scheme as replacement with a puller: preparation, cleaning, lubrication, etc.
Video - replacement without a puller:
Replacing a ball joint on a VAZ 2109
This process is carried out not only when the ball joint is worn out, but also when there is a breakthrough in the boot. This cannot be ignored, as it poses a danger to passengers and the driver.
It is most advisable to use a lift or inspection hole for work. If you don't have one, you can use a jack. What you need to do:
Remove the wheel on which the diagnostics revealed problems with the wheel brake. All structural parts are cleaned of dirt. Plus, the fastening elements are treated with a special rust removing compound. This will make installation and dismantling easier. Using a 19mm wrench, unscrew the nut that secures the ball joint to the suspension arm. Using a hammer and a pry bar, the SHO pin is pressed out of the suspension arm. To do this, the nut is not completely unscrewed, but several strong targeted blows are applied to the lever. Using a pry bar, the suspension arm is moved down to free the SHO pin from the lever. The bolts connecting the ball joint and the steering knuckle are removed using a 17mm wrench. The damaged ball joint is removed. The condition of not only the support, but also the boot is checked. Sometimes replacing the latter may be enough to fix problems
If obvious damage is detected, the ball joint is removed, a new one is installed, and the unit is put back together. It is necessary to pay attention to the condition of the finger. It should contain a spacer sleeve
If it is missing, it should be returned to its place, otherwise the updated SHO will not work correctly. The rubber boot is lubricated with grease before the reassembly process. Plus, grease will need to be applied to the installation site of the boot in the ball joint.
https://youtube.com/watch?v=QSB88vJE3zs
Features of the design of ball joints
Renault Logan Front Suspension Do-It-Yourself RepairRenault Logan front suspension do-it-yourself repair
A ball joint is an important part of any car, being a structural part of the suspension, containing a metal pin equipped with a spherical end and threads on opposite sides. It necessarily includes a special housing that can be filled with polymer and contains a nest of a certain shape. The ball-shaped end allows you to easily insert the part into the socket, eliminating backlash. Proper installation should maintain the ability to successfully move the finger in various directions. The connection must be covered with a boot made of high-quality rubber. This boot prevents dirt and dust from getting into the assembly, which provides more chances for successful operation of the ball joints.
The threaded edge of the device is inserted into the designated holes provided on the lever suspension, then secured with a nut. For the successful functioning of the component, it is necessary to ensure mutual mobility of the support mechanism to the suspension arms. When carefully studying modern component products, you need to understand that some models of ball joints do not have threaded connections
Thus, it is important to know the operating features of the spare part, guaranteeing successful operation
Signs and causes of malfunction
The service life of a ball joint ranges widely and ranges from 15 thousand km to 150 thousand km. It is difficult to predict when this element will fail. Most automobile manufacturers indicate the timing of replacement of ball joints in the vehicle's technical manual. In practice, the service life depends on driving style and the quality of the roads on which the car drives.
Signs of damage
There is noise coming from the suspension. If you hear noise from the suspension when overcoming speed bumps or when driving on a bumpy road at speeds up to 30 km/h, it means that there is not enough lubrication in the ball joints, or the pin is knocking due to wear. In winter, such knocking is common, since at low temperatures the lubricant takes longer to heat up than in the hot season. If the knocking does not stop a few minutes after you start driving, it means you need to check the ball joint.
The wheel wobbles. If during movement the wheel behaves unstably and “wobbles”, then there is play in the support. This phenomenon is dangerous because during maneuvers the wheel can turn out and the car can fall on its side. When this symptom appears, you need to replace the support as quickly as possible.
Uneven tire wear. A bad ball joint may be indicated by uneven tire wear on the front and rear axles. It is worth taking a close look at the tires of your car. If they are worn unevenly, diagnose the ball joints.
Also, a squeaking sound when turning the steering wheel may indicate a malfunction of the ball joints.
Causes of breakdowns
The main reason for ball joint failure is its mechanical damage. The following factors can speed up this process.
Stitching the finger. One of the reasons for support failure is pin grinding due to increased clearance. As a result, the element becomes loose and when driving on an uneven road, the finger may jump out of its socket.
Lack of lubrication. Another reason for ball joint failure may be partial or complete depletion of lubricant. Car owners are recommended to regularly carry out preventive maintenance and external inspection of the support and renew the lubricant layer.
Anther rupture. Anthers are made of rubber, which quickly wears out and becomes unusable at abnormal temperatures (heat, cold). If a crack has formed on the boot, it must be urgently replaced in order to prevent moisture and small particles from entering the ball joint.
Driving on uneven roads. If the car has to be driven frequently off-road, the wear of the ball joints accelerates. This problem is especially relevant for Russia. This should be taken into account by owners of foreign cars, many of which are not designed for off-road driving.
Which ball joints to choose
Let's look at the best types of ball joints sold in stores today. As a rule, their largest share in Russia is occupied by Belebeevsky LLC and others. These enterprises mainly produce spare parts and ball joints for VAZ. Although they use parts from these, as well as other cars.
But you also need to remember that none of the above manufacturers will produce ball joints that can be compared in quality to their originals. This is the reason they are so cheap. Therefore, when replacing, you should, if possible, install high-quality balls so that you do not have to change them regularly.
In particular, the ball joint from Honda has an unambiguous service life, which is comparable to the service life of the boot. It is about 80 thousand km. There were also examples of ball ones that in practice lasted even longer - 150 thousand kilometers. So decide for yourself whether to replace the ball joints with original parts or not.
We got the opinion of experts on this matter. And this is what they told us. It turns out that installing duplicate ball joints instead of the lower standard bearings is not recommended at all. This leads in many cases to rapid wear. Most often, duplicates “die” without even showing any signs, thereby eliminating the possibility of timely replacement.
As for the upper ball joints, duplicates can be installed here. This will not lead to dire consequences, as experts say, since the design of many car suspensions is designed in such a way that this part does not bear a large load.
The video shows how to replace a ball joint on a VAZ 2108–2115:
https://youtube.com/watch?v=RNvEEiKFluI
In conclusion, I would like to note that the replacement of ball joints must be carried out competently. But if you are unsure of your abilities, then you don’t have to immediately go to a car service center. You can use the help of a friend or acquaintance who knows more about this than you. And as they say, one head is good, but two are better.
We hope that this article will help you replace the ball joint yourself, which is not so difficult, as it turned out from the article. Good luck!
How to check the condition of a part?
A faulty ball joint can be recognized by a dull knock that comes from the vehicle's chassis when driving over uneven surfaces. Strong play and deviation of the car from a straight course are also eloquent symptoms of a breakdown. If the first signs are detected, you must immediately resort to replacing the ball joints.
On cars without power steering, the steering wheel will become much harder to turn in both directions. The same symptom is the nature of the breakdown of the steering rod and tips. But, if the problem is with the joint, then it will be necessary to apply much more force to turn the steering wheel, especially at extremely low speeds, for example, when parking or starting to drive
If a strong squeak occurs when the vehicle turns, then most likely the part is operating without lubrication. The lubricant could leak due to a damaged boot. Such a hinge will not last long; it is best to replace it in a timely manner. Many car owners are also interested in the question: how to check a ball joint without a puller?
Related article: The importance of choosing the right coolant
This work is quite simple to do: you need to insert a flat-head screwdriver into the gap between the bipod of the steering knuckle and the lever. Next you need to make an effort and try to disconnect the parts from each other. With this simple action, even minor play can be detected.
Device
The design of the ball joint is quite simple. Its central element is a metal cone-shaped finger with a thread on one side and a ball on the other. The ball is located in a housing filled with plastic liners or a polymer composition, which act as a sliding bearing. The threaded end of the pin is attached to the lever.
By its design, a ball joint is analogous to a human joint. The joint allows the hand to move freely in any direction. Likewise, the metal support ball, moving in several planes, ensures the mobility of two suspension elements connected to each other.
In most modern cars there is one suspension for each wheel, less often – two, very rarely – three or four. Cars with independent multi-link rear suspension also have ball joints on the rear wheels. On the one hand, the more ball joints a car has, the longer their service life and the lower the likelihood of breakdowns. On the other hand, with a large number of suspensions, their diagnosis becomes significantly more complicated, and the cost of their repairs and spare parts also increases.
The ball joint can be non-separable or collapsible. In the first case, the support body is pressed into the suspension arm, in the second it is bolted to it. The non-separable ball is replaced together with the lever, the collapsible - separately from the lever. In modern brands of cars, a non-separable design is more common, in older domestic cars - a collapsible one, which allows you to eliminate play by simply tightening the cover.
Some “traditional craftsmen” have learned to extend the life cycle of non-removable ball joints. To do this, they cut out the bottom, screw in the threads, install new polymer gaskets, assemble all the parts into the body and use the support further. Such a unit lasts a long time, since for its normal operation you only need to change the polymer filler from time to time. However, not everyone can successfully re-equip a support. And an incorrectly restored unit can create a real danger on the road. Therefore, experts recommend not to risk your life, but to promptly replace failed supports with new ones.