The process of painting a car is perhaps one of the most scrupulous. It requires the performer to have certain skills and adherence to certain rules. Otherwise, you need to prepare for such unpleasant and, perhaps, even more complex procedures as correcting the consequences of your work.
how to remove paint drips
Therefore, it is very important to first consider car paint defects and how to eliminate them. You should also know some simple recommendations, following which you can do without corrective work.
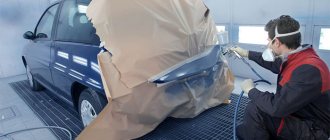
Along with the services of professional car painting specialists who will quickly, efficiently and for decent money carry out certain work on painting the entire car or a specific area of it, there are ways to paint a car on your own.
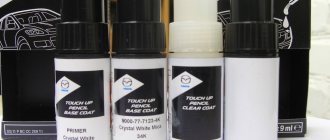
Carrying out this kind of work at home has become possible thanks to the use of a computer as a means of selecting and mixing individual elements of the final product. Anyone wishing to carry out painting work on their own today can absolutely freely turn to a colorist, who, using a computer selection, will make the shade of auto enamel that is necessary for him. But you should take into account the fact that auto enamels are more picky about the climatic conditions of the paint room than conventional paints.
To reduce efforts aimed at eliminating car paint defects, you should familiarize yourself with all the recommendations of professionals in this field.
We can distinguish the following types of defects that occur when painting a car:
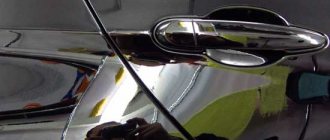
- The appearance of drips.
- Appearance of graininess.
- Characteristic matte spots.
- Orange peel, shagreen.
- Splashing of car enamel during drying.
- Problematic drying of varnish.
- During the drying process, the color of the paint changes.
- Cavities across the entire surface of the car enamel.
All these defects are very serious and each of them should be given special attention, during which you can become fully familiar with the ways to get rid of them.
How to remove varnish stains on a car after painting (step-by-step instructions with photos and videos)?
Good afternoon.
From today's post you will learn how to remove varnish stains on a car after painting. It's no secret that Russians' incomes are not as high as they would like and the vast majority of the population drive cars older than 10 years. Naturally, such a long period of time negatively affects the appearance of the car, and most car owners end up repainting their cars, and since painting a car is quite expensive, many do it themselves. In this case, with a high probability the following smudges are obtained:
And if there is a smudge on metallic (base enamel) it is impossible to remove! Either on acrylic paint or acrylic varnish, the smudge can be removed without major problems, you just need to be careful and patient.
So, in order to remove smudges on acrylic varnish, we will need:
- Sandpaper 240-360-400-500-600-800-1000-1500-2000
- Soft rubber block
- Water
- Polishing paste 1 and 2 numbers
You may need:
- Blade for smudges - will speed up the work and allow you not to sand off the smudge itself
- Universal putty. – allows you to sharpen smudges without fear of opening the varnish.
Step-by-step instructions if you don’t have a blade to cut off smudges:
Step 1 - sand off the leak itself. Sandpaper with numbers 240-360-400-500-600-800-1000-1500
We work with sandpaper with numbers after 800 with water, and rub the smudge crosswise on a soft rubber block.
Here's a short video for you:
Step 2 - after the smudge is leveled with the rest of the varnish/paint surface, be sure to wash the surface.
Step 3 – polish with paste numbers 1 and 2, making sure to wash the polishing area after each number.
Here's an example in the video:
Step 4 – wash the repair area and enjoy the result (scratches are a consequence of haste).
Notes.
If you have a smudge remover blade, which you can buy here, the process will speed up.
Cut off the smudge with a blade, matte the surface with a rubber block using sandpaper with numbers 400-500-600-800-1000-1500 and then wash and polish according to the instructions.
If there is a very thin layer of varnish at the site of the smudge, or if you have never sanded off smudges before, use putty.
The technique is as follows - apply the putty in an even layer to the area of the leak:
And sand it as in normal preparation for painting.
Your task is to sand the putty, finishing sanding at number 800-1000, in this case the drip will go away and the varnish next to it will not come off.
When the putty is sanded, knock down the marks from 1000-1500 sandpaper with water and polish the area of the leak.
That's all for me today. I hope that the article fully answered the question of how to remove varnish stains on a car after painting?
If you want to add to the article or have any questions, write comments.
Algorithm for removing smudges from a car body
At the first stage, you only need masking tape. With its help, you need to isolate the area of the body where you want to remove smudges. Next, using a sharp blade, you need to cut off the flaws formed after painting. This procedure should be performed as carefully as possible so as not to damage the layer of old varnish. If the defect is so small that cutting it off is simply impractical, then you can use high-grit sandpaper. Then comes the polishing stage.
A wooden or rubber block that has been prepared in advance is wrapped in medium-grit sanding paper. To avoid the paint breaking off on the surface around the drips, the sandpaper can be dipped in warm water or soapy water and then worked with. Paper with a small number, for example, P2000, will help remove remaining roughness on the car body. At the final cleaning stage, the area is treated with a grinding machine.
How to remove smudges after painting a car? Several possible solutions to resolve the problem.
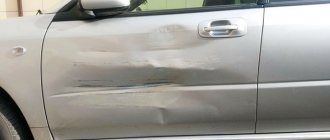
You will encounter smudges when applying paintwork only if you decide to do all the painting work yourself. Indeed, in workshops, such defects are simply not allowed to be issued to the client, or you will have every right to demand that this unpleasant fact be corrected.
Often, lack of experience with the same spray gun or poor choice of materials leads to uneven application of the layer, and the paint or varnish begins to slide over the coating. And if you are faced with such a problem, then the first thing that will interest you is how to remove paint smudges on a car, and whether you will need to completely redo the whole job. Everything, of course, depends on the situation; if the area of defects is too large, then you will definitely need to sand and reapply the material, but if the drops are located locally, then they can be carefully removed. In this article we will look at techniques for eliminating smudges after painting a car.
Reasons for the appearance of smudges and drops on the coating
First, let’s better understand the question of what are the main reasons for the appearance of these defects; this is necessary primarily for those who have not yet started work.
The list of factors is quite lengthy:
- low quality paints and varnishes.
- an incorrectly selected solvent or failure to comply with the proportion of paint dilution, which makes it too liquid and does not adhere well to the surface.
- incorrect settings of the spray gun and compressor, or applying the material at the wrong angle, and often the tool is moved too far from the surface. Here you need to follow the application technique.
- ingress of dust and insects.
- lack of temperature control, which at low temperatures leads to slow setting of the material and the formation of drops and smudges on the surface of the car body.
- failure to adhere to the drying regime between layers.
- lack of experience to apply a uniform layer of material.
These are basic things, and most of the nuances can be eliminated if you first try to apply the material to a test surface, set up the tool correctly and fine-tune the operating technique. Also pay special attention to the preparation of the workspace, this concerns the cleanliness and temperature of the room.
What will you need for the job?
Before starting work, you need to prepare the tools and consumables that you will need to remove paint smudges on your car.
Here is a list of necessary devices and materials:
- Sandpaper grades: R-600, R-1000, R-1500, R-2500.
- Rubber or wooden block.
- Napkins and rags.
- Soapy water.
- Thin and sharp blade.
- Universal putty.
Also prepare personal protective equipment such as gloves, a respirator and safety glasses.
Technology for removing large paint smudges on a car
To remove large paint deposits, you need to wait until the applied coating is completely dry. If you start removing a still wet layer of material, then there is a high probability that you will also touch the primer, and this is a more serious repair, since you cannot leave exposed metal, this will lead to corrosion. Dried smudges of paint can be easily cut off and give you room to maneuver.
Where do the drips come from?
The main reasons that the paint goes on unevenly is non-compliance with the painting rules. And this manifests itself in different ways.
- Failure to follow the instructions for the paint: the proportions of the pigment and solvent are incorrect, or the thinner used does not match the paint. As a result, the composition turned out to be too liquid, and it is not able to stay on the body;
- The spray gun is not adjusted before use;
- The muzzle of the apparatus was held at an angle, or at too great a distance from the surface, or over one area for too long;
- During the work, dust got into the paint;
- The temperature regime was violated when storing the compositions or in the room where painting was carried out;
- The required time interval was not maintained between individual layers, and the previous one did not dry completely before applying the next one;
- Well, and, of course, low-grade paint. Moreover, it does not have to be cheap: you can buy an expensive one, but an unsuccessful one, or a trusted manufacturer, but a fake.
Minor flaws:
Some defects can be corrected either immediately or without additional effort. So, if you are painting a separate element of the body and notice that the paint has flowed, you need to quickly turn it: the composition that has not yet dried will be evenly distributed over the surface. If drips are detected after drying, but are very small (for example, they are not visually detected, but can be felt), another applied layer of paint can help out. Just this time, try to do everything as correctly as possible.
How to remove varnish stains when covering a car
Painting a car is a painstaking and time-consuming process. Violation of rules and technology causes the formation of defects on the surface of the machine, for example, coating smudges. However, you can deal with minor flaws yourself. Using methods to remove varnish stains allows you to remove defects and not have to repaint the car.
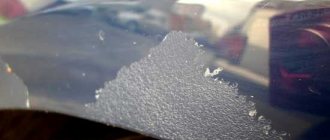
Varnishing defects
Smudges of varnish occur much less frequently than from paint. First of all, because it is usually sold ready-made and does not require dilution. The only thing that can cause varnish to leak is a violation of its application technology. In most cases, the effects are removed during the polishing process. It can be either manual or using an eccentric sander. If there are influxes, it is better to rent an EShM, since manual liquidation will take an unreasonably long time.
The best way out of the situation would be to follow the rules at all stages of paint and varnish work, since removing smudges of paint and varnish after painting a car is much more difficult than applying everything at once and without defects. And in some cases, if there are a lot of drips, you will have to completely repaint the body.
Reasons for the appearance of smudges and drops on the coating
Leakage occurs as a result of uneven thickness of the coating layer in certain areas. This is especially true for vertical surfaces. Excessive accumulation of wet paint and varnish causes runoff.
Painting a car is a painstaking and time-consuming process.
The reasons for the formation of flaws include:
- use of low-quality paints and varnishes;
- insufficient surface degreasing;
- using an unsuitable solvent or violating the paint dilution rules - the composition becomes excessively fluid;
- incorrect operation of the spray gun, compressor, non-compliance with the technique of applying the product - at the wrong angle, with an increased distance of the device from the surface, prolonged or insufficient use of it in one area;
- lack of preparation of the body for painting, ingress of dust, small debris, insects;
- the use of products without taking into account temperature conditions - at low temperatures the material sets slowly and drops form;
- do not use drying between layers, their large number and weight.
Often the reason for the formation of smudges is the procedure carried out by a beginner without the proper experience and skills - in this case it is recommended to practice painting on a third-party surface.
Types of automotive varnishes and features of their application
Manufacturers and their official representatives offer a wide range and different prices for car varnishes, so car enthusiasts can make the right choice for themselves. Considering the price-quality ratio, the most popular types of polyacrylates are acrylic car varnishes.
They are based on glyphthalic resins, due to which they save on solvents.
Polyacrylates come in two types:
- thermosetting (dry when exposed to high temperatures);
- thermoplastic (harden as a result of evaporation of the mixed solvent).
You can also purchase glyphthalic varnish for painting. It is characterized by good gloss, does not require polishing and reliably protects the base paint. It takes longer to dry compared to cellulose varnish. Therefore, before using it in your garage, you need to thoroughly clean it, preventing dust and dirt from getting on the recently varnished surface of the body, and also making sure there is sufficient air exchange with the surrounding space.
What you need for work
When choosing a method for removing paint and varnish stains, evaluate the surface area and the reason for the formation of drops.
Grinding the surface of a car to remove varnish smudges
Next, determine the list of materials needed for the work, which include:
- soapy water;
- masking tape;
- sharpened blade (for a razor or wallpaper knife);
- sandpaper of various brands: P600, P1000, P1500, P2500;
- a block of wood or rubber.
- polishing paste;
- grinding machine;
- universal putty;
- rag or napkin.
You will also need personal protective equipment: glasses, respirator mask, gloves.
Tools and materials needed to eliminate smudges
You should start with the fact that paint smudges can be large or small, so you may need different tools. In any case, you need to prepare:
- a stationery knife or other sharp blade;
- masking tape;
- sandpaper of various grain sizes (from P800 to P3000);
- polishing paste;
- a plastic “one and a half” with water;
- sandpaper block;
- grinder for polishing;
- windshield wiper blade.
Read more: Do-it-yourself wheel alignment on an ATV
The wooden block must have a completely flat surface, and to make it smooth, it can be treated with P120 sandpaper.
How to remove smudges after painting a car
It is recommended to carry out the procedure for removing large formed deposits after the paint has dried. This will make the task easier and will avoid the occurrence of cavities on the machine elements. If you use techniques to remove smudges on paint that is still “raw,” there is a high risk of affecting the primer. This will require more serious intervention, since it is unacceptable to leave the metal surface exposed - this will cause corrosion.
Only after the paint has dried is it recommended to carry out the procedure for removing smudges
Instructions on how to remove varnish or paint stains formed after painting contain several sequential steps:
- After the paint has dried, cover the untreated areas with tape.
- Use a blade to cut off excess varnish.
- Wrap the block with P600 sandpaper and sand the surface, first moistening the abrasive in soapy liquid to enhance gliding.
- When approaching the main paintwork, the sandpaper is gradually changed - first to P1000, then to P1500, the final grouting is carried out using P2500 and a grinding machine.
- After getting rid of paint smudges, you need to apply varnish. If the varnish coating has been processed, polishing using paste and a grinding machine is necessary.
The method for removing smudges on a car when the paint or varnish is not dry is to use putty. A universal type of material is required.
Step-by-step instruction:
- Apply putty to the defective area. Leave for 10-15 minutes.
- Sand the surface using sandpaper according to the previous method until the smudge is completely removed.
- Wash off the putty from the surface.
The described method of how to remove varnish and paint deposits from a car requires quick action. If the putty is left on the surface for 45 minutes or more, it will be extremely difficult to remove.
Small stains on a car can be removed using a sanding machine.
Methods for removing small stains on a car are quite simple:
- If a drop forms during application, you can tilt the element and wait until the product is evenly distributed over the surface.
- A rag soaked in solvent will also help. It needs to remove the newly formed smudge of varnish. After the solvent has dried, paint over the area.
- If small smudges form after short-term drying, it is advisable to re-coat the body.
The method for removing small stains of varnish after painting the car and drying the product is identical to the procedure for large stains. The difference lies in the use of P1000 abrasive at the initial stage, and not P600.
If smudges have formed on the car not of varnish, but of primer, the way to remove them is alternate polishing with P240 and P400 sandpaper.
It is imperative to remove sagging in order to avoid the formation of bumps when applying the topcoat.
Specialists with the proper skills and experience in car painting often use only a sanding machine to remove defects from the surface. However, it is important to choose the right abrasive wheels. It is not recommended for beginners to resort to this method, since errors in operation can cause damage to the primer.
Polishing
After leveling the surface, apply a small layer of 3m polishing paste to the paintwork; it is sold by weight and requires very little to polish. Then we take the sander and start polishing, constantly moving the sander from side to side. Polishing should be carried out evenly, without holding the machine in one place for a long time.
Before polishing, all surfaces of the car body should be covered with a protective layer of special paper, all glass, rubber seals and plastic parts, securing the paper with masking tape. You should also close all emblems and holes in the radiator grille, and it is better to remove the turn signals and mudguards. If possible, the interior and engine compartment should be sealed; it is advisable to prevent dust from polishing from getting there.
Read more: VAZ 2114 gray photo
How to prevent them from appearing
To prevent the formation of smudges on the surface of a car when painting, it is advisable to adhere to the following rules:
- Thoroughly degrease the body before applying the coating;
- choose the optimal thinner based on temperature conditions and repair area;
- maintain exact proportions when using solvent;
- adhere to the correct coating application technology, avoid local accumulations of the product and uneven application;
- do not make a large number of layers or their excessive thickness;
- follow the instructions for operating and setting up the spray gun;
- apply materials at the optimal temperature - it is about 20 degrees.
You can avoid the formation of defects by first carrying out a test staining on another surface. This will allow you to optimally configure the tool, acquire and hone your operating skills. It is important to pay attention to cleanliness, proper surface preparation and temperature conditions in the room.
How to remove smudges after painting?
Welcome to the kuzov.info blog!
In this article we will look at several ways to remove smudges after painting a car.
Smudges occur due to applying the second coat too early. Other reasons: paint or varnish diluted too thin, incorrect spray technique (spray gun too close, spray speed too slow), temperature in the paint room too low. You can read about how to paint without streaks here.
How to remove smudges before the paintwork hardens?
- Never try to wipe away a smudge with a rag or napkin, as this may disturb the underlying layers of paint.
- You can reduce the spread and increase of smudges during painting. If you notice that a leak is beginning to form, you can stop its formation by blowing a gentle stream of compressed air over the area. This will speed up the evaporation of the solvent, stop the leakage and make it easier to remove it after hardening.
- For fresh, uncured smudges, the following method works: take masking tape and touch the sticky side to the top of the smudge. Some of the flowing varnish will transfer to the tape. This can be done several times, each time touching with the clean sticky side, until the bulk of the smudge is removed. You just need to lightly touch without touching the lower layers of paint. Next, blow this area with compressed air from a spray gun to speed up the evaporation of the solvent, spray a dry thin layer of varnish and leave to dry. After 15–30 minutes, apply a full coat of varnish (see article on proper varnishing). The remaining irregularities can be removed by sanding after the paintwork has completely hardened.
- If a smudge has formed during painting, it can be moved lower by spraying an excess amount of varnish into the smudge area. Thus, you can move the smudge to a place where it will be easier to remove it (for example, away from the edge or concave part) or even beyond the edge of the panel. This method works on vertical body panels.
Fresh varnish smudge on a car fender
You need to spray an excess amount of varnish into the smudge area.
The leak begins to slide down
As a result, the smudge disappeared and the paintwork became smooth.
The varnish leak has moved down the wing
Primer Defects: Removal Methods
If the manufacturers' recommendations are not followed, primer paints can also form smudges. If these deposits of primer are significant, then they must be removed, otherwise the unevenness will be noticeable even after applying the top paint coating. Smudges on the primer are eliminated using the same sandpaper of different grain sizes.
Moreover, it is even easier to remove defects with a primer than with paint. After all, minor roughness that may remain after sanding with sandpaper with a grit of P240 to P400 will subsequently be covered with paint. Therefore, you don’t have to waste time on very careful sanding with fine-grained sandpaper (mandatory for the top paint layer). If, after removing the primer drip with a blade, a small cavity forms, then you can not use putty, but simply apply an additional layer of the same primer.
Based on the results of painting work, defects may be detected on the car body. This often happens when painting was done independently. Smudges on paintwork appear as a result of non-compliance with car body painting techniques. How to remove smudges after painting a car in this situation, what should you do, how to avoid this? We will analyze all this in this article below.
How to remove smudges after painting a car?
Before removing the stain, the paint or varnish must be completely hardened. So that both the leaks and the rest of the paintwork are of the same hardness. Stains take longer to harden than other fresh paint due to their thickness. A smudge that has not completely hardened and the paint or varnish adjacent to it can be sanded differently, which may make it difficult to remove it without leaving a trace. You can check the hardness by scratching the stain with your fingernail. It is better to remove stains after 24 hours of drying or later. This time is enough to harden and the paint remains slightly pliable for sanding.
To remove the bulk of the smudge, you can use replacement blades (for paint scrapers or scrapers for glass ceramics). Use a new blade each time. Hold the blade at a 90-degree angle and scrape along the stain in one direction. There is no need to try to cut off the smudge; scrape off each passage a little. If the leak has hardened well, this method works well. When using the blade, its edges should not touch the paint surface. It is better to seal the edges with masking tape so that only the middle of the blade remains sharp. After scraping off the bulk of the smudge, the remaining unevenness should be sanded using P2000 sanding paper with a hard stone and polished.
The smudge can be removed by sanding paper through a hard block with water, but there is a danger of rubbing off the paintwork adjacent to it. We will look at how to avoid this in the next paragraph. Large smudges can be started by sanding with P800 or even P600 abrasive and continue with P1000 - P2000. Sanding paper P600 can remove 80% of the smudge, and the remaining 20% can be removed with finer abrasives. The function of the hard block is to sand down the high spots of the smudge without touching the surrounding paint surface. Never use a sponge soft block to remove smudges as it will only hug the smudge as you sand. When sanding with water, periodically remove the water and check the result. Why not sand the smudge immediately with P2000 abrasive? If you remove the smudge only with P2000 sanding paper, it is safer, but it will take a lot of time. In addition, when it seems that the smudge has disappeared, after polishing you will be able to see a small unevenness where it was. This is due to the fact that the P2000 abrasive is too fine and does not cut off excess varnish well, but rather smoothes it out. Therefore, it is better to start removing stains with at least P1000 abrasive, continue with P1500, and finally remove scratches from previous abrasives with P2000 paper. It is better to soak the sanding paper in water with a small amount of dishwashing detergent.
Putty can also be used to remove smudges. It is better to use fine finishing putty. It is applied in a thin layer to the stain and the surrounding area. The function of the putty is to prevent rubbing of the paintwork located next to the smudge. The putty should be sanded using P600 sanding paper with a hard block. The smudge will be erased along with the putty. When all the putty and smudges are erased, you need to change the sanding paper to P1500, and then P2000, to remove large marks. Next, the matte paintwork needs to be polished.
When sanding, the smudge is removed along with the putty, and the surrounding varnish remains practically untouched.
Some recommendations
- To remove smudges after painting a car without damaging the paint surface, you must let the paint dry.
- As a last resort, if you don’t have a cylindrical grinder, you can use an electric drill.
- When there are a lot of paint runs on the car body, in some cases it is easier to repaint the car.
- Often smudges form due to poor quality paint and varnish, so you should not skimp on materials.
- When removing smudges, you need to clean the area with the defect carefully, and it is better not to scrub a little than to overdo it. You can level the surface with longer polishing, but if excess paint is removed, then this area of the surface will have to be repainted.
- If there is no special paper to cover the body, you can use newspapers.