Particularly small class cars VAZ and SeAZ “Oka” 1111 and 1113 were the only models of the domestic automobile industry that were equipped with two-cylinder water-cooled power plants. These motors were very compact and structurally very well made.
But, like any power unit, Oka engines required major repairs after long-term operation. Moreover, some of the restoration work, especially the crank mechanism and the cylinder-piston group, is much easier to perform with the engine removed, so you definitely need to know how to remove the engine from the Oka.
In general, removing the engine from the Oka is not a difficult operation, but you need to know the sequence of actions. You will also need the appropriate equipment.
Removing Attachments
Also, for the convenience of performing work, it is better to drive the car into an inspection hole. Immediately after this, the negative terminal from the battery is removed.
Before starting work, you need to drain the engine oil and coolant system.
To make it more convenient to remove and disconnect engine attachments, you must remove the hood from the car. This will provide better access to the upper hanging elements.
Then all pipes and wiring from the engine are disconnected - the cooling system pipes going to the engine from the radiator, the pipes going to the stove.
As for the wiring, you will need to disconnect all connections going to the sensors:
- oil pressure,
- coolant temperature,
- carburetor solenoid valve,
- spark torque sensor,
You will also need to disconnect the wires from the spark plugs, starter, and generator. In the future, the generator will have to be completely dismantled.
| 4. Removing the coolant sensor | 5. Removing the solenoid valve |
| 8. Disconnecting high voltage |
You will also need to disconnect:
- fuel pipe from the fuel pump,
- brake booster hose,
- air filter housing from carburetor,
- from the carburetor itself - the throttle and air damper drive cables.
In general, removal of the Oka engine should be accompanied by preliminary dismantling of the gearbox and drive, but this may not be necessary.
Since the engine will still be disassembled, the method of removing the engine without a gearbox will require removing the cylinder head before removing the engine from the car.
| 10. Removing the carburetor pipe | 11. Removing the brake vacuum hose and manifold heating | 12. Removing the air filter housing |
| 13. Removing the air damper drive | 14. Removing the throttle drive |
How to remove a gasoline engine
Removing a gasoline engine, for example VAZ or ZMZ models, is quite simple. The first recommendation is that this process should be carried out with 4 hands, since it will be difficult for one person to do it. So, let's consider the sequence of actions for removing a VAZ-type unit:
- For more comfortable operations and less time, it is recommended to carry out the process on a lift, pit or overpass. Also, it is necessary to collect tools, namely: a set of keys, screwdrivers and sockets, a hoist or winch, and containers for draining liquid.
- The first thing you need to do is remove the battery and also unscrew its shelf. At the same time, you can remove the air filter housing, as well as the air ducts.
- The second stage is draining all liquids. To do this, you need to remove the motor protection (if any), and, placing containers under the drain necks, unscrew the plugs. For a standard engine, coolant (10 liter container) and engine oil (up to 6 liter container) are drained.
- After the liquids have been removed, it is worth starting to disassemble the unit to dismantle it.
- In the first stage, it is necessary to remove the generator, starter, all drive belts, and battery wiring.
- Now we begin to remove the elements of the cooling system: thermostat, water pump, expansion tank, coolant system pipes.
- Next, we dismantle the ignition system - spark plugs, wires, distributor, injector.
- After this, we disassemble the fuel system, namely, remove the carburetor or fuel rail with injectors, power supply pipes, and intake manifold.
- Another important step is dismantling the cylinder head. First you need to remove the camshaft pulley. After unscrewing the bolts, remove the valve cover, and then the cylinder head itself.
- We hook the motor to the winch and firmly fix it.
- Unscrew the gearbox from the engine. In this case, the clutch should remain on the power unit.
- We unscrew the nuts securing the pillows and lift the engine, carefully removing it from the engine compartment.
- Reinstalling the motor is carried out in the reverse order.
Then you need to move under the car
Removing engine mounting elements
First you will need to unscrew all the bolts securing the clutch housing from the power unit.
16. Removing the clutch housing
Then you should proceed to the engine mounting elements.
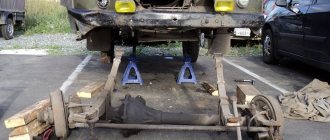
To do this, you will have to unscrew the bolts securing the motor mounts. First, the nut is unscrewed from the bolt on the front support. Since the power plant continues to rest on this support, in order to be able to pull out the bolt, the engine should be lifted slightly using a pry bar and the bolt removed. Next, holding the unit with a pry bar, insert a wooden block into the gap between it and the subframe. After this, it will be possible to unscrew the engine bracket mounting bolts.
| 17. Removing the front engine mount | 18. Lifting the engine with a pry bar, remove the bolt | 19. To unload the bracket, we place a block |
| 20. Using the “17” head, unscrew the 3 bolts securing the bracket | 21. Bracket mounting bolts when removed | 22. Remove the bracket with support |
In the same way, the rear right support becomes loose, followed by installing it on a wooden block and removing the bracket.
| 23. Using a 17 key, unscrew and remove the bolt | 24. Unscrew the 2 bolts securing the rear support bracket | 25. Remove the rear support |
26. Removing the rear mounting bolt of the clutch housing is possible only after dismantling the rear support.
The photo shows a removed engine Removing the left engine mount
| 27. Place a block | 28. Using a key set to “13”, unscrew the nuts securing the left support bracket to the gearbox |
| 30. Take out the support |
The lifting mechanism is hooked onto these eyelets. To remove the motor, you need to move it all the way to the left so that the gearbox input shaft comes out of the flywheel. It is quite possible that for this you will have to tilt the engine a little, and at the same time moving it to the left.
After the shaft comes out of the flywheel and clutch discs, the power unit is carefully lifted up by the lifting mechanism. It is better to do this together - one will lift the motor, and the second will guide it so that it does not cling anywhere.
Step-by-step instructions for disassembling the internal combustion engine of a car + Video
- Prepare all the necessary tools and drain the oil from the crankcase.
- Firstly, this will be necessary to lighten the weight of the motor, and secondly, it will help to avoid excess dirt on the workbench. Next, unscrew the oil filter. Also unscrew all the bolts that secure the oil pan. The old gasket can be thrown away as it is no longer suitable for further use.
- Now you need to remove the crankshaft pulley. This is not as easy to do as it seems at first glance, since in this case you will need good physical strength. However, no one has canceled the use of a pipe as a wrench extension. Secure the crankshaft from turning by blocking the flywheel. For this, a special device is used, which can be purchased in the store. Next, use a wrench to unscrew the ratchet and remove the pulley.
- Unscrew the nuts securing the valve covers and timing chain, remove it and pull out the gasket. Unscrew the bolts securing the camshaft gears, as well as the shaft that drives the engine oil pump. Next in line is the timing chain tensioner. First, loosen the special cap nut, and then unscrew the other two nuts that secure it to the cylinder head. Do not forget to unscrew the bolt securing the shoe, and then remove the tensioner itself, along with the shoe. Then the pin that restricts the chain is unscrewed, the camshaft and oil pump gears are removed, and the chain is removed.
- Now you need to remove the camshaft. To do this, unscrew two nuts located on its studs in the bearing housing. The housing must be removed and the camshaft carefully pulled out. Before pulling it out, do not forget to also remove the special thrust flange.
- Next, the bolts intended to secure the cylinder head to the block itself are unscrewed. The cylinder head is dismantled immediately along with the manifolds, which are not required to be removed (depending on the type of repair being carried out). After removing the head, it is also recommended to replace the gasket. This procedure will help you, in the future, get rid of repeated removal of this element.
- After this, you need to dismantle the oil pump. To pull it out you need to remove the special thrust flange. After this, remove the roller from the cylinder block, which is responsible for driving the oil pump.
- Using a special removable device, remove the gear that fits onto the engine crankshaft. Then remove the nuts located on the connecting rod bolts. Now remove the connecting rod caps and, using the cylindrical opening, pull out the connecting rods along with the pistons.
Video - How to remove the engine from the Oka
Engine removal may be necessary after a certain mileage on any vehicle to repair or replace it. In this article we will look at the entire process of removing the engine from the engine compartment without using the services of car services.
All power units consist of an engine and gearbox. The process of removing the unit includes disconnecting the drives and removing the linkage, which remains on the vehicle.
It is impossible to describe the process of removing all brands of engines in one article. Let's look at the main points without touching on the minor nuances of each individual model.
It is convenient to remove and install any engine using a hydraulic crane or winch mounted on the ceiling of the room in which this process is carried out. Most engines without a gearbox weigh over 200 kg, and even heavier with a gearbox.
It is advisable to remove the engines on most cars together with the gearbox. The gearbox most likely also needs to be repaired and seals replaced.
Below we will look at the process of removing the engine along with the gearbox of the most common VAZ model. The work procedure is almost completely similar to removing engines from foreign-made cars.
Beginners are usually advised to prepare a camera before starting work to record the sequence of actions.
Removing the motor
Many car enthusiasts ask the question: how to remove the engine? The installed engine can be removed from the car at a car service by professional specialists or with your own hands in your garage. So, dismantling it yourself will take approximately 8-10 hours.
But, if the vehicle has a lot of electronics and the power unit is equipped with it, then it is not recommended to carry out the operation yourself, but rather turn to professionals. So, let's look at the process of removing the engine on the simplest versions of cars.
The sequence of actions when removing the engine from the car is as follows:
- jack up the car from the front and secure the rear wheels with the hand brake;
- remove the engine crankcase protection;
- drain technical fluids (stove heater tap);
- unscrew the drain plug in the engine sump and drain the antifreeze;
- remove the terminals from the battery;
- disconnect the wires from the generator and starter;
- disconnect the air filter;
- remove all wires going to the carburetor;
- remove the cooling system pipes;
- remove all wires from the gearbox and clutch drive;
- remove the exhaust system by disconnecting it from the exhaust manifold.
After removing the motor, roll back the hoist and place the motor on a trolley or install it on a special stand for repairs.
Please note that the 4AKB-YUG company is a manufacturer of engine repair stands. You can purchase the product in any convenient way by contacting us by phone or sending us an email.
In case of delay in issuing an invoice and commercial proposal, as well as if there are any complaints about the work of the sales department, contact a senior manager.
Attention! All prices on the website are excluding VAT.
There are two options for removing the engine from a car: with engine disassembly and without engine disassembly. Removing the engine from the vehicle and disassembling it is recommended if there are no mechanical or hydraulic devices for lifting the engine (a hoist with a traverse, a “goose”, etc.). It is recommended to carry out engine removal work with one or two assistants.
Removing the engine without disassembling
Place the car on a lift or over an inspection ditch, place supports under the front wheels and hang the rear axle on one or both sides.
Remove the hood, disconnect the wires from the battery and from electrical components installed on the engine. Remove the battery and engine compartment lamp.
Drain the liquid from the radiator, cylinder block and heater by unscrewing the plugs on the left side of the cylinder block and on the lower radiator tank, move the upper heater control lever to the right (it opens the heater valve) and remove the plugs from the expansion tank and radiator.
ATTENTION
: To avoid damaging the radiator, when unscrewing the drain plug, hold the plug fitting soldered into the radiator with a second wrench. Unscrew the plug with a socket or socket wrench so as not to tear off the edges of the plug.
Disconnect the coolant inlet and outlet hoses from the engine and remove the radiator along with the thermostat, hoses and fan motor.
Remove the air filter by first disconnecting the hoses from it, removing the cover and filter element. Close the carburetor with a technological plug.
Using a spanner, unscrew the nuts securing the front muffler pipe to the exhaust manifold.
Remove the gearbox as described in the "Gearbox" chapter.
Disconnect the carburetor throttle linkage and the choke control cable from the engine. Disconnect the fuel supply hose and the hoses going to the heater from the engine.
Hang the TSO-3/379 traverse on the hoist and sling the engine on the right side through the bracket installed on the front stud of the exhaust manifold, and on the left side - behind the clutch cover mounting hole.
1 — support casing; 2 — front engine mount support; 3 — cylinder block flange; 4 - bracket; 5 — intermediate plate; 6 - insulating plastic ring; 7 — support spring; 8 - buffer; 9 — support cushion; 10 — washer; 11 — rear engine mount support; 12 — spacer sleeve; 13 — cross member of the rear engine mount
Lightly tension the hoist chain, unscrew the nuts securing the mountings 9 of the front engine mount to the cross member of the front suspension and remove the engine from the compartment.
Remove the starter heat shield, starter and hot air intake along with the supply hose. Remove the two side brackets with the front engine mount cushions from the cylinder block.
Unscrew the clutch mounting bolts and remove it.
Install the engine on the car in the reverse order of removal. Pay special attention to the connection between the engine and the gearbox: the input shaft must fit exactly into the splines of the clutch driven disc.
Wash the engine in a washing machine, place it on a disassembly stand and drain the oil from the crankcase.
Remove the carburetor by disconnecting the hoses and throttle linkage from it.
Remove the fuel pump, ignition distributor, use wrench 67.7812.9514 to unscrew the spark plugs and coolant temperature gauge sensor.
Remove the generator and coolant pump drive belt, remove the generator and generator bracket.
Removing the engine from the car with disassembly
Installing the engine on a car
Assembling and installing the car engine is performed in reverse order.
How to remove a diesel engine
Dismantling the diesel heart of the car is carried out by analogy with the gasoline one. The difference is that diesel power units are often equipped with a turbine, which must be removed before dismantling the fuel system.
Another difference is the injection system itself. So, instead of an injector, a diesel engine has a high-pressure fuel pump, which is usually located on the cylinder block itself. It's not that difficult to remove, but you shouldn't forget about it because it weighs down the engine.
Often, especially on older diesel products, the body also houses the oil and gasoline fine filters. They must be removed after draining the lubricant.
Many auto repairmen recommend removing the exhaust manifolds from the power unit, which get in the way when the engine is removed from the engine compartment. If we talk about diesel engines installed on trucks, this is done to reduce the weight of the product.
Removing an injection engine from a car without disassembling
To remove the injection engine from the car, you need a lifting device with a lifting capacity of at least 300 kg and slings (chain).
Installing the injection engine on the car
Install the engine and all removed parts in the reverse order
It is recommended to remove the engine and transmission together as a single power unit and then disconnect the engine from the transmission. The following work is carried out in the same way for all types of engines; additional instructions are given for cars with an automatic transmission. When lifting the power unit, it must be tilted at an angle of 45° to ensure exit from the engine compartment of the transmission. The power unit weighs more than 200 kg, so when removing, special care must be taken not to damage the body surfaces or paintwork.
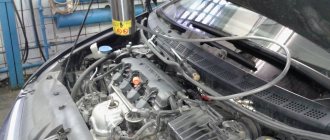
- To avoid damage, place protective covers on the fenders of the car. Release the locking lever on the left hood bracket and lift the hood up until the lever disengages. Then release the locking lever on the right hood bracket. Move the hood to a vertical position. The picture shows the position of the latch.
Rice. Open the hood to a 90° position
- Disconnect the negative cable from the battery and remove the battery along with the mounting frame.
- Open the cooling system plug. The coolant temperature should not exceed 90°C.
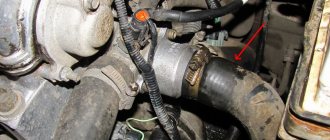
- Remove the coolant drain plug on the right and left sides of the cylinder block. Do not confuse the plugs with the bolts securing the crankshaft main bearing caps. The figures show the coolant drain plugs and the arrows indicate the bolts securing the covers.
- Remove the radiator and fan. To do this, remove the rubber supports and radiator mounting brackets. Remove the radiator, then remove the oil cooler. In cars with an automatic transmission, before removing the radiator, remove the hoses from the transmission oil cooler and plug the holes in the hoses.
- Remove the expansion tank.
- Remove the exhaust system assembly.
- Suck out the oil from the power steering reservoir and disconnect the hoses from the power steering pump.
- Disconnect all hoses and pipelines of the cooling system, lubrication system, power system and wires between the car body and the engine. It is advisable to mark the pipelines.
Rice. Location of the coolant drain plug (1) on the left side of the cylinder block. Do not unscrew the bolts indicated by the arrows.
Rice. Location of the coolant drain plug on the right side of the cylinder block. Do not remove the bolts indicated by the arrows.
- Disconnect the fuel control rod.
- In vehicles with air conditioning, the refrigerant must be drained. The work must be carried out very carefully. If you lack experience, you should seek technical assistance and guidance. Then disconnect the hoses from the dual pipeline.
- Unscrew the bolts securing the front engine mounts in the lower part of the body on the left and right; to unscrew, use an extension with a hinge that starts from the bottom.
- Attach a lifting cable to the engine and place it on the hook of a crane or other lifting device. Pull the cable slightly.
- In vehicles with adjustable wheel suspension, unscrew the four bolts securing the suspension hydraulic pump together with the connecting pipelines, remove the pump and move it to the side. Remove the pump drive parts.
- Remove the cross member of the rear engine mount together with the support; before removing, mark the location of the cross member relative to the body.
- Disconnect the driveshaft from the gearbox and slide it backwards. Do not loosen the clamping nut on the propeller shaft.
Rice. The arrows indicate the mounting bolts for the pump of the hydraulic system of the adjustable wheel suspension.
- Disconnect the wires from the transmission (reverse light switch wire). For automatic transmissions, disconnect the kickdown device wires. Unscrew one side of the steering shock absorber mounting and turn it.
- Remove the engine mount shock absorbers.
- Loosen the bolts securing the gearbox to the engine.
- Place a jack under the gearbox (install a wooden spacer between the jack support pad and the gearbox).
- Remove the body tunnel protective splash guard.
- Carefully lift the engine, tilting it at an angle of approximately 45°. Raise the gearbox using a jack, following the movement of the engine. Carry out the work of lifting the engine slowly with constant monitoring, make sure that there are no connected wires or pipelines left, especially if additional equipment is installed on the vehicle. Pay special attention to the cable fastening.
Basic maintenance of the motor is possible without dismantling it. Replacement of spark plugs, maintenance of intake and exhaust manifolds, and even replacement of the timing belt (chain) is carried out directly in the engine compartment of the car. However, work with valves, crankshaft, piston group, etc. is carried out only with the engine removed. Not to mention the overhaul procedure.
From our article you will learn how to remove the engine from a car in the garage, how you can remove the engine yourself and how to do it correctly.
The material was prepared by the site Auto-science.ru - whose specialists will help you check the mileage of your car efficiently and without errors.
Lada 2107 First › Logbook › Removing and disassembling the engine 2107
Well, it’s finally a day off, the weather is great, IgorZamorev 31547’s friends have arrived. Remove the motor? No problem, let's go.
They rolled it out onto the street and things started to go:
Everything that was in the way was removed, on the advice of ciklop06: pan, carb, battery, radiator, distributor
The cover was removed, and I didn’t climb any further... Well, what to do, let’s continue:
Having removed the head, I see a huge amount of carbon deposits on the valves, and in general the surface is not very clean:
and it seems to me that they are not completely closed
Let's go further, we removed the engine from the cushions, disconnected it from the box, pulled it out
The cylinders also seem to be imperfect, the carbon deposits around the edges are scary
The pistons also have hard carbon deposits, and some kind of scuff marks, it looks like they are caused by the valves...
Well, here are the stuck liners:
The clutch was also dropped, it still seems to work
Well, we suffered a little from nonsense :))
I checked the paint on the disc and it was exactly the color I wanted.
Then they rolled it into the garage:
Now I see several options for further action:
— Collect and repair this one. — Find the same one assembled but livelier. — Go look at the gear and install it.
There are also difficulties and questions with the options:
1.- How serious is carbon deposits on cylinders, valves and pistons and how to remove it? — Seizures on the pistons from the valves? Or what causes them? — Is repair advisable with such problems?
2.- Likewise, does it make sense to take the same motor? Or am I getting caught up in the same problem?
3.- They offer a shex for 5k, where should you pay attention during inspection, how to check whether it is at least functional? — Is it difficult to install in general, and wiring in particular, when moving from a carb?
I would be grateful for any advice. Considering that today the engine was disassembled for the first time)
How to remove the engine from a car in the garage without resorting to the help of a car service?
In fact, this is not such a complicated procedure as it might seem at first glance. The main task is to select tools for removing the motor.
Important!
The engine weighs several hundred kilograms.
Falling it can not only cause property damage, but also cause serious injury. Before lifting the engine from the engine compartment, it is necessary to carry out the following procedures:
- Drain all technical fluids: oil, power steering fluid, brake fluid.
- Free the cooling system from antifreeze.
- Drain the gearbox (except when you remove the engine without removing the gearbox).
- Disconnect all hoses and pipes of the fuel, brake, lubrication and cooling systems.
- If possible, remove attachments: air conditioning compressor, generator, etc.
- Disconnect electrical cables, engine control unit, injector control cables, high-voltage ignition coil wires.
- Remove the connectors from all motor sensors. It is recommended to make a list (“based on” the maintenance and repair instructions), this will help you not to miss a hidden connector.
- In most cases, you will need to remove the hood cover.
If you plan to remove the engine without the transmission, you need to unscrew all the tightening bolts and make sure that after removal the gearbox will not fall under the car. That is, you need to take care of temporarily securing the unit.
Motor repair
Before throwing away an important and expensive part, it is worth inspecting it, looking for faults - some of them you can fix yourself.
To find a breakdown, the motor must be connected to the network, having first connected the rotor and stator. If the motor brushes look disheveled and spark during operation, they should be replaced with new ones. They may be located in the middle of the engine or near the manifold. In the first case, the motor needs to be disassembled, and in the second, only the fastenings must be pryed off.
If unusual noise or overheating is noticed, then most likely the problem is in the winding. A multimeter will help you verify this. You need to attach the probes of the device to different groups of lamellas: if the difference in resistance is above 0.5 Ohms, there is a short circuit. The diagnosis will be confirmed by the presence of burning or a strong odor during operation. If the lamellas do not have resistance, the winding may break. It is not profitable to rewind the rotor - it is better to buy a new one.
The rotor lamellas could also deteriorate, peel off, or come off. If the defect is minor, then you can level them on a lathe and clean the gaps. Do not leave metal dust or burrs between them; measure with a multimeter for a short circuit. Completely torn or broken lamellas cannot be repaired.
Problems with parts are a consequence of a short circuit in the winding. Even after cleaning them well, it is not always possible to repair the engine. It's worth looking for a new rotor for the machine.
How to remove the engine from a car?
At home, there is usually no professional lifting equipment, so you will have to rent it or make it yourself.
Do-it-yourself goose for removing the engine
This is a simple mechanism that resembles a gooseneck. It makes it possible to move the engine away from the engine compartment. It may have a rotating design that allows you to remove the engine without moving the machine.
The heavy internal combustion engine is simply transferred to a workbench located next to the car. In fact, it is a universal garage crane. The rack rests on long “legs” located under the engine compartment to prevent it from tipping over. A cable and a winch are used for lifting.
The gander is used both in garage conditions and in small services.
DIY engine removal lift
As a rule, this is a rolling crane, the lower part of which is placed under the front bumper. A smooth platform is required; on uneven ground, removing the engine using such a device is problematic. The lift operates using hydraulics or a tensioning mechanism like a winch. The device is simple: a stand with rolling supports, and a movable boom on which the motor is suspended. You can make a lift with your own hands from a channel or a square professional. pipes.
If there are strong wheels on supporting legs, you can quickly roll out the lift with the motor and move it to the repair area.
Do-it-yourself winch for removing the engine
Applicable if the car is being repaired in a solid stone garage. The most inexpensive tool that can be used to remove an engine. A chain or cable is used to pull it out.
There are two design options:
- A transmission mechanism with a drum that is suspended from the ceiling.
- The winch is fixed to the floor, and a pulley is fixed under the ceiling.
Features of removing various motor designs
Longitudinal arrangement.
As a rule, such internal combustion engines are removed without a gearbox, although exceptions are possible. The radiator needs to be removed.
Transverse arrangement.
The motors are compact and easy to lift vertically. The gearbox remains on the engine.
Hybrid systems and electric vehicles.
Internal combustion engines in such machines take up little space or are absent altogether. Electric motors can be built into the wheel drive or integrated into the transmission. Due to their small size, their dismantling is not difficult.
All types of internal combustion engines are installed on supports. In frame structures, the attachment points are located on the frame; in cars with a monocoque body, there is usually a subframe.
How to remove and replace the heater motor on VAZ-2107, 2105 and 2104
So, dear friends, today we will tell you in an accessible language how to get to the heater motor on a VAZ-2107 in order to replace it or repair it, depending on what forced you to take it out. Let us immediately note that if the heater motor on your seven began to squeal when cold, or squeal, then this will only get worse, the motors from the factory are bushed, lubrication will not lead to anything, it may return you silence for a short time, but not for long, so in this case only replacement. And ideally, replacing the heater with a bearing motor - it definitely won’t squeal. So, first we will need to remove the beard on our seven. First, we remove the gear shift knob, it will interfere with us, and we remove the radio from the shaft and disconnect the connectors. It’s different for everyone, some may not even have a radio.
First, let’s unscrew the shelf, everything is simple here, the action is in three photos:
Then, we disconnect the wires from the clock, the cigarette lighter (for ease of assembly, I would advise marking them), remove the socket to the side and gain access to two nuts, here it will be convenient to use a 10 mm socket wrench
Replacing the oil pan and its gasket on a VAZ 2101-VAZ 2107
Today, many people already know such a thing as an oil pan, but not everyone knows what it really is, when it needs to be changed and how to properly replace it on cars of the “classic” family - we will look at these questions today.
To replace the pan and its gasket, you will need to prepare a few things in advance: First, be sure to stock up on wrenches, or you can use an extension, universal joints and sockets instead!
Where is the oil pan and its gasket located?
The pan is located at the very bottom of the car engine; unfortunately, in order to fully see the pan it is necessary to remove the crankcase protection, which is done in the figure below:
The blue arrow indicates the gasket that is located between the cylinder block and the crankcase pan!
When do you need to replace the oil pan and its gasket?
The pan must be replaced if it is deformed, due to which the engine oil that was located in it begins to flow out of the pan itself.
The pan gasket must be replaced if it is strongly compressed and if it is torn, how do you understand this, you ask? Usually, when the gasket is deformed, engine oil begins to flow through it, but the leak can also be treated by simply tightening the bolts that secure the oil pan, but if tightening the bolts does not produce any results and the leak does not stop, then replace the gasket with a new one.
How to replace the oil pan and its gasket on a VAZ 2101-VAZ 2107?
This method is not always suitable for people to remove the pan from a car, because not everyone has items that facilitate this, so at the very end of the article there is a video that shows the procedure for removing and replacing the pan and gasket without the use of special tools!
- Before you start work, drive your car into the inspection pit.
- Then remove the crankcase protection from the vehicle. (How to remove the protection, see the article: “Replacing the crankcase protection”)
- Then completely drain the engine oil from the car engine. (How to drain the oil, see the article: “Changing engine oil”)
- Next, unscrew the two nuts on both extreme sides that secure the right and left engine mount to the cross member.
- Next, install the “Travece” on top of the engine compartment, it is indicated by the number “1” in the photo, and then begin to tighten the nut under the number “2” and thereby raise the engine from the car.
Note!
You need to lift the engine until the ends of both studs, numbered “1”, coincide with the flat part of the engine mount brackets, which are indicated under the number “2”!
- Now, using a wrench or an extension with a hinge and cap, unscrew the “19” bolts that secure the pan to the engine.
There are washers under each bolt, so be careful not to lose them!
- And finally, use a screwdriver to carefully separate the oil pan from the cylinder block and, as a result, remove it along with the gasket.
If the gasket is stuck to the block, then use a sharp object to remove it and clean the entire plane of the block from pieces of the gasket!
Installation:
- First, use a clean cloth to wipe the mating surface of the block, and then the oil pan.
There is no need to degrease the surfaces of the block and tray using products such as White Spirit, etc. Because in the future, this will make it easy to disassemble the connection!
- Next, lubricate both sides of the gasket with a thin layer of silicone sealant to ensure that engine oil does not leak through the gasket in the future.
- And finally, install all the removed parts in their place, in the reverse order of removal.
Replace all deformed parts with new ones, and tighten the “19” bolts that secure the oil pan during installation crosswise. When tightening the bolts, do not use much force because this may damage the crankcase flange and the gasket may be deformed!