Turning the key in the ignition and starting the engine - it would seem that nothing could be simpler. However, this is a view from the driver’s side, and inside the car at this moment many very important processes take place in a matter of seconds. The ignition system consists of dozens of parts, but this article is about the mechanism that connects the wires and closes the contacts needed to start and stop the engine. This mechanism is called the contact group of the ignition switch. The contact group is a connecting system of electrical wire contacts that allows them to be closed in the required sequence, thereby ensuring the distribution of current supply from the power source to various electrical appliances of the car.
How the ignition switch contact group works
The ignition switch itself is a banal electrical circuit breaker. The ignition key performs the function of adjusting the position of the contacts, thus, you can choose several options for connecting circuits: starting the engine, powering electrical appliances, stopping the engine. If you remove the ignition switch cover, you can see the mechanism itself: the lock and many wires that are connected according to the “ plug - socket." The wires extend from the power source (battery) and connect all the electrical appliances of the car into one circuit. The contact group acts as a connector for electrical wires. For isolation and separation, the wiring contacts are fixed in a plastic housing of the contact group.
Cost of repairing or replacing the ignition switch
| Name | Price |
| lock repair | 500r-1500r |
| manufacturing a chip for autostart | 1000r-2500r |
| chip key production | 1500r-3500r |
| making a key with buttons | 4000r-8000r |
| smart key production | 6000r-15000r |
| making a key for a lock | 500r-3000r |
| removal and installation of the lock | 1000r-3000r |
| programming a key in case of complete loss | 3000r-7000r |
| auto opening without damage | 1000r-3000r |
| key body replacement | 1000r-3000r |
| key blade replacement | 1000r |
| cutting a duplicate key from a client's blank | 300r-1000r |
| disabling the alarm | 2000r-3500r |
| immo repair ecu. complex electrics. outcall. non-standard solutions. work on Mercedes BMW Lexus Infiniti cars | price negotiable |
Volkswagen
Mercedes
Ford
Audi
Honda
Toyota
How does the ignition switch contact group work?
There are two types of ignition systems: battery and generator. The difference is that the battery ignition has an independent power source and the car’s electrical appliances can be turned on without starting the engine. Generator ignition allows you to use electrical appliances only after the engine is started, when the generation of electric current starts. When turning, the driver closes the electrical circuit from the minus terminal on the battery to the ignition induction coil. Electric current passes through a system of wires to the ignition switch, through the lock contacts to the induction coil and returns to the “plus” terminal. The moment current passes through the coil, it generates high voltage and supplies it to the spark plug. Thus, the key closes the contacts of the ignition circuit and starts the engine. In addition to the ignition circuit, there are many other electrical circuits in a car that transfer current from the source to the electrical equipment. To differentiate these circuits, a control group is used. The contacts of the wires are closed to each other using a contact group. Each of them is responsible for their own group of electrical equipment. The key in the lock turns to several positions. In position A, the circuit from the power source to the voltage distributor is closed and electrical appliances are activated. With battery ignition in this position, you can turn on the headlights, interior lights and use all electrical appliances. The voltage will be supplied directly from the battery to the distributor. If you turn the key to the following position, the engine will start according to the scheme described above. Turning it in the opposite position will stop the engine. On different cars, the ignition locks may differ in operating modes in one or another key position. Many cars supply voltage already at the moment when the key is in the lock. In this case, the very presence of the key closes the voltage supply circuit. Due to the position of the key in the lock, many alarms, anti-theft systems and car door locks operate.
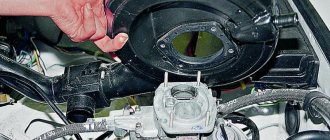
Removing a faulty lock
Unscrewing the ignition switch bolts with a chisel
In practice, replacing the ignition switch on a VAZ 2114 will be impossible until you get rid of the old one. This is not difficult to do, but you will have to spend some time on your car.
- Once you have gained access to the ignition switch, or rather its housing, you will notice that the lock is attached to the steering column with four bolts. The problem is that they don't have heads.
- This phenomenon is part of the “unique” factory anti-theft system manufactured by AvtoVAZ. In fact, such a system makes it somewhat more difficult for criminals who do not have a key to start the engine. So don't scold them too much.
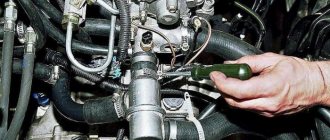
- These bolts are loosened with a chisel and hammer, and their removal is done using pliers.
- Next, remove the bracket from the column;
- Be sure to unplug the power supply. In general, the wiring diagram for the VAZ 2114 ignition switch is simple if you buy the lock assembled. You don't have to solder anything or figure out which wire goes where. Everything is assembled into a block, so all that remains is to insert it into the appropriate connector. That's all.
- By disconnecting the power supply, you can now finally get rid of the failed ignition switch.
Replacing the contact group
Contact group burnout is a fairly common phenomenon.
This usually occurs due to voltage drops from one contact to another. When you turn the ignition key, sharp voltage surges are observed, especially when starting the engine, which leads to an increase in the temperature of the electrical wire material - the insulating material burns out. To protect the contact group from burnout, you can install an additional unloading relay, which will relieve part of the load when starting the engine. However, for some cars, contact group burnout is a “chronic disease”. In this case, you need to make a replacement. Replacing a contact group is quite simple: you need to dismantle the old group and install a new one, and all contacts must be connected according to the same circuit as on the old one. The connection diagram is in the car's operating instructions. The ignition is necessary in order to start the car and lock the steering wheel. After prolonged use, this element or its group of contacts becomes unsuitable for further use, the car does not react in any way to turning the key, and the cylinder stops freely allowing the key into itself. Therefore, it becomes necessary to replace the lock in order to restore the functionality of the car.
- locking rod;
- body part;
- roller with contact disk;
- sleeve;
- protrusion on contacts;
- wide protrusion of the contact part.
The locking mechanism comes into contact with a large number of wires. They reach to the battery and connect automotive electrical appliances into a single chain. At the moment the key is turned, the electrical circuit is closed from the “negative” terminal of the battery, as determined by the connection diagram for the VAZ 2106 ignition switch that comes to the coil. If the key begins to turn poorly or jams, this means that the secret is broken. Experts recommend spraying VD-40 into the larva, but the effectiveness of this is low and rather short-lived.
Has the contact group burnt out, after which you have difficulty starting the starter? Change the ignition switch.
Replacing the larva in Kalina
First of all, replacing the lock elements means that the door trim will be completely missing. Therefore, first we will figure out how to dismantle the trim on Lada Kalina cars. The second chapter is devoted to how to remove the larva and install a new one in its place. The last step will actually be the simplest.
Removing the door trim yourself
Numbers here indicate all fastening elements. But to get to them, you need to remove the screw cap “3”, as well as the inner door handle. The pawl handle also needs to be unscrewed.
If these actions are completed successfully, the casing begins to be dismantled, moving it away from the metal. Dismantling is carried out starting from any of the corners, but care must be taken: the pistons holding the plastic are fragile.
If the package includes power windows, you will need to disconnect the connector connected to the button block. Also, another similar connector is present in most trim levels - where there is a central lock. Both connectors must be disconnected.
All the steps described here involve electronics in any case.
Therefore, at the stage before dismantling the trim, you need to open the hood, take the “10” key and unscrew the negative terminal. We are talking about the battery terminal, which can be connected last (when the last screw is screwed in). Anyone who breaks this rule will look for blown fuses. Draw a conclusion.
How to get to the door mechanism
According to the recommendation of the magazine "Behind the Wheel", in the absence of casing, access to the lock is always available. Simply put, there will be no need to remove the inner lining made of metal. The steel sheet is simply bent to the side.
The rotating part with the protrusion is called the “drive”, and this is what you will need next.
Replacing the larva will be easy:
- The key in the cylinder currently fixed in the door is turned 90 degrees;
- Using a steel ruler, knife or thin screwdriver, you need to press the locking tongue located opposite the slot in the body of the cylinder. You need to place a screwdriver between the rotating and stationary parts of the mechanism. Know that in the driver's door the slot is made from the bottom (looks “to the floor”), in the passenger doors - from the top!
- By pulling the key towards you, the larva is pulled out;
- The new cylinder is installed like this: with the key inserted, it is pushed into the lock until it stops. The locking tab will need to be pushed inward.
The procedure for connecting wires to the ignition switch
Let's consider all stages of work one by one. First, remove the casing from the top and bottom of the steering column. Now, using a marker or regular paint, we mark the wires connected to the rear lock, after which they can be carefully disconnected.
Using a cross-head screwdriver, unscrew a pair of screws located below and directly securing the locking device:
Now we insert the key and turn it to the zero position to disable the anti-theft device that blocks the steering. At the same time, use a thin awl or a screwdriver to press on the fixing element, with the help of which the lock is held in place:
After completing these steps, pull the key to remove the locking mechanism from the bracket:
To install a new lock, all operations should be performed in reverse order.
How to replace the ignition switch on a VAZ 2114
In general, over time, the ignition switch began to die: the car started normally when cold, but when hot it started on the third try. Yesterday the castle outside the city died completely - I had to push it